


thibaultron
-
Posts
2,876 -
Joined
-
Last visited
Content Type
Profiles
Forums
Gallery
Events
Posts posted by thibaultron
-
-
Frank. They say "The Devil is in the details!". Keep up with Your level of details! Fantastic work and a great build thread!
-
-
-
-
There were two types of early "anti-fouling" type coatings used below the water line: White Stuff and Black Stuff. The White Stuff was used in colder waters, the Black Stuff in tropical climes. The Black Stuff was a dark brown to black color the White Stuff was an off white.
Vallejo Ivory 70918 in the Model Color line is suposted to be a good match for White Stuff.
-
Generally all ship's boats were lowered and towed behind during battle, so them hanging in front of the guns would not affect battlewothyness. Servicing the guns and port for normal cleaning may have been a pain though.
- popeye the sailor and jct
-
 2
2
-
One thing to note. Most of the modern Diorama/Figure painting books assume you start with a model with heavy woodgrain patterns cast into the surface, not a smooth plastic one.
Buy some of those cheap plastic "For Sale" signs at the hardware store and practice on the white backside, of the sign. Pratcicing on cardboard or paper will give different results, as they absorb the paint differently.
These are great for practicing airbrushing also, as well as testing your paint color/mixes for final dried look.
I tried several techniques using a Revell DR-1 1/32nd model. While the model is a newer one, they cast it with distinct wing ribs rather than the gentle sagging fabric skin between the ribs. The distinct ribs allowed me to segragate the various tries, and then record the results, for future use.
-
Doll house curtains (1/12th scale), might be a source, as well as 1/16th figures or 1/12th. In either scale maybe a child's figure, were the scale difference may not be noticible.
On a side note I once owned a 17' sailboat and found an old ad for it. The boat looked much bigger in the add, with more people in the cockpit than it could ever hold in real life. It wasn't until you looked closely that you noticed that the occupents were all children, about 6 or 7 years old!
-
-
Interesting and unusual build! I'm in.
One question, in the "movies" they always show the windmill turning, with no cloth on the "sails". Don't they need the sail/vain frames covered to actually run?
- flying_dutchman2, mtaylor, Elijah and 2 others
-
5
-
-
Beautiful model!
- palandoken and mtaylor
-
2
-
-
The Shapeways printers are much higher resolution than the ones you can buy, reasonably. Theirs run in $10,000s of dollars. As in many things in life, money brings quality.
In my experience, depending on your scale, larger pieces can be printed in 1/96th scale smaller in 1/64th or greater. In HO (1/87.1), They have successfully printed 1 1/2" rivet detail for me. In 1/64th some larger cleats. and cheek blocks.
- fnkershner, Canute and mtaylor
-
3
-
-
I'm following along with interest! In about 1960, when I was a "Wee Lad", my grandfather built a 16 foot runabout, over the course of a couple years, at his camp on the ST. Lawrence River. I have many years of fond memories of both the Grandparents, that camp and the boat, all gone now.
I wish I knew what plans he used (I think it was a kit boat), even some pictures of it. Both my brother and I (as adults) tried to get him to sell us that boat when he sold the camp, but he wouldn't. We never figured out why.
-
-
On a model getting that slight catenary on the shrouds to look right would be difficult. They are like the rest of the rigging, in real life all the rigging sagged some, even under load. On a model, assuming the thread did not curl, or misshape itself when not under load, getting that sag would be very difficult. You also have to consider the audience Others looking at your sagging rigging will just think you did a poor job.
-
-
Great effort for a good cause!
-
I looked at the kit offerings, and the Battue(sp) is on my short list for purchase!
- greenstone, mtaylor and Canute
-
3
-
-
-
Latest 3D printing project:
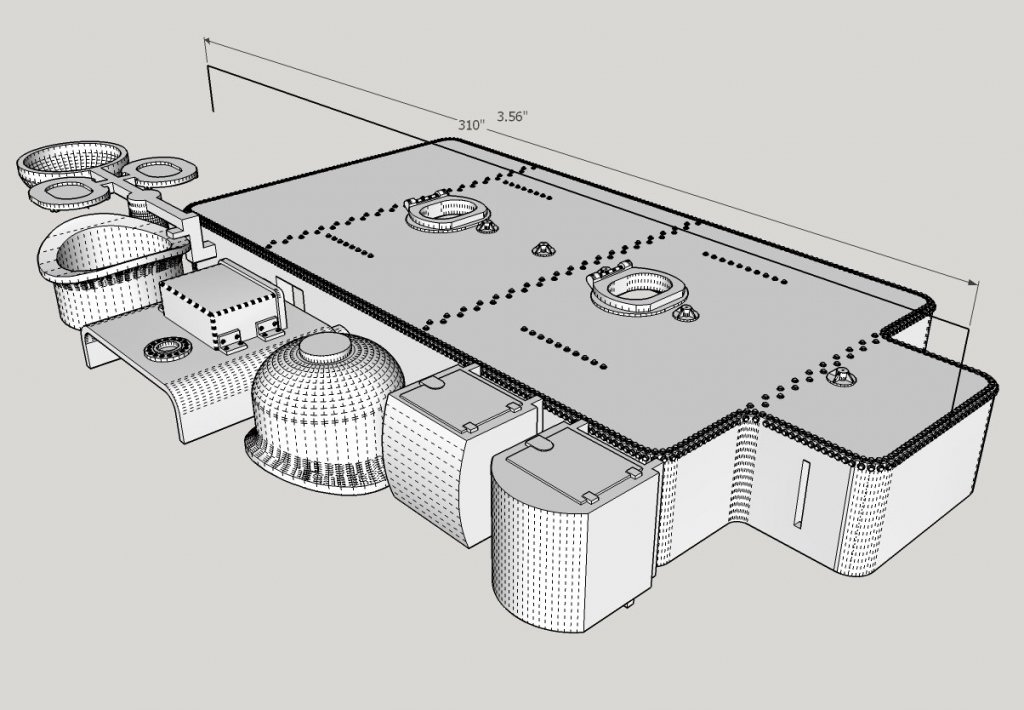
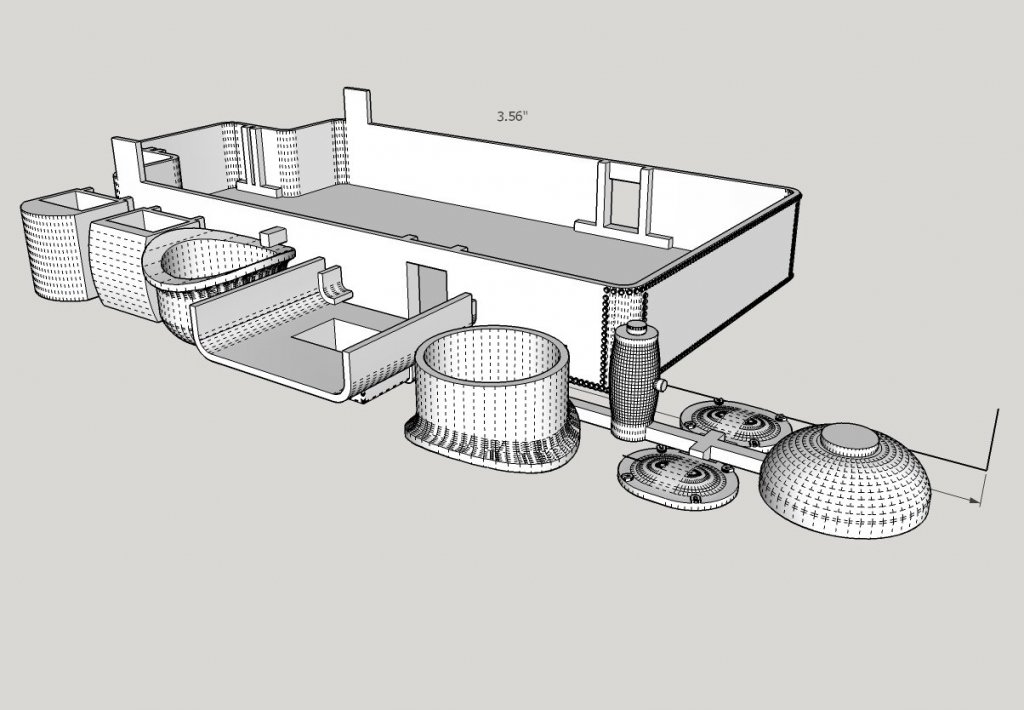
An oil bunker for an Bachmann Spectrum 2-8-0 HO locomotive, two tool boxes for the tender, and a new dome for the boiler. This model has two domes, the 2 part on is for initial fitting, and the complete dome for the final install. Over a thousand (1 1/2" diameter scale) rivets, and yes the total length of the parts as shown is 3.56". The slots in the side of the bunker are to fit over the existing "walls" of the coal bunker (after the bottoms are cut out of the slots). This leaves the ability to change it back to coal, much as the Santa Fe railroad did in real life. The oil bunker was a tank that sat in the coal bunker, instead of the coal load. I've spent waay too long designing this, but it was an interesting exercise. This is version 2.0, the first part was just for a trial fit, and ended up needing a few dimension changes, as expected.
The first printed part had damage to the rivets were the Shapeways tech pried it out of the printer. In the end the 3D printed part is probably too fragile for production selling. If I decide to sell this, I'll probably have to use the final part as a master for resin casting.
Why the 2 part hatches (base and cover)? I plan to sand the cover to a scale thickness, hence the recesses in the bottom of the covers.


Kathryn by Mahuna - FINISHED - 1:32 - Skipjack Based on HAER Drawings
in - Build logs for subjects built 1901 - Present Day
Posted
Frank. Would a DXF or DWG file of the trailboard, help you? I Used the Kathyrn trailboard as one of the options for my Carrie Price model, that I will someday soon (hopefully) continue.
Here is a picture of port side one, minus the name, which I could add. The drawing is smoother and can be scaled, the convertion to a JPG roughens it.