usedtosail
-
Posts
2,421 -
Joined
-
Last visited
Content Type
Profiles
Forums
Gallery
Events
Everything posted by usedtosail
-
 Thanks Brian for that great post on cropping. Makes it all clear to me. Slog - for the stacking software, for focus stacking how close does the alignment need to be between images? If you tried do use it with hand held images, would it still work?
 -
What a great thread. Thanks for starting it Slog. I had a similar entrance into photography. I ended up getting a Master of Science Degree in Photographic Science, so I am a real technical geek but my artistic abilities are crap. That was many years ago however, and since then I got lazy and was using only a point and shoot for family pictures, until I started this hobby. I wanted to take better pictures of my models so I ended up back with a DLSR. I now have two Nikon D80 bodies, one of which stays in the workshop for progress pictures. I do tend to use the flash for these progress photos, though, but do set up better lighting for completed model pictures. I use a cheap macro lens too, for really tight shots, but will try cropping now that you have pointed it out. Its not like the old days where film grain was an issue, is it. Anyway here are a couple of shots of completed models
-
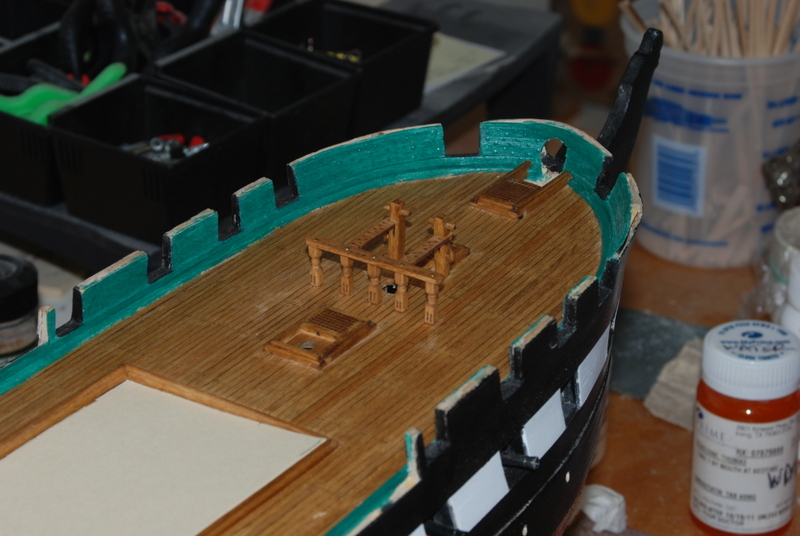
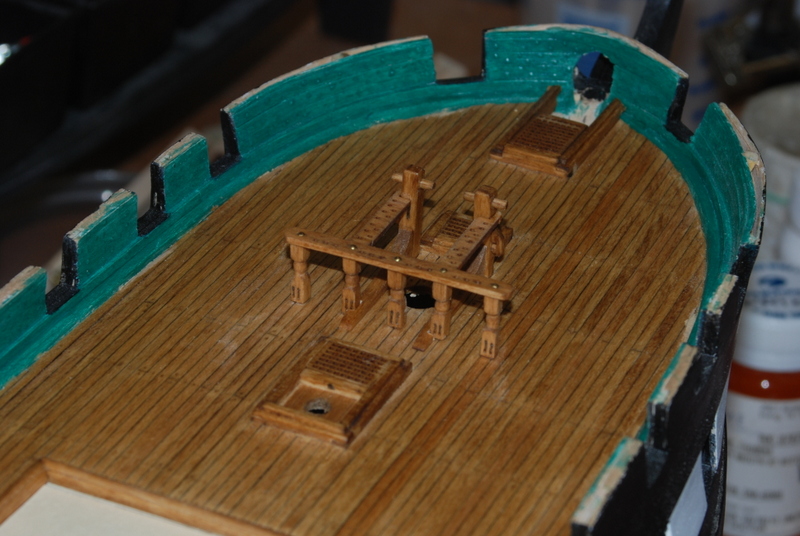
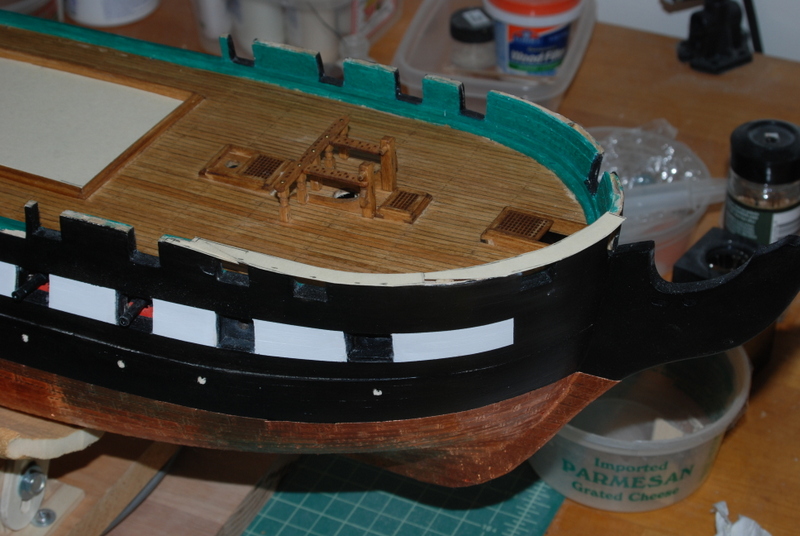
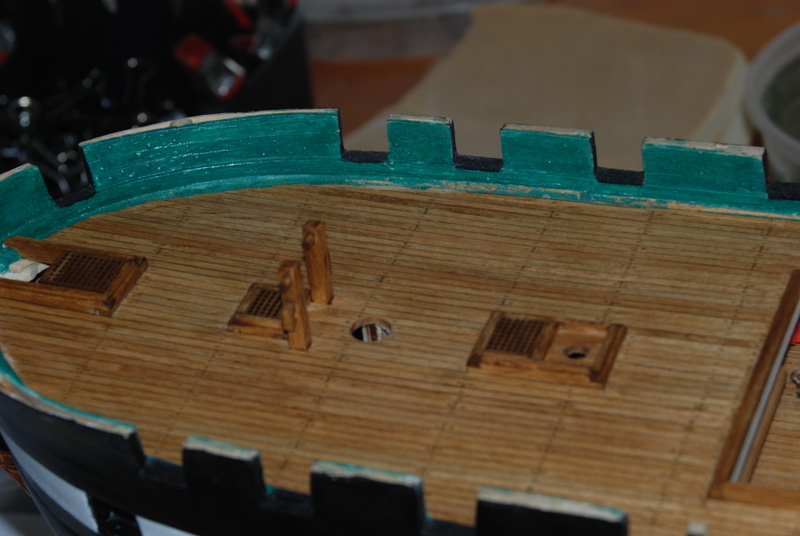
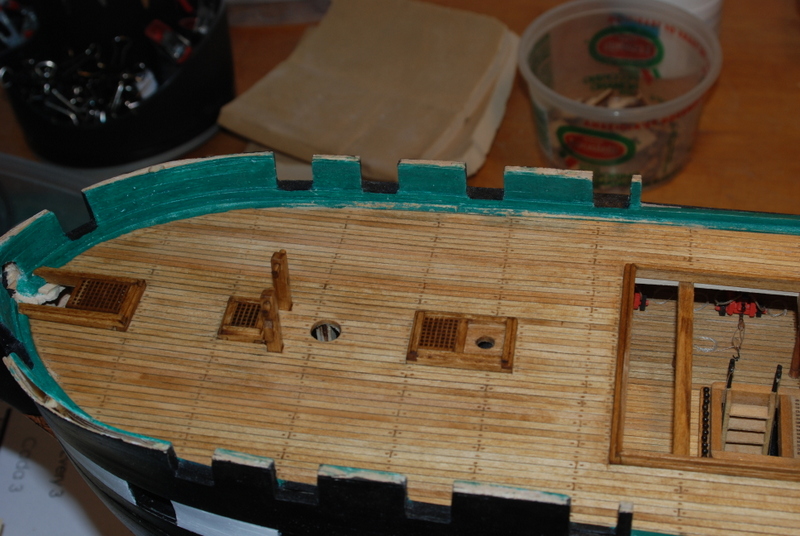
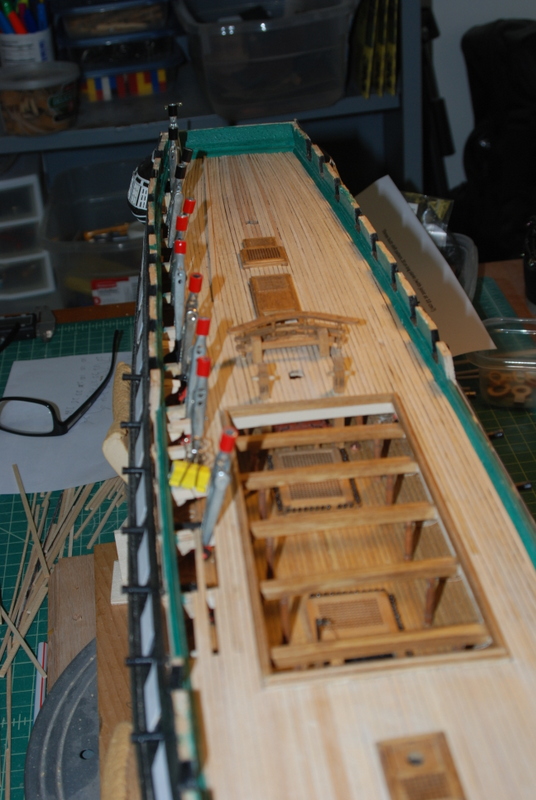
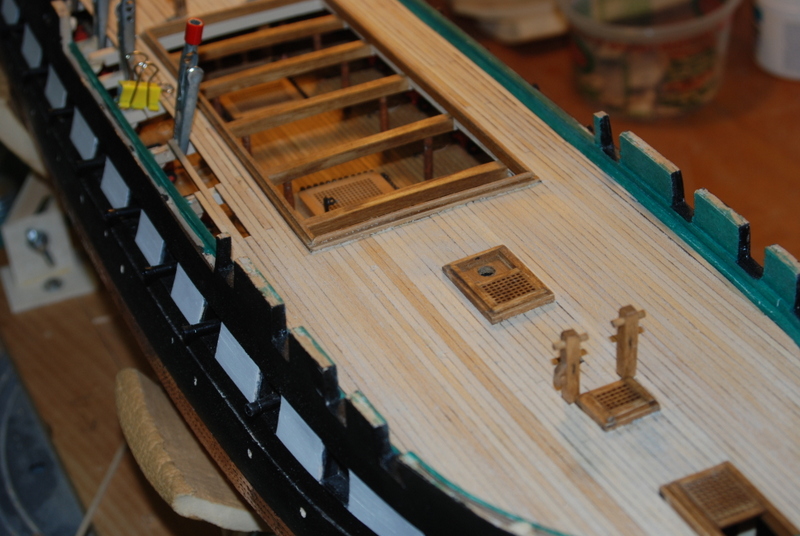
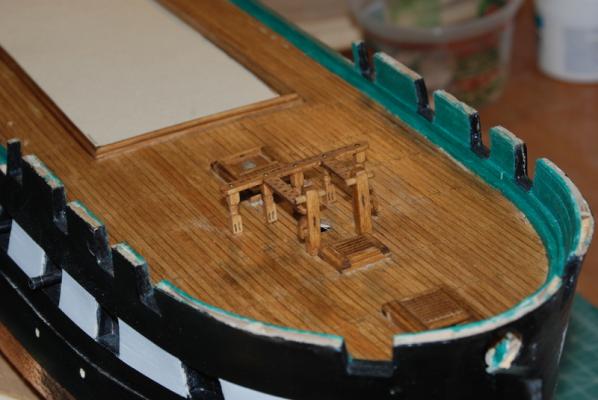
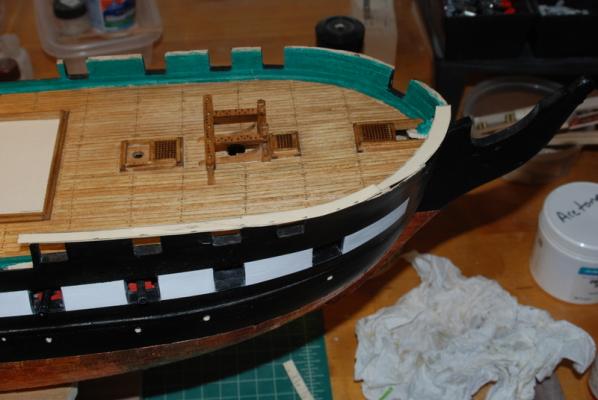
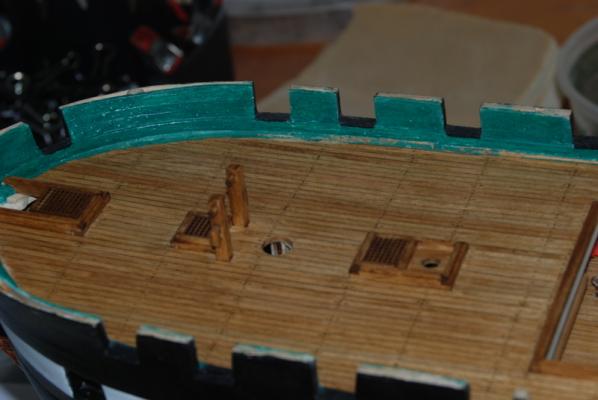
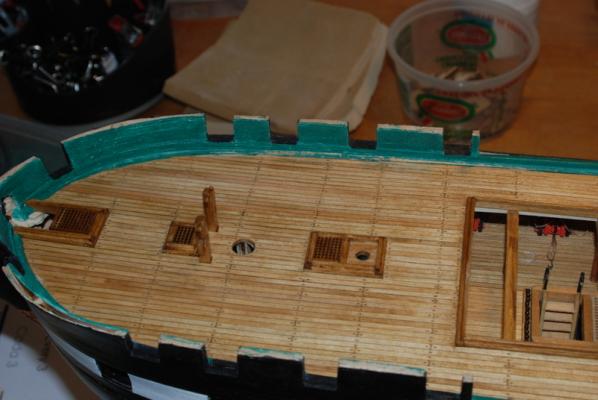
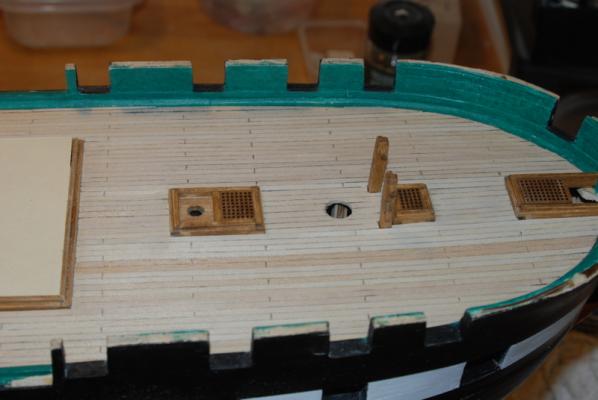
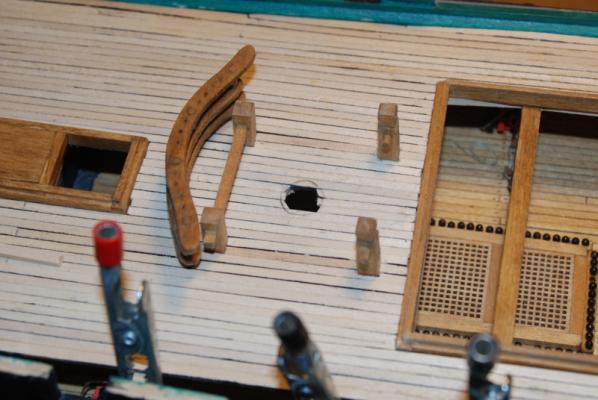
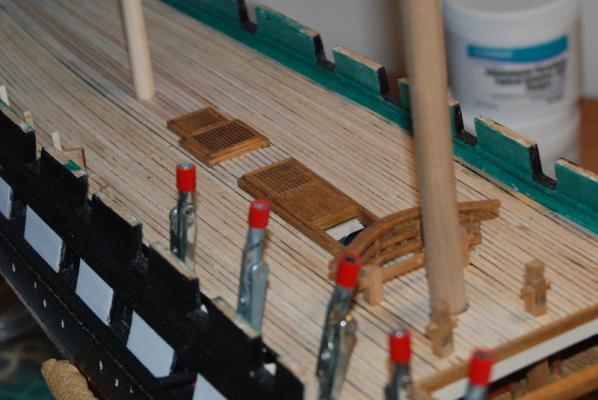
I then added the fore mast pin rail to the deck. I had made this piece a few months ago and used a piece of wood to hold it at the height of the planked deck, for alignment with the fore bitts. When I took that plank off the pin rail, I had a nice template to drill the three holes for the wire I had placed in the bottoms of the center and two outside supports. After test fitting the rail in the new holes, I removed it and place medium CA on the wire and bottoms of the supports and slipped it back into place. I then attached the two side rails to the bitts using CA glue. The whole assembly feels pretty solid now, so hopefully it will hold up during rigging. I then had to add the two pieces that sit on the deck (I am having a brain fart and can't remember what they are called). These had to be notched to fit around inside of the two middle supports. I used a square file to make the notches, then glued these to the deck and the bitts. Now I am getting ready to make the rails that sit on top of the bulwarks. I first test fit the supplied laser cut bow rails and taffrail. Neither of these fit well, so I will be making new ones to fit. I made up manila folder temples of the bow rail and fore rail sections, which took a while to get right. I made these slightly oversize so I can sand the rails to the final fit. The bow rail pieces have straight sections that the rails to the stem fit against, so I needed to make sure the angle was correct for them. I made the fore rail template long to fit all the way to the edge of the open waist, then figured out where I could use a straight piece of wood, and cut the temple into a scarf joint between two gun ports, so the joint would not be directly over a gun port. I flipped these templates upside down and test fit them on the port side, and it looks like they will work on that side too. Tonight I will use them to cut out the rail pieces.


- 1,354 replies
-
- 11
-

-
- constitution
- model shipways
- (and 1 more)
-
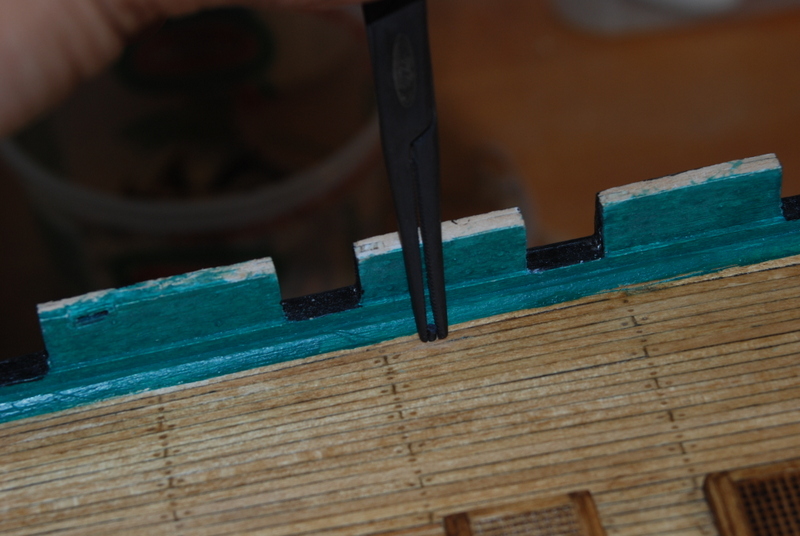
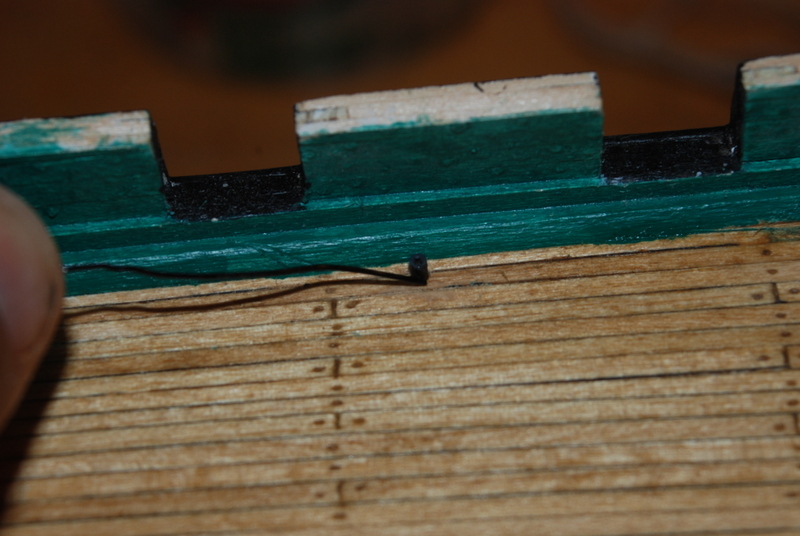
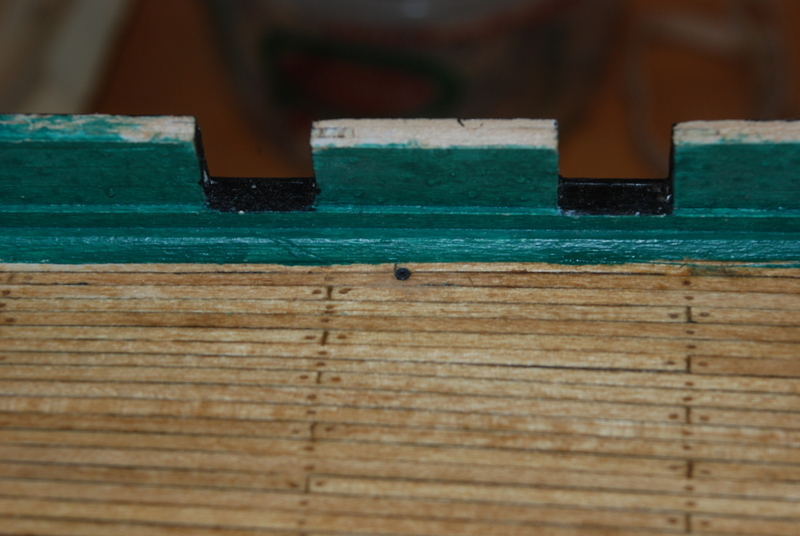
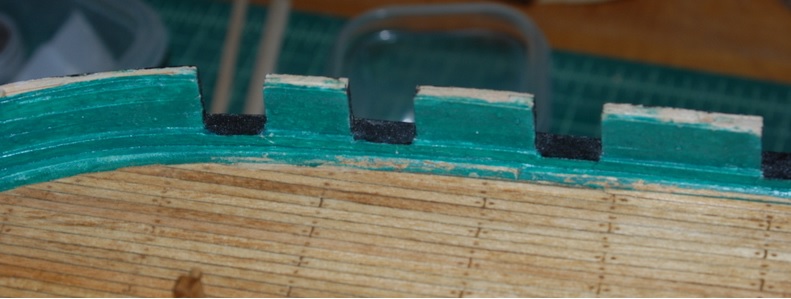
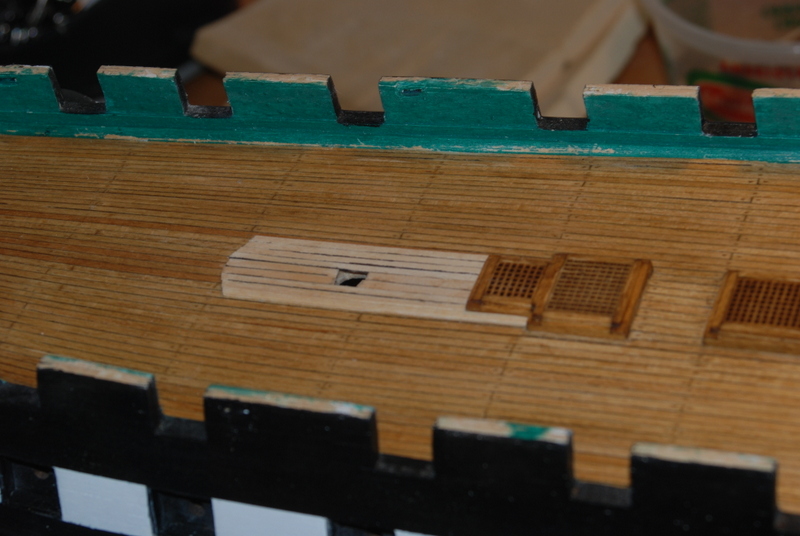
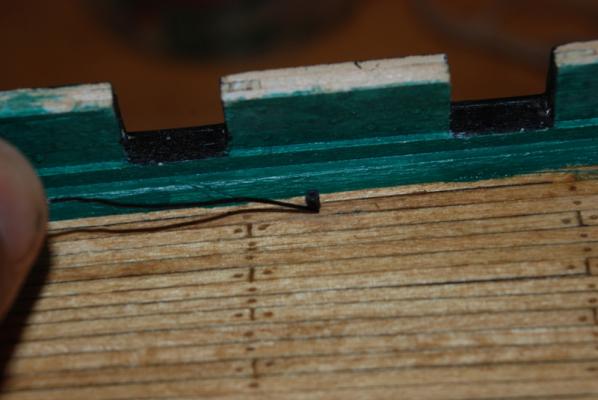
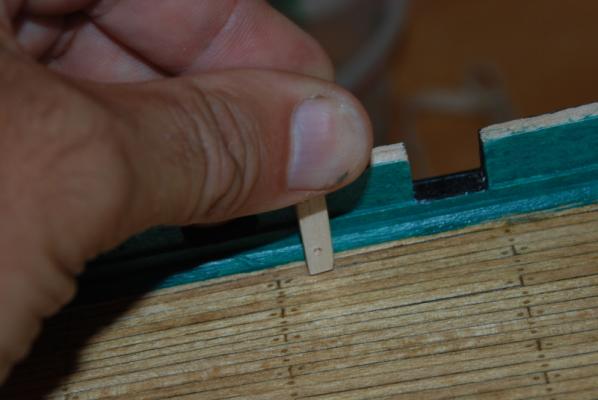
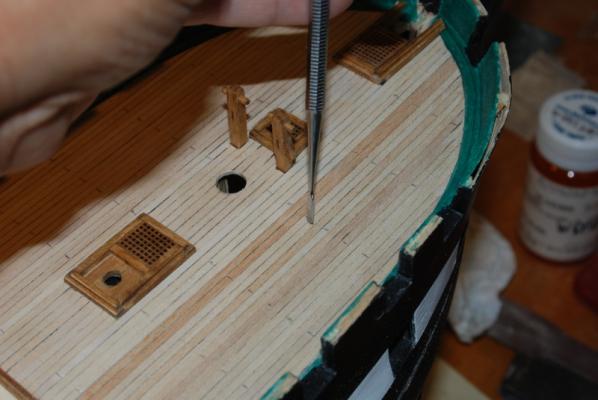
To continue with the scuppers, to install them I first opened up the drilled holes with a piece of the tubing I used for them: I then inserted a scupper piece half way into each hole using a hemostat: I then added a small amount of thin CA glue along the sides using a piece of wire: And pushed the scupper flush with the deck using a piece of wood And here is the result: Luckily, I made 9 of these pieces for the eight that I needed, because the first one I pushed in with an awl instead of a piece of wood and it went right through into the hull where it remains today since there is no access to that area of the hull.

- 1,354 replies
-
- 10
-
-
- constitution
- model shipways
- (and 1 more)
-
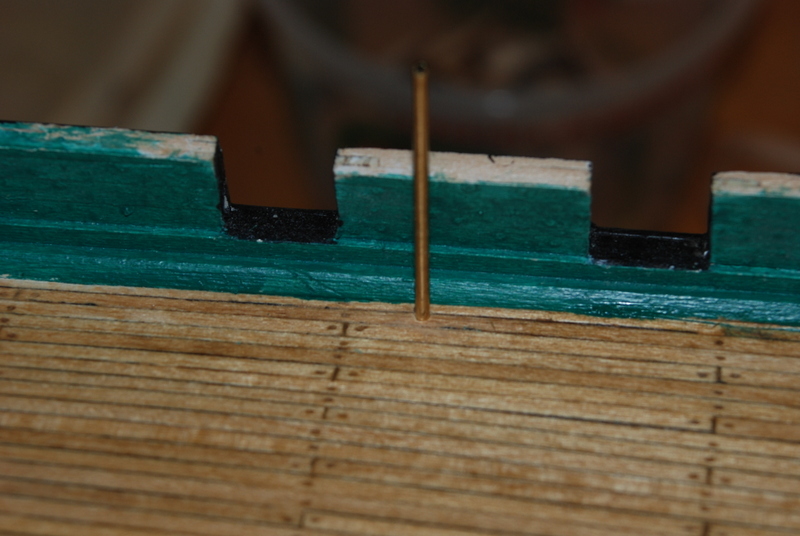
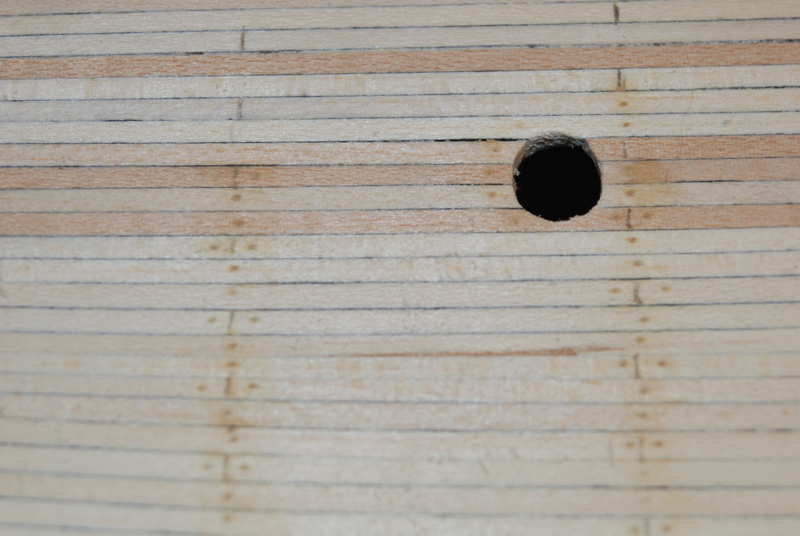
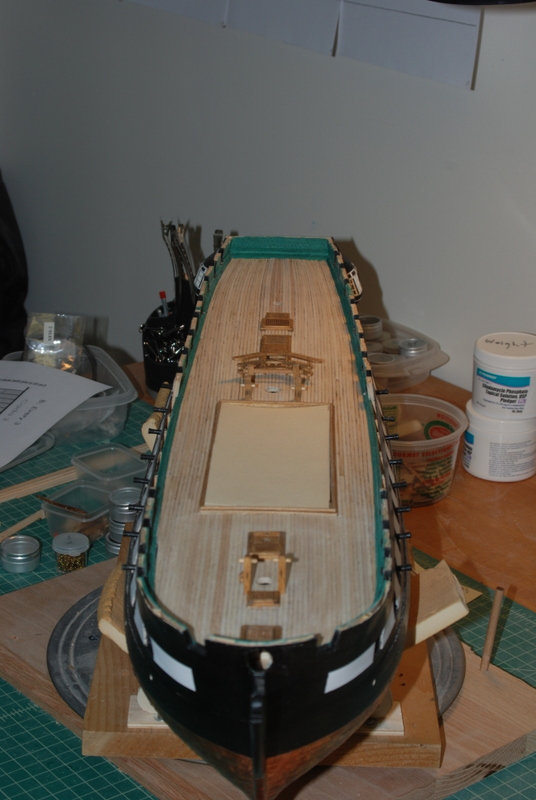
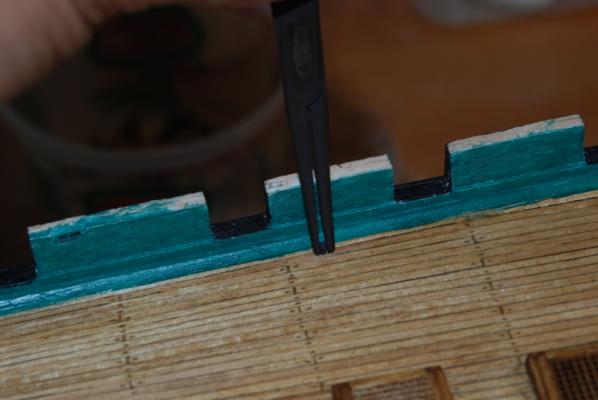
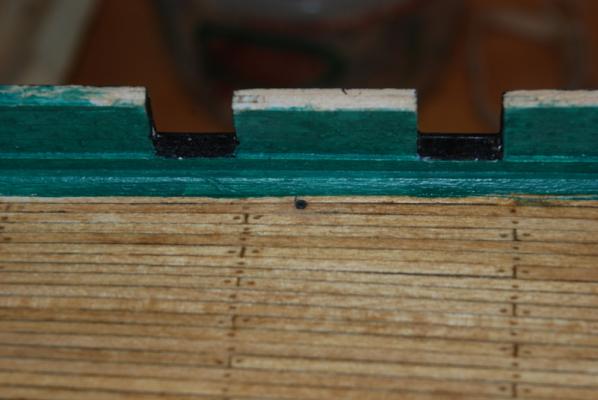
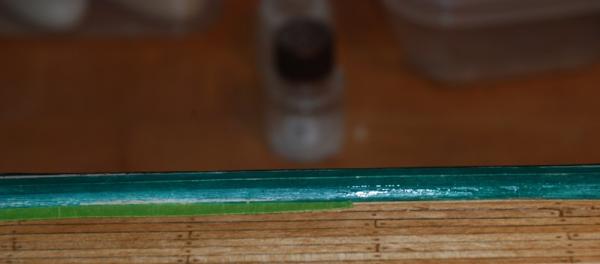
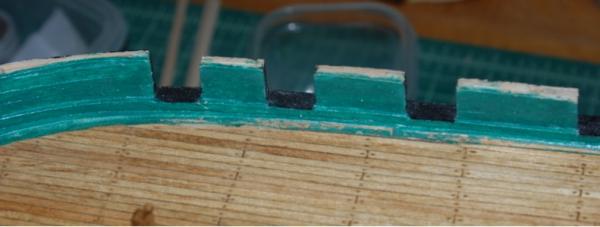
Hardly mastery Greg. But it is fun. Had a great long weekend in the Florida Keys last weekend, so not much work done on Connie this week. I did finish the doubler planks with oak stain and wipe on poly. I also touched up the green bulwark paint along the edge of the deck. I used short pieces of masking tape up against the waterway to keep (most of ) the paint off the deck planks. I cut short pieces of brass tubing to line the scuppers, which I blackened then painted the ends grey. I drilled the 8 scupper holes, but still have to glue the linings into the holes. Next up is to attach the fore mast pin rail which I made earlier, then start making and adding the rails on top of the bulwarks.
- 1,354 replies
-
- 8
-
-
- constitution
- model shipways
- (and 1 more)
-
I don't care what you say, Mobbsie, I am going to use your method as a tutorial. I have been using just a strip of black paper, but yours look sooo much better. Thanks for the method.
- 255 replies
-
- 6
-
-
- granado
- bomb ketch
- (and 2 more)
-
Wow, Captain Steve. I like where you are going with the stern. I can't wait to see your results.
-
Very nice looking windows, David.
-
Thanks Greg. Those extra cannon carriages I used came from Model Expo. They sell a complete set for the gun deck. I think it is on the same page as the Constitution kit on their web site.
- 1,354 replies
-
- 3
-
-
- constitution
- model shipways
- (and 1 more)
-
Thank you Steve. That sounds like a great way to simulate the cannons on the gun deck. I can't wait to see how it turns out for you. Tim - No worries. It is Minwax Oak stain, straight out of the can.
- 1,354 replies
-
- 2
-
-
- constitution
- model shipways
- (and 1 more)
-
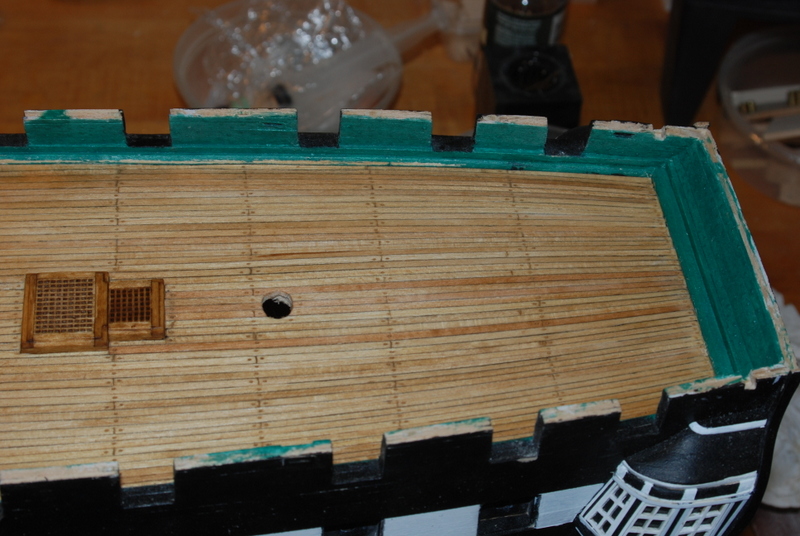
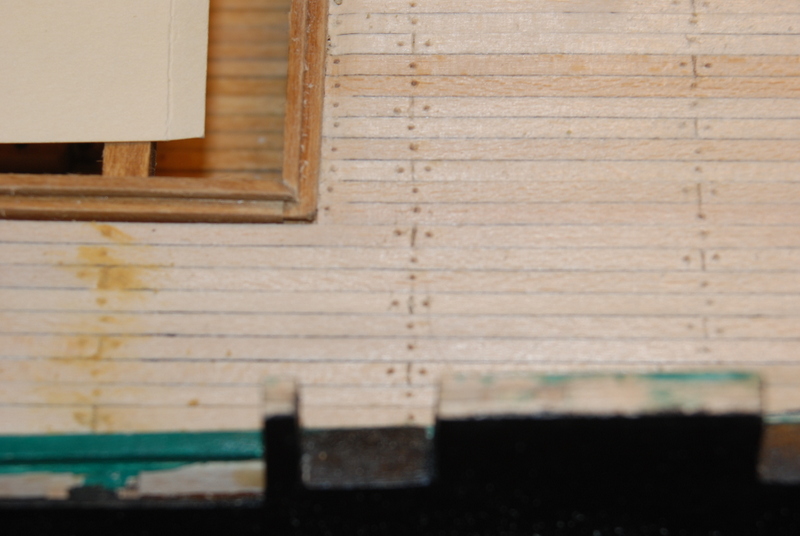
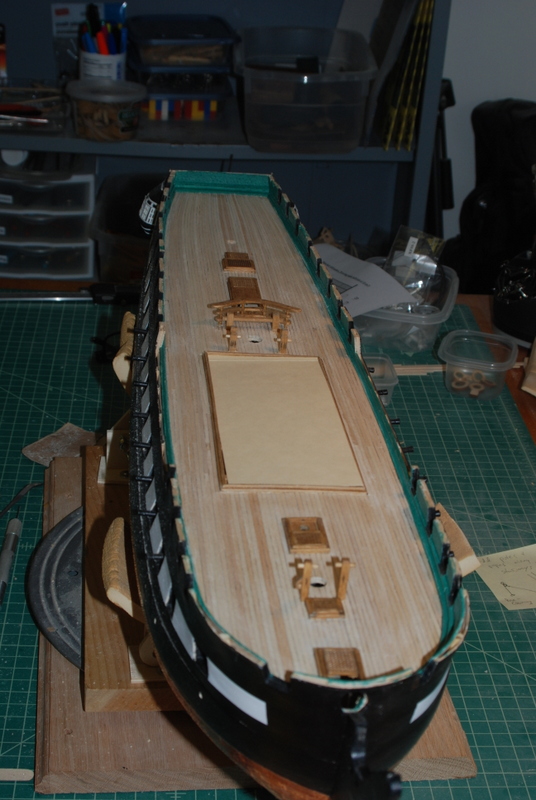
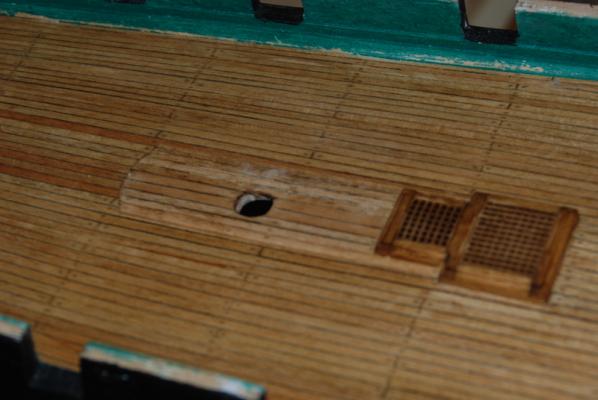
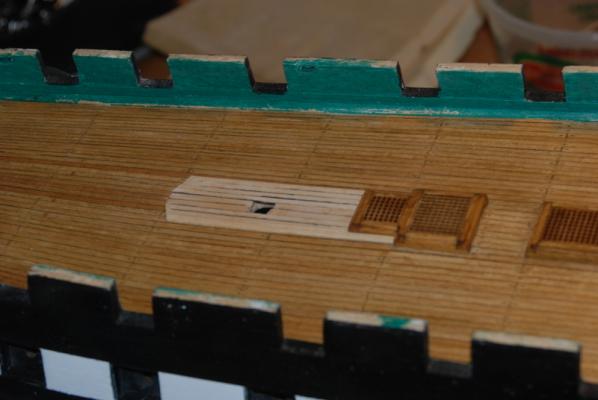
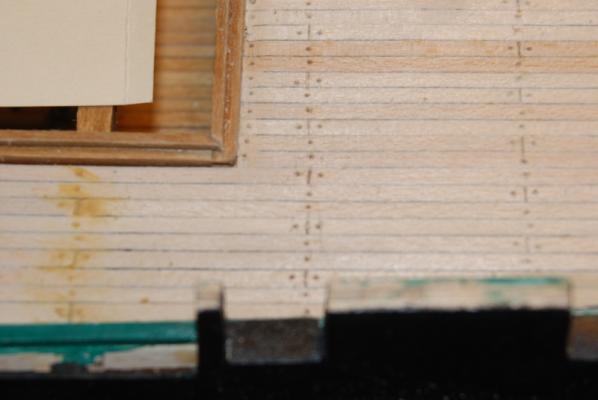
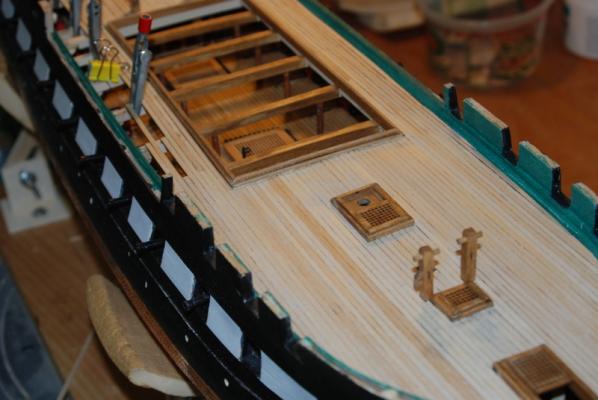
Thanks Tim, and those likes too. After a light sanding and clean up, I gave the spar deck planks two coats of wipe on poly. I used a fine piece of plastic "steel" wool between coats with a very light touch. I like this finish a lot, much better than the Tung oil I used on the gun deck. I used it on the coamings, bitts, and gratings too. You can see that there is some paint damage to the bulwarks from sanding the deck planks that I need to touch up. Before I do that though, I went through the plans and found a few more details to add to the deck first. I used 1/32" strips for the doubler planks around the mizzen mast, as shown on the plans. This was fortunate because I had elongated the mizzen mast hole slightly to get the mizzen mast to sit straight vertically side to side. Although the mast coat would have hidden that, I can now get the hole more rounded. These are the raw planks as glued on last night. They still some sanding and finish. I do have to be careful sanding them, however, because their thickness shows along the edges, not like the other deck planks. I am also going to be drilling holes for the scuppers in the deck planks, and fill them with some brass tube painted grey. Then I will clean up the bulwarks paint.
- 1,354 replies
-
- 9
-
-
- constitution
- model shipways
- (and 1 more)
-
Thanks for likes, guys. I finished drilling and filling the treenails, and gave the deck planks a good sanding with medium then fine sandpaper. I also scraped down a few high spots. I wiped the deck with a tack cloth and gave it a coat of pre-stain, wiped off the excess, and gave it a coat of Oak stain. I also gave the coamings and bitts another coat of stain. I was glad to see that the spar deck color matches the gun deck pretty well. I may give the spar deck planks another coat of stain though to even it out some more. I am going to use a different finish for the spar deck, though. I used Tung oil on the gun deck, but will use Wipe On Poly for the spar deck. The Tung oil was a bit blotchy and took a long time to harden up. When I checked my almost brand new can of Wipe On Poly, it was a solid mass . It looks like the plastic cap popped open at some point (or I forgot to close it the last time I used it? - nah! ) Instead of buying a new can, I decided to make my own by mixing 50% Poly with 50% mineral spirits. This way I can make up just as much as I need when I need it and store the Poly in a regular can. More to come on that later.

- 1,354 replies
-
- 8
-
-
- constitution
- model shipways
- (and 1 more)
-
Thanks for the clarification. This has been on my mind since I read this because I had to put a few into the sides of the Constitution deck planks but didn't want to put too many in.
- 1,051 replies
-
- 7
-
-
- cheerful
- Syren Ship Model Company
- (and 1 more)
-
Great looking deck planking, Chuck. You put mine to shame. In a previous post, you said: "I find that on most contemporary models there are only a few scarf joints.... as opposed to modern models where the builder uses way to many. I have always seen just two or three and on the rarest of occasions four hooked scarf joints against the waterway." It looks like you ended up with 5 scarf joints on each side, two in the bow and three in the stern. Did you mean two or three per each end?
- 1,051 replies
-
- 2
-
-
- cheerful
- Syren Ship Model Company
- (and 1 more)
-
I finished marking the butt ends and started drilling and filling. Here you can see the steps I use - the raw drilled holes on the right, the holes after I clean them out with an awl in the center, and the filled holes on the left. I use a wood putty for the filling. I then scrape the excess putty off with a razor blade, X-Acto chisel or smaller chisel, and end up with this: I am about half way done with this step, so more drilling and filling tonight.

- 1,354 replies
-
- 8
-
-
- constitution
- model shipways
- (and 1 more)
-
George, those deck strips are the 1/8" by 1/16" strips from Model Expo. There was a bunch that came with the kit, but because I used a lot of them for planking the gun deck, I did order another batch from ME, so these are a mixture of both. I actually ran out of these strips near the end, but I used the Byrnes saw to split some 5/32" by 1/16" strips that came with the kit into two 1/8" wide strips. The hull plank strips were straight out of the box. I sanded each strip on all four sides before gluing them in place, but in most cases they were in really good shape out of the box.
- 1,354 replies
-
- 2
-
-
- constitution
- model shipways
- (and 1 more)
-
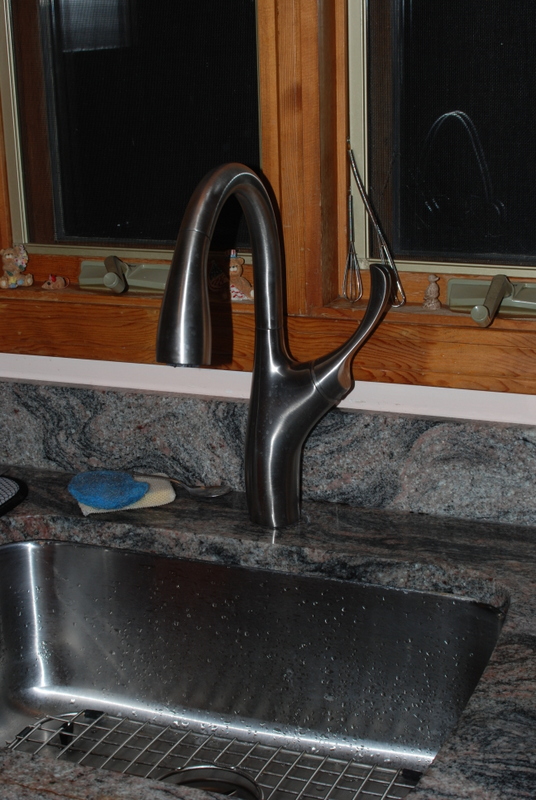
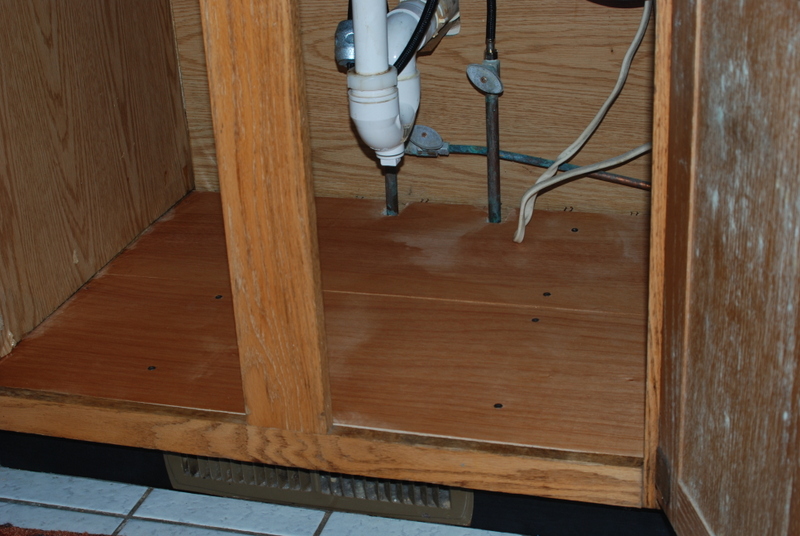
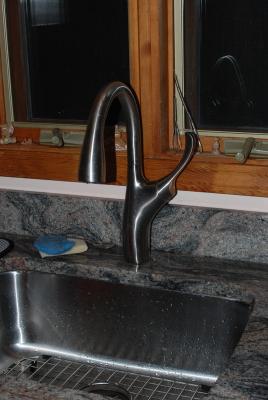
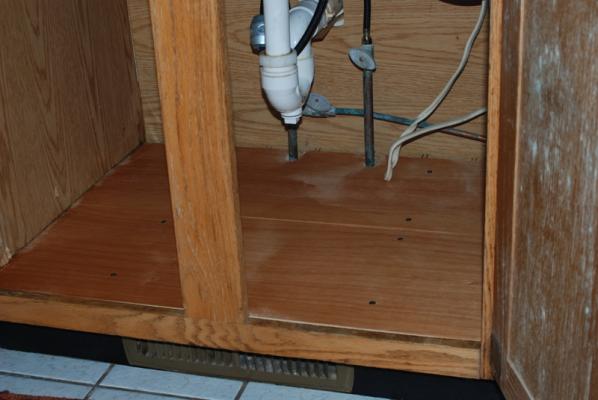
Thanks Sal and Steve, and for the likes. This part seems to me that it is taking a while, but it has been enjoyable. I am looking forward to moving on, though. Some progress this week, but first I had a small side project to take care of. Our old kitchen sink faucet let go and dumped a bunch of water under the sink . It took out the particle board cabinet floor. I had a plumber replace the faucet but I replaced the cabinet floor with some sanded plywood. I got to use the big boy tools so it was fun ! Here is the new faucet, which my wife picked out: And here is the new cabinet floor. I just put on a coat of poly so it looks a bit uneven. I have one more coat to go: (that flash is sure a harsh light, shows how bad these cabinets are, but that is a job for another day, or the next owner whichever comes first ) Back to ship modeling. I gave the planks a good sanding with medium sand paper to get them all even. I had a few more small cracks that I filled with sawdust filler. Then I marked the plank end butts. I used long planks when I did the planking but I wanted to show them at the appropriate lengths with a three butt shift. I first marked the planks with pencil, using a strip of manila folder to get a straight line. I then indented the planks at the pencil marks with a 1/8" angled chisel. Because it was angled, I could use it on the planks that were less than 1/8" wide. To get an even indent across the planks, I made one indent, then turned the chisel 180 degrees and made another. I still have to make the indents on the stern planks, they are just penciled for now. Planks after sanding but before marking: Bow area planks indented: This is the chisel I am using for this step. It came in a pack of chisels from Micro Mark (I think): We are home this weekend so I should have this step competed tomorrow, then start drilling and filling for the tree nails.

- 1,354 replies
-
- 10
-
-
- constitution
- model shipways
- (and 1 more)
-
Nice job on the ratlines, Tom. And the rest of the build looks great too.
- 212 replies
-
- 1
-
-
- constellation
- artesania latina
- (and 2 more)
-
You are right Jerry about wanting some supports for those vertical pieces. You could add some scrap pieces under the deck after making holes through the deck for them. Just make sure they don't interfere with a bulkhead.
-
Thanks Rich. George, thank you too, and here is the real milestone, the last plank is in! Markus, thank you and welcome. I am happy to have you follow along.

- 1,354 replies
-
- 10
-
-
- constitution
- model shipways
- (and 1 more)
-
Thank you for the likes. We are almost done with the deck planking so hang in there. A couple more along the starboard side bulwarks to add. You can see I added a piece of manila folder over the main hatch opening to try to keep the dust out while sanding the spar deck planks. In between planks, I opened up the mast holes. I used a circle template to mark the holes on the deck, then a small round file to get the holes close and a large round file to finish them. I checked the mast rake and alignment of the three masts as I went and adjusted the holes accordingly. I will finish this off with mast coats later when I install the masts. I had added the tenons to these three mast dowels before and made sure they fit in the mast steps. I was worried that I would not be able to get them back into the steps after the deck was planked, but I had marked the tenons with the directions that the dowels should go into the holes, and they went into the steps without a problem. I have some more initial sanding for the decks then I will mark the rest of the plank end joints and add the drill and fill treenails, like I did for the gun deck planks.


- 1,354 replies
-
- 9
-
-
- constitution
- model shipways
- (and 1 more)
-
Looks good. I'll follow along and if you have any questions I will be happy to answer them, although it looks like you are doing great.
-
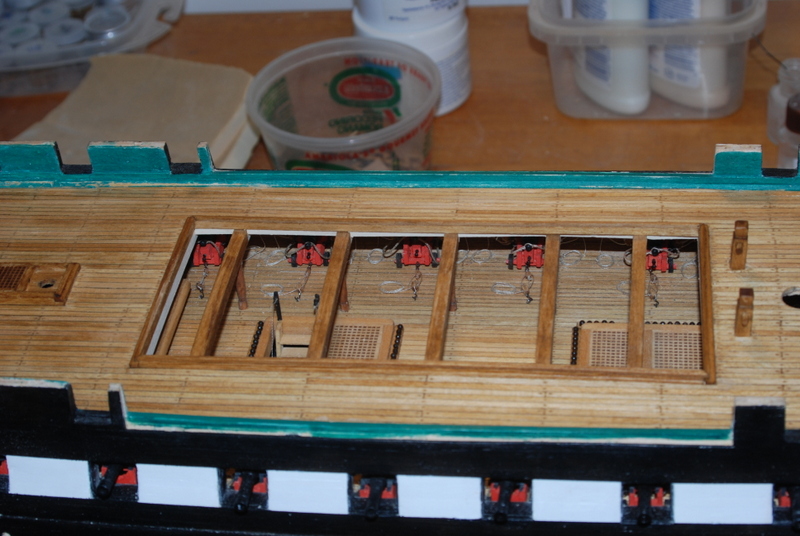
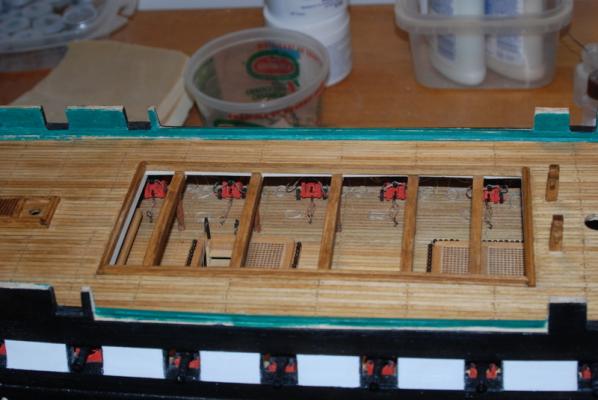
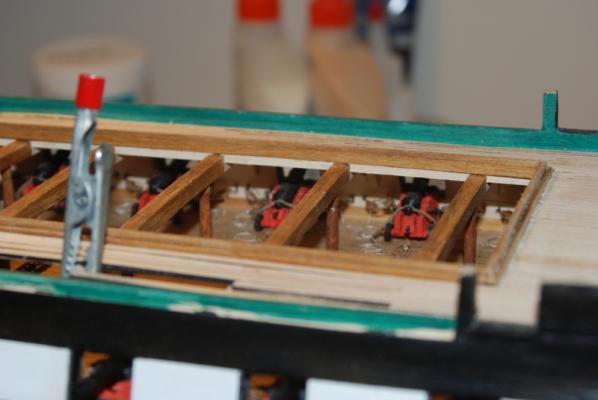
Thanks all. George, I do hope to get to scratch building in the future, but for now I have at least one more kit I want to do. Maybe someday I will do an admiralty model like EdT's or Dan V's, but that will have to wait until after I retire. Some more boring planking progress to show. I filled the port side and ended up with some thin planks along the back edge and transom, and a couple of hook scarfed planks along the sides. Not bad, but I am trying to do better on the starboard side. I am measuring the remaining gaps more often and adjusting the tapers as I go, which so far is yielding much more consistent plank widths. I am still going to have the hooked scarf joints along the sides so they will match port to starboard. I continue sanding the planks that are already in place. I filled the gaps along the forward hatch coamings that run athwart ship by first painting on some thinned white glue then mixing in basswood saw dust and pushed this into the gaps. I scraped it with a razor blade and will sand it after it dries. It filled the gaps nicely and I am hoping that after sanding I can still get even staining when I stain the deck later. Finally, another view into the gun deck through the main hatch, just for fun. There is some dust getting down there which I am not happy with, but I will take of that after the spar deck planks are sanded. The hatch coamings help to keep dust from falling into the hatch, but I am going to have to carefully blow the dust out later.

- 1,354 replies
-
- 7
-
-
- constitution
- model shipways
- (and 1 more)
-
Looks good J. I wouldn't sweat the planking - whatever works for you is fine. Your father will love it I am sure. One suggestion I would make is before you copper the hull, prime it where the copper will go, as it helps the plates stick better than to bare wood, and paint above the copper line and overlap it so you have a nice clean paint line above the plates. Maybe you were already planning to do that, but I didn't on my first model and I never did get a good line above the plates. Oh, and fill and sand the hull under the copper, as gaps between the planks will show.
-
Good to see you back at work to her, Max.