


RichardG
-
Posts
695 -
Joined
-
Last visited
Content Type
Profiles
Forums
Gallery
Events
Everything posted by RichardG
-
Miter boxes----What is the best one.
RichardG replied to roach101761's topic in Modeling tools and Workshop Equipment
This is mine. A couple of strips of double-sided tape holds it down (you can see the extra cuts before I thought of that!). It protects the teeth of the saw as well. You do lose the various grooves but I never found those to be of much use, finger pressure to hold the wood in place is enough. Richard.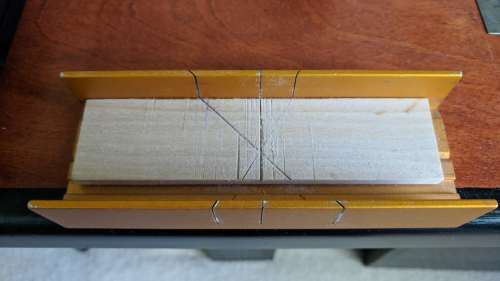
-
Miter boxes----What is the best one.
RichardG replied to roach101761's topic in Modeling tools and Workshop Equipment
I use the Zona 37-240 Aluminum Thin Slot Miter Box. I like that the slots are thin so you don't get the play that I found with the X-Acto version. I stick a 1/4 thick piece of wood to the bottom with double-sided tape to avoid sawing into the metal. The miter box from UMM that Kurt mentions is on my "to buy" list. Richard. -
Wonderful!! It's always a treat to see your work. Richard.
- 1,035 replies
-
- 6
-

-
- royal katherine
- ship of the line
- (and 1 more)
-
Thank you Steve. The model will have compromises because of the lack of information and limitations in my skills. But something that I knew was wrong and was easy to fix - it would have constantly bugged me. Fortunately when she's complete (sometime in the next decade or so!), all of my mistakes and retries will be forgotten. Richard.
- 78 replies
-
- 1
-
-
- dallas
- artesania latina
- (and 1 more)
-
Making it worse so I can make it better! She's no longer the "Dallas" The primer is preparation for coppering. Richard.
-
Fusion 360
RichardG replied to Williamo's topic in CAD and 3D Modelling/Drafting Plans with Software
I was wondering if l should download a copy. But the thought of the time it will take me to learn stopped me. At least for a little while -
Fusion 360
RichardG replied to Williamo's topic in CAD and 3D Modelling/Drafting Plans with Software
If you take a look here: https://knowledge.autodesk.com/support/fusion-360/troubleshooting/caas/sfdcarticles/sfdcarticles/How-to-activate-start-up-or-educational-licensing-for-Fusion-360.html Richard. -
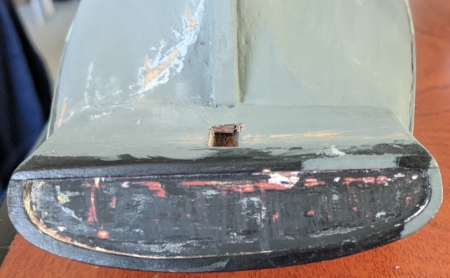
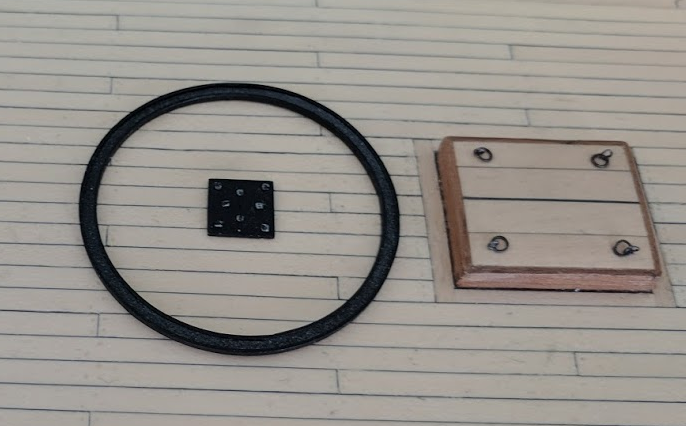
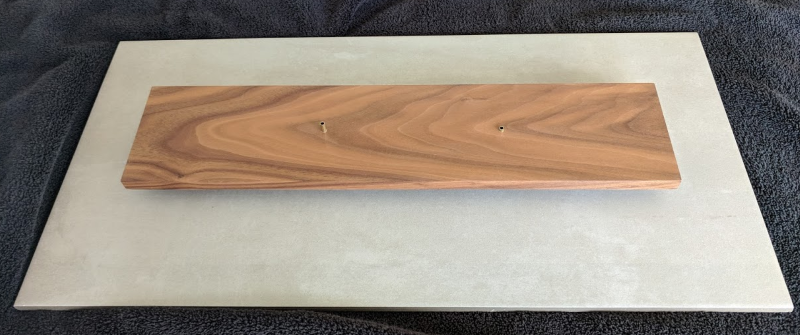
Wow nearly 2 years since I posted on my build. I am honestly ashamed. Thank goodness this is a hobby otherwise I’d have been fired . I have not however been completely idle. I’ve been doing some work, some planning, a fair bit of procrastination, and lots of scope creep. The gun carriage is almost complete along with deck reinforcement for the pivot. I've also made a base. This is a piece of walnut from my local Rockler store. It’s nicely figured to give an impression of water flowing. It has been mounted to a ceramic tile to provide a rigid and neutral colored substrate. The biggest item I’ve been working on is preparation for coppering the hull. My original planking was not great and I was not going to remove it as I did with the deck. However it took me a long time and many tries to find a way to create a nail pattern on the plate that was reasonably accurate and within my abilities. At this point it’s looking good. I’ll be posting about this separately. Other than that I spent a lot of time worrying! Mainly about the rigging. The plan that came with the kit is obviously simplified and I now know enough that I can’t use it. However I don’t know enough to create one for myself. So more work is needed there (mostly reading). Also this is not the Dallas. I’ve known that for a while. Finally I decided to just rename my log and live with it. Richard.

- 78 replies
-
- 1
-
-
- dallas
- artesania latina
- (and 1 more)
-
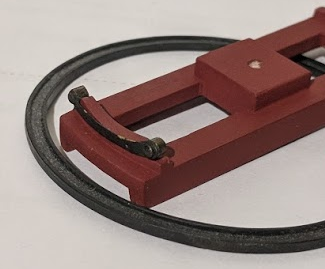
For my track on the 80-ton cutter I decided on a "u" cross-section and am using 2mm brass tube (with a toothpick filling the center) for the wheels. These are mounted on curved brackets with very small pins. The inspiration for this came from the USS Constitution As you can see the blackening of the bracket needs some work and I haven't fitted the rear bracket yet. I'm continuing to watch your builds with interest. Richard.

- 362 replies
-
- 7
-
-
- active
- revenue cutter
- (and 1 more)
-
Model Shipway Ratline tool
RichardG replied to fnkershner's topic in Modeling tools and Workshop Equipment
Thanks so much for taking the time to review this product. Richard. -
Received my copy yesterday. A 1976 edition (probably a little less accurate!). I only hope the author's already been paid, less than $5 (including shipping!) for a 970 page hard-bound book is not going to make anyone rich. Thanks for the recommendation. Richard
-
Try the book by John Mckay in the Anatomy of the Ship series. You should be able to get a good second-hand copy for around $50. The ISBN-13 number is 9780851778945. All the best, Richard.
-
I'm really sorry to see this. May I suggest you take a break and come back to it in a while. Please don't do anything rash. All the best, Richard.
-
Well I definitely can't do a "Like" for this. So I'll just pass on my sincere best wishes for you to get well and that we'll see more of your Revenge soon. Richard.
-
What Would It Take To Build This Interior?
RichardG replied to Julie Mo's topic in RC Kits & Scratch building
I'm not sure if any expensive tools are needed. Here's a wonderful example of a detailed interior from Doris's Royal Caroline build https://modelshipworld.com/index.php?/topic/854-royal-caroline-by-doris-card-1749-140/&do=findComment&comment=325142. (The whole build log is a treat). Richard -
Sorry to hear about the backward step. The two steps forward are really good though. It's been nice to see you back and working on this. Richard.
-
If you mean his Saw operation guide, I created a PDF copy - see this link https://modelshipworld.com/index.php?/topic/14965-looking-for-jeffs-hobbymill-saw-operation-guide/&do=findComment&comment=466069 Richard.
- 1 reply
-
- 6
-
-
Maybe these? https://www.menards.com/main/tools-hardware/hand-tools/clamps-vises/wolfcraft-reg-micro-needle-nose-clamp/p-1444439537678.htm Richard.
-
These clamps look the same https://www.lasaero.com/site/products/article?id=L01QXTCB9. They have some other interesting clamps, e.g. https://www.lasaero.com/site/products/article?id=P04HSD711 Richard
-
I used a razor saw for mine with a sanding stick to finish. I also did them in pairs and slightly longer than needed so I could sand them flush after assembly. Richard
- 362 replies
-
- 5
-
-
- active
- revenue cutter
- (and 1 more)
-
The copper tape I have does seem to be around 0.002 in. According to the USS Constitution the thickest plates would have been 28oz per sq. ft. See https://ussconstitutionmuseum.org/2015/08/12/copperbottomed/. This is then an 8lb plate. At 1/48 scale this would have been 0.00077. Well I'm working at 1/50th which is a bit better but the tape is still between 2.7 and 3.5 times too thick. Now even if I could get tape thin enough, I don't think it would be usable. Plus to be strictly accurate, I'd need 3 different thicknesses (28/26/22 oz). So basically I'm not going to worry about it . I'm not sure what to do about an overlap though. Yes, it's out of scale but to the naked eye it didn't really look that way (at least to me) when I stuck a couple of sample pieces to a plank. I will not be able to get a 100% accurate 1in overlap but if I don't overlap, can I avoid a small gap between each strip? Since I'm using strips there will be no overlap at the vertical joints (this will need to be an indent from the jig). So I'll have to experiment. I'm currently work on a nailing jig. Once that's done (and if it works), I'll create some test strips and see if I can actually apply them. I have to say, nothing in this hobby is simple. One thing that did surprise me was how thin these plates are in real life - less than a millimeter. Richard
-
Although I definitely like (try) to be accurate if I can, pink is too much
-
If it is pee at least I'll get no complaints about the cost. I'll have to do it outside though (still at my rate of progress it'll be warm before I'm ready).