MORE HANDBOOKS ARE ON THEIR WAY! We will let you know when they get here.
×


Piet
-
Posts
3,568 -
Joined
-
Last visited
Content Type
Profiles
Forums
Gallery
Events
Everything posted by Piet
-
 Ah yes, the spiders have been busy All the added "ropes" and lines sure makes the ship, they belong. Nice work there Popeye Denis. Cheers,
- 44 replies
-
- 6
-

-
- black diamond
- revell
- (and 2 more)
-
A beautiful piece of work Nenad. Cheers,
- 4,152 replies
-
- 5
-
-
- cutty sark
- tehnodidakta
- (and 1 more)
-
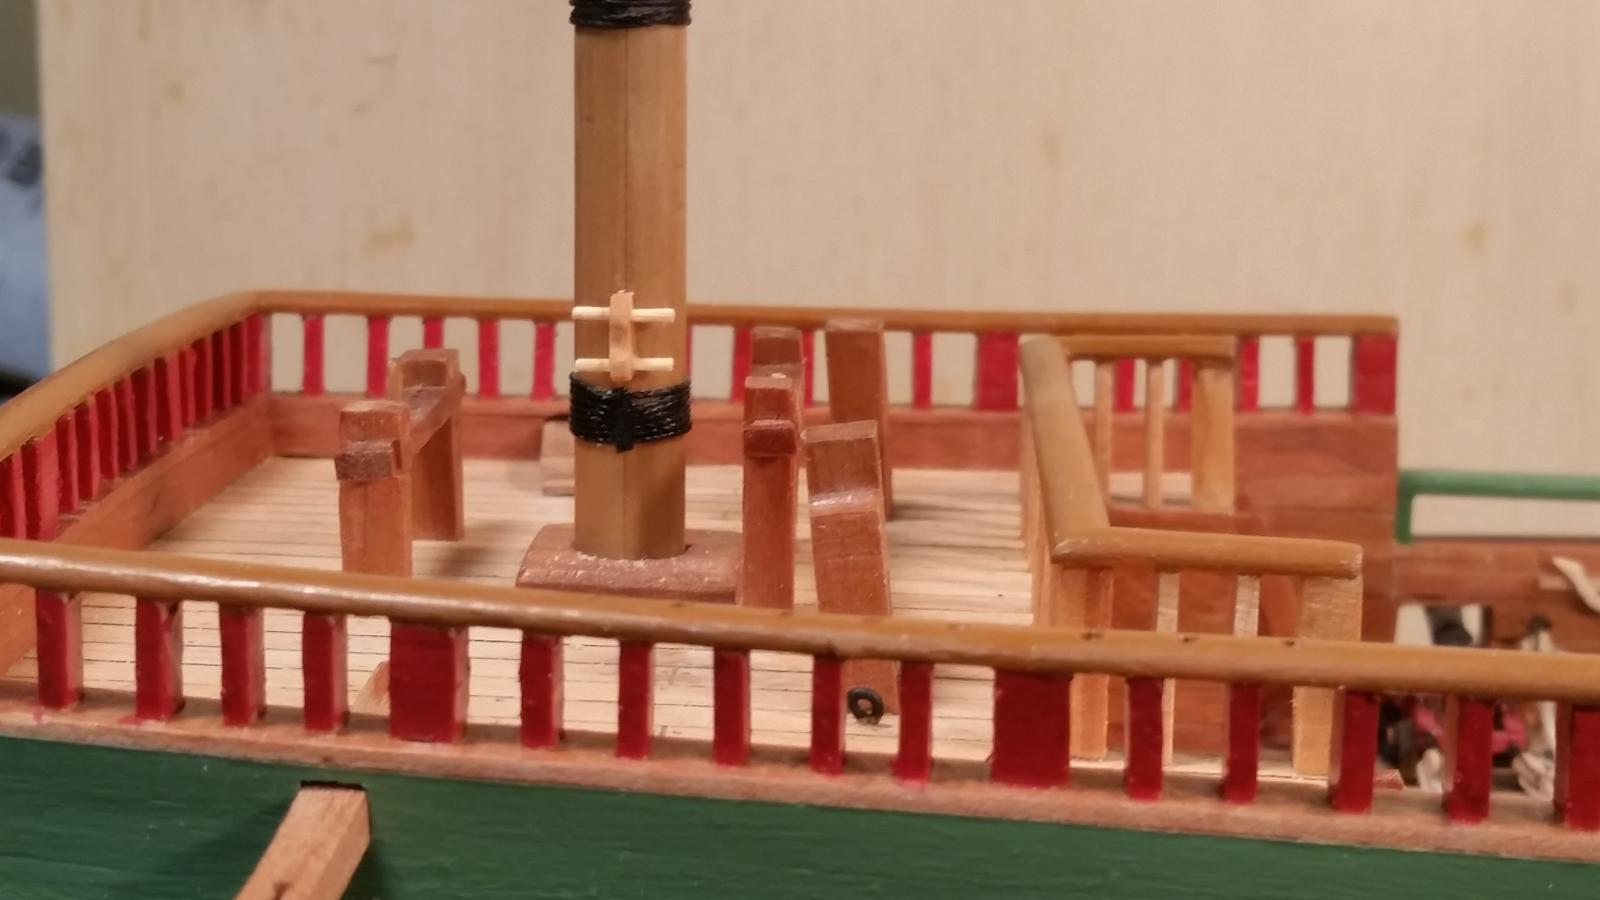
Hello all. Just a minor update. It's rather cool in the garage aka shipyard so I didn't spend too much time there and besides - I'm having a few pesky problems with my computer. I finished the stern flagpole with it's hardware and cemented a cleat to one of the knees to tie off the flag rope. Then I wend ahead and cemented and bolted the anchor lift beams to the forecastle deck. This about completes most of the stuff that's supposed to be on deck for the rigging. I still need to check with the drawings I received from Jan and Hans and make my own rigging layout drawings. I planned on starting with the anchors but I need a few 4 X 4 mm square brass bars. I tried my local hardware stores but they have become very limited in K&S hardware. So I'll have to go mail order for that stuff. If it isn't one thing then it's another. No rest for the weary. I'm also spending some time looking at pics of the O19 and Java from the URL's Jan gave me. Still hunting for pics with my father on it. Very sparse. Yup, I guess it's time to try my hand in making a few carvings. Have been making sketches and again I guess I need to make the heads for the knights before rigging starts. Okay, this is it for now. Thanks to all for visiting and your likes, see all y'all next time. Cheers,
-
Yes, John, Gwen and I would love for you and Diane to come and visit and lift a few Leffes with snacks! Stay for dinner this time though. The O19 sits proud as be on the shelf in my studio, right next to me. i think you'll liken it. Cheers,
- 2,250 replies
-
- 3
-
-
- model shipways
- Charles W Morgan
- (and 1 more)
-
WOW John, what a beautiful piece of art! Just love the base, the wood grain really makes it pop and then your artistic foresight to in include a wale and the tool that caught it, the little boat. I'm anxiously awaiting your next endeavor. It'll be as nice or better then the Morgan, if that's even possible. Well done my friend! Cheers,
- 2,250 replies
-
- 3
-
-
- model shipways
- Charles W Morgan
- (and 1 more)
-
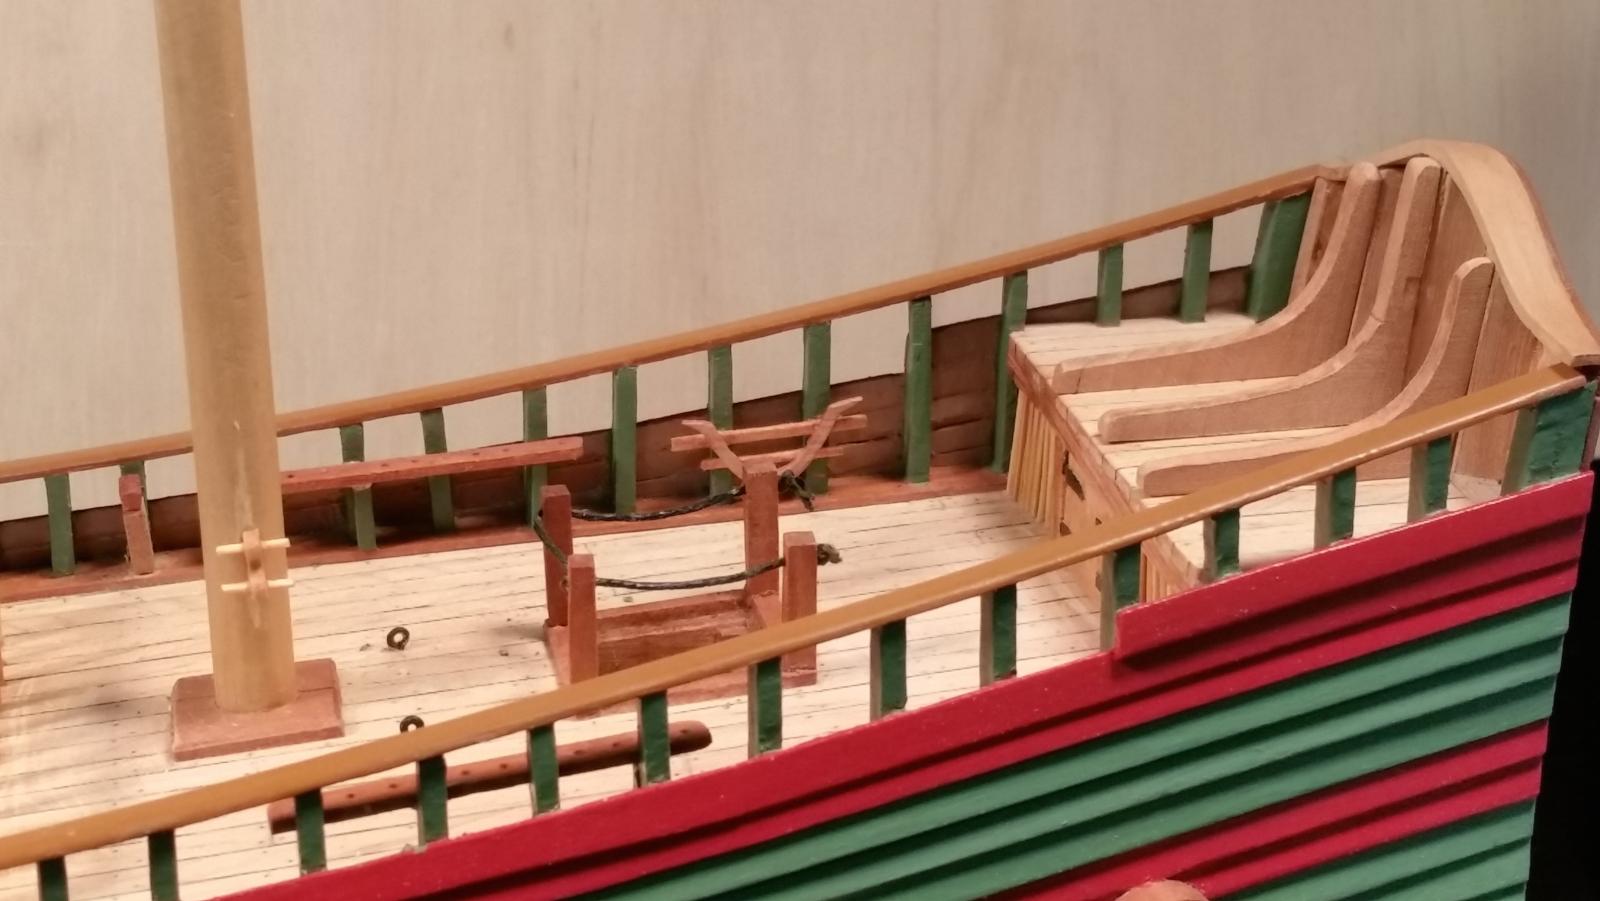
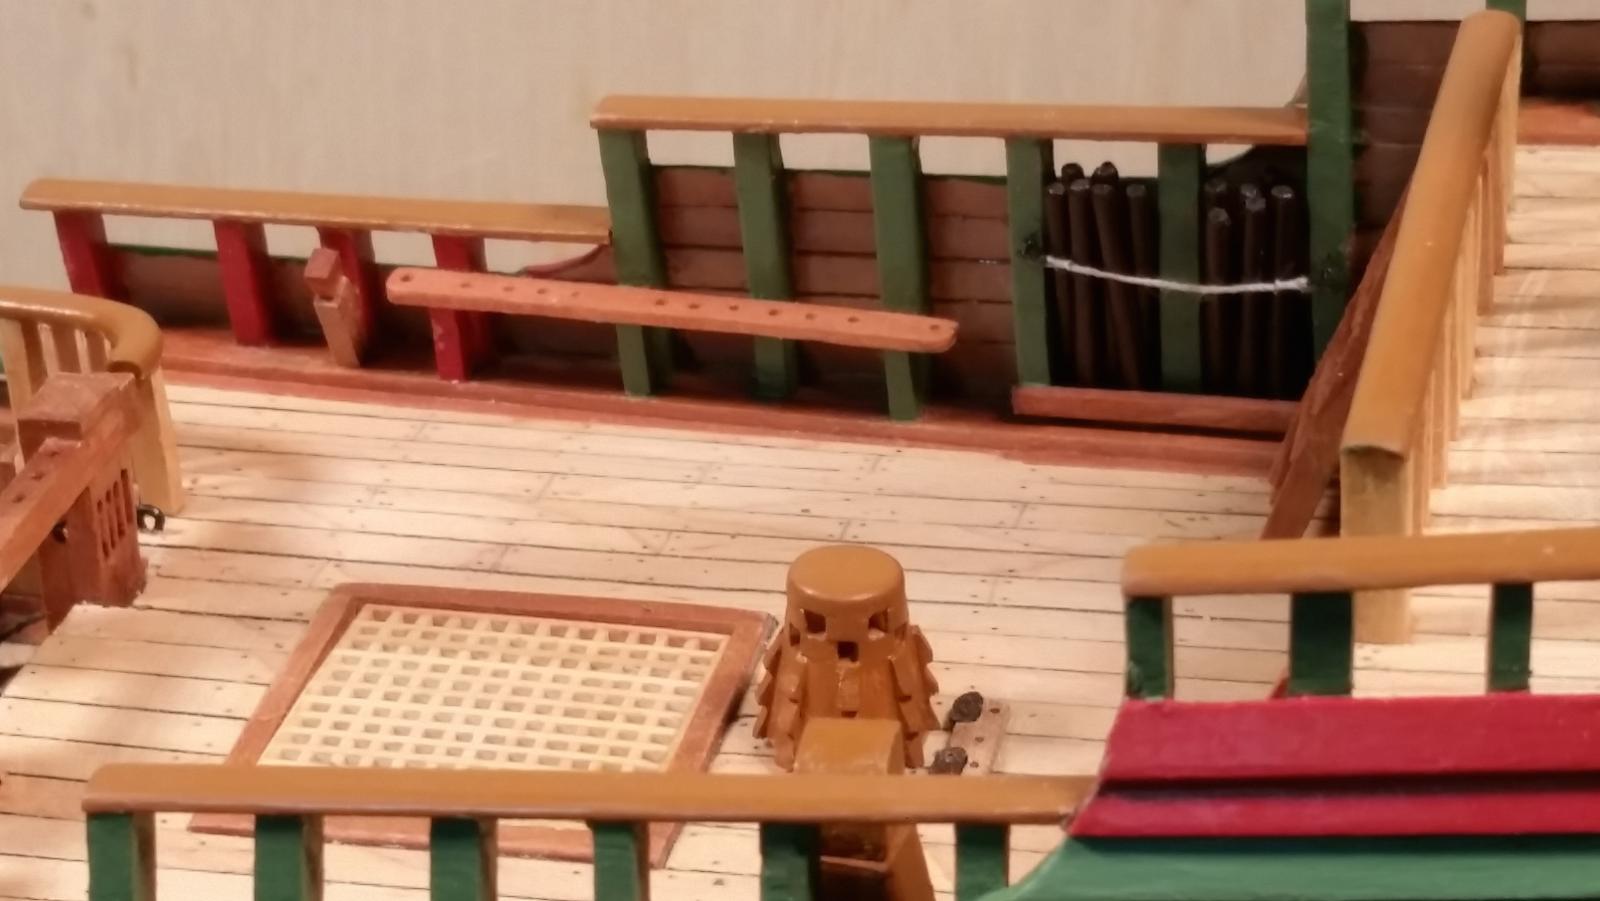
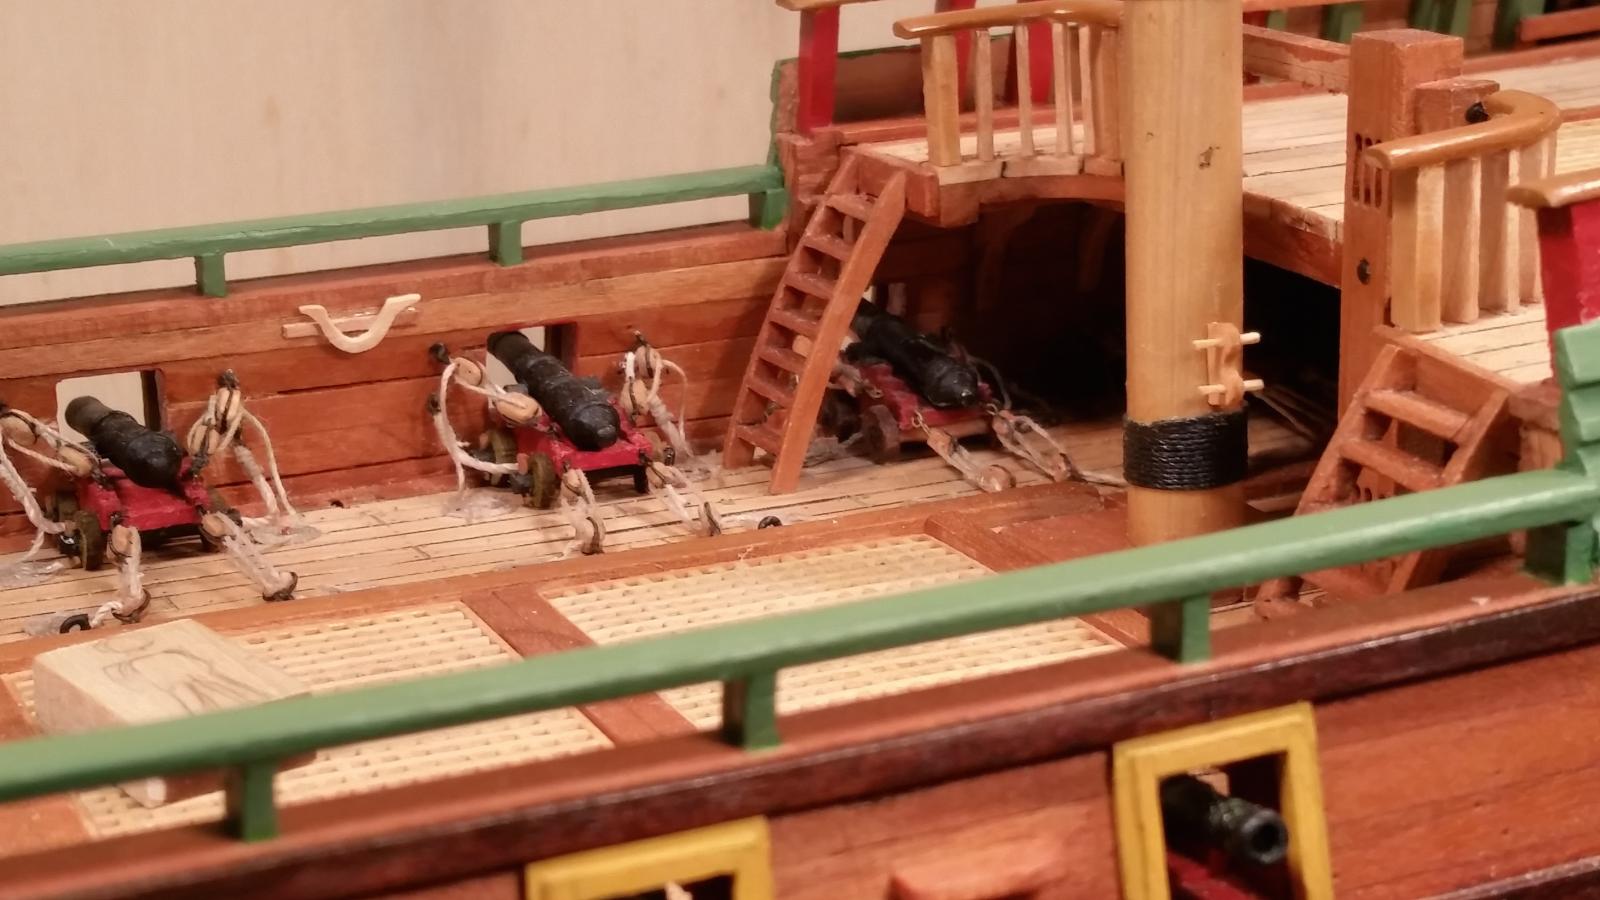
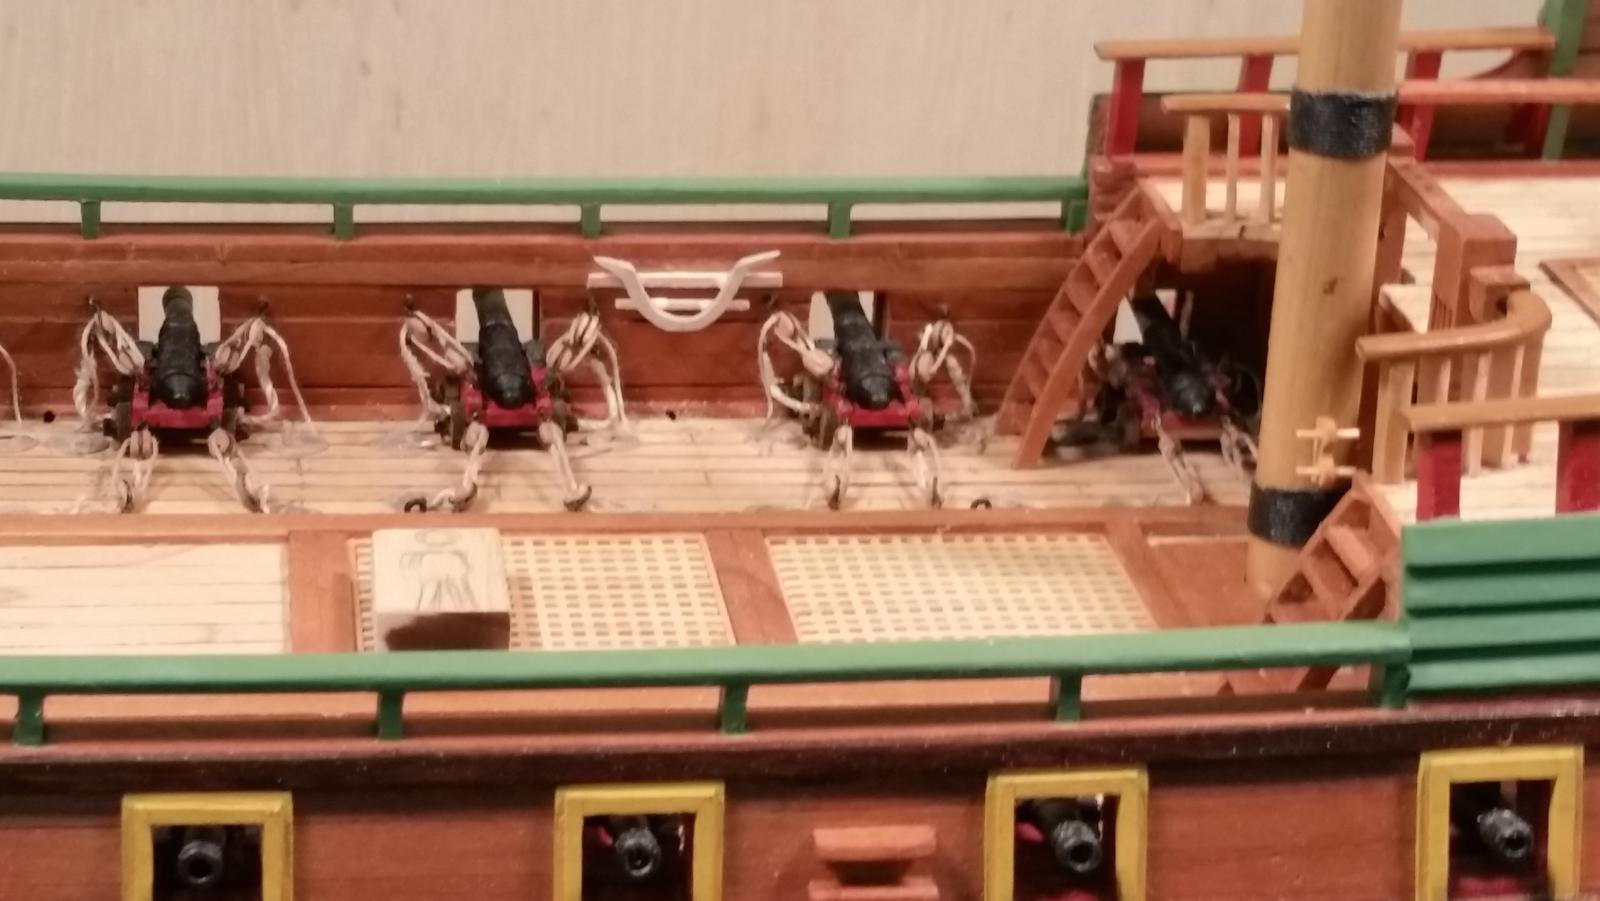
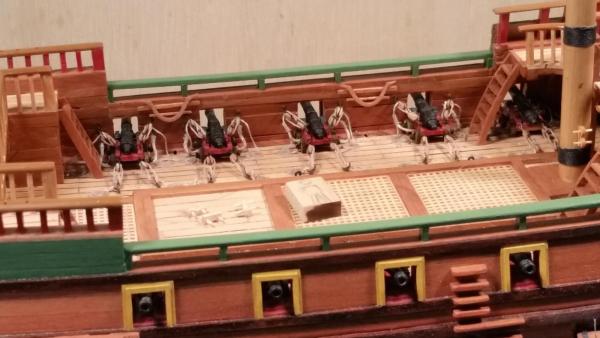
Thanks everyone for stopping by and your kudos. Well, let's see - - I managed drilling the rope holes in the four "boordknechten" (the knights against the bulwarks) without any damage to surrounding structure. I used a small hand-dril and slowly "worried" my way through them. Cemented and bolted the three large knees to the "animal coop" for the counter and put some poly on them. Made an eye bolt or loop fixture for the flagpole and temporarily inserted that into the center knee. The flagpole is made from a bamboo skewer and still need to be completed with the needed hardware and a top button. For now I'll leave it alone till later. I also removed the planking within the forward large grate opening to install a new grating. I changed this setup a long time ago to instal a forward capstan but thought better of it. I really need some more space for the ship's boats there and also wanted to gat back to my original design. This operation was also successfully completed and a new grating piece installed. Well, this sounds like "duck soup" but there was a lot of cleaning up to do and some minor repairs to be made. Not much else was done and I really must start with cleaning the dust out, especially under the quarter deck. I'll also wait with cementing the missing cannons into their hidden carriages till after I have painted the hull white up to the waterline. I think I'm going to make a few anchors next and perhaps the supporting pieces, crosstrees and lower mast tops. I'll be a busy boy looks like, if it doesn't get too chilly in the shipyard. Cheers,
-
That capstan step is a marvelous piece of work Remco. I have a question thought. From a strictly engineering point I would think that each peace of the three would have two 3/4 inch bolts at the ends instead of the one in the center you are showing. Is this per the drawings? Also from an engineering point of view, a 1/4 inch difference in bolt size is a big deal - in real life. There is less material at the edges and can easily tear the wood apart. Knowing you - - - it's already being remade and kudos to you my dear friend. So what are a couple of evenings or weekend days - - it's only time and when you have a near perfect model letting something like this, to many hohum discrepancies, go can lead to more "oh, it's okay" attitude. It's ultimately the builder who has to satisfy him / herself to continue wit a near perfect build. Go for it Remco, otherwise it'll be tearing at your heart forever. Cheers,
- 1,207 replies
-
- 6
-
-
- sloop
- kingfisher
- (and 1 more)
-
Fantastic stuff Cees. This mold making thing is a mystery to me, lots to learn yet. Cheers,
- 434 replies
-
- 4
-
-
- pelikaan
- beamtrawler
- (and 2 more)
-
Oh my, your CS looks mighty proud indeed on that very handsome stand Nenad. Like the pic of your son - - caught in the act of young people's favorite pastime - - eating. Cheers,
- 4,152 replies
-
- 6
-
-
- cutty sark
- tehnodidakta
- (and 1 more)
-
Very nice Pete! I see e line running down the center, did you make the deck in two halves? If so, nice looking joint. Cheers,
- 258 replies
-
- 3
-
-
- buzzards bay
- herreshoff
- (and 1 more)
-
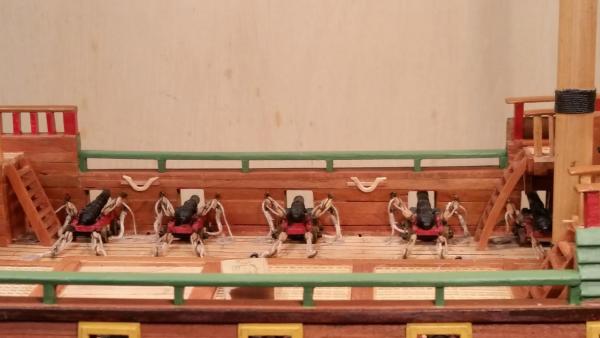
I feel your pain Dave on the too large o gratings. I ran into the same problem but that was my own doing. I reduced the gun carriages instead to simulate 12 pounders. I know that's not an option for you. In retrospect I should have made my gratings narrower and also the gun carriages smaller for better gun rigging detail. But it is as it is, at least for me. It'll look just fine once you are done with it. Cheers,
- 962 replies
-
- 4
-
-
- sovereign of the seas
- ship of the line
- (and 1 more)
-
Good seeing you back Josh. As I mentioned to Andy I am in love with Dutch ships and the Wappon is one of my favorite. Good luck with your build. Cheers,
-
Ingenious! Totally incredible Ian. Cheers,
-
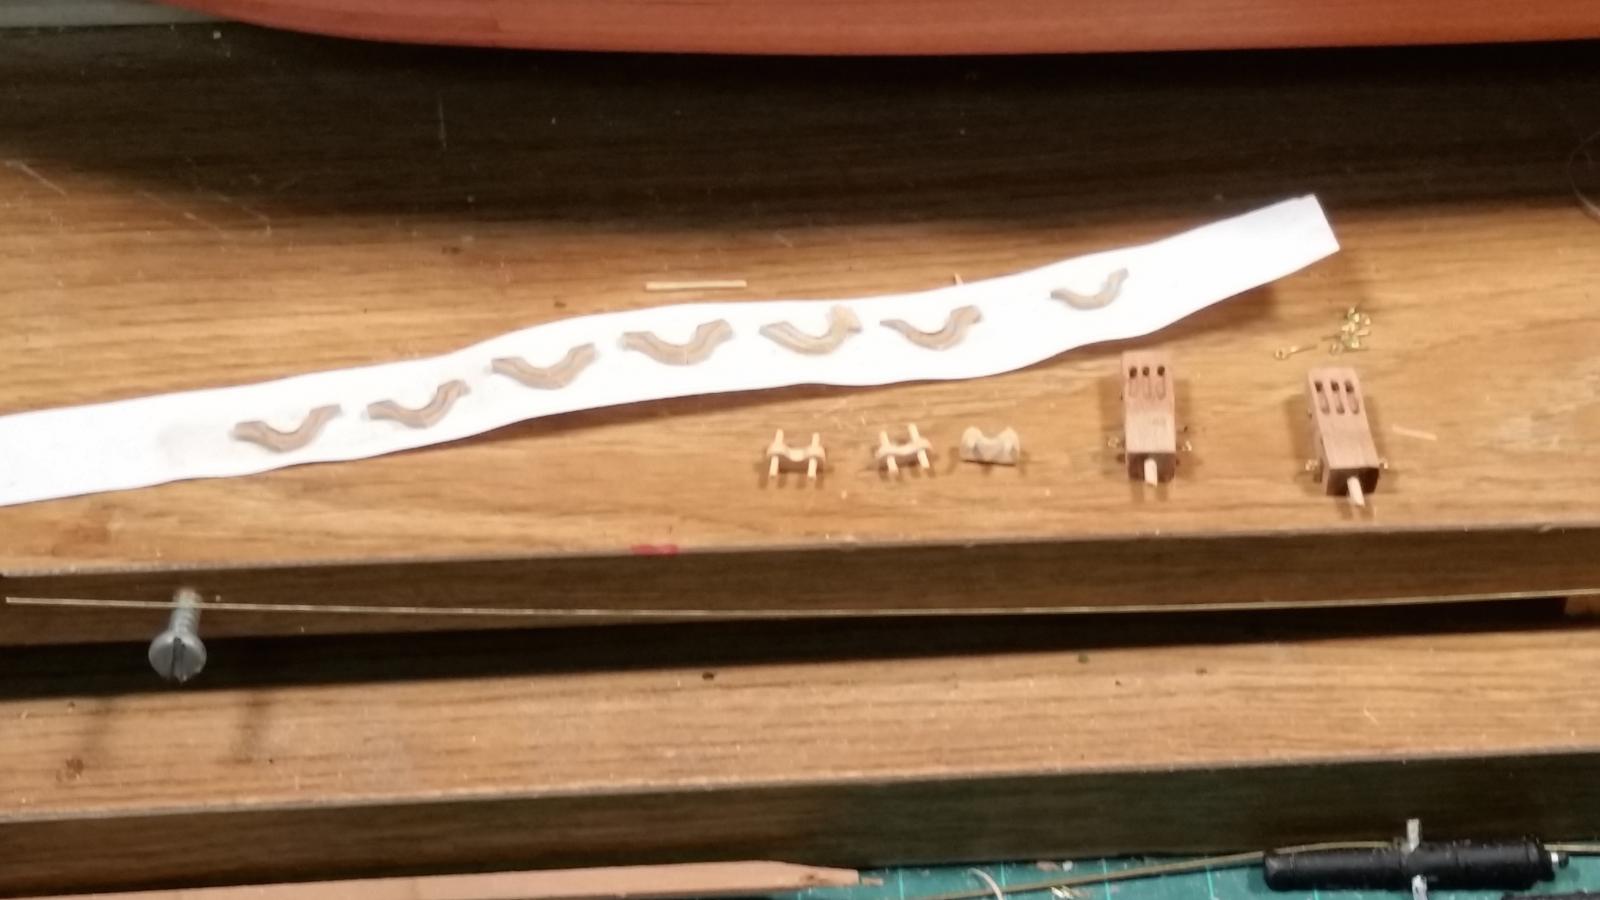
Hello all and thanks for visiting the Surabaya shipyard. Thanks for all the likes and your comments. Thank you Jan. Yeah, I guess that makes sense, that they would come in different sizes for different applications. I should have made them a hair thicker and perhaps a little closer together at the top but it's mostly the idea that counts in how they look like. Yeah Ian, I forgot already that Jan mentioned it in a previous post that the kruishouten were called kervels, old age disease It also makes sense that these hoornklampen are called pin racks. All I did with the making the pin racks was to draw them out on a piece of flat boxwood sheet of about 1.5 or 2 mm thickness. Then drilled the appropriate size holes for the pins and proceeded to cut them out. I made the pins from bamboo skewers. First splitting them into thinner pieces and then pulling them through a drill size plate. I drilled a 1/2 mm hole in the foot of them and cemented a small piece of 1/2 mm brass rod in. Drilled a 1/2 mm hole in the mast and cemented them in using 2 part epoxy glue. In my case I could not drill the holes in the main mast because it was already installed and not accessible. Oh, I could have bend a steel needle to 90 degrees and carefully pushed that in making a hole but was concerned about collateral damage in other places. I just cemented them on with CA. It's obviously better to do this kind of work when you have the masts on the bench. I'm coming close to having to make a few carvings and the lower mast tops to start with the standing rigging. I may have to investigate this casting business like Sawdust Dave is doing, it'll speed up that chore I think I have pretty much put all the fixed rigging parts on the ship except for a few lead-through holes in the bulwarks and eye bolts. I'm hoping that I can do that when it's needed using the appropriate drawings Jan and Hans have send me. By the way Jan, I have ordered Rob Napier's book "Valkenisse." Hip, hip, hurrah !!! That'll help with the rigging together with the Heemskerk and Batavia. Besides, I just love these Dutch ships, there is something about them - - - I'm currently working on the stern knees and flagpole. That'll kinda complete the hull work besides mounting a few cannons and then cleaning all the dust out of her. Here are a few pics of the last two day's work. This shows version 2.0 of the kruishouten aka kervels, the three remaing hoornklampen aka pin racks, four boordknights and two three pulley deck nights. Here we see the version 2.0 kruishout, aka kevel, bolted to the frames, a longer pin rack and one boordkecht that you can see just left of the mast bolted to one of the frames. Now a not so funny thing is that I forgot to drill the holes for the simulated pulley inside of it I'll either have to worry the holes in using a pin vice or ripping them of and doing it the easy way. This shows two of the version 2.0 kruishouten, kaka kevels, bolted to the bulwark in the wast. This shows a longer pin rack and a boordknecht on the quarter deck. Same sad story about the boordeknecht. Cheers,


-
USS Essex by spongbob - American Frigate
Piet replied to spongbob's topic in - Build logs for subjects built 1751 - 1800
Nice start Bob. She certainly was a very handsome ship. Good luck with your build. Cheers, -
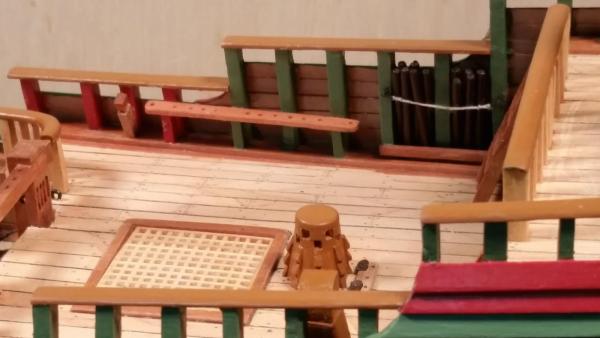
This is the post I planned to issue yesterday, or was it day before yesterday, but had to postpone it till now. In the meantime The "kruishouten" and "hoorn klampen" were finished and cemented to their various locations. A literal translation is "cross woods" and "horn clamps". There is of course a change coming with the kruishouten but that 'll be for another day. This shows the kruishouten cemented to the bulwark, port side, waist. Hmmm, kinda small - - - This shows the kruishouten as well as one of the hoorn klamped to the mainmast. Here we see one of the two hoorn klampen with their karvijnagels cemented to the foremast. The karvijnagels acts as belaying pins but are permanently attached to the klampen. Looking at the pictures with the kruishouten cemented to the bulwarks they seem too small. I decided to make them a little larger and see how they look. I kinda like the size - - unless Jan thinks they are no good and need a different shape and be a little heavier. I copied the idea from the Prins Willem book. No problem with that, I can easily rip them out and redo them. I'm so used to redoing that it's becoming routine Cheers,


-
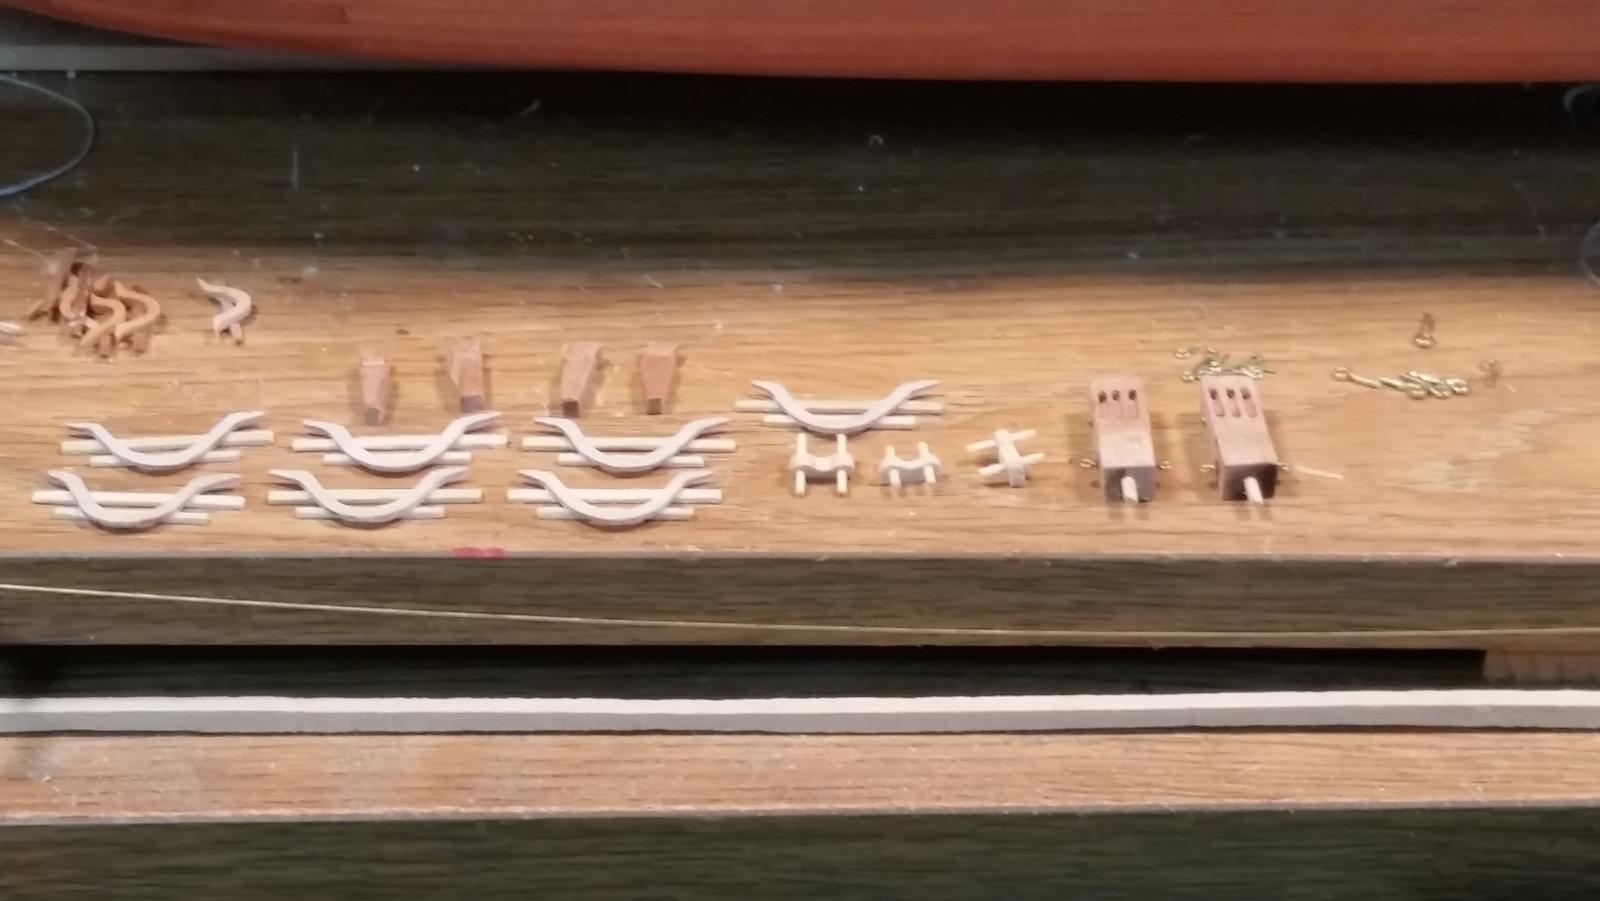
Hello all and thanks for visiting and the likes. No, I have not been AWOL! I posted a progress report a few days ago but it somehow vanished into cyber space. When I wanted to add another update yesterday I found out it was gone. I was one ticked-off dude and it was too late to re-post the one that's lost. In the meantime, our daughter Marianne and grandson Troy drove down from the Pittsburgh, PA area and stayed with us over the Holidays. Needless to say I got very little time in the shipyard, except for a few hours showing Troy how I make a few things. He has two left hands when it comes to tools and making stuff but he really liked the VOC ship and was totally blown away by his great grandfather's sub, the O19. I had to demonstrate all the things that work. I started to make six "kruishouten" and six "hoorn klampen" with "korvijnagels." Sorry but I don't know the English names for these things, must be something specially Dutch. The first item is for belaying rigging and is fastened to the bulwarks. The second item is attached to the lower part of the masts, one on each side. These are to belay the "parten" coming from the yardarms. In later pictures you can see where they will be cemented to. A picture is worth many words, specially when all this ship talk is still kinda foreign to me The thingies on the paper are the main parts for the "kruishouten" They are from 1.5 mm boxwood and I glued them to paper tom prevent the wood from braking when filing them into shape. Below them are three "hoorn klampen, next to them two pulley knight-heads and then a bunch of eye bolts. I made the knight heads in case I need them for the running rigging as well as the eye bolts. There will be planks cemented to the back of each kryishout so bulwark wont inhibit the ropes to be belayed. At this stage of the game I still don't really know for sure if I need the knight heads but the eye bolts will be needed. Cheers,

-
What a nice thing you are doing Popeye Denis, your grandsons will remember this forever. That model will be the most priced thing to them for a long time. You are doing quite a remarkable job on the model. Cheers,
- 44 replies
-
- 7
-
-
- black diamond
- revell
- (and 2 more)
-
Very ambitious and challenging, mostly in light of keeping it water tight with the windows and electrics. Have a great 2016! Cheers,
- 55 replies
-
- 3
-
-
- auguste piccard
- submarine
- (and 2 more)
-
Shaping up really nice Patrick and arguing with yourself is okay, I do that all the time, even calling myself "domkop." Cheers,
-
Glad to hear you are in the mend Robbyn and am looking forward to some updates soon. Get well quick and have a great 2016. Cheers,
-
High Michael, looking nice. I have been using bamboo skewers pulling them through a drill index. I use my fingers to pull the skewers and bamboo is a lot stiffer then cane. Works for me. Cheers,
-
Exquisite! Just can't stop looking at the pics, just out of this world. Cheers,
- 1,207 replies
-
- 2
-
-
- sloop
- kingfisher
- (and 1 more)