


YankeeD
-
Posts
151 -
Joined
-
Last visited
Content Type
Profiles
Forums
Gallery
Events
Posts posted by YankeeD
-
-
-
-
-
13 hours ago, flying_dutchman2 said:
Hans,
In post 152, last picture, the clamps. Self made? Here you can purchase them in 6" (15cm) and up. I have not found anything that small.
Marcus
No Marcus not selfmade.
Bessey.
Amongst here you can find them. https://www.superhandgereedschap.nl/product/parallelspanner-mt-1-36mm-bessey/?gclid=Cj0KCQjw-r71BRDuARIsAB7i_QNHe24SCgjOSfzT7rpOcK4HFeeTyKBU-YfHtKlM9ucSh0GK8fC2z8kaAubrEALw_wcB
They will for sure be cheaper in US.
- EJ_L, FrankWouts and mtaylor
-
 3
3
-
-
-
Due to corona there is quite some spare time, so I progressed nicely.
The deck beams for the halfdeck (english Quarterdeck I believe?) were all finished so I could start working on the closing of the maindeck. That meant making a lot of gratings... It took me the last 2.5 weeks to get it done. But more on that later
But I started first on the schaarstokken, thickers strakes then the normal deck planks.
That meant collecting a lot of saw dust but also some fine sanding to have them fit correctly over the deckbeams.
Sawing the strakes, thickness 2x the deck planking wich will be 1.8mm thick and just about 8mm wide. And they are sawed so that the top is just as wide as a deckplank and that the top is flush with the planking.
.thumb.jpg.cbd52fe790f00aaf52bd5c63021aca10.jpg)
.thumb.jpg.8048c9f2164e9a09dafbbc08df32fabf.jpg)
.thumb.jpg.70214b7546530338744ffa774678652a.jpg)
Milling the inserts for the beams. Not straight in first instance, the pieces moved. so I had to improve holding the pieces of wood against the miter. I used sanding paper
.thumb.jpg.46dce061df74a10dbadfc26c6f27692b.jpg)
.thumb.jpg.56d0a3d3aa2d232d63ddce1253986464.jpg)
The lot finished from fore to aft.
.thumb.jpg.8c73c33f6dbca131231c29e837f0e604.jpg)
After that I started on the gratings. Man that took me long to get it right. I followed a russian builders example but soon found out that it was noy my way of doing.
It was based on sawing to 2 pieces and mount them counter wise and then removing top and bottom half. It was all too fragile for me.
.thumb.jpg.2e8b36980323796ca021b7ac10b780ba.jpg)
When removing the surplus material the parts were always easily damaged
.thumb.jpg.f442ad632f25ed51ab411180974c91e3.jpg)
I went to making a saw sled mould that could saw both directions accurately and then filling with seperate pins.
Be ware this is all 2mm in all directions, wide long and deep.
This still took some inventing to do as my sawblades (Byrnes saw) were all US in inches. So at last after finding a kerf 2mm sawblade it still had to be mounted to the arbor.
But an adpater ring was easily found (Thanks mr Bosch!)
.thumb.jpg.f41d33456e459dbdffba4929fd7d51bc.jpg)
Here prepared for striking it with heavily diluted PA glue with water. After drying it is better to work on.
.thumb.jpg.f76713b5fe50f6ebab0badf05169dcba.jpg)
I then found my spacing of deckbeams irregular out of line. So I had to go back to redoing the strakes with correct, even spacing.
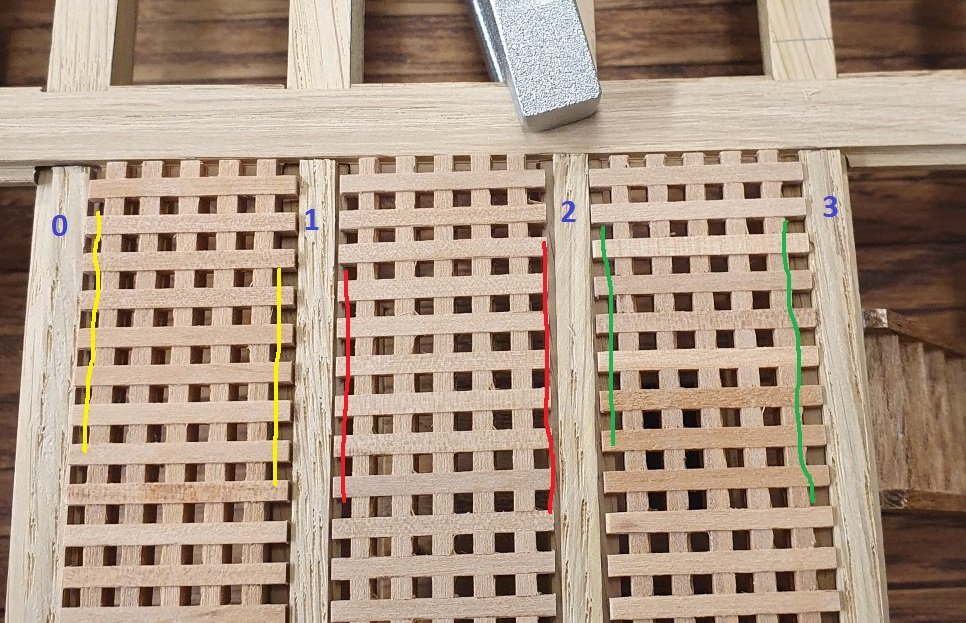
Status of today. I still have to redo the middle grating of the 5 adjoining. I cut it a little short as you can see.
.thumb.jpg.48b6cebcf6fed16cc6ec2eb6df08bbc7.jpg)
But overall satisfied with the result.
7
.thumb.jpg.c6b941dc88a59de94830b2d4e7d3ee4f.jpg)
So I will continue to finish this deck and then probably the inner hull planking up to the half deck
C U later, Hans.
- Archi, Rik Thistle, firdajan and 18 others
-
21
-
-
-
0,4mm and it is soft copper, so no need for annealing in fire or so. bought at a Dutch internet modelshop
- FrankWouts, mtaylor and EJ_L
-
3
-
Marcus, when doing the planking and scarphs on my ship I found that each scarph-joint was different due to the bending etc of the planks.
Maybe that is also something that Ab means by his comments?
I also had a mould but needed to sand each scarph afterwards for a nice, flush fitting.
-
Thanks Marcus. And toy toy toy with your build!
- FrankWouts, EJ_L and mtaylor
-
3
-
Happy Easter everybody!
A nice progress in the last weeks. I painted the orlop using this as a test for later decks that will be seen. I liked the outcome but it has to be a little lighter brownish.
Started also mounting the bits and pieces on the orlop. As I will close the main deck soon this has to be done first. A pity you will not see anything later on. I will not mount canons on the orlop, I will close most gunhatches or slightly open some for fresh air, as was sometimes done in these days.
Then I started working on the deck beams for the halfdeck and finished setting the masts in the correct position. They will be loose but if the 'vissingen' are placed and fixed they will be automatically have the right setting. Pictures speak for itself I think.
.thumb.jpg.8e4edad504b371b352f86c932920e1da.jpg)
.thumb.jpg.39cdb02da5898e6c749b1ead85876c7b.jpg)
.thumb.jpg.97ded21a5e2129608a4d6dbbbcebdb99.jpg)
.thumb.jpg.3e8e8f657795bea37aac0656a50ef393.jpg)
.thumb.jpg.01c9cb5314019e92029d60adca76d189.jpg)
.thumb.jpg.a95f6b409c7ac59482b57f49fa0cc420.jpg)
.thumb.jpg.a493019df5c12ec2eaa9cba5fdd2d0a2.jpg)
A few pics on the process of the deckbeams.
.thumb.jpg.16adf21efba10ee39e99c04cb47f3e06.jpg)
.thumb.jpg.c420cc367ea1c47767a012e17d6d49a2.jpg)
.thumb.jpg.f3b462820fcc3dd5313b211e27e01212.jpg)
.thumb.jpg.dc1d3e68f936c07e6df786256a10fbad.jpg)
- GrandpaPhil, Siggi52, JpR62 and 11 others
-
14
-
The Corona has left us with some good spare time so I progressed well with the fortuining (klinker in english I believe).
I succeeded keeping the numeber of planks the same everywhere but has to slope them some to come to the final result.
I installed the last 3 gunports using pre-fabricated rabbits. So I took out a good part and inserted the pre-fabricated rabbit.
Now I am busy sanding the rest of the gunports. Next step will be the beams of the verdek and fixing the details on the gundeck and closing that.
I will probably leave the gunports of the gundeck closed or slightly open, but I will not install any canons.
I also set out the internal lines for the remaining decks.
.thumb.jpg.eafe5ffefaedbef2e7a72c4f824b80bd.jpg)
.thumb.jpg.acde8d66b0098d6c77a17a736c4cbfcf.jpg)
.thumb.jpg.b3f0b7ba9f599bc655070f429e4cedb3.jpg)
.thumb.jpg.1b91c96c96e290c74e42763cbee416a8.jpg)
.thumb.jpg.3d96c37dd34acb43679746ccd77dd3e6.jpg)
.thumb.jpg.24a3d3d9bfebe4b70af504a7ac5eaa5f.jpg)
.thumb.jpg.4c5ebb14056cb14c71ea49d017092e8d.jpg)
.thumb.jpg.7368969052116aa4d6f9593a0370c7fd.jpg)
.thumb.jpg.fbd5c744ac2bcecd3070a5d240f8516d.jpg)
Checking that the internal deck lines run horizontally paralel.
.thumb.jpg.6c009c0fb2076a0a88d61e3f267dd055.jpg)
- GrandpaPhil, EJ_L, druxey and 8 others
-
11
-
Beautiful! So much inspiration and learning to do for me. Thanks.
-
So yet another month passed by. Some weeks holiday and some other work came also by so not much happened.
I started to work on the Gunports in the Fortuining. I had to do quite some repair work as the ports did not coincide very well with the frames, as in the drawings. In the end I cut out quite some area's and rebuild them anew. Both sides are done now. Still at each side 3 upper gunports, that is for the coming days. After that I can start on the Fortuining.
As I had a lot of sanding to do there was quite some movement in the frames so I put some reinforcement between the sides.
.thumb.jpg.4598a2998ed76a704027655944f5f176.jpg)
The rest speaks for itself, a long and tedious job. But the better this is done the easier it will be onwards. I intend to make these ports without rabbits or gunport hatches.
As I read somewhere that these were not always fitted. (making life easier for me). Although maybe I change mind later on....
.thumb.jpg.ca8354fc681d77e2fa67c1168e76f321.jpg)
.thumb.jpg.7756c7517911bbf8c1415982079e509b.jpg)
.thumb.jpg.edc1e11c6dee29cde80b0cd1eeea7983.jpg)
.thumb.jpg.2d9d50c85efef80bfe4632ac4b8eea7a.jpg)
.thumb.jpg.54f7e3077a5359c8b1cd25bbe8afa905.jpg)
- Ondras71, Captain Poison, G.L. and 12 others
-
15
-
As a month has gone by lets update. As there were some holidays and some other projects not much has happenend.
I finished the galleries bottomsides. Also the windows under the Spiegel were placed.
Next steps I decided to work on the Fortuining and getting the top side railings in the right shapes.
.thumb.jpg.fbd00ba3a8928f5b0ae10f8e086293c1.jpg)
I guess the glass wasn't perfect in these days as well, so I am happy with the results
.thumb.jpg.557853aa80d62aea840d79e5be094e53.jpg)
.thumb.jpg.5e8a24fcf456182f6c6aa409efb67302.jpg)
.thumb.jpg.eedf416e4e3850a50c2dd3f062393d25.jpg)
- FrankWouts, druxey, GrandpaPhil and 13 others
-
16
-
Just before we go into the new year a last update. As the coming weeks the warf will be closed.
I was not happy with the gallery and the method of the filling blocks. It put me in trouble for planking. So I went with an early advise of someone to make the bottom parts of 1 piece of layered oak. I used 3 layers of 6mm wide that nicely fits the size and shows an imaginary planking.
The pictures explain the rest I think.
.thumb.jpg.9875af5bfa331f33f478af8fc7492c65.jpg)
.thumb.jpg.e7e5feb1e80eec7f6dde965a753eff3a.jpg)
.thumb.jpg.6d88a375f83e9c309cbc87b8460dda08.jpg)
.thumb.jpg.c196e8d82289b2056a1ac0570f04e975.jpg)
.thumb.jpg.da82ddace141524d3ac8e100e7058562.jpg)
I am going to fill the last part up and then plank it with same width small pieces.
.thumb.jpg.8dce04083075c8dfd939741f8cae3327.jpg)
.thumb.jpg.79f3b9397edb86801c1ee93926544831.jpg)
.thumb.jpg.d839955f594582ce9a7d22b0ddbd0a92.jpg)
.thumb.jpg.798ba3d385f02772146322b55a275913.jpg)
.thumb.jpg.e0596801c3a169411c6ca990e503b373.jpg)
- bruce d, Captain Poison, druxey and 9 others
-
12
-
Just a short note and update as it has been quite some weeks now. And I do not wat you to think I stopped building
")
The hand has healed well so we can start building again. But we first went to Down under for 5 weeks I had hoped to visit the Endeavour but is was closed until end of this month.
I am still thinking about the mass production of hinges so in the meantime I started working on Het Torentje...
All still dryfit and first test models. And not to my satisfaction but we are getting there.
.thumb.jpg.9237a77d0b52639389a6e2af3637f597.jpg)
.thumb.jpg.6f7eabf576a9b10badabf25cf32e8d16.jpg)
.thumb.jpg.7a257ab1d49f25f5b27cbddf215d4526.jpg)
-
Very very nice.

Interested to see you proceed.
What is the wood used?
Hans
- Louie da fly and mtaylor
-
2
-
-
-
The work has stopped for a couple of weeks. Finally I underwent corrective surgery on the righthand. But before it, I was just able to comple some things.
As said I am trying tio finish all on the gun deck.
.thumb.jpg.34ef0906091bb3dbee0ec514fdbfa7ee.jpg)
And the waterpumps..
.thumb.jpg.631810084b61014c84fe528d6671cb95.jpg)
.thumb.jpg.4dabf13e109eae637ab81e30c66a9c8e.jpg)
.thumb.jpg.81477a9247ca68965666de349de34405.jpg)
.thumb.jpg.ed94b755521ac47547b611a81c23b608.jpg)
Then the frontmasttop
.thumb.jpg.f35110d2b1b8eabbb7f64e0763cee9f5.jpg)
.thumb.jpg.ddbb3fd9c5ffbfdd57ac1611b2c1ede5.jpg)
And finally the gunport hinges. I am working on a method to build them easily in quantity, production line like..
.thumb.jpg.cf00e89f1d757b2d93efcfaa097f9dd7.jpg)
I hope to start building again in a couple of weeks. Have a nice weekend!
- coxswain, druxey, marktiedens and 14 others
-
17
-
September. As said working on the Rahout and getting the right routerbit. I offered a proxxon bit for this, diamond sanding it to the right profile.
.thumb.jpg.60237485f9cbb99c6c519b3e66a86358.jpg)
.thumb.jpg.73fc1941e80b7577a678920bee5b7914.jpg)
This got me the right profile. I used walnut and not oak. I tried oak but that was to coarse to get a nice profile.
.thumb.jpg.96d4f48bbb9d4cdf1f918963a3e089b2.jpg)
Finished fitting them.
.thumb.jpg.e35d849d2be33028f612af65b9a6da85.jpg)
Later on the difference in colour from the wallnut will dissappear after colouring.
.thumb.jpg.555d74ad11eedb6bb2ccd802d99d99e0.jpg)
Then the kaapstaander. I will now finish all the parts of this gundeck so that as I start on the next deck this one can be fully fitted. Although I have not yet decided on guns.
I am thinking to leave this deck with closed gunhatches and only fit gund where you can see them whole.
.thumb.jpg.30aefcc7f9b8d8c7a72ee72c1d3de788.jpg)
.thumb.jpg.198742c7cb9006e1de52c189adc169ff.jpg)
.thumb.jpg.7a6ff59877ac93d35ef8ee3201114e69.jpg)
Rounding the squares pole was not always succesfull...
.thumb.jpg.4eaa060268ece85a7add970087f51901.jpg)
.thumb.jpg.783b76d1d2cbd97c4240c13b2c31d92d.jpg)
.thumb.jpg.faed73791f506a9144d899f0d3abf095.jpg)
- Dubz, chris watton, popash42 and 15 others
-
18
.jpg.17bfd93af85a9f7af70f795cf01ba530.jpg)
.jpg.95cd52dd601c184bedeaca33377b7625.jpg)
.jpg.c4c02c83db1d831de34ce41fe5d340f0.jpg)
.jpg.44a77645073b9087ae4c3525b8cc3ec3.jpg)
.jpg.f22c44eeef9a45e10e0f959a6c5733bf.jpg)
.jpg.d040fe6b4bc7a147ff525394d6793b26.jpg)
.jpg.6c88bb55ff19d45ebab178968f2911bc.jpg)
.jpg.67ecc4c0e7fe55259608db453d5009d5.jpg)
.jpg.91d2bcb2086d496450520a77e4a111ca.jpg)
.jpg.bae01bcf4bcb1b3c5953bc747eb63ee4.jpg)
.jpg.eee1bf1e7d7573929d72c3e39f6477ed.jpg)
.jpg.b8cc01cf884be92b2b53105db7f8d251.jpg)
.jpg.dc567a3c187238a23e85aab887314ecb.jpg)
.jpg.4746ae5e1fc20d9a65929c2cb4654940.jpg)
.jpg.c63181ed485ac71e09684b52c5d3776b.jpg)
.jpg.f15d04d630428be02375b7cb17b0d6a4.jpg)
.jpg.802436923541a287b510d11ff9b9c420.jpg)
.jpg.1422b5c9729931a2fdc13c1067c214dc.jpg)
.jpg.9743e866edaa5803fd4c9fc5e9517aa8.jpg)
.jpg.136caec680587e71112caa2c3659a522.jpg)
.jpg.a5e2254d1091415107930728c2de8c96.jpg)
.jpg.ef2907eaae96907199f7d95ab2ad6bb6.jpg)
.jpg.0c1f09cdefec2a3496497023418c61ea.jpg)
.jpg.d41c200a95bb7a7abce0c5994549405e.jpg)
.jpg.f7d141d8f330cfe41d260867d1695949.jpg)
.jpg.8994e34410733b9a1a10788c3e333747.jpg)
.jpg.f3760f6498a3e76e4cfcb9566731ef75.jpg)
.jpg.65148abfb497e37edd36d5a233d3d5cc.jpg)
.jpg.088a266d29f68427a556d9174657576c.jpg)
.jpg.2d84f8acfe5cffe223f9a1c4838e577f.jpg)
.jpg.eef3dddd4a435b65955a83193624f37a.jpg)
.jpg.c1f95d160293c22425ad1cd0c156ae31.jpg)
.jpg.70a50308912228012229144ef6577227.jpg)
.jpg.b7b7cbecbdd285fd3b0f2a23ce15150a.jpg)
.jpg.c44c890d313e53e8f7ee9b2610ce52f7.jpg)
.jpg.fc91a3bd76c138a7b4683aae79377aff.jpg)
.jpg.8d26af39c2d63b25061a02d55e8f89f5.jpg)
.jpg.dacfe7ec06fd1cf02ae88cc0448f677d.jpg)
.jpg.714513f167fb431ffc2d072496b87af9.jpg)
.jpg.e31cf3cde0e49917e92d86f490c41f66.jpg)
.jpg.098f6f5fff76f9542c92c8e7473e609e.jpg)
.jpg.1a3353e1f1ca07bd2c18fbfa38a5c7a6.jpg)
.jpg.f51c03cba8bd9a7a8f6589f32c8b533f.jpg)
.jpg.a17418e4585634d1ba63bf26e128684d.jpg)
.jpg.7db674f006940e984737a945ce986327.jpg)
.jpg.5914df08c8a5f2a27c68e07629db663a.jpg)
.jpg.74e0b740bb20effa570b1c813a6fd899.jpg)
.jpg.e545648fe164a35264cb5e8c7abf6576.jpg)
.jpg.54a0e494b62c7cd182a0561cc7939564.jpg)
.jpg.729c2757266ae2ead2b4b4213ecad4f0.jpg)
.jpg.da2935a4fb2f16a08436f491addef3ab.jpg)
.jpg.b6b412eb775007a05fa600b491ef8329.jpg)
.jpg.81f2d2e0bdefc300208ab29df241eb11.jpg)
.jpg.8af1761c06778dc484d5dc4c58ba1042.jpg)
.jpg.953f68c480cf099ff27d13d9f5113cc6.jpg)
.jpg.c160c3e428e5576c5cc2f14f34bb5a8a.jpg)
.jpg.ed1548adaa0d8c3840653217cdfbc2ff.jpg)
.jpg.efaad689d375f6b593e8e852b2a672de.jpg)
.jpg.c0cf60606676269d27d4e1e1bf698fb7.jpg)
.jpg.e31ca5ea31d6263a42c6767a9d393b96.jpg)
.jpg.79bbb738b00f6ec3b6d3e730e4121d5e.jpg)
.jpg.9a8e47f21db236c683a09cb22ba2a29f.jpg)
.jpg.956ad131aac1f28619f18e281d7fd07d.jpg)
.jpg.4e113e2e1ddb85a67ea3ad347943419e.jpg)
.jpg.59219d983f6c019ef9af7b0e74996d00.jpg)
.jpg.2f947d398a2b21a353329de16735bb04.jpg)
.jpg.a802b824b70495454002fbea962c1c76.jpg)
.jpg.8688654e50df3600ff5ee254d203837c.jpg)
.jpg.325eb31c61c380ad7b83b828eba10981.jpg)
.jpg.9bdd7038a76801572290aed2d74ae400.jpg)
.jpg.046f4f3e517f2d54ad9b2cb70a8fd96e.jpg)
.jpg.789af99f2ca4a01ebb1284f7a2c05a35.jpg)
.jpg.e3c1e93aef4058e1c2c059208e86b000.jpg)
.jpg.f6c350fe31d605f7ab361da003ad6e12.jpg)
.jpg.755c958712ae85167c559f6489eaa408.jpg)
.jpg.ebd12bd8dc085961b1353cd6b9dda3c9.jpg)
Model Shipways Essex and Confideracy
in Traders, Dealers, Buying or Selling anything? - Discuss New Products and Ship Model Goodies here as well!!
Posted · Edited by YankeeD
In terms of taxes and import nothing has changed yet. Only by end of this year and only then if no agreement is reached on forehand.
As far as I am aware that is.