HOLIDAY DONATION DRIVE - SUPPORT MSW - DO YOUR PART TO KEEP THIS GREAT FORUM GOING! (Only 51 donations so far out of 49,000 members - C'mon guys!)
×


BobG
-
Posts
3,109 -
Joined
-
Last visited
Content Type
Profiles
Forums
Gallery
Events
Everything posted by BobG
-
Otro maravilloso barco en miniatura de un maestro modelador de barcos. Estos pequeños modelos son verdaderas obras de arte. Yet another wonderful miniature ship from a master ship modeler. These small models are true works of art.
-
Great build log and a beautiful set of weights you have there, BE.
- 195 replies
-
- 1
-

-
- lady eleanor
- vanguard models
- (and 1 more)
-
Be sure to start a build log, Pete, this would be a very interesting build of a model rarely seen on this forum and you'll get a lot of helpful advice if you need it too from some very experienced modelers. Good luck on your build!
-
I forgot that the you can download the plans with all the rigging sizes indicated from the Medway Longboat Group Build forum. Go to the following link and select "rigging plans:" https://modelshipworld.com/topic/19248-download-the-chapters-for-each-part-of-the-medway-longboat-project-here/
- 66 replies
-
- 1
-
-
- Finished
- Model Shipways
- (and 1 more)
-
It will be a few days before I actually start planking the deck. I just ordered some 1x3 mm mahogany strips so I can have a mahogany margin plank to start with too. In the meantime, I hope I can get a good, card template of the deck made with the joggling before I start laying down any deck planks. I'd rather erase pencil lines than rip off planks! I'm going to play with it a bit and see what kind of layout I can come up with. I've also been looking at as many photos of the Pen Duick 1 that I can find on the internet. I can tell now that, although the AL kit can certainly make a very nice model, it's not completely historically correct. For one, the AL model only has about 1/2 the total number of deck planks that the real sailboat has on it. I thought about using 1.5 mm wide planks which would effectively double the number planks on the model but then I think the joggling would become a nightmare. I'll stick with the 3 mm wide planks. You can see how there are many more deck planks on the Pen Duick I than the kit has: The sequence of some of the build steps puzzled me at first. Typically, one would think that after the false deck is glued on and the bulkheads have been faired, you would then attach the bulwarks and plank the hull before planking the deck. I'm not sure why the AL instructions have you plank the deck before adding the bulwarks and the hull planking. I think I will follow the AL sequence, however, since it seemed to work the two build logs here on MSW that I have read. I guess I could begin assembling some of the deck structures while I'm waiting on the mahogany strips to arrive but, for now, I'm going to go and make some rustic bread... 🥖
-
I just finished the Medway Longboat and I can give you the various rigging line sizes if you need them.
- 66 replies
-
- 1
-
-
- Finished
- Model Shipways
- (and 1 more)
-
Very nice work, Joe. She's looking excellent!
- 140 replies
-
- 1
-
-
- benjamin w latham
- model shipways
- (and 1 more)
-
Don, I wish I could be of more help but the actual time I spent aboard the Calypso was only an afternoon way back in 1969. So I really don't remember specific details like the use of the hoist. I think you've made a good hunch about how it would be rigged. I wonder if there is a Calypso museum or association you might be able to contact for more information? I was stationed at the US Coast Guard Captain of the Port Los Angeles/Long Beach and only spent several hours one day discussing a LORAN program for responding to nautical emergencies at sea. We wanted the Calypso to be a part of it and they welcomed the idea. Anyway, spending time talking with Jacques and others onboard the ship was very special for me since I admired Cousteau and the Calypso so much for their work in promoting the education and conservation of the world's oceans and sea life. Congratulations again on your wonderful model and I look forward to seeing you work on your Medway Longboat. All the best,
- 36 replies
-
- 5
-
-
- calypso
- billing boats
- (and 1 more)
-
I'm a latecomer to the ship modeling party and time is not on my side either. I'd need another lifetime to build all the models that I find are so interesting to me. Then there's always the question that my wife asks me that I need to consider, "So where are we going to put it." There's still a little bit of space in the house since I only have 3 completed models on the shelf currently but I've got 9 models still in their boxes. I'm about to put a few of them up for sale if I can bear to part with them. Are you sure that you don't need to adopt another orphan....? 🤔
-
Thanks very much for this information and link. That's a very interesting story of Ken Greenwood building the Tehnoart model of the Endurance and then eventually donating it to the South Georgia Island Museum. It's too bad that Tehnoart is no more. I would have purchased that model kit.
-
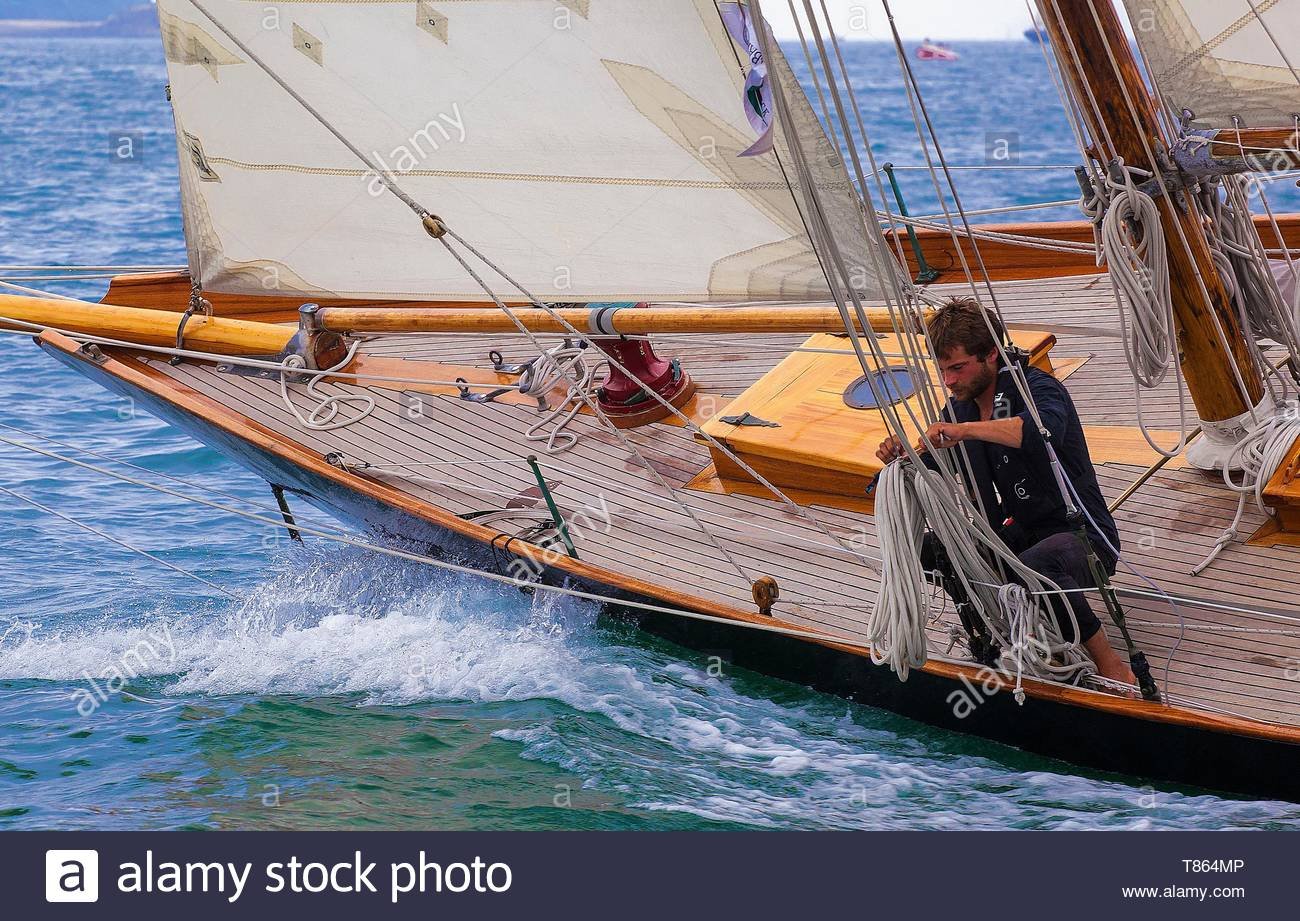
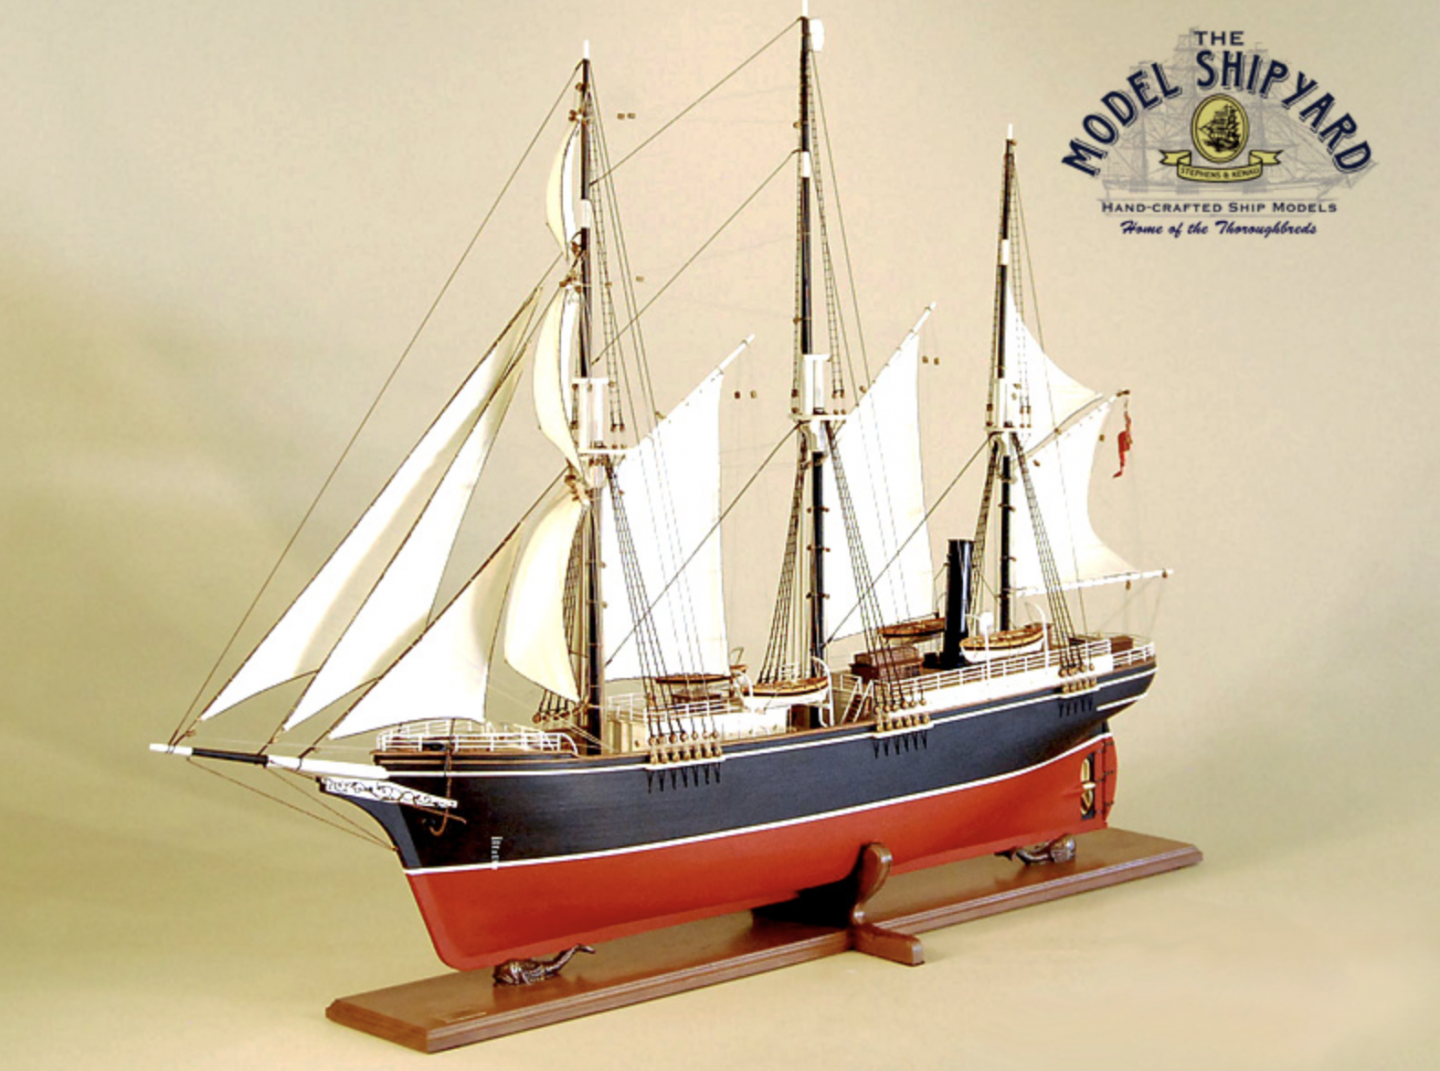
I knew this ship was not something you would be passionate about but I just thought I'd throw the idea out there just in case you got bored some years down the road! I'm relatively new to ship modeling but I have found, like you, that it's important to have a very strong interest in the history and stories of the ships I choose to build and the Endurance is such a ship for me. I've searched the internet to no avail trying to find a wood kit of her. The model of the Endurance in the photo I posted is not from a kit. It is a custom, hand crafted model from designer builders, Stephens & Kenau, located in the Mossel Bay Maritime Museum in Mossel Bay, South Africa. https://www.stephensandkenau.com/ship/endurance/ I'm looking forward to all the models you have lined up to come. I'm currently working on the Pen Duick by Artesania Latina and the poor instructions make me really appreciate even more the high quality kits you are producing. All the best,
-
Beautiful, Don, you did a fantastic job on her! The Calypso is one of my favorite ships ever and you've certainly done her justice. Jacques would be proud of your model.
- 36 replies
-
- 4
-
-

-
- calypso
- billing boats
- (and 1 more)
-
You take on the most interesting orphan models to build, Mike. I'll be following along on this interesting project.
-
I'm really happy that you decided to add the two wonderful fishing vessels to your line of kits and it seems that will be very busy with 6 more kits already in line next. I would love to see you consider making a kit for Shakleton's Endurance someday. Surprisingly, I don't think there has ever been a wood kit made of her. I believe a high quality kit of the Endurance would be extremely popular since It is such a legendary ship and the true story of her tragic voyage is so compelling. Not only that but she is a beautiful ship as well. She would certainly diversify your line up of kits too!
-
I hear you, Justin. It's such an important step in laying the foundation for the planks and to get a correct hull shape. I think this is one of those modeling skills that simply comes with more and more practice.
-
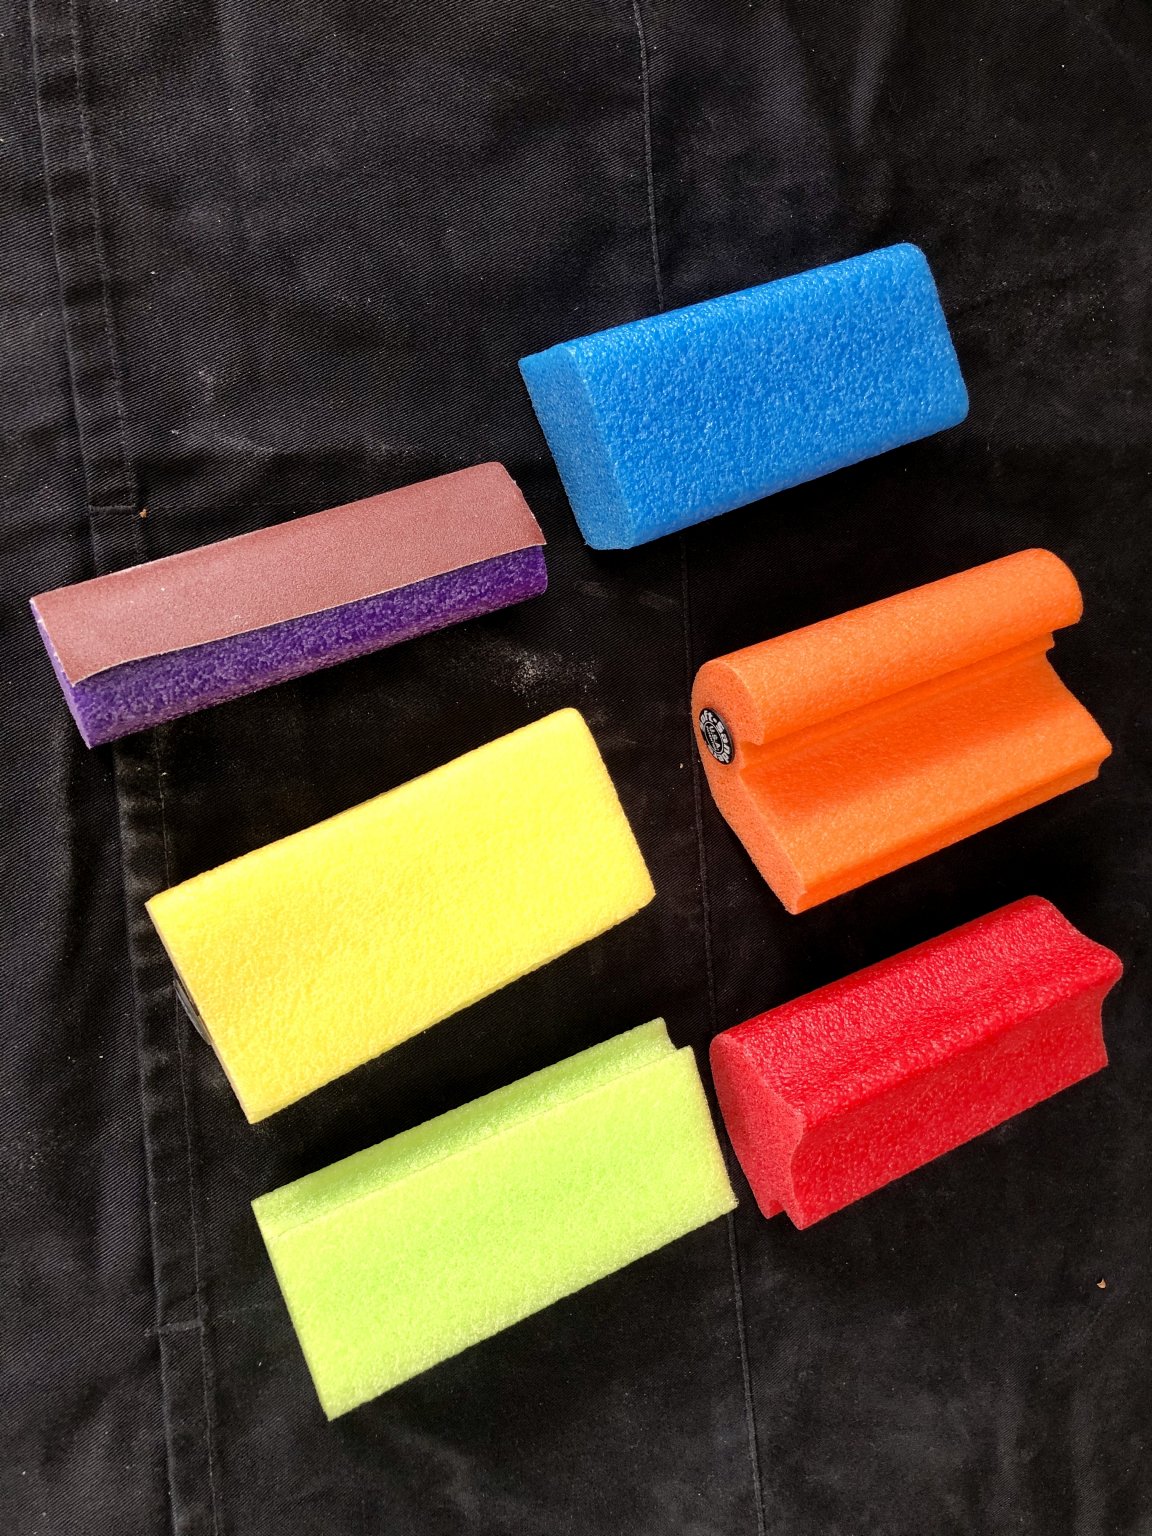
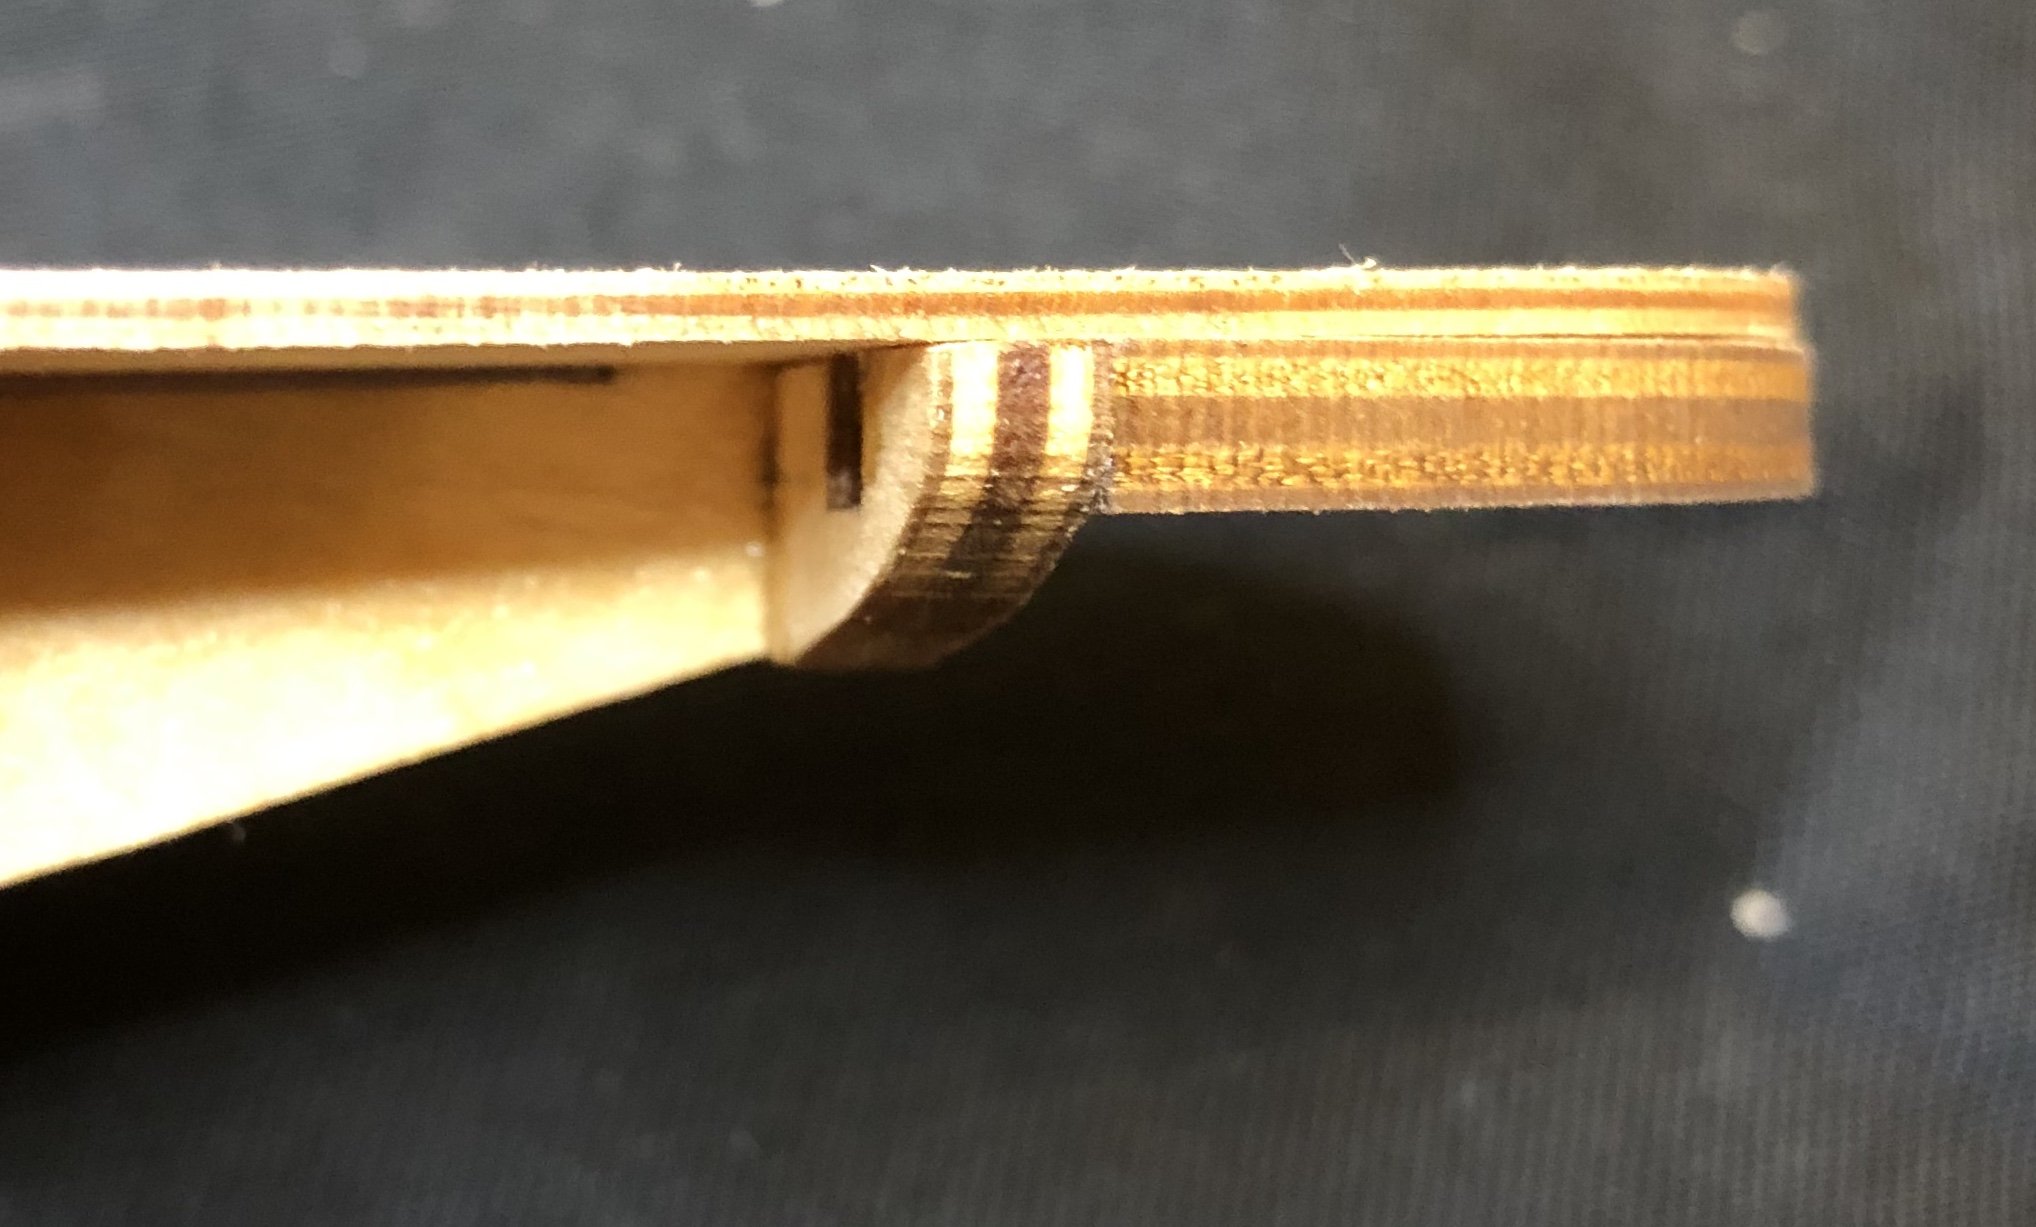
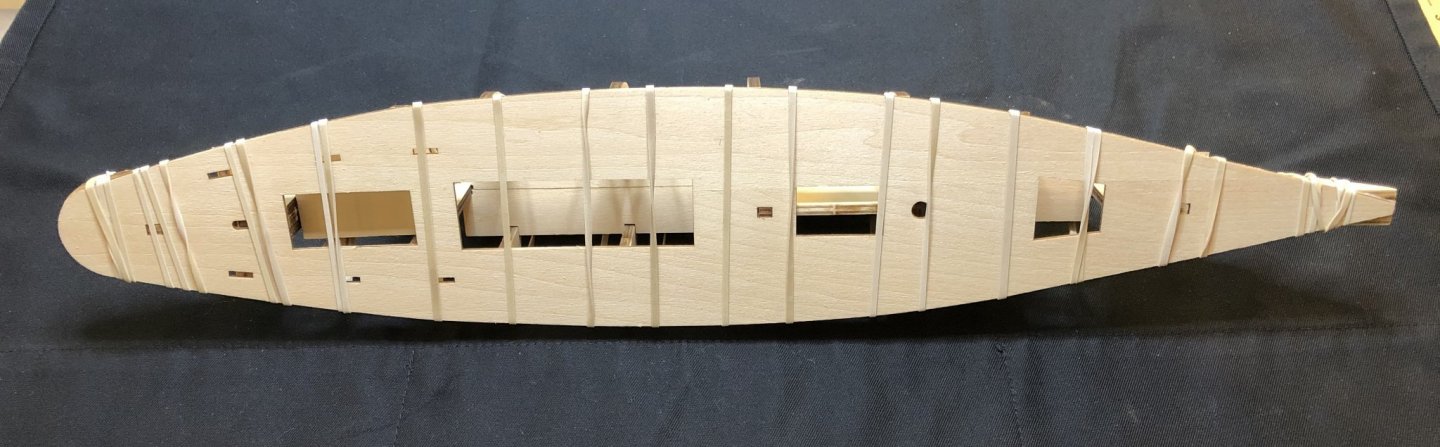
I finished fairing the hull today. I'm always unsure of this process though and I hope I did a good enough job on it. I probably spent a 7-8 hours in the past two days sanding and checking and sanding and checking. I went slowly using 120 grit sandpaper on the Soft-Sander blocks that I recently purchased. I used a plank to lay across the bulkheads regularly to check for high and low points as I was sanding and I sighted down the hull from different angles to try and see if the hull shape looked symmetrical. It looks fair to me when I sight down the keel and it feels fair and symmetrical to my hand but I'm still not sure if I may have overdone it or it may still need a little more sanding. We'll see how it goes once I start planking. I really like the Soft-Sander blocks. They are very light and comfortable to hold for long periods of sanding and they conform nicely to curves and various shapes. They are stiff enough to sand precisely but have some give to them so the edge will not gouge. They use adhesive-backed sandpaper and it was easy to put it on the blocks and peel it off. I bought the 5" length block set that has 6 different shapes and comes with 6 pieces of adhesive-backed sandpaper in grits from 80 to 2000. They also come in 8 and 11 inch block sets. I only used 120 grit for the fairing with the yellow and purple blocks. I got this set on Amazon: https://www.amazon.com/Style-Line-STY0701-Piece-Sanders/dp/B002XMOX3I/ref=sr_1_6?crid=1M0E8L0AXZT8T&dchild=1&keywords=soft-sanders+flexible+sanding+blocks&qid=1589766325&sprefix=soft-sander%2Caps%2C210&sr=8-6 I like them so much that I ordered some more adhesive-backed sandpaper in various grits from the manufacturer's website. They also sell the sandpaper in rolls. https://www.shop.softsanders.com/main.sc I used the yellow block the most and the purple blocks worked well for the more pronounced curved areas. You can see the sandpaper attached to the purple sander below:


-
Hello Rici, I have begun building this model and have started a build log. It would be great if you would like to follow my build. I'm sure I will have a lot of questions and you might be able to give me some good advice and steer me in the right directions if you see me going off course. Any and all advice would be very much appreciated and welcome.
-
This ship just keeps getting better and better! 👍👍👍 from me for a Winnie cross-section. I would love for it to have the main mast and rigging with it too or at least as an option.
- 1,784 replies
-
- 3
-
-
- winchelsea
- Syren Ship Model Company
- (and 1 more)
-
I think William would look quite regal wearing a tricorne!
- 195 replies
-
- 2
-
-
- lady eleanor
- vanguard models
- (and 1 more)
-
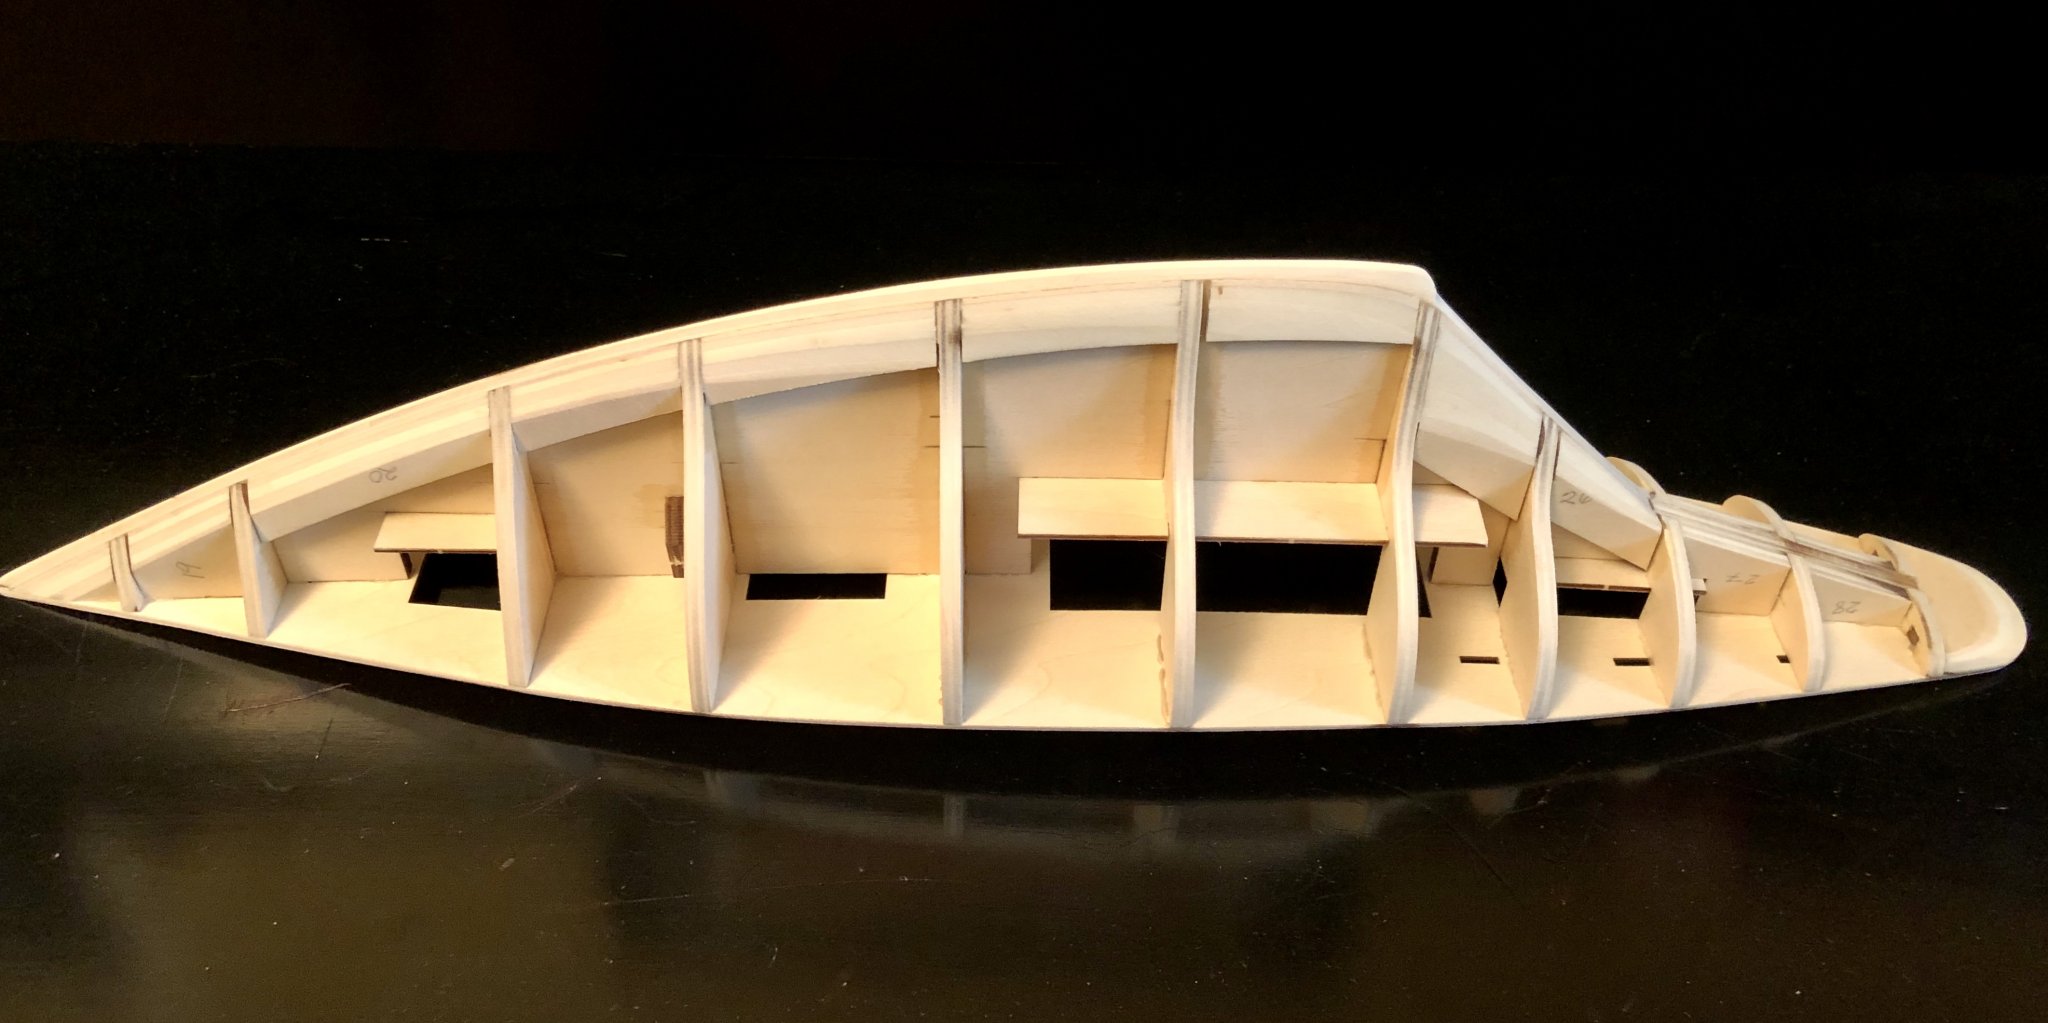
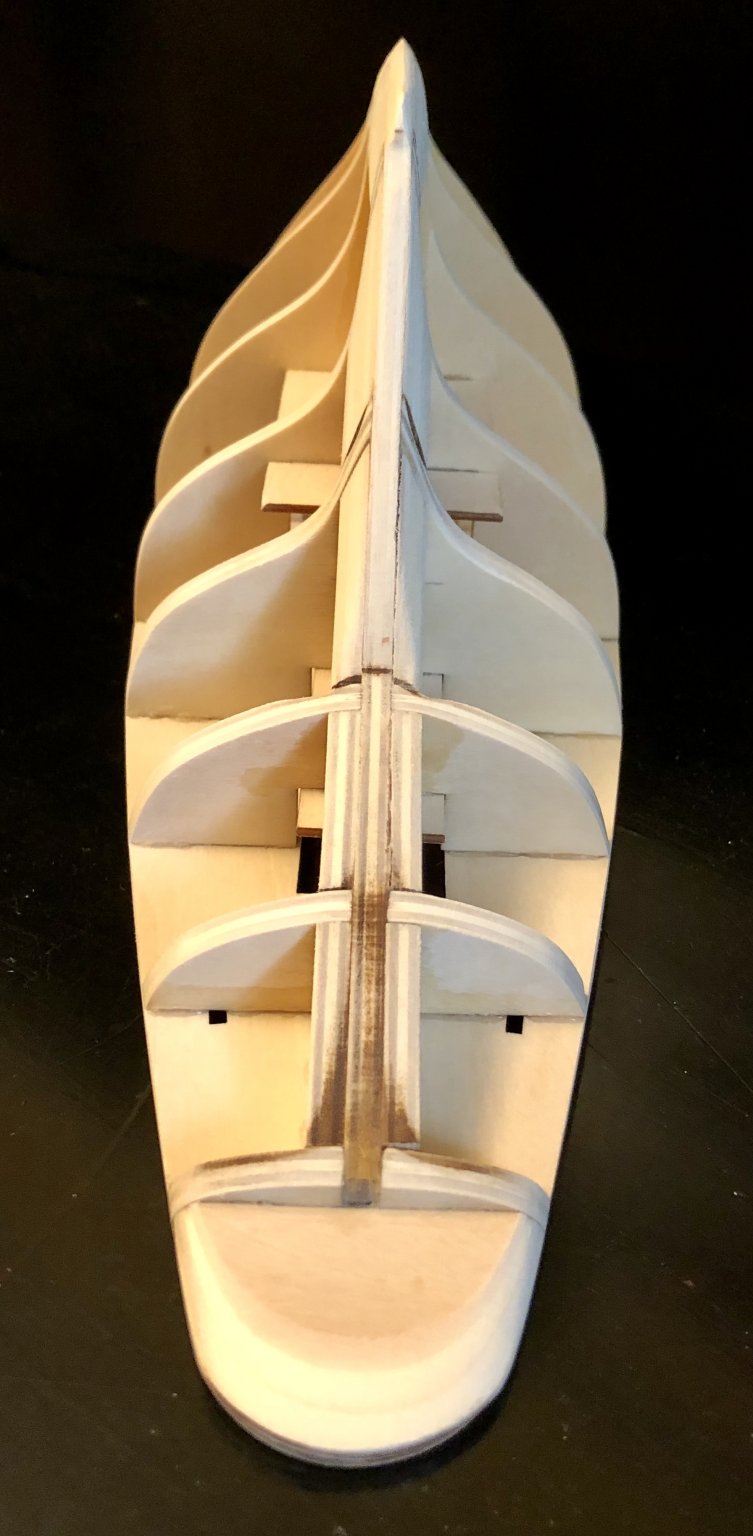
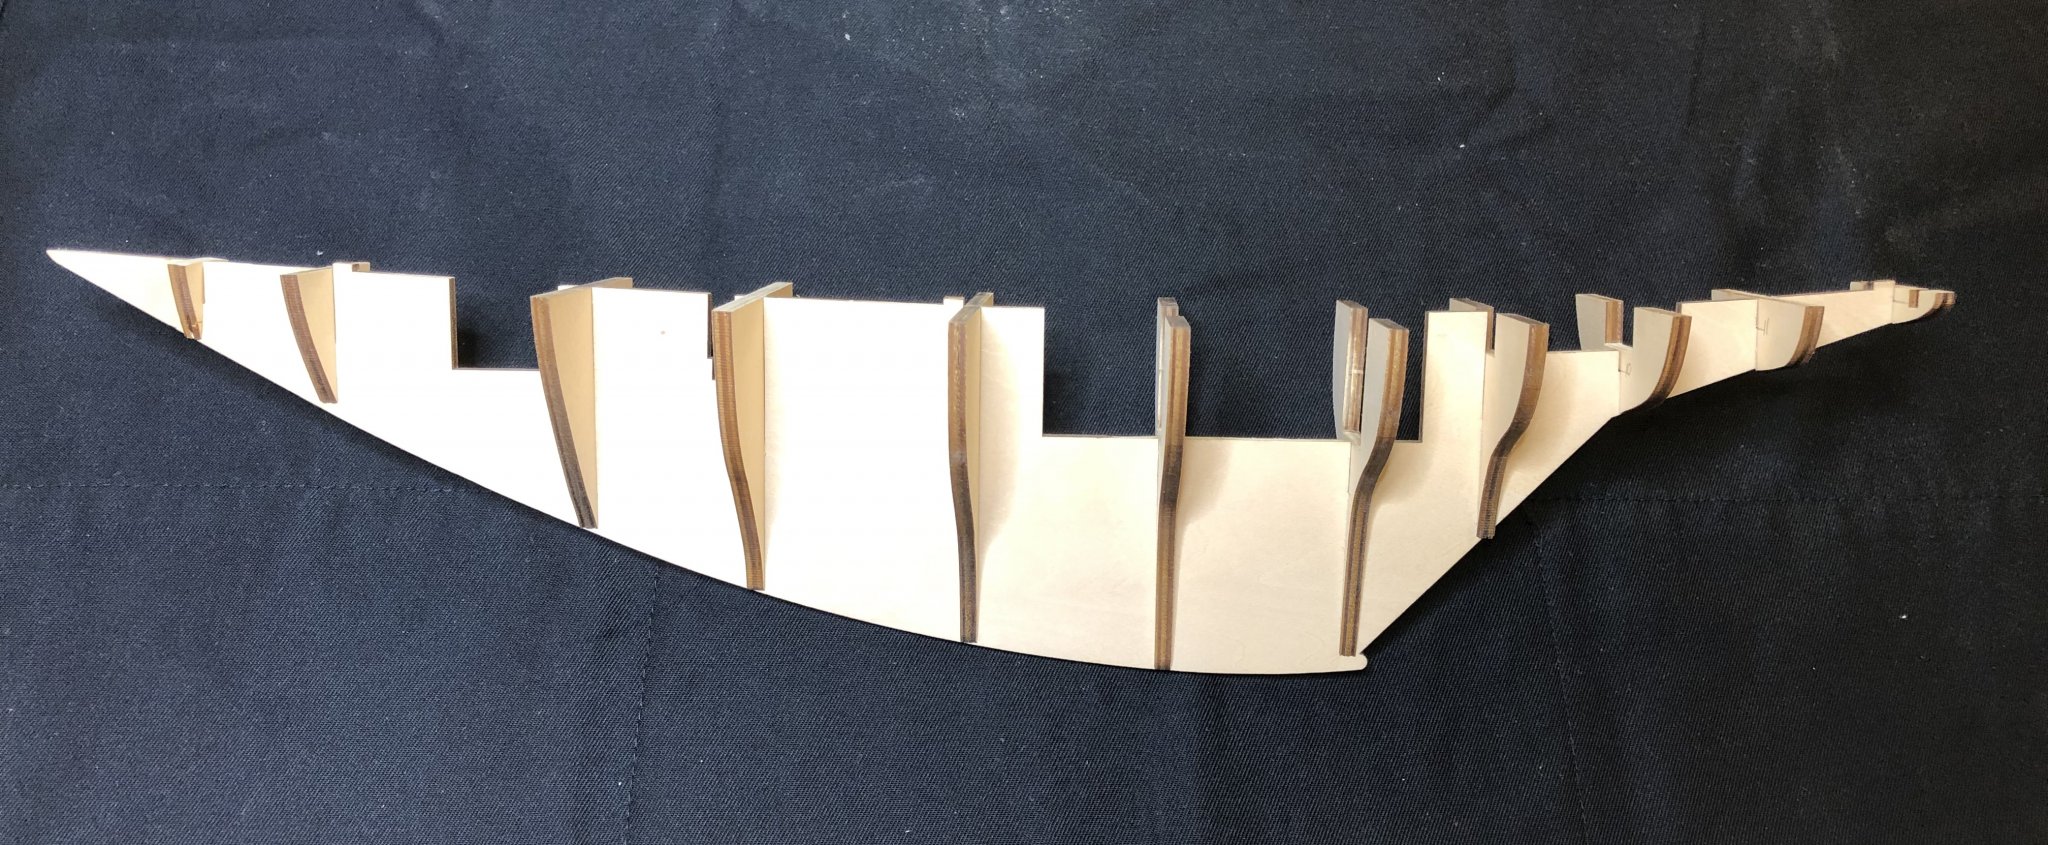
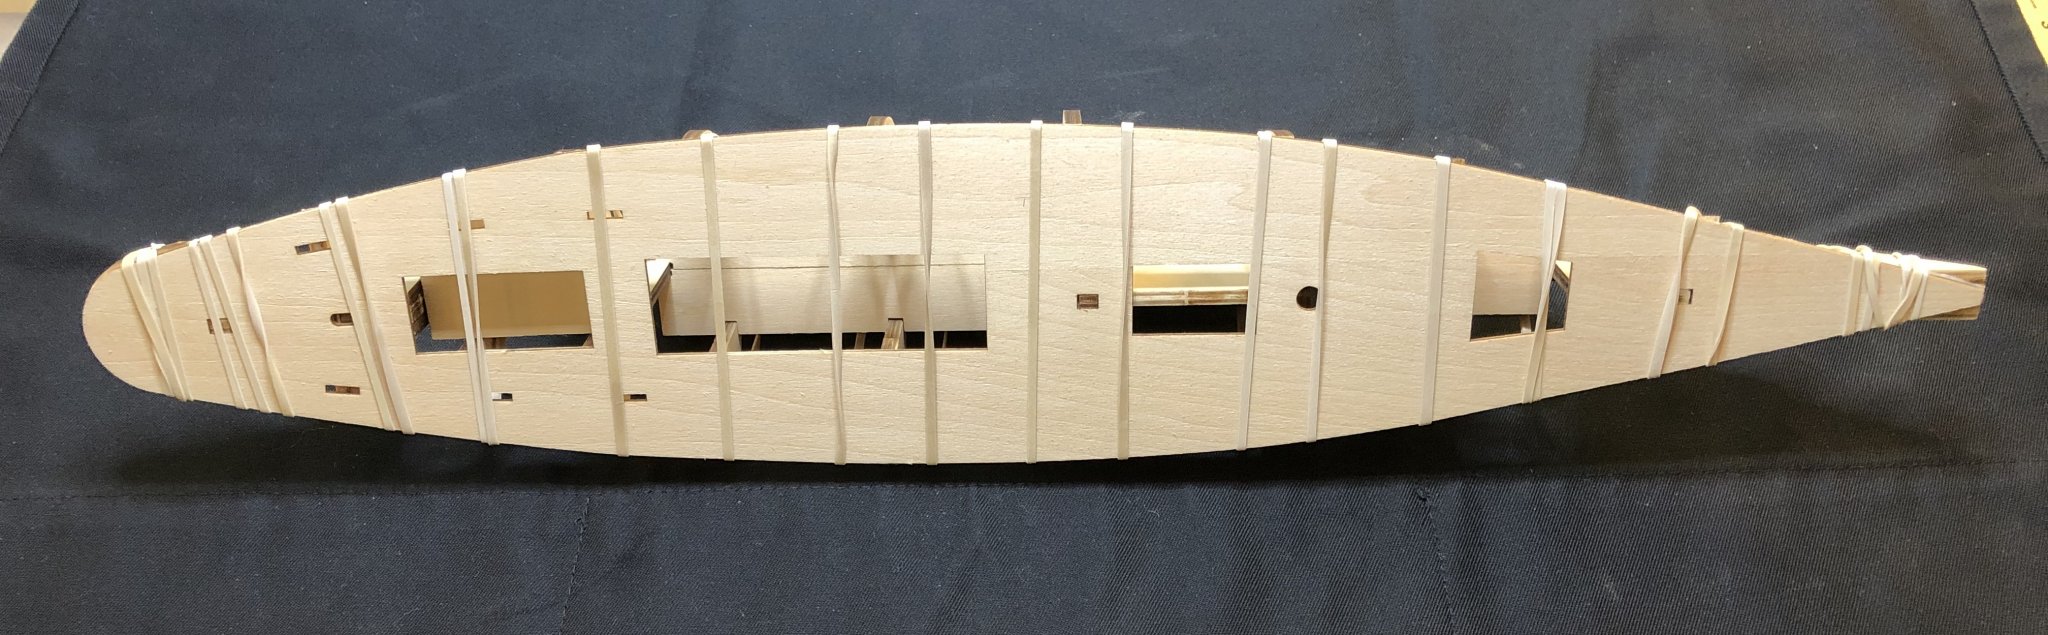
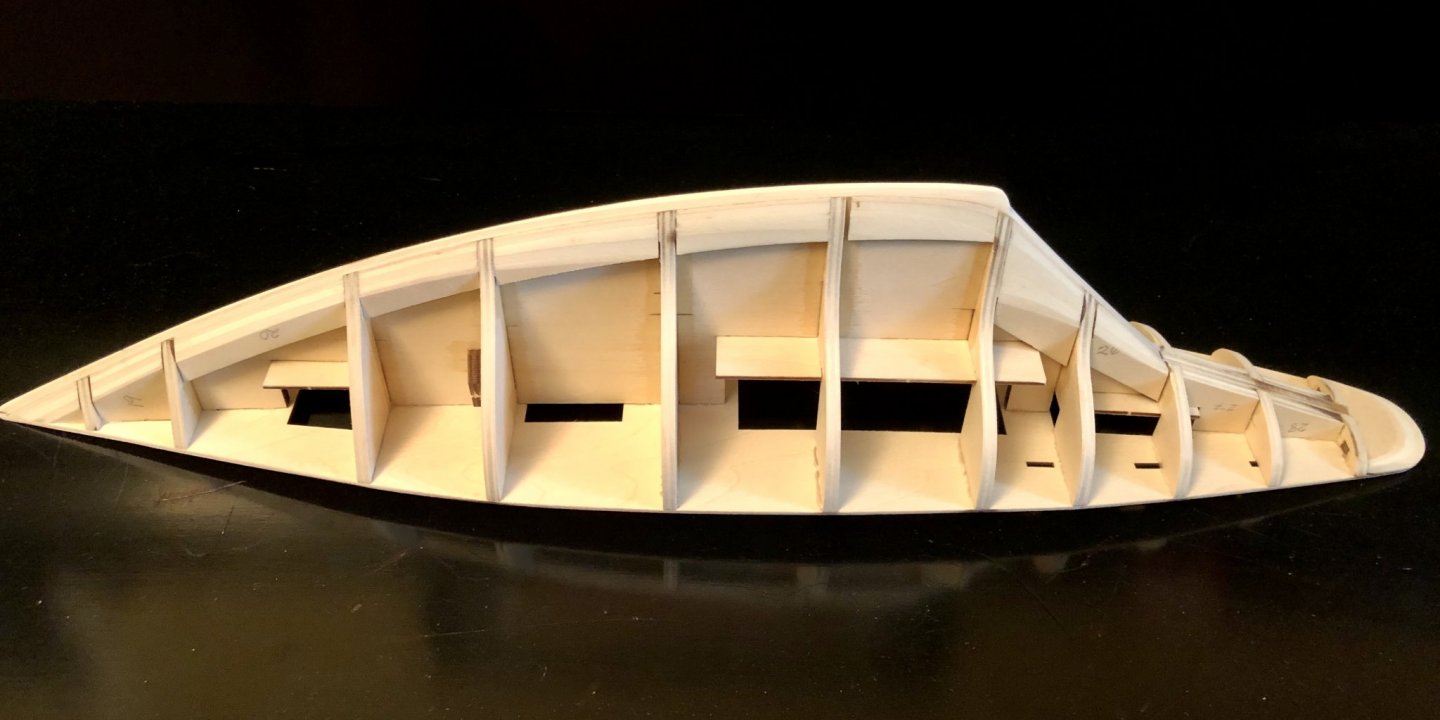
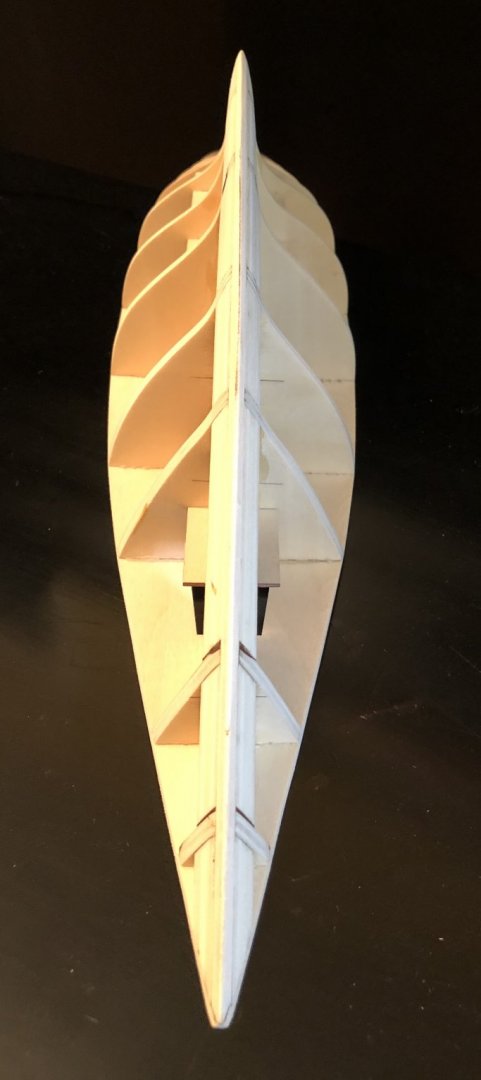
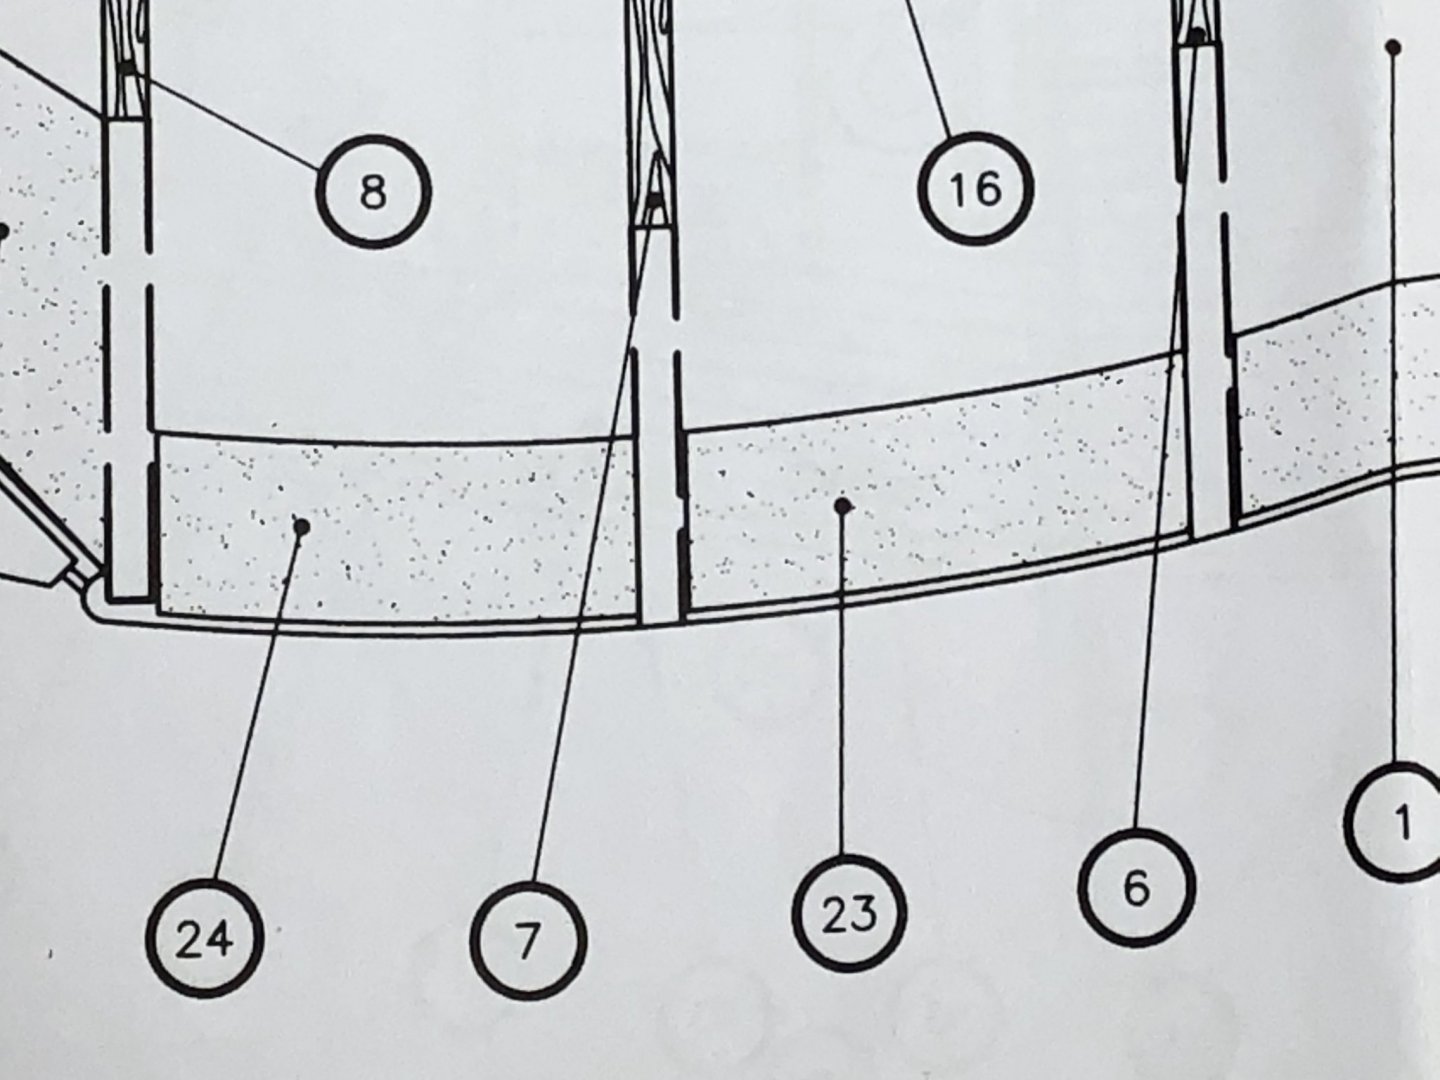
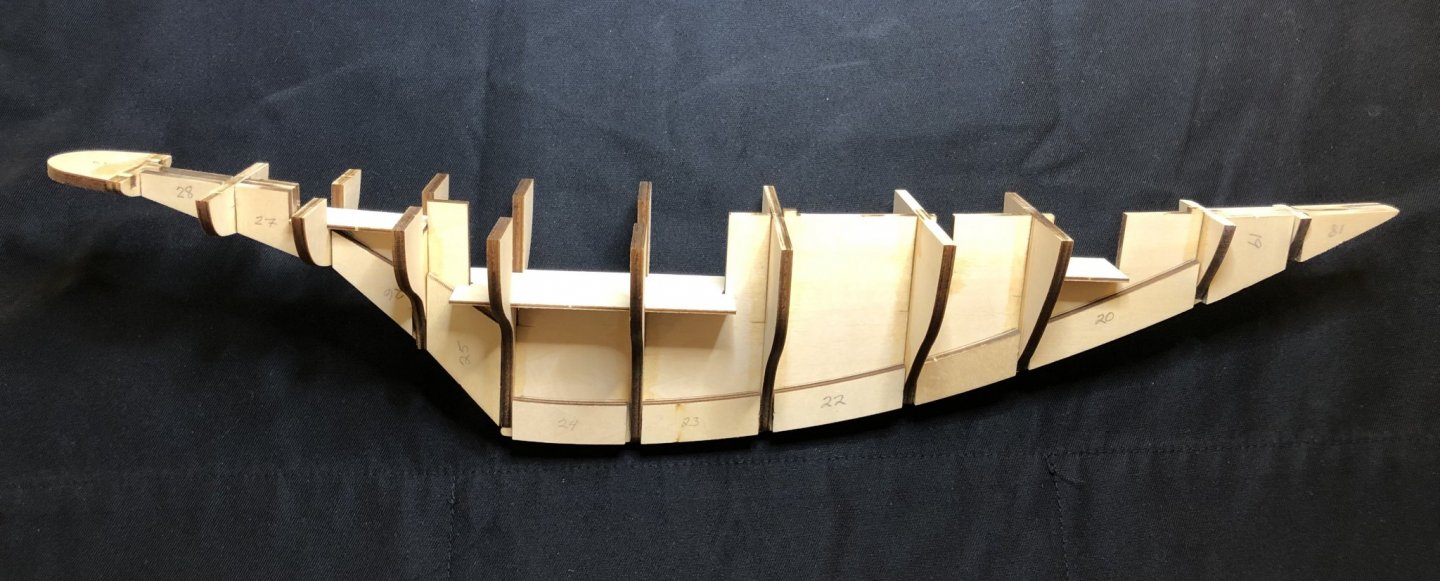
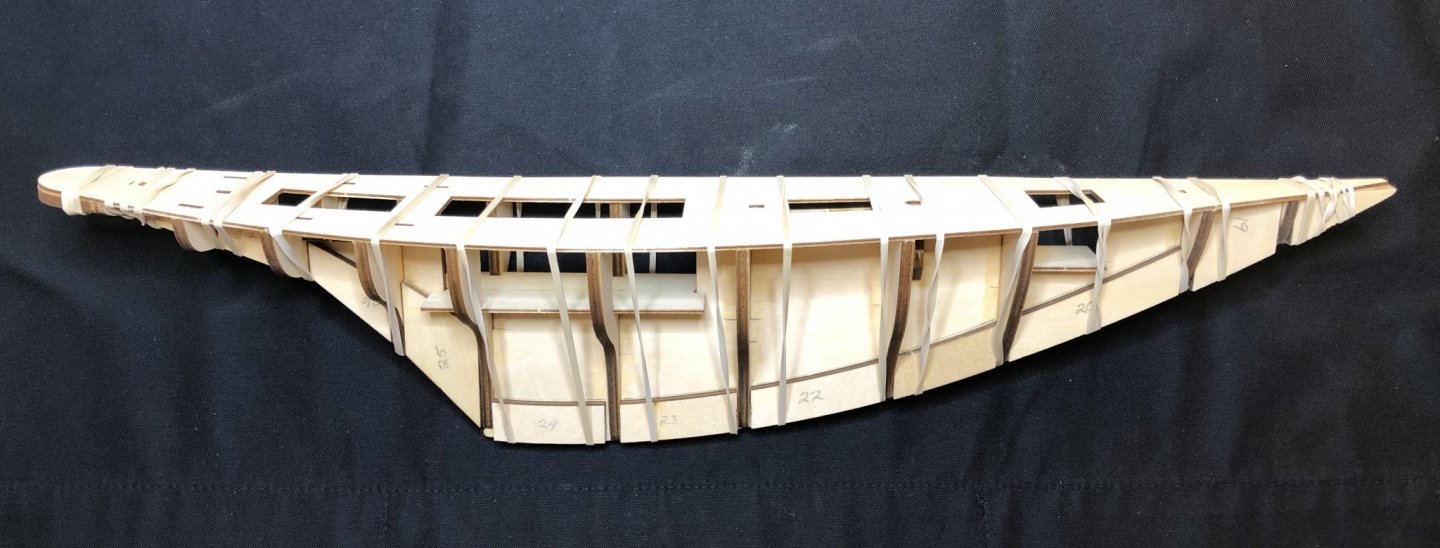
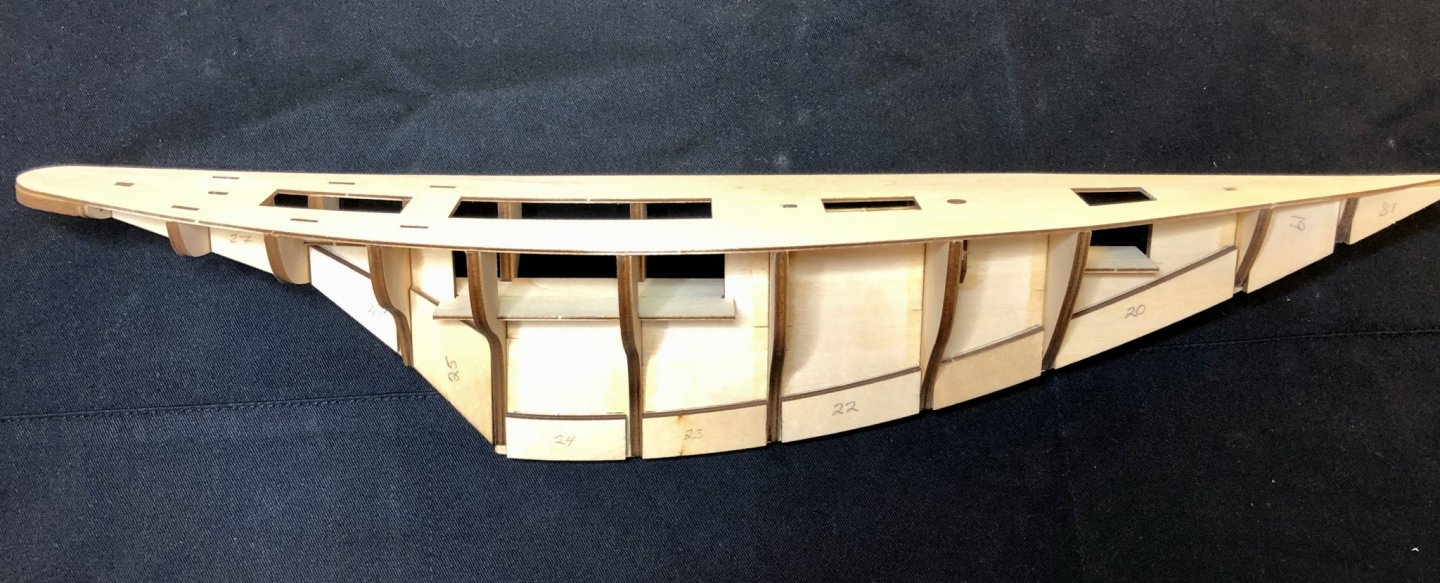
I carefully filed the slots on the bulkheads and the keel former until I was able to get the bulkheads to seat completely down in the slots while dry fitting them. Only bulkheads #9 and #10 needed to be squared up and clamped for gluing. All the others were a very tight, square fit. I used thin viscosity CA so it would seep into the seams of the bulkheads since they were such a tight fit. I then dry fit the deck onto the top of the bulkheads and keel former so I could insert the horizontal fantail piece #13 into the two slots on bulkhead #12 at the correct angle. Then I tacked it in place against bulkhead #12 with a spot of medium CA. That held it at the correct angle and then, after removing the deck, I used thin CA so it would run down into the seams as I held it firmly in place. That worked really well and made a strong bond on this rather fragile area. Next up was to glue in all the keel stiffeners between the bulkheads. Take care to study the plans and notice that the not all of the stiffeners are flush with the bottom of the keel. Only the first two stiffeners at the bow and the stern are flush with the bottom. All of the other stiffeners have a 1 mm space between them and the bottom of the keel or sit at odd angles. Guess why I know that...?!! Luckily, I only had to remove 3 of them with isopropyl alcohol and then glue them back in place correctly with CA. Note to self: Make sure to study the plans more thoroughly before proceeding! I also glued the subdeck floors in place I dry fit the deck and it was a good fit so I used white glue attach it and held it in place with rubber bands. The deck plate is very flexible so it was easy to form it to the shear of the boat and, after letting it set for a few hours, I removed the rubber bands and it formed a very solid structure for the fairing and planking to come. The keel area is quite thick with the stiffeners in place so it looks like there will be quite a bit of sanding to get a fair run for planking yet to come. Since this is a sailboat that was made for open ocean racing it will have a rather V shaped hull that narrows sharply at the bottom. I've just started that process and will make another post when I've completed a bit more. Thanks for taking the time to take a look at my build log.


-
It's time to update my build log. I have been able to get the build started and, after spending quite a bit of time studying the plans and trying to get as much as I could from the very brief instructions, it has been going fairly well. Harry, who goes by hof00 on this forum, has been extremely helpful in answering my questions and sending me photos of his beautiful build of the Pen Duick. You can read his log and our current conversation here:
-
Good looking assistant you have there BE! Watching you start this build has gotten me thinking more about the Zulu Lady Isabella model Chris now has also. So watching you have so much fun with this model has convinced me to go and place my order and the Flirt will be another I'll order up when she's available. One can't have too many projects to look forward to...at least that's the way my thinking seems to be!
- 195 replies
-
- 2
-
-
- lady eleanor
- vanguard models
- (and 1 more)