


ccoyle
-
Posts
10,558 -
Joined
-
Last visited
Content Type
Profiles
Forums
Gallery
Events
Everything posted by ccoyle
-
If you look through the galleries and build logs here, you will find many examples of nicely done plastic models. The two media, plastic and wood, require slightly different skill sets, though certain modeling tasks, such as tying ratlines, will be the same regardless of medium. If you feel more comfortable working with plastic, there's certainly no compelling reason to not continue working with it. Of course, wood is nice too and rewarding in its own way. There's really no correct answer to your question that applies to very person equally. Perhaps try both and see which one you like better?
-
These are highly simplified kits done at scales that are often difficult for beginners to manage. I find them to be more of a novelty than a serious project. Or something suitable for kids. As always, your smileage may vary.
-

Shopping on eBay: A Primer for Newbie Ship Modelers (Parts 1 and 2)
ccoyle replied to ccoyle's topic in Wood ship model kits
That is something to consider for foreign transactions in general. However, I have purchased from the seller in the example and received the kit in good order and with English instructions. As I said, I mainly included that example to show that there are some less well-known sellers who are, in fact, making the effort to be competitive purchasing options and not just trying to sell second-hand merchandise at ridiculously unrealistic prices. As always -- buyer beware! -
Great suggestion, Frankie. I got hold of a short piece of braided copper wire and will try something similar, but it will have to wait until after I finish my current project.
-
Old model shipways USS essex (solid hull)
ccoyle replied to Mike Esposito's topic in Wood ship model kits
As a rule of thumb, I would leave any of the old "yellow box" Model Shipways kits for the collectors (unless it was the lumber schooner Forrester -- I have my weaknesses). Bob's observations above are spot-on. -
Looks great! Sounds like one of the walnut billets has a little bit of discoloration. I suspect that most of those parts will end up being painted.
-
Try telling this to all of those delusional eBayers trying to sell their "vintage" kits at premium prices! 😝
-
Great videos! Too bad I don't speak Russian. Interested modelers can really see your approach to LOTS of hull frames and assemblies that lock up very tight and precise. Thanks for sharing!
-
It looks like you are looking for a small schooner or cutter?
-
I saw your dory in the gallery -- it looks very nice. Good luck with this project!
- 60 replies
-
- 1
-

-
- mary taylor
- solid hull
- (and 2 more)
-
The answers are yes, yes, and don't worry about it too much. Yes, I know that there were only two questions. Recalculating is a part of the process. Usually it is done with each plank within a band, so that the allotted number of planks fills the desired amount of space, but there's certainly no harm in recalculating the widths of the remaining bands. Use a stealer if and when a taper results in a plank end being less than half of the original plank width. Now, the "don't worry" part is in regards to this being the first layer of planking, which will be hidden beneath the veneer planking, so no one will be wise to whatever technique you use on that layer. In fact, for maximum hull strength, you don't want both layers to be tapered exactly the same way anyway (which would be difficult to do in any case) -- the veneer planks should overlap the joints between 1st-layer planks. You are doing great so far -- keep it up!
-
Hey, Mike. I can't speak to the quality of the Dumas kit, but I have built two from Midwest, including the flattie that Ron mentioned, which is an awesome kit and about as foolproof as any beginner's kit can be. It can certainly be had for under $50 on eBay.
-
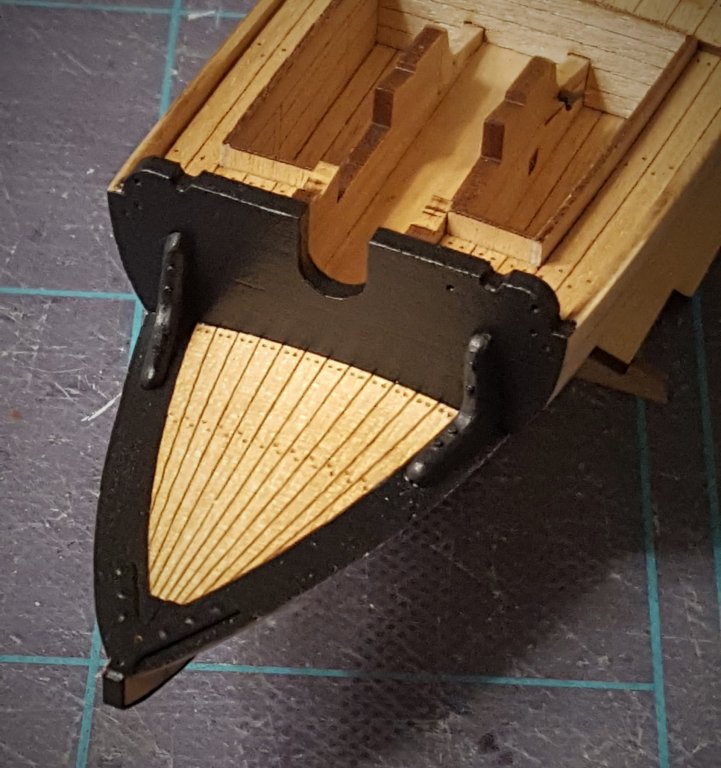
Okay, just a brief update to show that I AM making some progress. I don't get very far because my modeling schedule usually looks something like this: Day 1: fabricate a part. Day 2: finish the part that I started on Day 1. Days 3-5: no activity in ship yard. Day 6: install the part that I finished on Day 2. Day 7: no activity in ship yard. Day 8: repeat Days 1-7 for the same part on other side of the boat. At least, that's how it went for the knees shown in the attached photo. Onward!
-
Concerning the painting, and you might not like this idea since you are a Brit, but I've been waiting for someone to build this particular model in her hypothetical American colors. As I recall, she was captured by us Yanks but never put into service. Had she been taken into service, she might have worn the typical American black hull, white gun port stripe, and green bulwarks scheme, which is quite attractive. She may even have been coppered. Just a thought!
-
Scientific is a long-since defunct company that produced solid hull kits. They were good enough back in the day, but are hopelessly dated compared to more recent kits in terms of materials and design. Personally, I would avoid them. What kinds of ships appeal to you on a visceral level?
-
I believe you are both correct! As Mike points out, with experience comes less reliance on written instructions, but novice builders certainly benefit from them. It largely depends on who is buying the kit! I think, though, that there has been a trend in recent years towards manufacturers providing better instructions in kits, which is good. But there's still plenty of existing kits in circulation with bad instructions, and in some instances a manufacturer may not feel that upgrading the instructions is worth the effort on their part. Having worked in the printing and publishing industry, I suspect that part of the problem there lies in the fact that the lion's share of any printing costs stem from the initial set-up, and the longer a print run is, the more the cost per item decreases. Thus, a manufacturer probably gets many more instruction booklets printed than he will use in an initial production run, and once having gotten them printed is not very likely to get them reprinted prior to a subsequent run. A far worse sin, in my view, is for foreign manufacturers to not have their translated instructions proofread by a native speaker of that language. It's a simple matter to do, and there's probably any number of native speakers who'd be happy to do the job. Enjoy your new model kit, and I hope we may see it on your workbench in the not-too-distant future!
-
Then I think this model would be a viable choice for a second model.
-
Great work so far! And I love the natural light you receive in your work area there -- makes my modeling area look the depths of a cave in comparison.
- 128 replies
-
- 1
-
-
- panart
- anatomy of the ship
- (and 1 more)
-
Based on the instructions included in other Victory Models products, I would say yes, with the caveat that Granado is not necessarily an easy model. If this is intended as a first model, you might want to start off with a simpler project.
-
Looks like the strip wood and dowels are all there. For 60 euros that would be an incredible steal (let me know if you're not interested). But I'm also somewhat cautious by nature, and I would be curious why the seller didn't notice that the supposedly missing material is in fact there. The stuff is pretty easy to spot in the photos.
-
Hello and welcome! I saw your post on FB and was hoping that you would ask your question here, as I think you are more likely to get a response. I'm not intimately acquainted with AL's product line, but I'm not aware of any updates or modifications having been done with this kit. It does date back a ways. Probably the only difference between the two kits in the above photos is the box art. Newer AL kits do, I believe, include photo-illustrated instructions, so it's possible that Harvey has been updated in that respect. Cheers!
-
Does the model feel very light for its size? A lot of model kits from the 40s and earlier included solid hulls carved from balsa.
-
Serge, have you tried sending him a private message here? He checks in regularly.
-
The fittings appear to be untouched. This kit regularly retails in excess of US$400. If the owner is only asking $60, then you can buy a lot of very nice strip wood and dowels with the savings! Heck, you can even replace it with some upgraded wood, e.g. Swiss pear, cherry, boxwood, etc.
-
Internet translators have improved greatly in recent years.
