


Landrotten Highlander
-
Posts
269 -
Joined
-
Last visited
Content Type
Profiles
Forums
Gallery
Events
Posts posted by Landrotten Highlander
-
-
Hi Jim,
it is quit clear to me that you have mastered the skills required to create beautiful paintings.
I enjoy the individual atmospheres you create, dispite the fact that your subjects are restricted to a single topic. On a more technical note, the last two paintings have enabled me to understand and/or appreciate the tips I once received about using the structure of your canvas to help you with your story (looking at the waves and the way you suggest foam).
Thank you for showing us / letting us enjoy your talent (even if it is silently for the most part).
Slainte
L.H.
-
3 hours ago, jablackwell said:
L.H.,
That was very helpful to note the 120mm scale.... I hadn't searched for that specific term, but was looking more for "1:16" or 1/16. A lot of figures have popped up, so I should be all set.
Something about scales does seem a little odd.... a 120mm tall individual (if that is what this means) would be some 6'4" tall.... a pretty tall pilot. Perhaps the 120mm is referring to something else?
Build status: wheels on. Engine on. I am working on the cockpit coaming. Eventually this will be on a diorama for display.
~john
Figure painting is another of my hobbies.
The following most common sizes generally correspond with these scales:
54mm ==> 1/32
75mm ==> 1/24
90mm ==> 1/18
120mm ==> 1/16
but this is by no means always exactly the case: I have some in my collection that were advertised as 54mm but are measured to be closer to 60mm.
A 120mm figure would represent a person of 1m92, and I agree this is tall for your general pilot.
If you think 120mm is too large then consider 90mm - I believe there are more options available in that scale.
Slainte
L.H.
Edited: P.S. you can also consider putting a bust next to it, although I think most in that format are WWII era - and Manfred von Richthofen, but he would be better with the Fokker DR.I
-
I know of German pilots and a British army offier in this scale.
Did you search for 1:16 scale, or did you also try for 120mm figures (this is the same scale)
L.H.
-
-
1 hour ago, savo1 said:
What vessel is this, Savo?
- oneslim, jud, FrankWouts and 5 others
-
 8
8
-
1 hour ago, amateur said:
Now I start wondering: how did this machine actually work?
I though it was somethink like the modern machines, with a number of scoops mounted on some kind of belt, but that wouldn fit on these large wheels, so.... could you explain?
Jan
The scoop was man-powered. People got inside the wheels (bit like mad hamsters) and spun em round to get the scoop to raise and lower as was needed
-
-
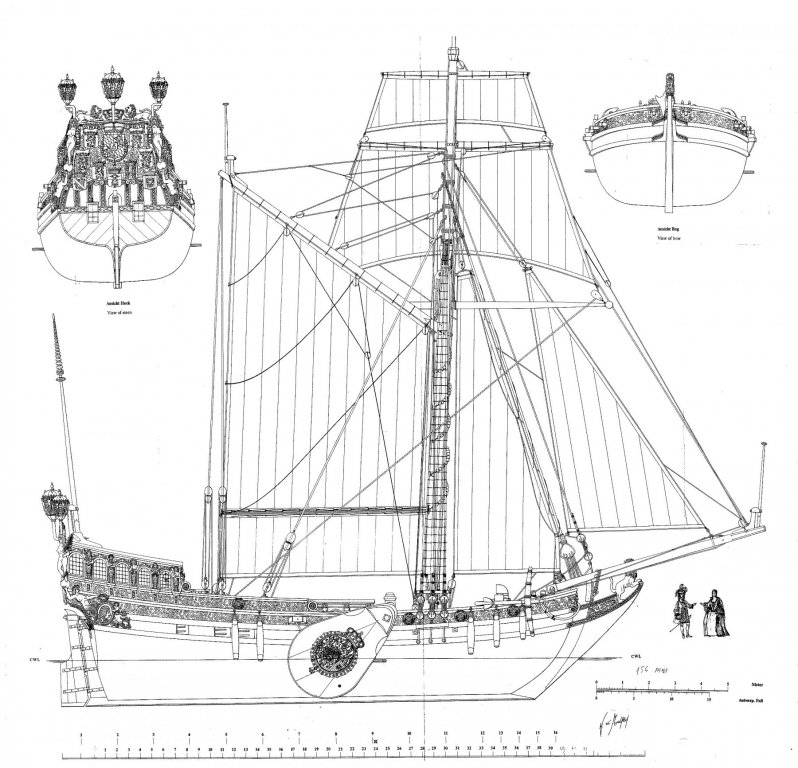
On 19/07/2017 at 6:16 PM, Mumin said:
Hachette in Italy just anounced partwork "La Belle 1684":
http://www.costruiscilabelle.it/
if I understand correctly, "tecnica dell'arsenale" means "admiralty model"
Looks to me they are using this as a basis for their model:
Slainte
L.H.
-
-
would it improve your jig if you were to put guides along the wood near the number 1?
When I see this jig, I almost instantly think 'good idea, but how can you ensure that when you move the bottom part, you move it perfectly in line'?
Hope I make myself clear - if not, please don't hestitate to ask.
Slainte
L.H.
-
Hi Druxey, could you PM me his address as well? I am keen to get a similar set.
Slainte,
L.H.
- Keith Black, Nirvana, BETAQDAVE and 1 other
-
4
-
On 25/02/2017 at 10:23 AM, puckotred said:
Anyone know if there is anywhere in europe one can get these kits?
I bought my kits directly from http://zootoyz.jp/ . Communication can be done in English, payment is easy. The only thing to take into consideration is customs in your country (had to pay extra when it arrived in the UK).
Hope this helps.
Slainte
L.H.
-
Just noticed this thread, so inclined to give my thoughts.
I am working on one of their mini kits at the moment. Also have one of their larger kits waiting on the shelf. I preferred the typical Japanese ships they offered over the more European / Modern kits - but that may be just my taste.
Lovely wood (Japanese Cedar - adore the smell), and has very well executed details. Parts are very finely laser cut and laser edged where needed. Initially the wood may feel flimsy, but it appears stronger than what I assumed at first look (e.g., not have any parts split on me so far, even though they are very thin).
The kit is easy enough to put together when you take time to study the instructions - all pictures are in my mother tongue, as well as English, French, German (you get my drift); the text is Japanese, but pictogrames used for 'glue this, do not glue that, file this, etc' make the instructions sufficiently clear not to need even a basic understand of the wording. Compared to some other kits, these instructions are very good - similar to some plastic kits such as Hasegawa or Tamyia.
The kit may seem pricy, but I think it is worth the money - especially when you consider that the wood is of such good quality (unlike some of the cheaper kits I have where the wood is not so pleasant to work with - replace the wood is a thought that often occur to me with such kits) and they offer ships that are not so common in our market.
Just my thought, and hope it helps.
Slainte
L.H.
- Canute, Moab, Ryland Craze and 1 other
-
4
-
I'm pulling up a chair as well.
@Gaetan, can you give us the title of the 5th book (I already have the 4 in the series and am aware that there are separate plans sold as well).
Slainte
L.H.
- aviaamator and mtaylor
-
2
-
Hello Alexander,
vossiewulf was referring to this blog http://modelshipworld.com/index.php/topic/327-le-fleuron-by-gaetan-bordeleau-124/
Gaetan is the person who has just finished building a beatiful model of the French ship 'Le Fleuron'.
The 'dictionary' he refers to is one way of saying he is running out of words to describe how good your work is (and that of Gaetan) - and I agree.
Hope this helps with understanding.
Slainte (this is a Gaelic greeting)
Peter
- mtaylor, Chasseur and korablik1979
-
3
-
-
Here is the translation from the text above:
From original illustration to executed carvings, it is very easy if one knows what one is doing.
For the carving I use only "Buchsbaum", in this case the board is 12 mm thick.
If I am not mistaken 'Buchsbaum' is box (buxus) wood
-
-
If you find that your dowel is too small to be used with this tool, you can insert the dowel in a tube (inner diameter tube = outer diameter of dowel).
Make sure you mark the centerline using a very fine marker (the finer the better), and rotate the dowel at least 3 times. That way you will obtain a very small triangle which denotes the center.
Good luck
Peter
- thibaultron, mtaylor, Torbogdan and 3 others
-
6
-
-
Maybe a daft question, but could they have rigged the canons in such a way they are pointing more forward of the vessel (i.e. not perpendicular to the bow-shape, but more parallel to the keel). That way they appear to have a bit more moveability (if this is a proper word).
-
-
-
I know that I seriously lack any understanding regarding taking pictures - my experience is limited to point and shoot.
Nevertheless, I am constantly in awe of what can be done, and how a tiny detail can ruin a picture.
Not only is this model a work of Art, seeing you working to improve how you represent that model in the best light commands my greates respect.
Slainte
Peter


Sopwith Camel by Mike Dowling - FINISHED - Model Airways - 1/16
in Non-ship/categorised builds
Posted · Edited by Landrotten Highlander
clarification of thickest part of wing
Not sure if this helps...
Consider the wing of a run-of-the mill airplane (civil, not military). The wing is rounded on top, hollow at the bottom. The rounded edge points towards where the lift goes (that is a force that 'pulls' the wing upward).
Also, the bit that hits the air first is called the leading edge, and the other end is called the trailing end. To ensure easy airflow around your wing, the leading edge is usually thicker and rounded, while the trailing edge... trails to nothing. Located rougly 25-30% from the length of your wing (as measured from front to back) is the thickest part.
Now turn that wing 90 degrees, so that the rounded bit of the wing is now pointing forward (the direction you want the propellor to pull the aircraft = forward). What is now the back side of the propellor is hollow, while the front side is rounded.
So far the easy bit. Now for the more complicated bit.
The force called LIFT (i.e. the pulling force) is dependant on V^2 (= speed x speed). So the faster the speed, the bigger the force. But if the speed goes too fast the airflow around the wing (propellor) breaks away from the surface, and you end up with no lift whatsoever.
Without getting too technical here, the tip of the propellor goes much faster than the root (the bit closest to the shaft). Given the problem above, it is important that the speed at the tip does not get too big. To that end the angle of attack (that is the relative angle the windflow has relative to the forward edge of your aerofoil) needs to be adjusted, from pointing forward at the root of the propellor to almost at right angles to the shaft at the tip of the propellor.
The easiest way to visualise this is to take a piece of paper. Hold it vertical, the bottom touching the table in front of you and you facing the writing side of the paper. Now while holding the bottom edge of the paper in place, twist the top edge of the paper either clockwise or counterclockwise. That is the shape of your aerofoil that seems to elude you, as I understand it.
Because of the material and forces involved, the tip of the propellor is much thinner than the root (so the aerofoil goes from thin at the tip to oval/almost round at the root.
Another way of looking at it is to see your propellor as a series of differently shaped aerofoils layered one on top of the other, each aerofoil slightly differently shaped as well as at a slightly different angle.
Wishing you good luck.
L.H.
p.s., been following your build log with interest, might tackle one of these things as well....