Cathead
-
Posts
3,522 -
Joined
-
Last visited
Content Type
Profiles
Forums
Gallery
Events
Everything posted by Cathead
-
 Well, if you have questions, you can always send me a direct private message through MSW's system. To do this, click on a member's name to go to their profile, then hit the prominent "message" button right next to "follow member".
- 96 replies
-
- 4
-

-

-
- topsail schooner
- revenue cutter
- (and 3 more)
-
Ancient anchor found in Yucatan.
Cathead replied to Eugenio Treviño's topic in Nautical/Naval History
I could easily imagine it being a storm-driven wreck. Even if it happened post-settlement, hurricanes can move incredible amounts of sediment, easily covering a large anchor before anyone had the chance to salvage it. -
Ancient anchor found in Yucatan.
Cathead replied to Eugenio Treviño's topic in Nautical/Naval History
Not necessarily. Shorelines change naturally all the time, especially if there's a river mouth nearby dumping sediment into the area. Waterfronts also routinely get filled in by humans to make more usable land. For example, a significant amount of downtown Boston is built on fill and its modern shoreline would be nearly unrecognizable to 18th century residents. So it's pretty easy to imagine the anchor being lost in a harbor area 200 years ago that has since filled in. Reading the Spanish account, this was found along a seafront promenade, so a variety of scenarios are possible, from it being dropped in an area that's since filled in (naturally or anthropogenically), to it being washed ashore and buried by a long-ago hurricane (to which the Yucatan is prone), to even theoretically being abandoned on land as naval stores and buried. -
This is a great attitude! I'm so glad you're sticking with the project despite the kit's myriad flaws. If you're finding this worthwhile, you have a bright future ahead building kits from better sources! Do you have a build log? If so, I'd be happy to follow along and offer advice if needed.
- 96 replies
-
- 2
-
-
- topsail schooner
- revenue cutter
- (and 3 more)
-
I just heard about that as well, so cool! Looking forward to following your project. I agree that a newer kit will give you a much better building experience.
-
I personally think railings are the worst part of steamboat modeling.
- 238 replies
-
- 1
-
-
- Robert E Lee
- steamboat
- (and 3 more)
-
Thanks Brian and others. I won't be doing any projects for quite a while, I injured my wrist and need surgery with a 1-2 month recovery time. Has rearranged our whole life.
-
That's wonderful! Not sure what to tell you about the album question, I've never had that problem. Can you be more specific about what's not working?
-
Thanks, Tommy! I'm glad to hear it. Sounds like you're pretty far along, but if you'd like to start a build log anyway and I'd be happy to follow along as you finish it off.
-
HMS Beagle by Dean77 - OcCre - 1:60
Cathead replied to Dean77's topic in - Kit build logs for subjects built from 1801 - 1850
Rule of thumb for maintaining sanity: there's always someone better than you at any given task/skill. And if there really isn't at the moment, there will be in a few years. So enjoy what you can do, 'cause there's also plenty of people who haven't gotten as far as you have! So sorry to hear of the accident, such things really do turn life upside down. Best wishes for getting through that and continuing with your lovely build. -
I have this tool and have found it useful, though I don't always use it. Most often I soak in warm water and then let dry while clamped to a form, either on the model itself or some other curved surface. But there are strong advocates for dry-bending (never using water, only heat). The tool doesn't keep you from learning anything about how to shape planks properly, it just helps apply heat in a way that eases the wood fibers into accepting your bend. The relevant skills in shaping the planks in the first place are needed regardless of what you use to achieve the goal. The most important point, though, is to get your head around how planks will wrap around 3D surfaces. As you found, parallel lines of same-width planks simply won't work, despite what so many kits try to advise you to do. So they either need to be spiled (cut into non-linear shapes that actually follow the hull) or edge-bent (deformed into those same curves against the natural grain of the wood). It's a really fun skill once you get your head around it!
-
That approach (and lots of filler) works fine for the under-planking, which is just meant to provide a solid base for the outer planking, but I'd suggest reading some planking tutorials before tackling the outer layer. There are some concepts and skills that would really help you in the next step. Check out the relevant section on MSW for more. You might even consider making a bit of a false hull out of scrap material (think a few bulwarks on an easy keel) to test how to bend and shape planking before doing it on the real thing. EDIT: I meant to add that I left some blood in my last project, too. Think of it as a signature to your work of art.
-
Y'know, that'd make a great figurehead...
-
Congratulations! Such a neat vessel, and a model to be proud of. I've greatly enjoyed following along and learning from your work.
-
Great progress!
-
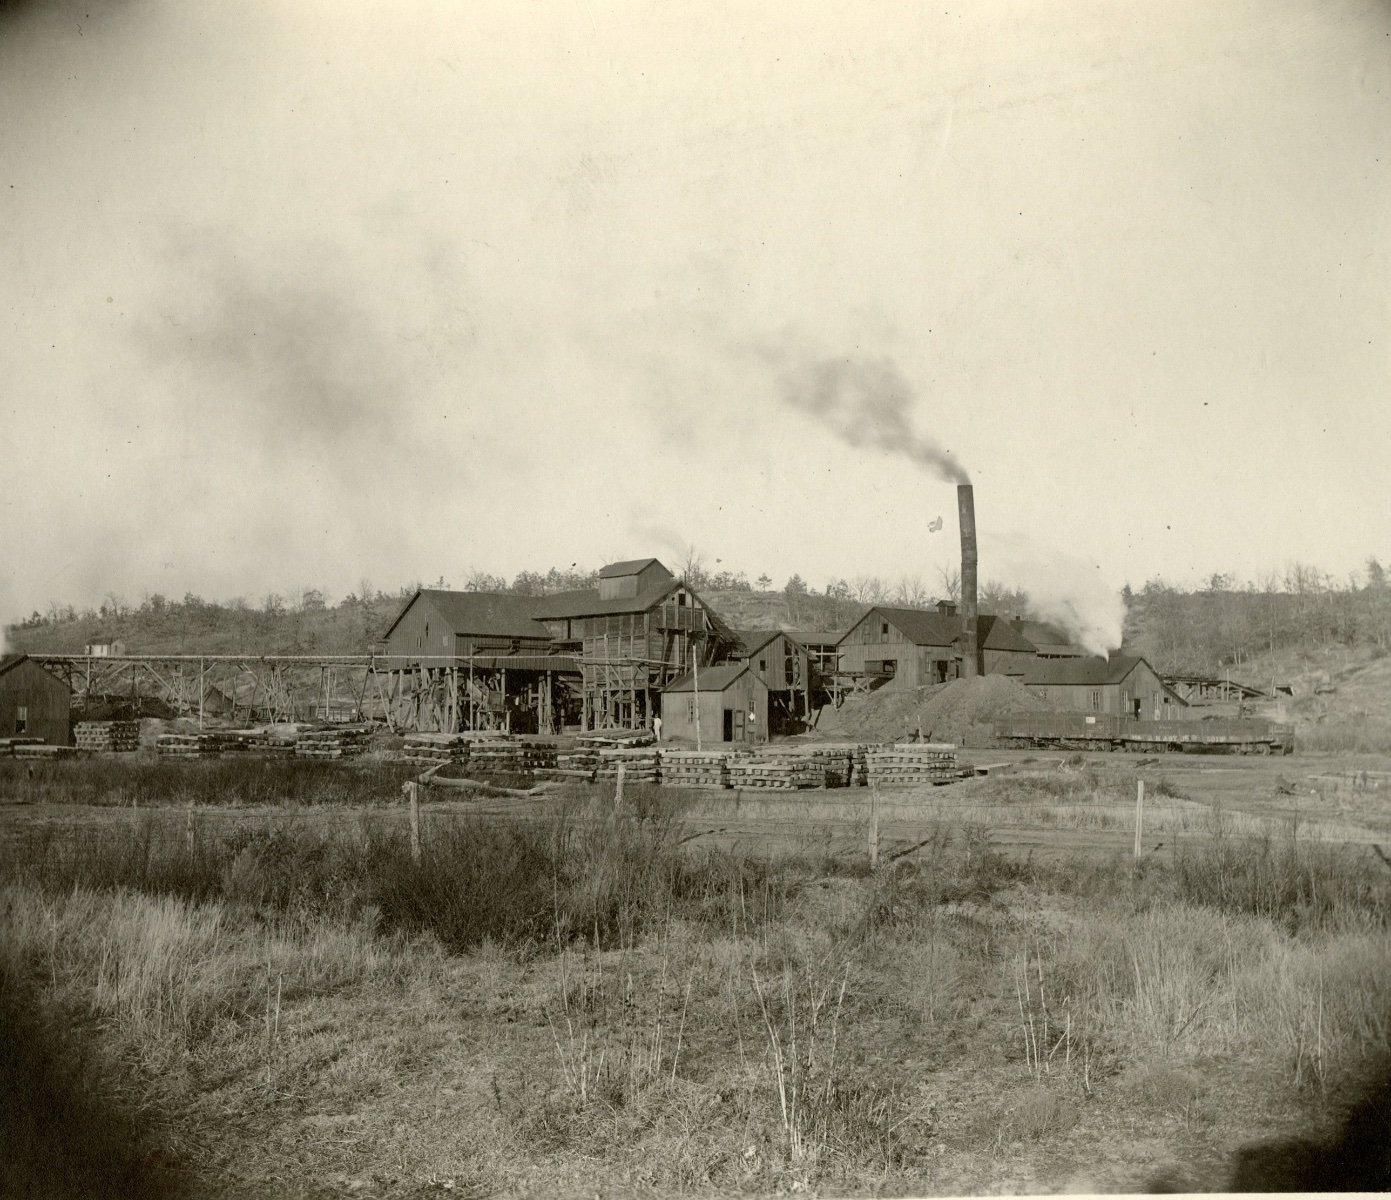
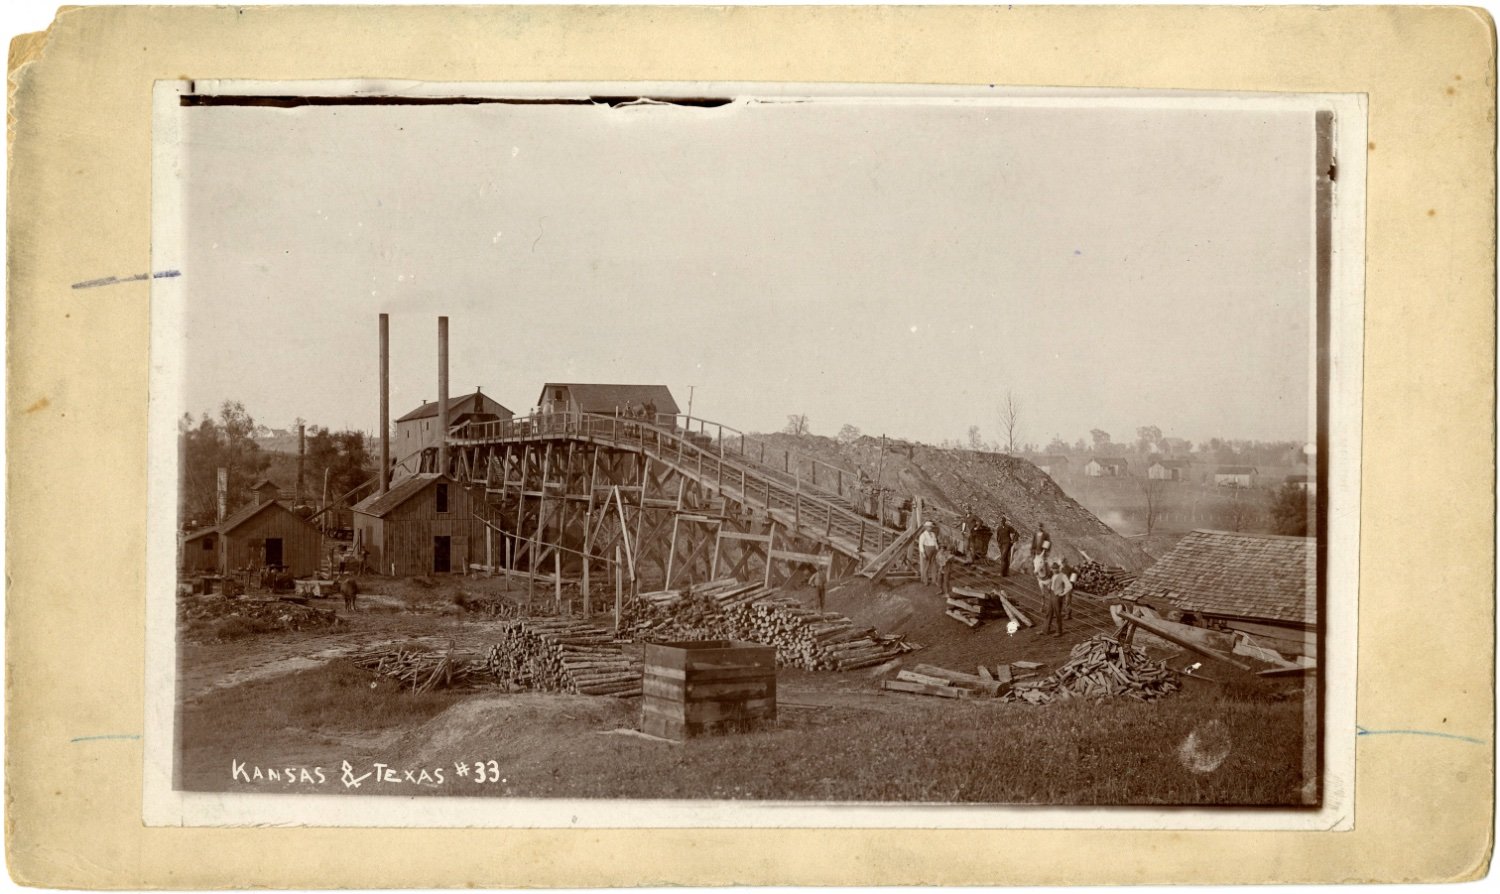
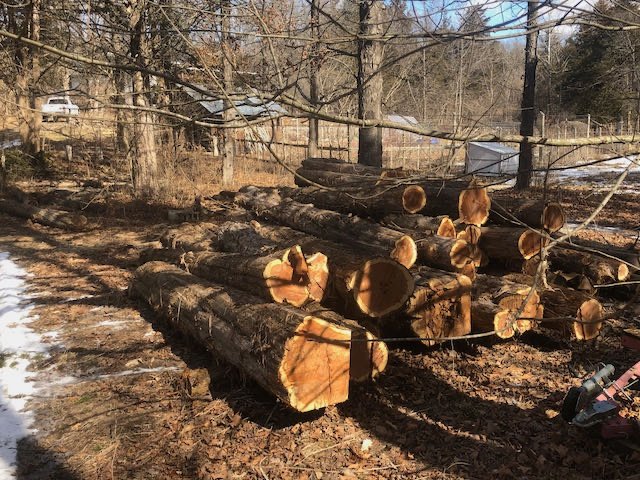
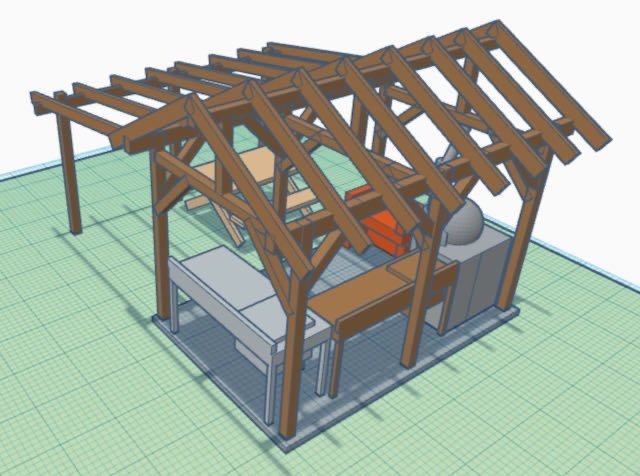
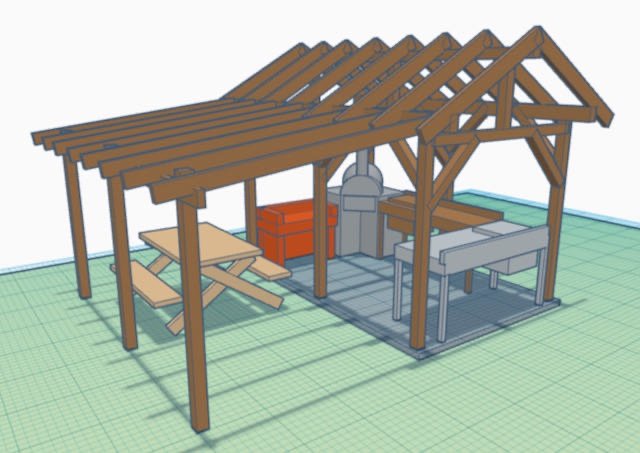
Ironically, any maritime model building is going on hold for a while as I have several 1:1 projects in the works and a potential model railroad project. I've been busy cutting a stand of large cedar trees to produce lumber for an outdoor kitchen, which I plan on building with proper traditional post-and-beam construction, seen here in my initial 3D rendering of the conceptual design: Much of our life on this homestead farm is built around food production and cooking, so this space will take some of the mess out of our overworked indoor kitchen, making it easier to do everything from meat butchering to food preservation to maple boiling, as well as simple entertaining (note the included wood pizza oven). I've already built many home-milled cedar-lumber barns and other outbuildings here, but this will be my first true post-and-beam structure. Here's the log pile so far and the area I'm logging: In addition, I'm about to start ripping out the carpet in a spare bedroom so I can refloor it properly in wood. This is likely to become my new modeling/woodworking space and may end up hosting a small model railroad centered on Missouri coal-mining history. Early 20th century Missouri had some really cool mining complexes that are screaming to be scratchbuilt, such as these (from the Missouri Historical Society): These are going to keep me quite busy for a while and I'm ready for a temporary break from nautical modeling. Not going anywhere from MSW, but I probably won't start any new model projects until at least next fall/winter, at which point I'll probably return to some Missouri craft like the Lewis & Clark barge or another steamboat. I have my eye on the JR Wells, a relatively well-documented small steamboat that operated into the Missouri Ozarks on the Osage River. See the Miller County Museum website for some nice photos and background; not reproducing them here because they're marked as copyrighted. Okay, that went off-topic, but you did ask!


-
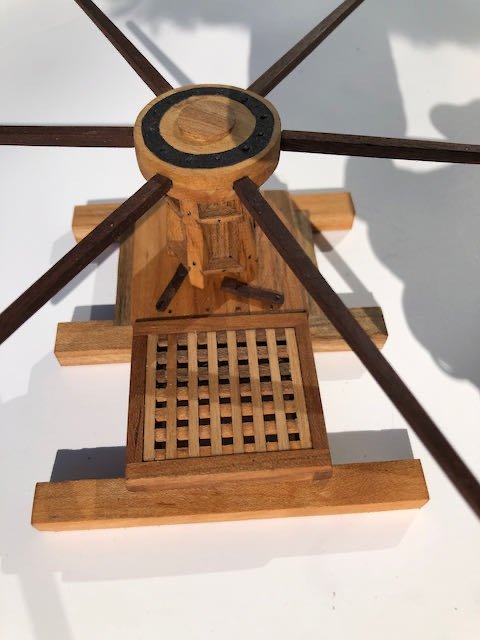
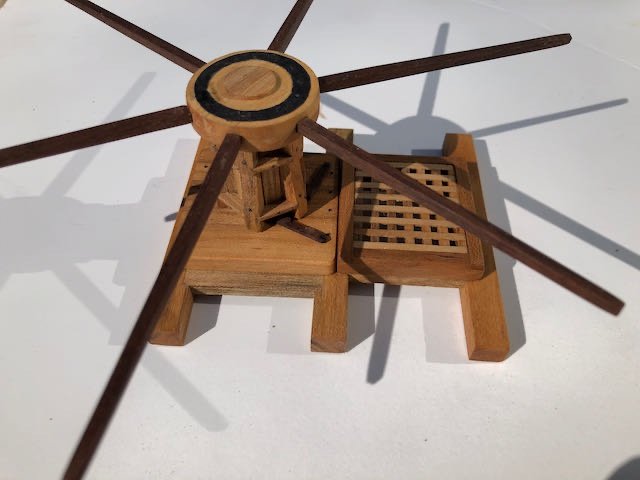
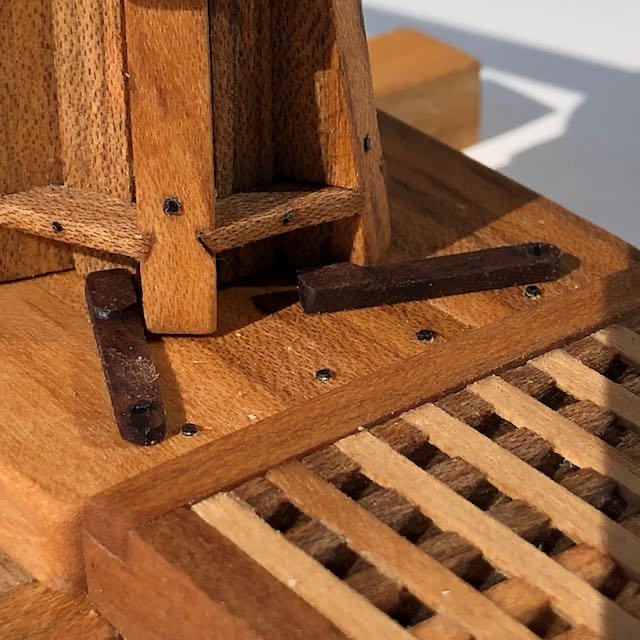
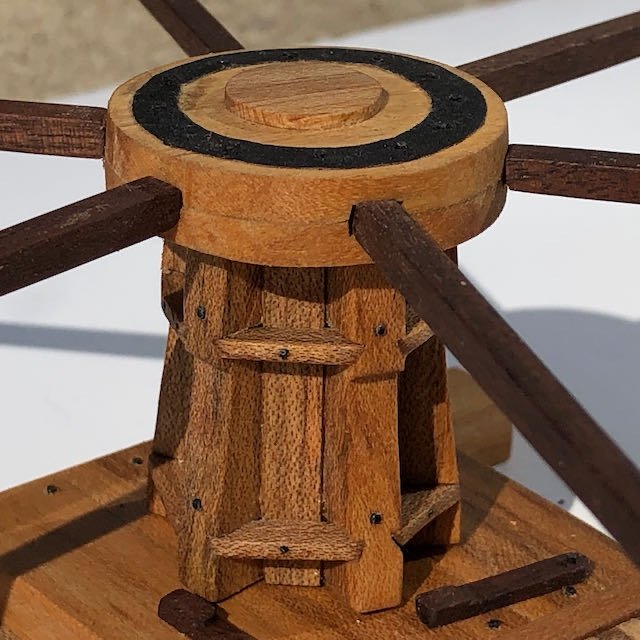
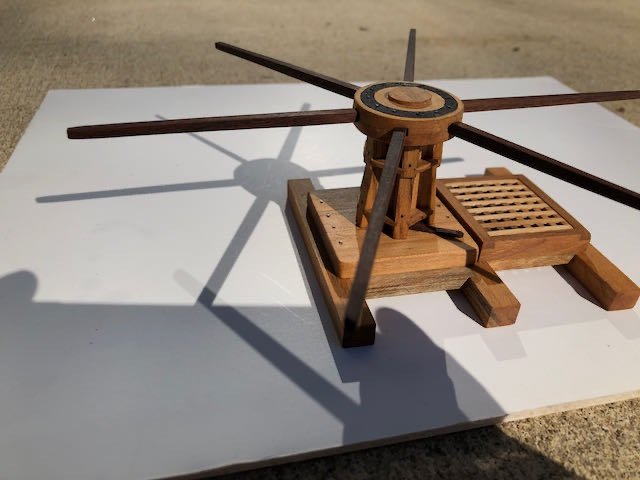
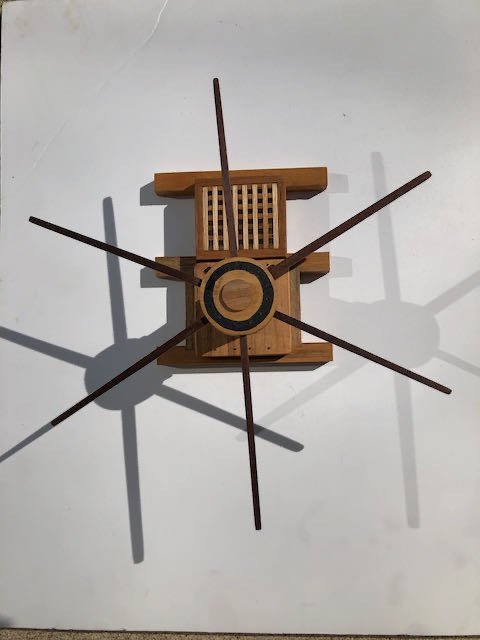
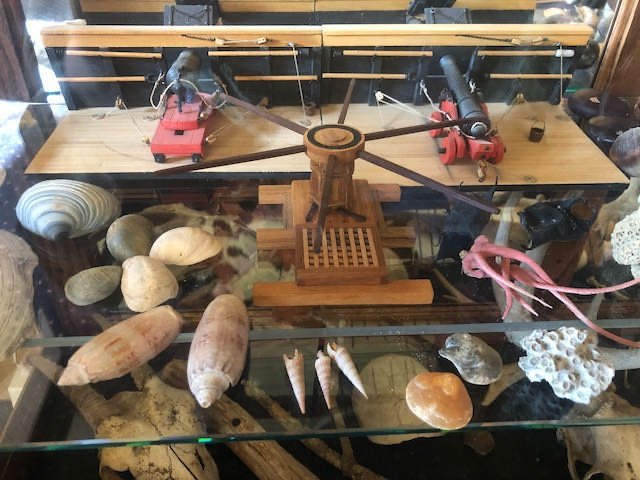
I declare the capstan completed! I didn't take photos of the final details and assembly, partly because I was excited to push through, partly because they were all pretty straightforward. A few notes on these: The capstan bars are just a basic shaping of square stock, easily followed from the plans. Because the slots in my drumhead were a little wonky, I custom-fit the insert end of each capstan bar to each hole, but this isn't noticeable in the final display. I used black walnut for the color contrast. I didn't try to add the nailing pattern in the grating, as I didn't think I could do this well at 1:24 and preferred to leave it out than do a bad job. I added the bolts to the drumhead and base by drilling holes, inserting black wire, and nipping it off just above the surface. The instructions call for making sure the bolt heads are flattened/widened, but at 1:24 I decided this wouldn't be worth the work, so just left the cut ends in place with a bit of filing. I made the iron ring atop the drumhead using fine black sandpaper rather than the regular paper (colored with ink) called for in the instructions. This was sturdier to cut out, had no danger of ink running, and had a nice rough texture that looked more iron-like to my eyes. I made the pawls out of walnut and just oiled them rather than painting them black to represent metal. This is less realistic but more aesthetically pleasing to me, matching the capstan bars and emphasizing the natural wood. I left off the pins & chains that hold the capstan bars in place (photo below from @tlevine's log). I didn't have anything on hand to make these and wasn't sure I could do it right by hand at 1:24. The instructions say these are optional anyway. Maybe if I end up with some spare chain and tiny eyebolts from a future kit, I'll go back and add them, but didn't feel like ordering a tiny pack of chain and other material: My model is essentially an artistic interpretation anyway, more than a perfectly accurate scale representation, so I decided I was pleased with it as it was. Here are a few more photos: Below is the worst drumhead hole; it's still barely noticeable except in closeup photos, so I'm ok with it. Closeup of the walnut pawls and black wire bolts: So that's that. This project certainly achieved its goals of pushing me to try something new that I probably wouldn't have thought of otherwise, and exposing me to new skills that I will be able to put to good use in future. It was a challenge at times, and I strongly encourage other builders to think ahead to be sure you aren't led astray by confusion or inattention (a good practice in any build). I'd also say it's fine to make your own course; I deviated from the instructions quite often where I thought necessary, and in truth that's also part of the scratch-building skill set this is meant to teach (confidence to think for yourself and work out the best approach to a problem rather than blindly following instructions). Although I've been critical at times, I want to be absolutely clear how grateful I am to @tlevine and the NRG for developing this project. I wasn't at all sure I could produce something this nice, even if it isn't quite at the level of truly skilled builders, and I couldn't have done it without their development work. It's especially cool to display knowing that all the wood (except a few hidden dowels) was harvested, milled, and finished right here on-farm, making this particularly special to me. Here's the capstan in its final location within a bigger display case, staged with its companion 1:24 naval gun dioramas and various marine life collected primarily from my favorite coastline in the world, the Outer Banks of North Carolina. Thanks to all the readers who gave encouraging likes and helpful comments. Hopefully this log is of use to others.
- 69 replies
-
- 14
-
-
Seeing those beautiful paddles and engine room come together make me want to tackle another one!
- 238 replies
-
- 3
-
-
- Robert E Lee
- steamboat
- (and 3 more)
-
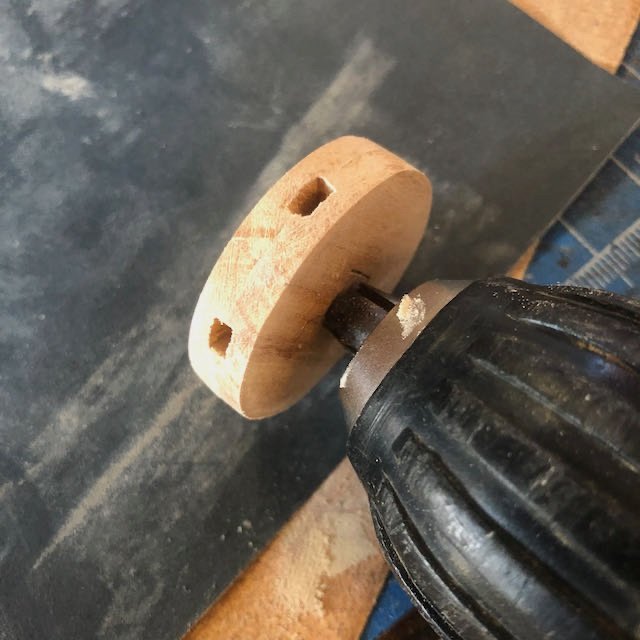
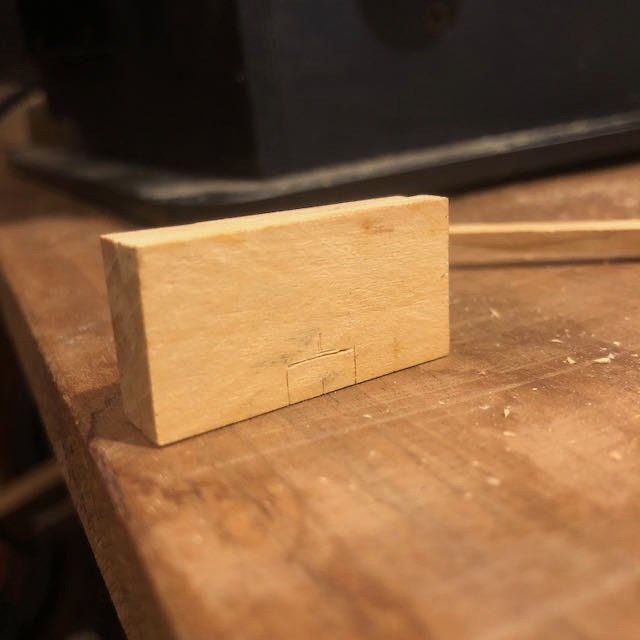
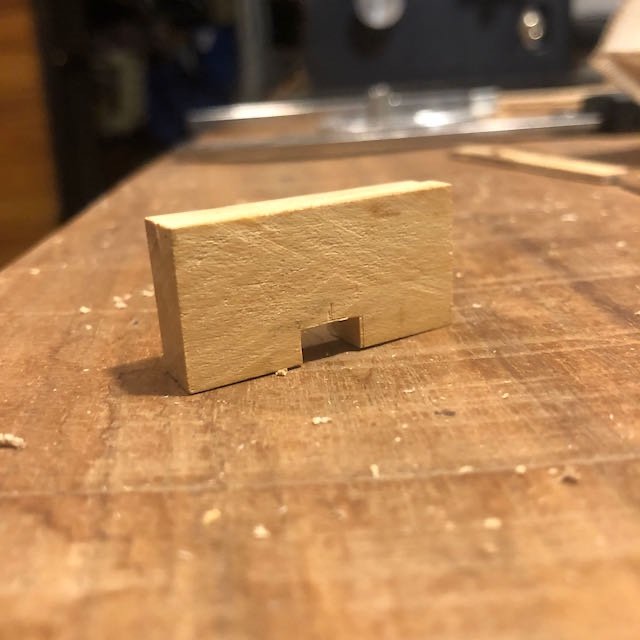
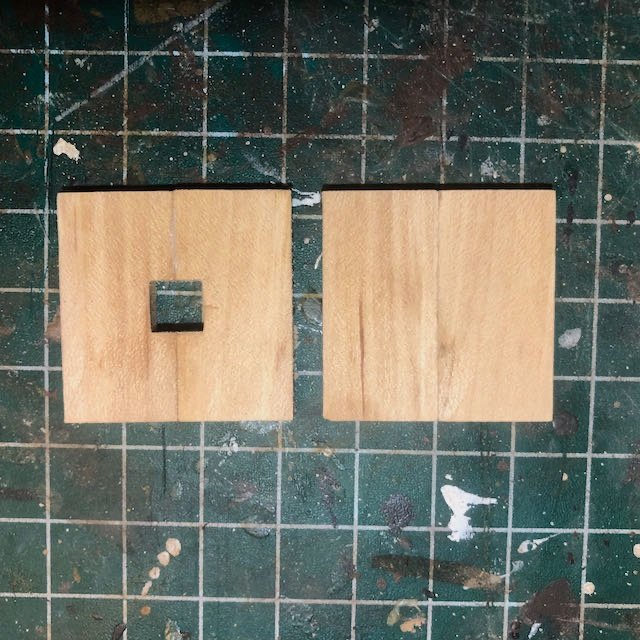
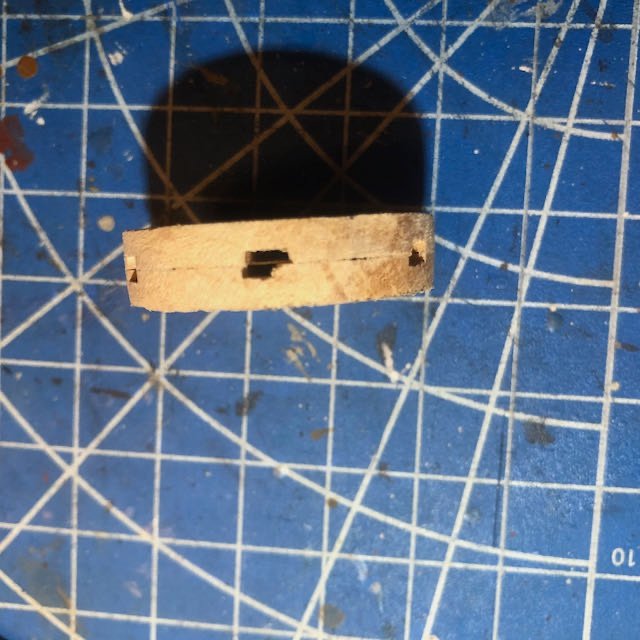
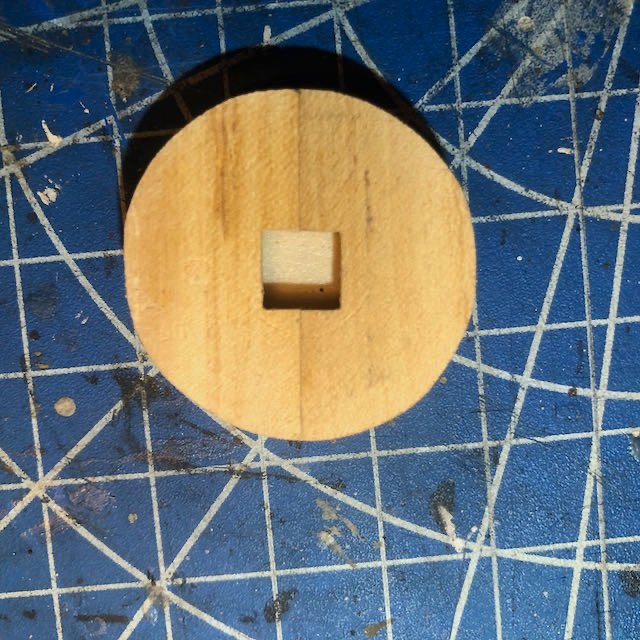
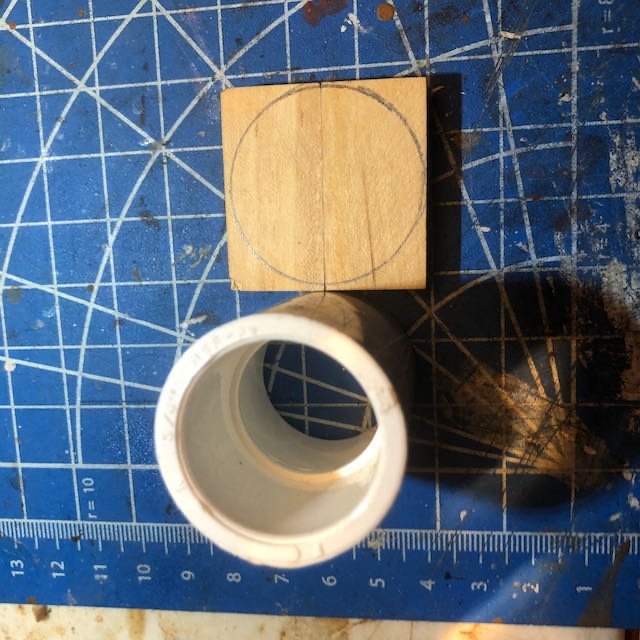
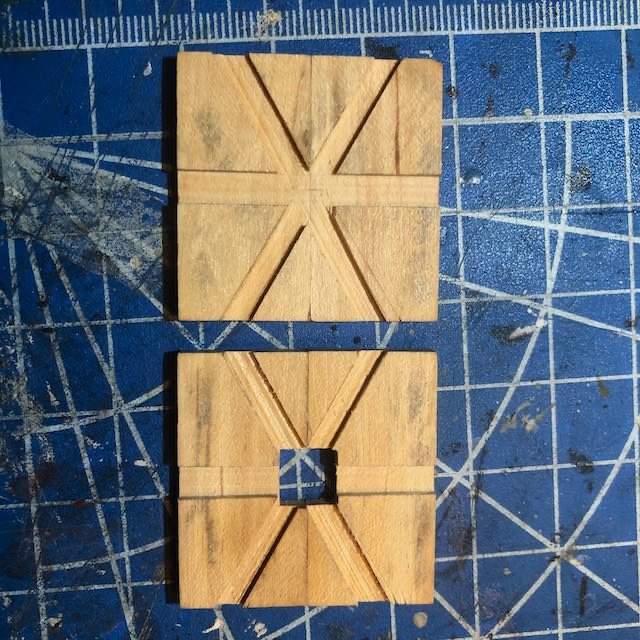
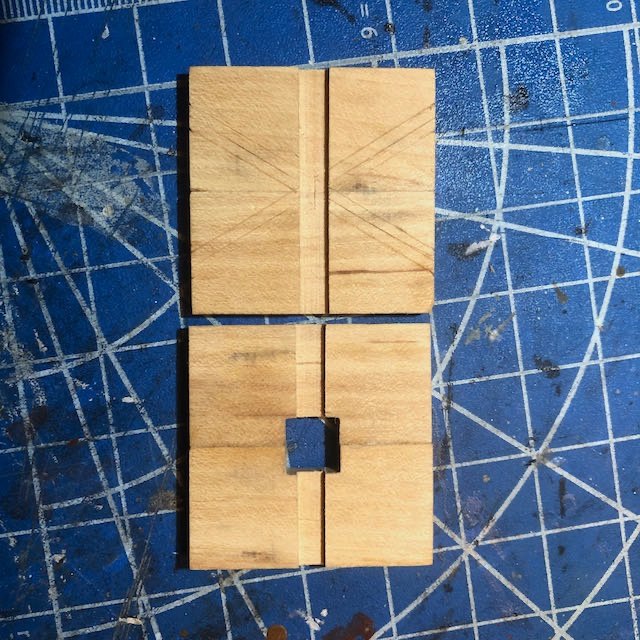
Time to make the drumhead. As you would expect by now, I deviated into my own way of doing things at various points. This is made from two circles of wood, which are themselves made by gluing together two halves. Here's what we're going for (photo from @tlevine's log): The bottom half has a square cutout that's meant to sit on a matching block atop the capstan body. The upper half is solid. The instructions call for gluing the two halves of the bottom half together, then cutting out the square hole from within, but that seemed unnecessarily complicated to me. Instead, I used double-sided tape to stick the two halves together face-face, then used the Byrnes saw to cut out a half-square notch: I then glued up both halves of the drumhead, resulting in a nice square hole that didn't need to be cut out later. I also felt this let me be more accurate than trying to cut this out with a hand saw within a solid block. I'm honestly not sure why this square hole and its matching block mount are necessary. My guess is this is how the real thing was built, allowing the drumhead to be removable but locked to the capstan, but none of this is ever visible on the final model, and it would be a lot easier to just glue the drumhead directly to the capstan or at least just mount it directly to a smaller dowel if you want to ensure it's centered. The block just seems like extra work and an extra chance for something to go wrong. Next, the instructions have you cut these halves out into circles before cutting the internal slots (which end up holding the capstan bars) using a razor saw. Again, I thought this was more complicated and difficult than necessary, as I don't trust myself to hand-cut perfect slots to a consistent depth using a razor saw on a round workpiece, or to cut two matching circles from two separate workpieces. So instead, I left the halves square and marked the slots at the proper 60º, then cut them out using the Byrnes saw (for reliable depth control) and its miter gage (for reliable angle control), just like other joinery in this project: I then glued these squares together, and only then cut the single resulting piece into a circle, using a piece of PVC pipe close to the right diameter to draw a guide line: The resulting cutout was rough and I intentionally made it too big: To clean this up, I placed a square block (into which a dowel had been glued) into the square hole on the bottom of the drumhead, then chucked the dowel into a hand drill and used this setup to sand the drumhead down to a nice smooth circle. It would have been much harder to do this evenly by hand. This was also the step that made me question why the block was even necessary; gluing the dowel directly into the capstan would have been easier: In summary: Instruction order of operations: Glue two sets of pieces together into two square halves Cut two halves separately into circles Cut slots across both circles Cut out internal square in lower half Join two circular halves into complete drumhead My order of operations: Cut internal square before gluing up lower half (easier to do accurately on Byrnes saw) Cut slots while halves are still square (for easier use of miter gage) Glue square halves together Cut out into single circle (easier than cutting two equal circles, then gluing) Despite all that, I still managed to make a few mistakes and not get my slots cut just right, so a few of the capstan bar holes didn't line up quite right. This is the worst one, I just didn't get the piece lined up properly on the miter gage, and cut the upper half too wide: This one's more like it: This is an indictment of my skill, not of any methodology. I just wasn't careful enough, and also should have cut the slots a bit narrower to better allow for final widening. Honestly, though, as you'll see in a future post, it's barely noticeable in the final product. I cleaned up the mismatched slot halves using a sharp nice and small files. So that gave me a nice solid drumhead. Next, I proceeded to make the capstan bars and start adding final details, which I'll write up tomorrow. It's not done, but it's very close. Thanks for following along!


-
Steamboats and other rivercraft - general discussion
Cathead replied to Cathead's topic in Nautical/Naval History
So I'm sad to say that I was underwhelmed by the recent talk. It was probably fine for an audience that was new to steamboats, but the presenter's knowledge base was pretty shallow and he made a number of mistakes during the presentation. The following Q&A made it even clearer that he didn't really understand the topic. I've read his book, and found it disappointing as well. I was hoping the talk would at least share some new information, insights, or imagery, but it was pretty bland and rambling. If others felt the same, I'm sorry for wasting your time by bringing it up.- 281 replies
-
- 2
-
-
- Steamboats
- riverboats
- (and 3 more)
-
Thanks for the kind comments! I just revised my earlier post for clarity, since I kept using "wedge" to mean "chock", which could be confusing as "wedge" means the pieces the initial capstan barrel was supposed to be made of. Also, @Siggi52 has been finishing up the double capstans for his unbelievably beautiful HMS Tiger (seriously, I'm not being hyperbolic here), and I thought it was interesting that he, too, seems to have built his capstans by filing down a round dowel where necessary. Just thought I'd share these photo for anyone considering doing it this way. Otherwise it's neat how similar his capstans are to this project's (though not surprising given the research that's gone into both): I hope he's ok with me sharing these, I think they're a great reference and if you're not already reading his log, you should be! Coming soon, an update on building the capstan head.
-
Lynn, this may be too picky (and too late), but it looks to me like the drawing shows that the hull-length coppering is meant to make a sweeping curve that follows the natural curve of the hull and blends gradually into being parallel with the keel, not a straight line that ends in a specific angle with the run of the keel, as marked up in blue below: It's not a big deal now, but as you keep going up I'm concerned you'll have more trouble with that angle and it'll become ever-more awkward and noticeable. I assume the next lines of coppering follow that initial curve, so without having to redo anything, I think you could fix it by making sure to lay the next one in a curve and just insert a small filler plate where there's a gap between the curve and the angle (yellow below): Forgive the rough mark-up but hopefully it illustrates the point? Full disclosure, I've never coppered a hull, I'm just going on what the plan you displayed seems to show and my intuition as to how any linear feature (whether planking or coppering) will run naturally over a curved hull. Feel free to disregard, just wanted to make the suggestion. Happy to hear that I'm wrong from someone with more experience laying out coppering belts.


-
Wow, that’s a significant improvement! I agree that I can see a slight extra gap after the A but the rest is awesome. And since A in that font is broader than average and creates more space around itself anyway, I don’t think it matters. One (of many) things I’ve learned in modeling is that individual “wrong” details can bug you during construction but completely vanish in the overall model’s effect.
-
I've never built this kit so any advice I can offer is more general. Actual builders like Bob will certainly be more directly helpful.