Chuck
-
Posts
9,725 -
Joined
-
Last visited
Content Type
Profiles
Forums
Gallery
Events
Everything posted by Chuck
-
 I am not sure yet. I may actually just skip the POB all together and if I only sell a handful of Speedwell POF kits then so be it. And then move onto the smaller subjects I started. It is what it is. I am still mulling it over. Its a big decision. But so far there are about 9 pof kits reserved. I will just keep a couple on the shelf after making those first 9 and see where it goes. I decided not to put a number on how many POF kits I will eventually make. I will just keep one or two on the shelf and if they ever sell thats fine. If they do sell I will just make one or two more. Some other smaller prototypes in progress below. Hudson River Sloop and Block Island Fishing Boat. chuck
-
Just beautiful. Well done.
-
Thank you all who have contacted me. I have a grand total of 8 people who have reserved the first two chapters of the fully framed kit. I will laser cut those 8 and another 2 additional to keep on the shelf. Just in case. I am buying all of the supplies needed to complete them now and also getting the plans printed and starting to write the monograph chapters. Should be a fun project for those who are taking the plunge.
-
Its sadly not…that would be an entirely different model needed to be started from scratch. Just to let folks know because that request comes up a lot. Not just of me but I see folks ask other mfg’s as well. You just cant increase or decrease the size. Any change in scale requires quite a bit of redesign…as if you were starting from the beginning. Wood thicknesses and sizes will get too screwy and you couldnt use nominal common sizes. It would be such a headache.
-
There are so many cross sections out there already…good…bad…and ugly and everything in between. Two chapter one sets almost complete If I only sell 5 of these that will be fine…if I sell more, thats great too. But I am not gonna worry about it too much unless the Admiral finds out how much $$$ I lost on the project, LOL I might just push ahead with the POF only and just cut my losses…and move on to another project once this is done. That would be the smartest thing to do. LOL
-
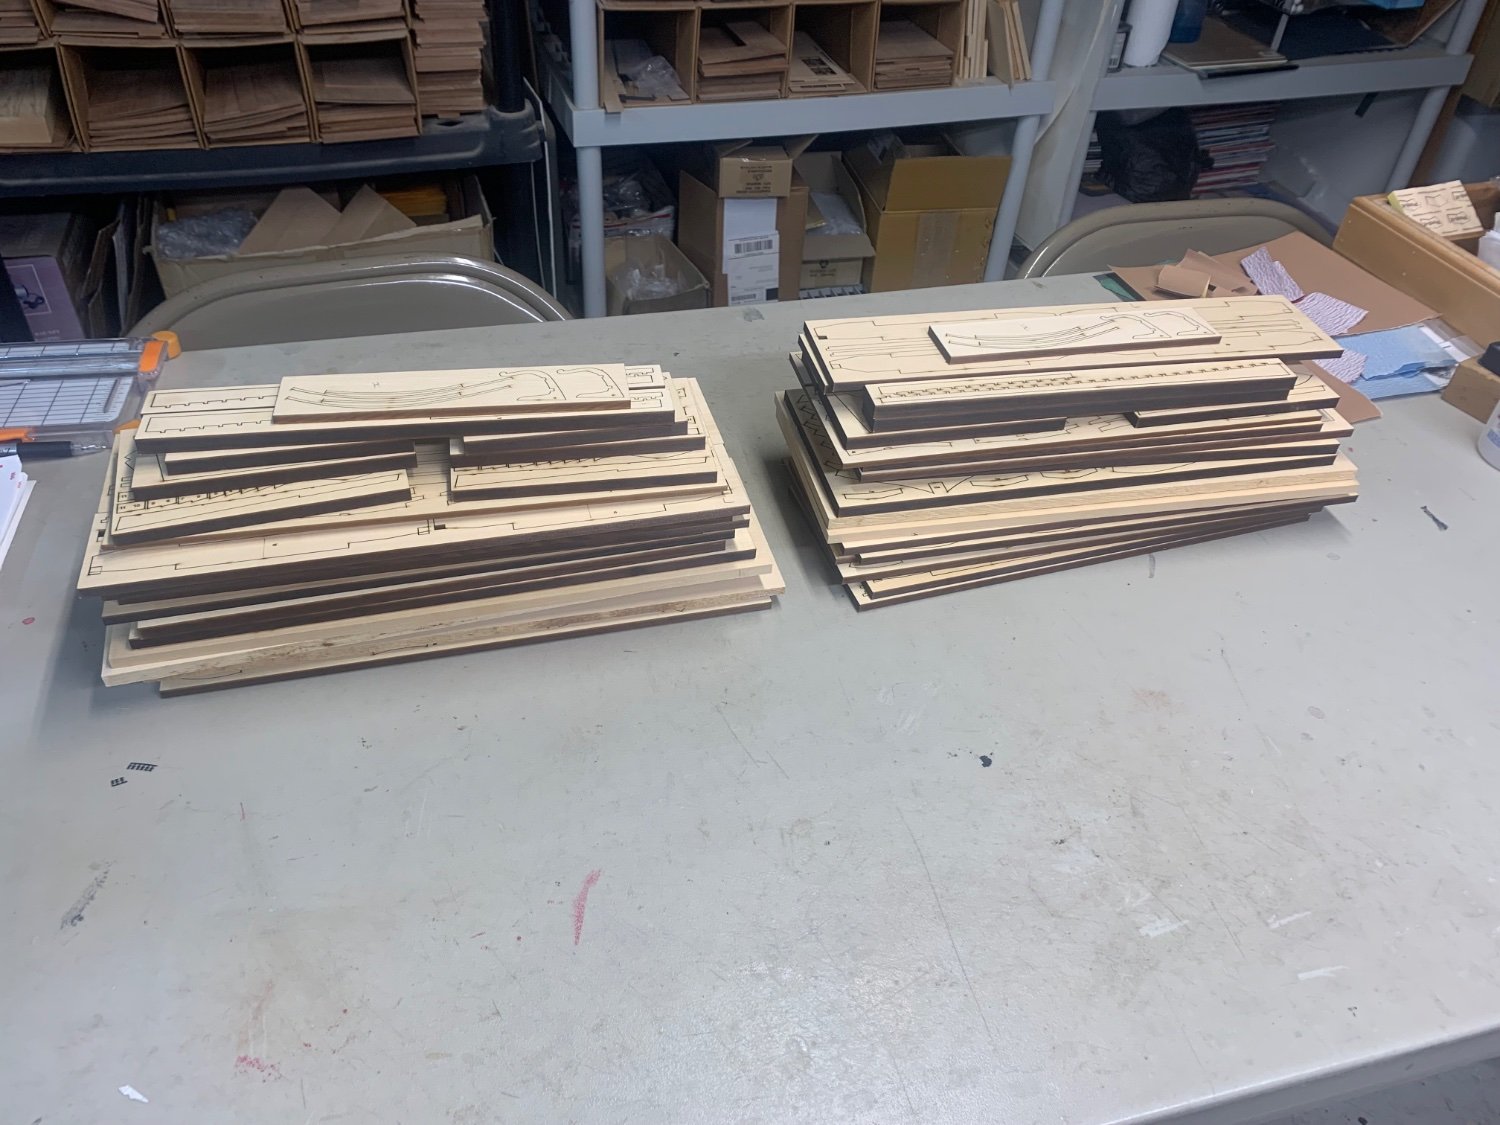
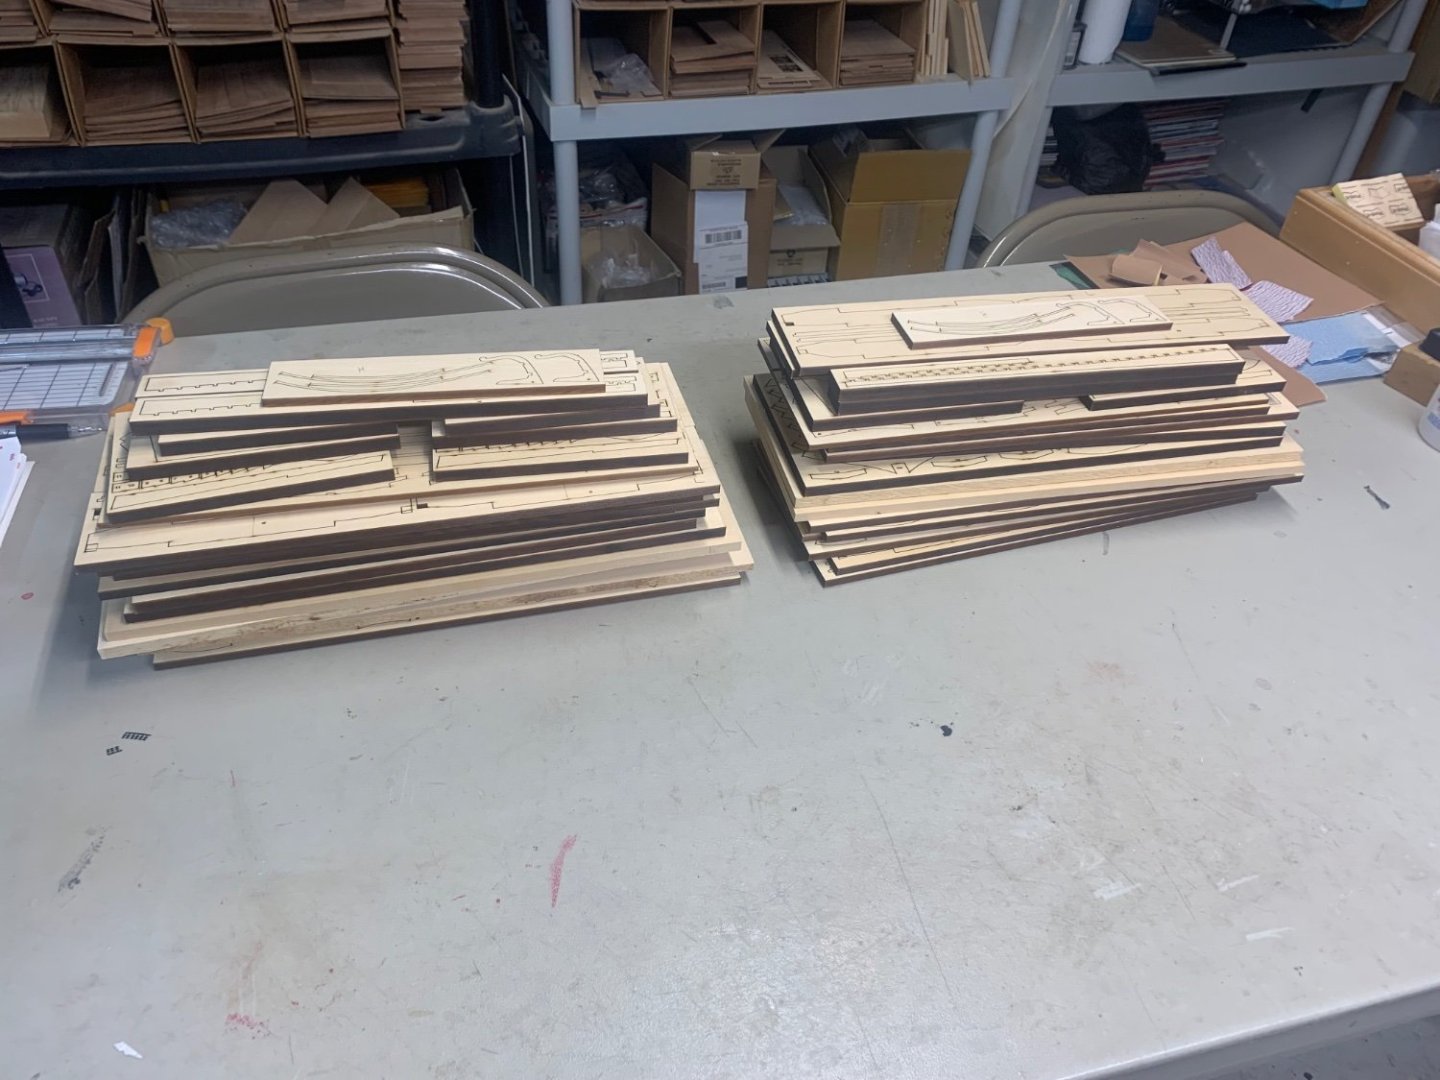
Remember that is just for the first two chapters....although I have been discussing with Joe my wood supplier and we have come up with a plan to make things a lot more plausible. Yes its about $500 my cost for those first two chapters after its all said and done....Plans, Licensing fee, packaging, laser time and wood. This doesnt include the design time or time to write the instructions etc. Its really not a smart business decision...its more of a labor of love and I really wanted to build it for myself. So there is that satisfaction. That is pretty much the only way to do it. I couldnt possibly ask Joe to mill the hundreds of sheets of wood needed at one time. So I will be making just one or two chapter sets at a time as my wood supply allows. I will of course make the initial 5 sets of chapters one and two to start. I already have two sets laser cut....three more to go. Chuck
-
Yes indeed it does Greg And just to clarify...when I say POB it isnt the traditional POB. I have known for some time that few would ever pay this much money for a quality POF kit. I have planned for the last year to make sure that I could recoup my initial investment. I have had a design in POB made and ready to go for a while now. Just in case. Forget everything you know about previous POB designs. This version will look identical to the fully framed version. But it will let you fully detail all of the interior. It is basically the same kit with less than half the frames.
-
There will be a limited run of 10 or 15 POF kits. I am cutting the first two chapters now which will comprise all of the framing for the first five. The cost for the first 2 Chapters is $800. It is comprised of a whole lot of wood sheets. The estimated total cost for the project fully rigged will be about $2300. To reserve one of these very special limited edition POF version send me a PM to reserve it. Although when time and my wood supply permits, I will keep one or two sets of these first chapters on the shelf. Chuck
-
Thanks for the feedback. It was very helpful. I will be making just 5 of the POF kits. That is it. It is sure to become a collectors item. After talking to many kit mfg’s about the economy and current sales trends this is the best option. Maybe in the future there will be another run of 5 kits. Please send me a PM to reserve one as a pre-Order reservation. The cost for the first 2 chapters is $800. Beyond that, each chapter will be considerably less with the completed kit costing around $2300. This will be a fully rigged model. Chuck

-
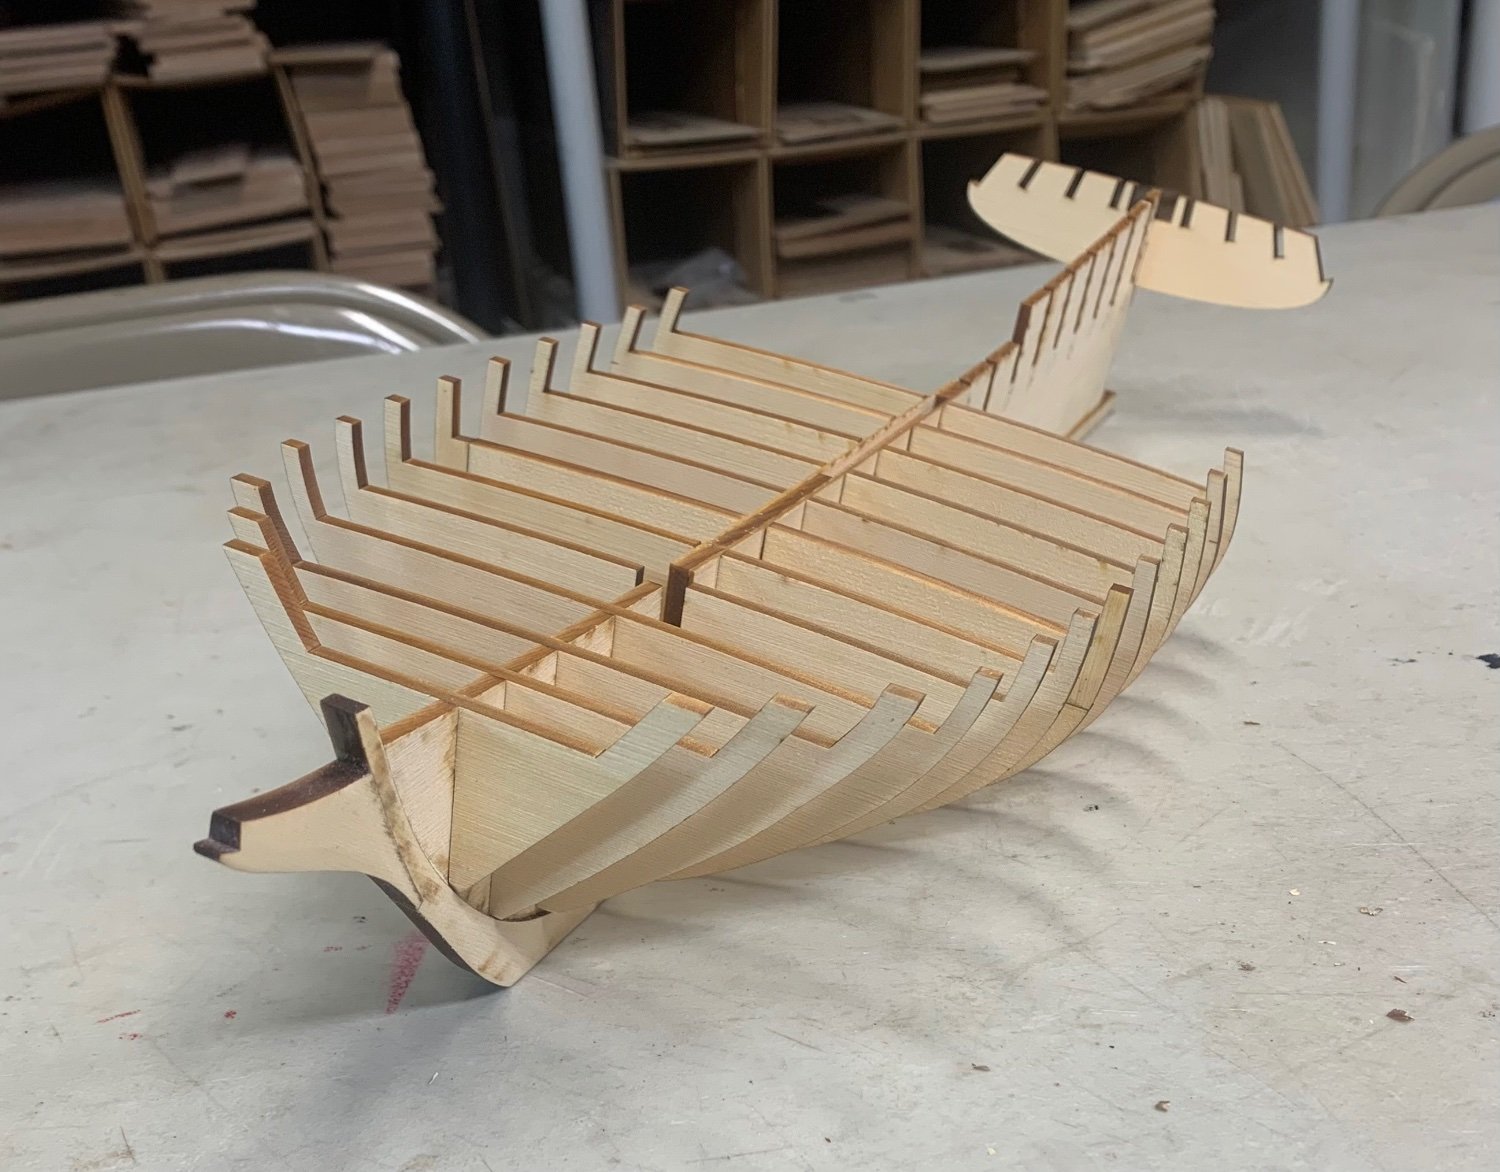
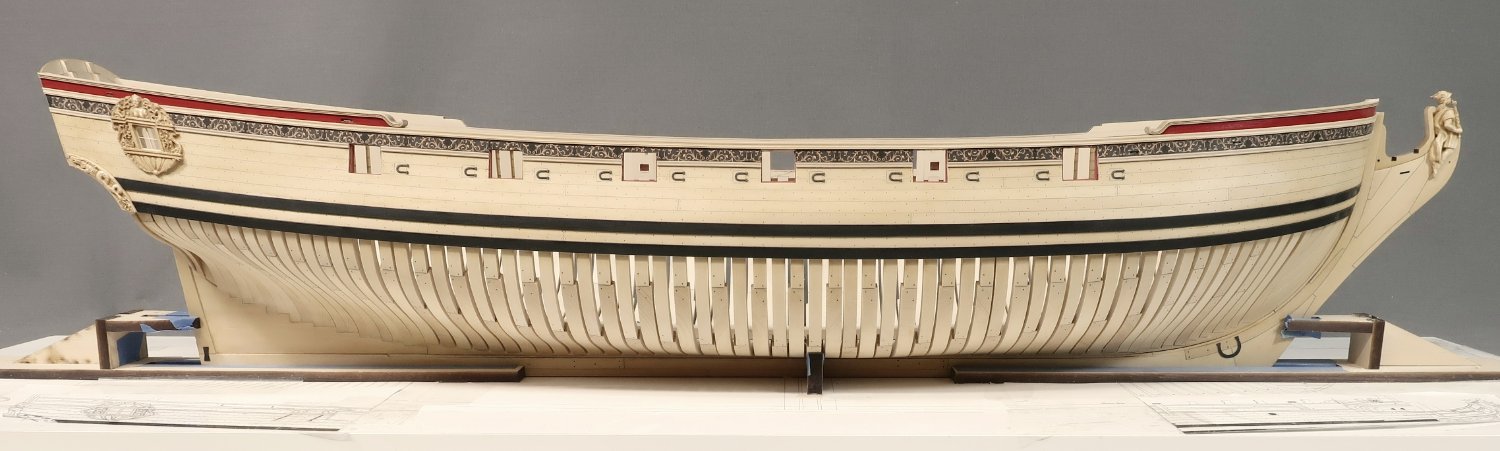
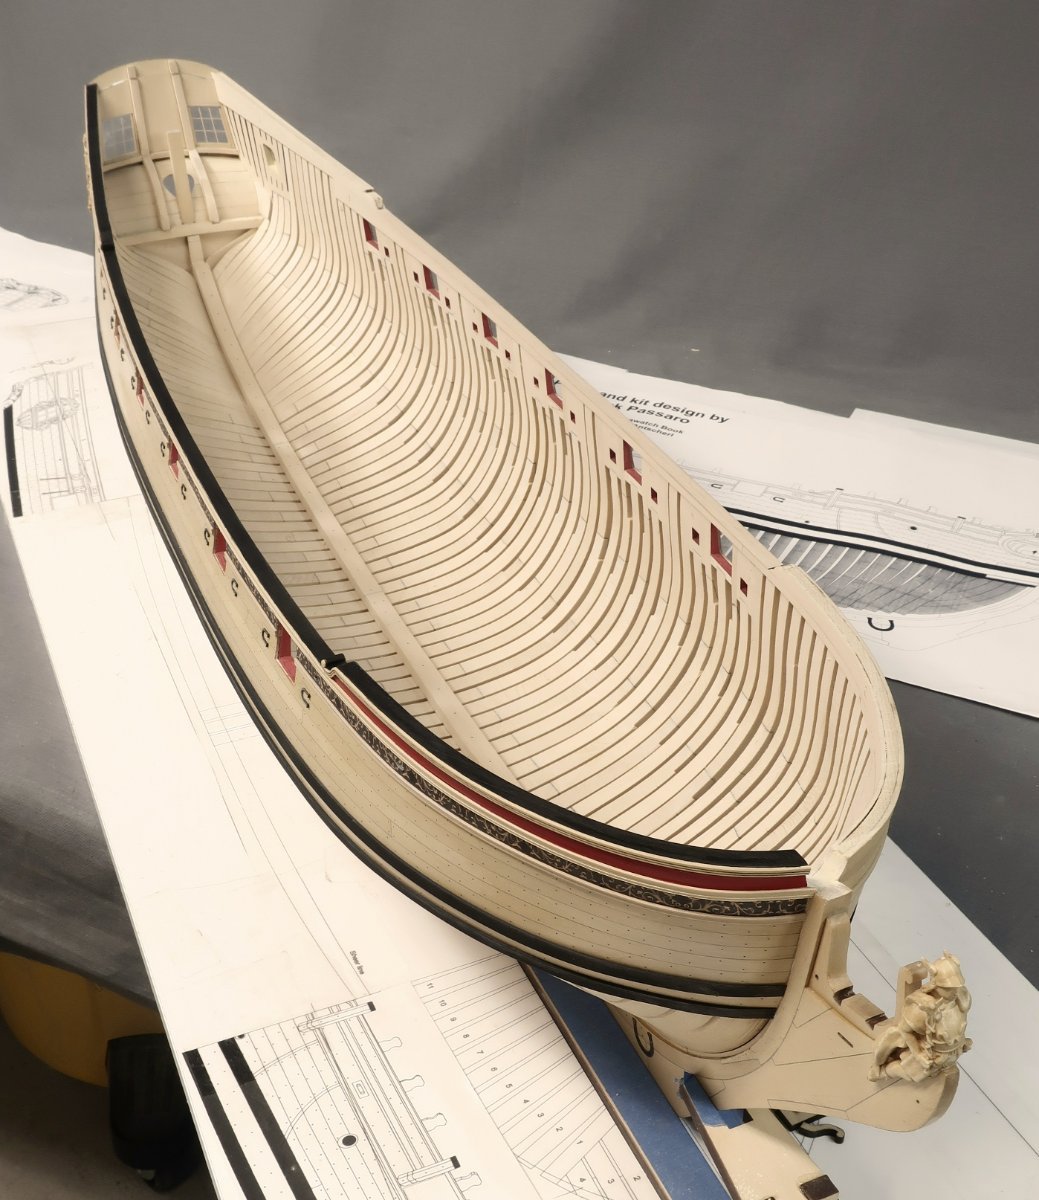
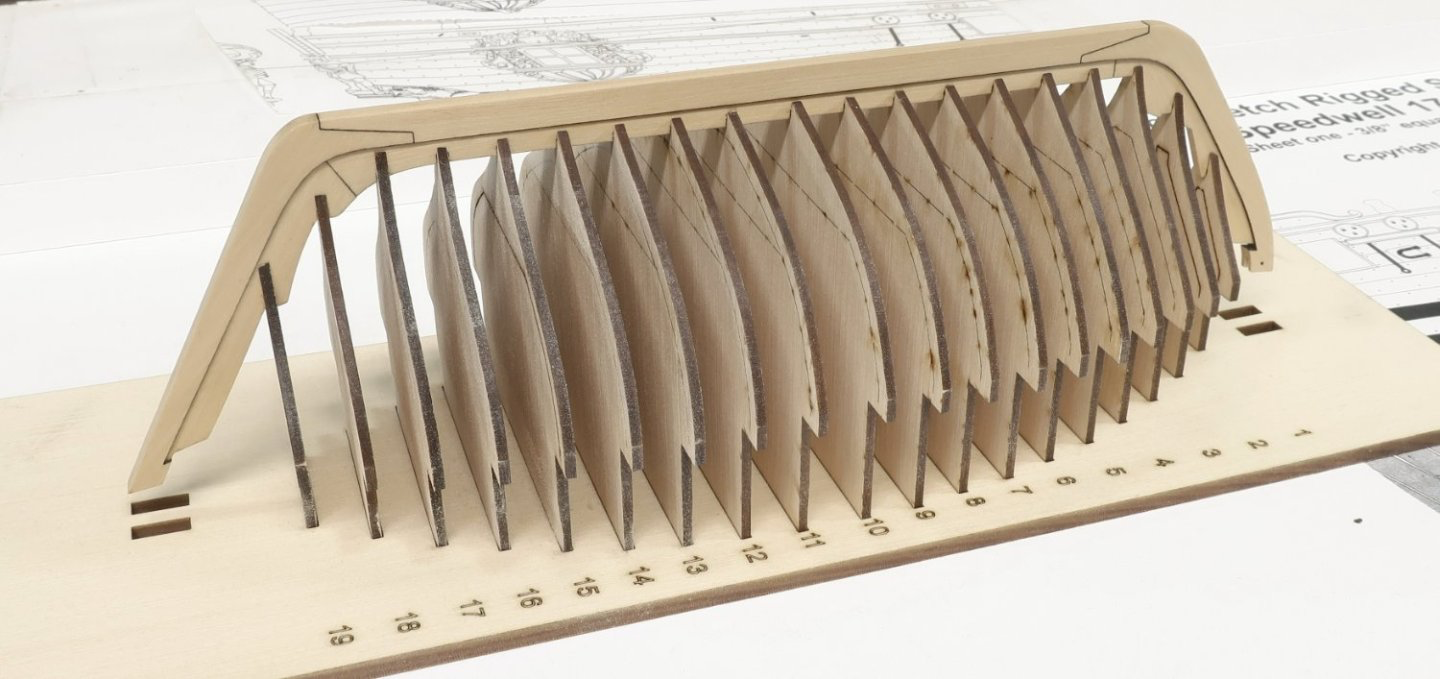
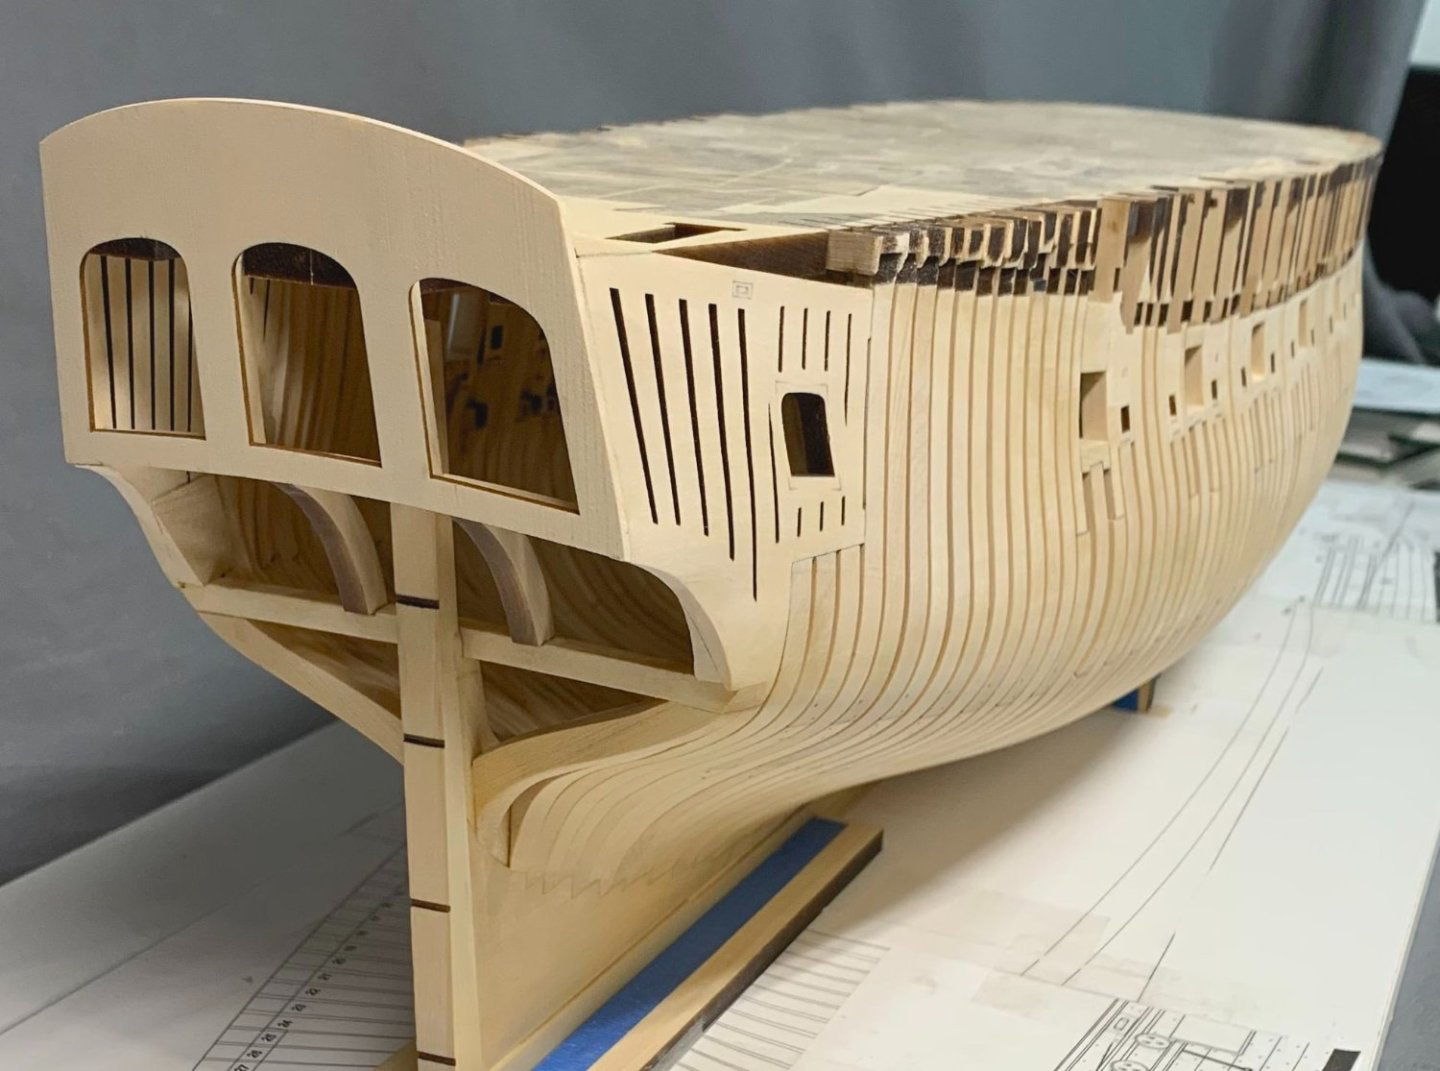
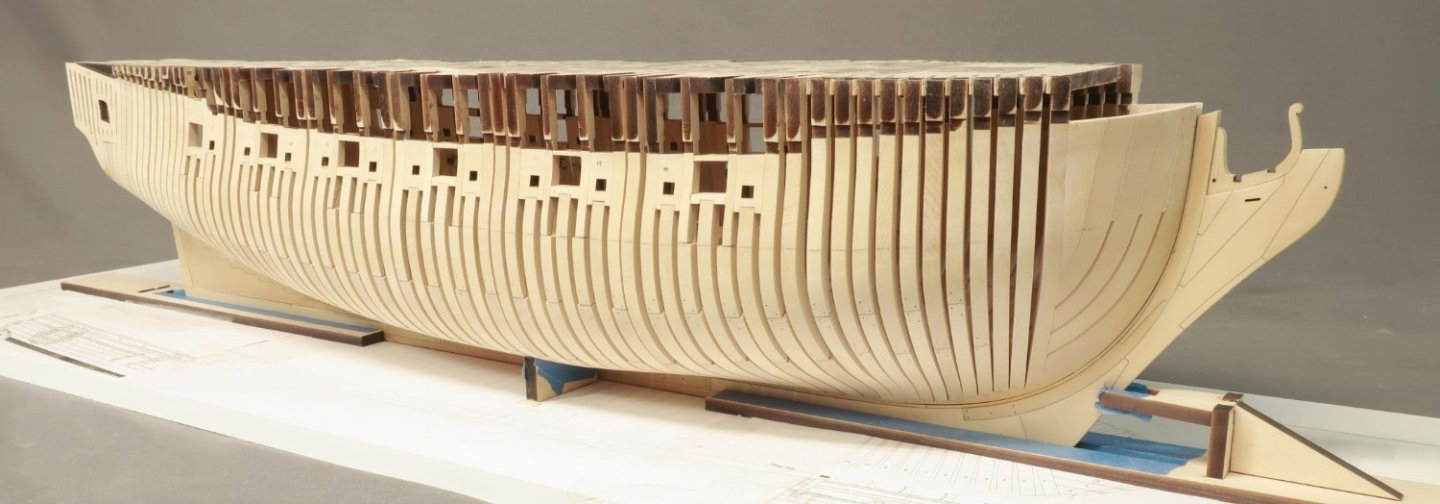
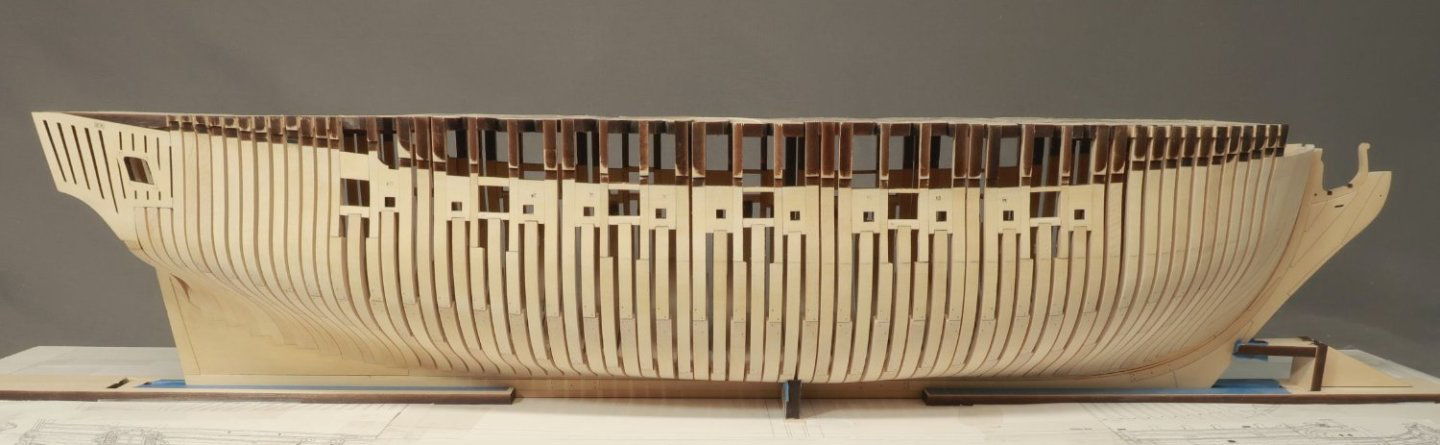
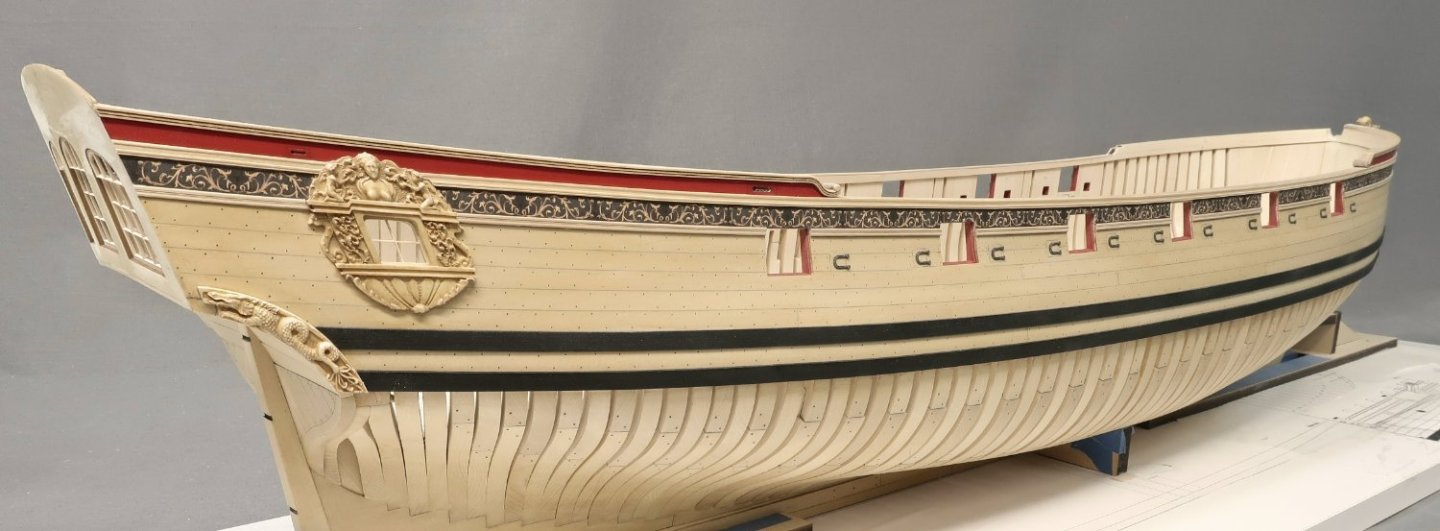
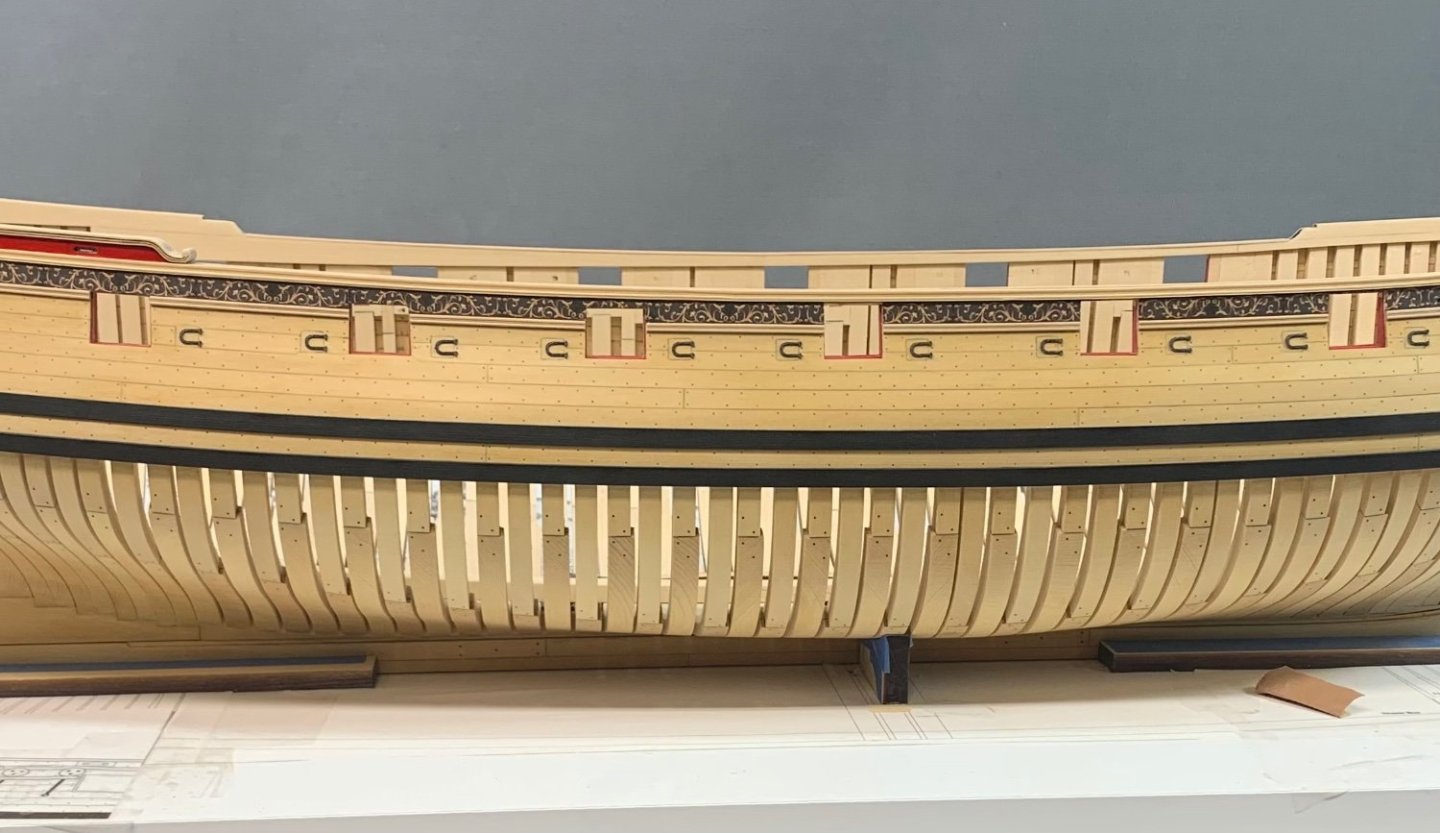
A quick question for the group and an important one for what will be very apparent if you continue reading. And I thought some of you might be interested in the business side of kit mfg and some of the decisions someone like me must make. As you guys know, I am working on. POF kit of Speedwell…below I designed this kit so that the first two chapters would complete the entire framing and skeleton. As you can imagine the number of parts needed to fully frame the entire skeleton before planking is substantial. They are quite thick as well. Chapter one and two uses 5 sheets of 3/8” thick Cedar 15 sheets of 1/4” and 7 sheets of 5/16” as well as another 14 sheets of various thicknesses. A grand total of 41 sheets of Yellow cedar to complete the first two chapters. That gets you to the point where you can begin planking and adding other details in Chapter 3. The same point as completing a plank on bulkhead skeleton where you are about to start planking. This is what it looks like after the first two chapters… I need to ask those who are very interested in building this kit and would likely purchase the first two chapters a question. And anyone else who cares to share their input. What Price would you expect to pay for these first two chapters? Being fair minded and knowing the amount of wood used in these first two chapters and how long it takes to laser cut all those parts. About one full day to laser cut two chapters for one kit. Maybe a day and half. What do you think is a fair price to pay for a framing set of these two chapters? What is the price you would be willing to pay? the hull is only slightly smaller than the Winnie…about the same exact size as the Vanguard Indi kit. First two chapters and printed plans and instructions… $400 $550 $700 $850 more? I have started laser cutting the parts to make the first two chapters…. I know what my costs are and it may determine how many of these I actually make. Most likely a limited run because it is sick expensive to make these outside of China or Russia. material cost..??? time to laser and mfg??? time to research and design??? Keep in mind that a POB version would cost you about $275 to buy the parts needed to complete the skeleton so you could begin planking.


-
No just this scale will be tough enough to produce.
-
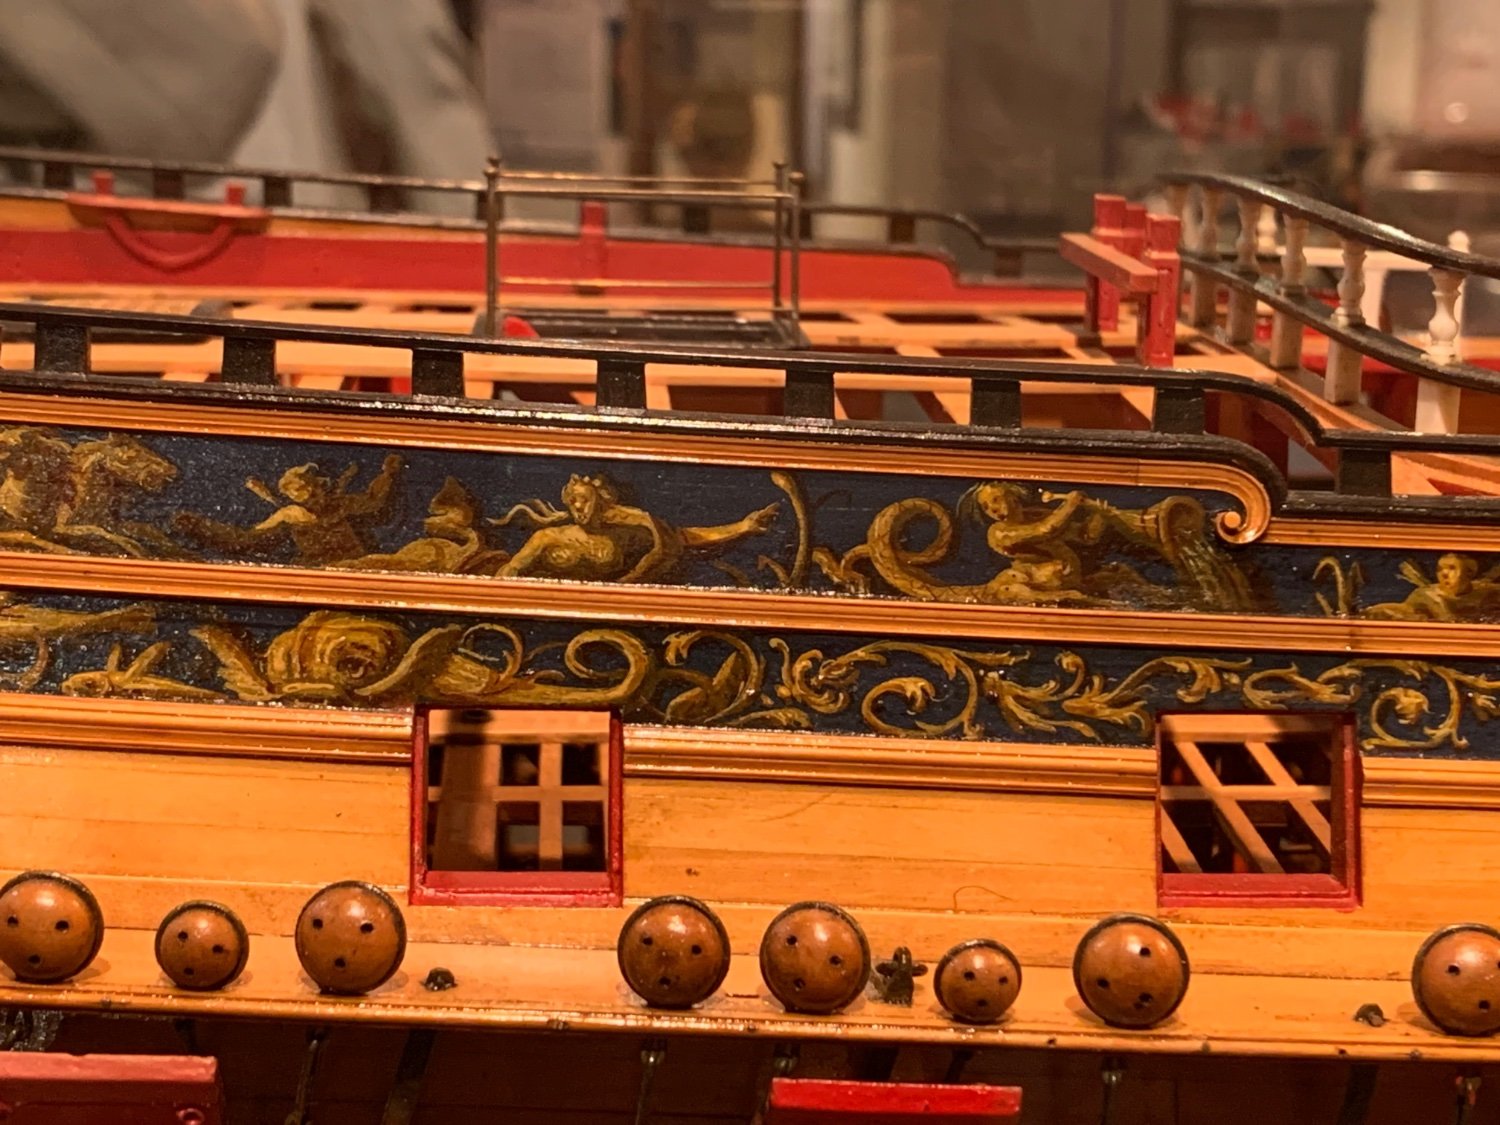
I agree Druxey but as you said it does mimic the old contemporary models. I imagine I did speed up the darkening with age for this version of the frieze. But I am shooting for that contemporary look as I always do. I guess the older I get I also like my models to have a bit of patina, LOL But rest assured there will be that shiny new traditional blue folks are fond of.
-
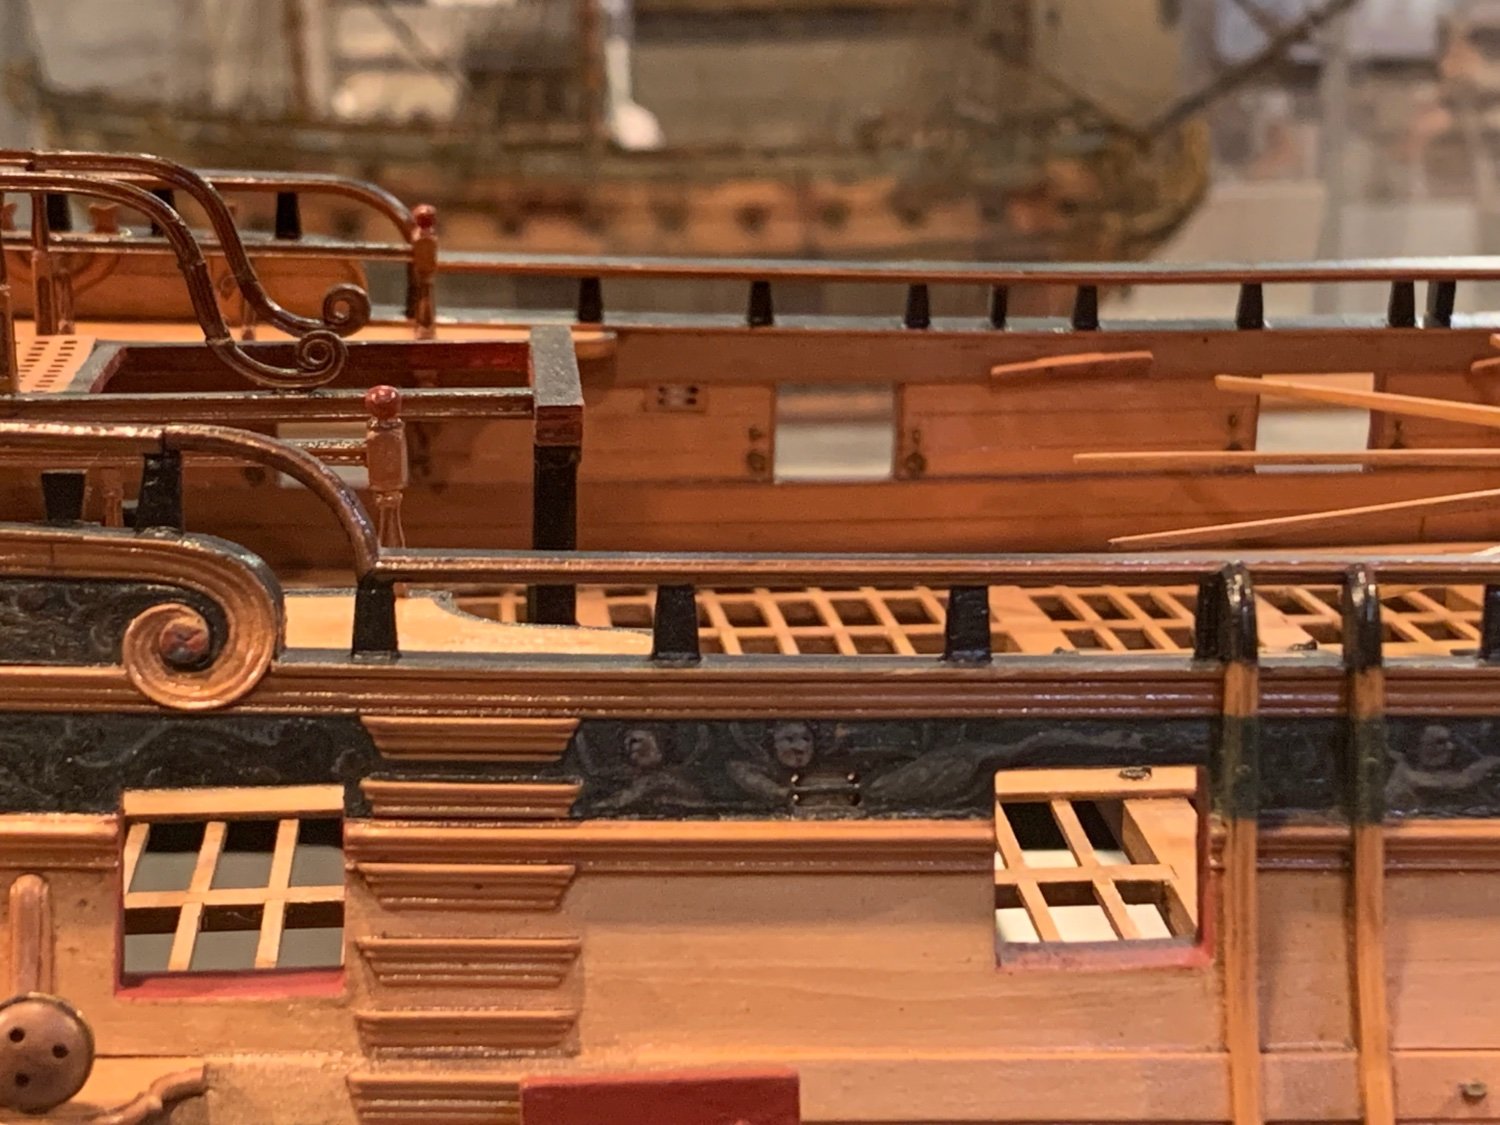
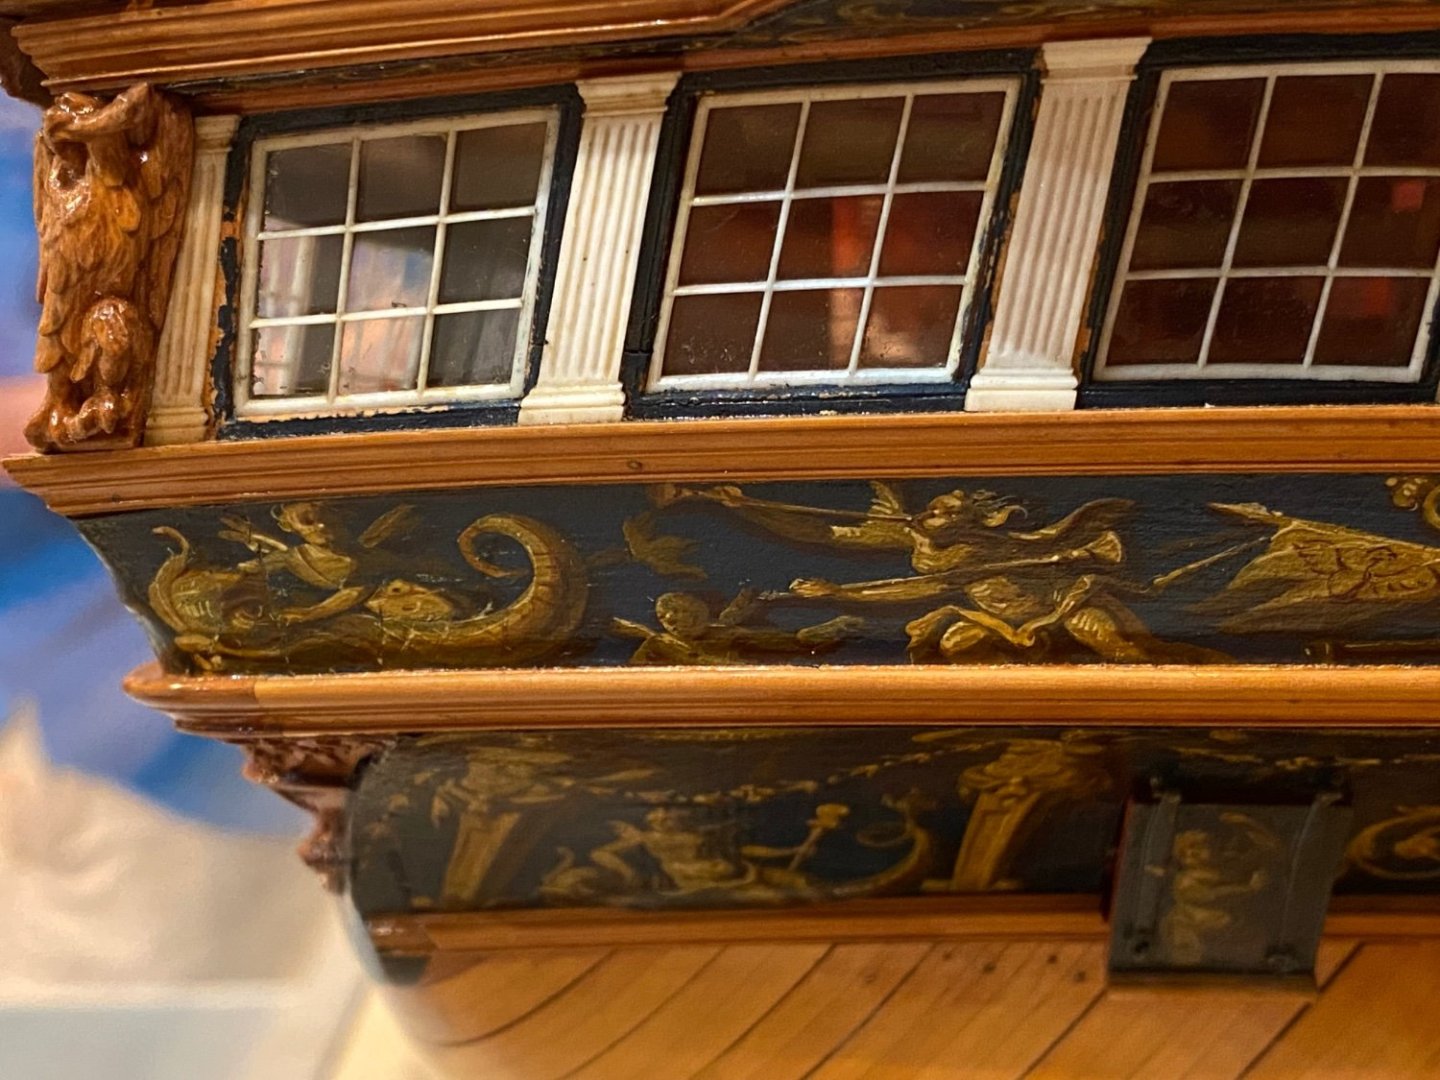
I am sure there will be those that hate it...whether blue or darker, and even a red field. The friezes are certainly something that is a personal thing. I saw so many variations of friezes at the Rogers Collection. I encourage everyone to get out of their comfort zone...it was tough for me but things can get stale fast otherwise. Just a few close ups as I took many. These are dark ones.


-
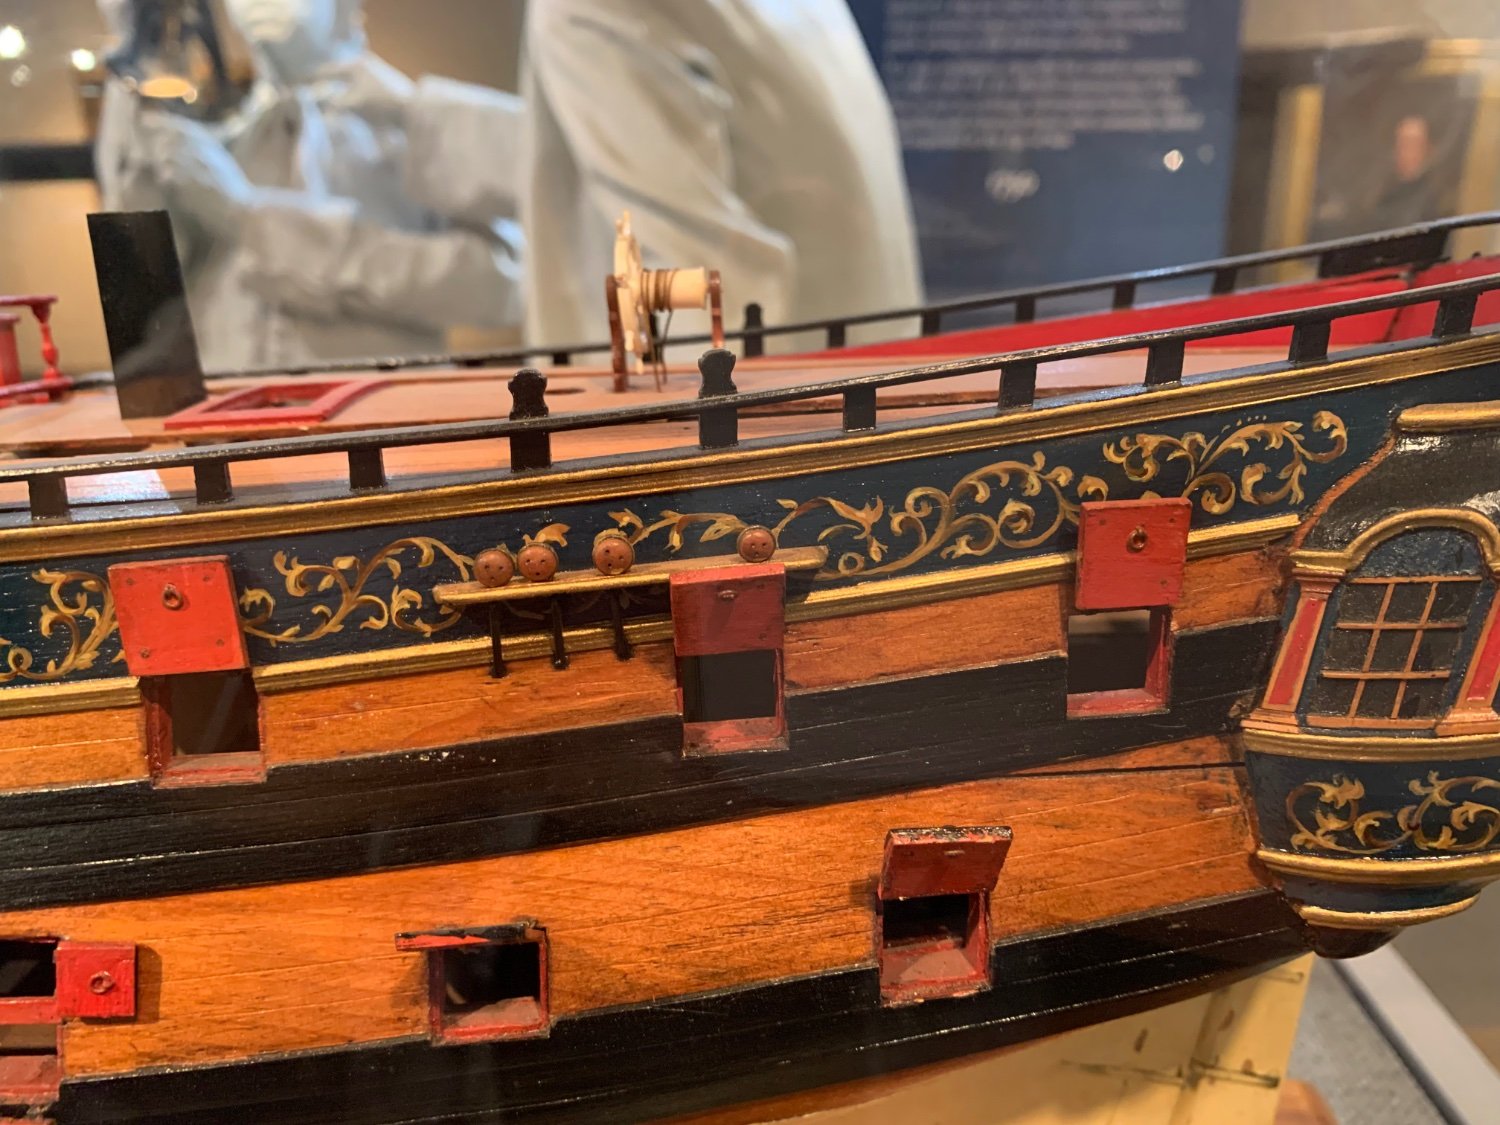
Thank You...also of note the upper molding along the sheer is laser cut and etched to look like fancy molding. The same as for the Winnie. The scrolls are also laser cut and etched. The lower molding were scraped in the traditional way...and not laser cut.
-
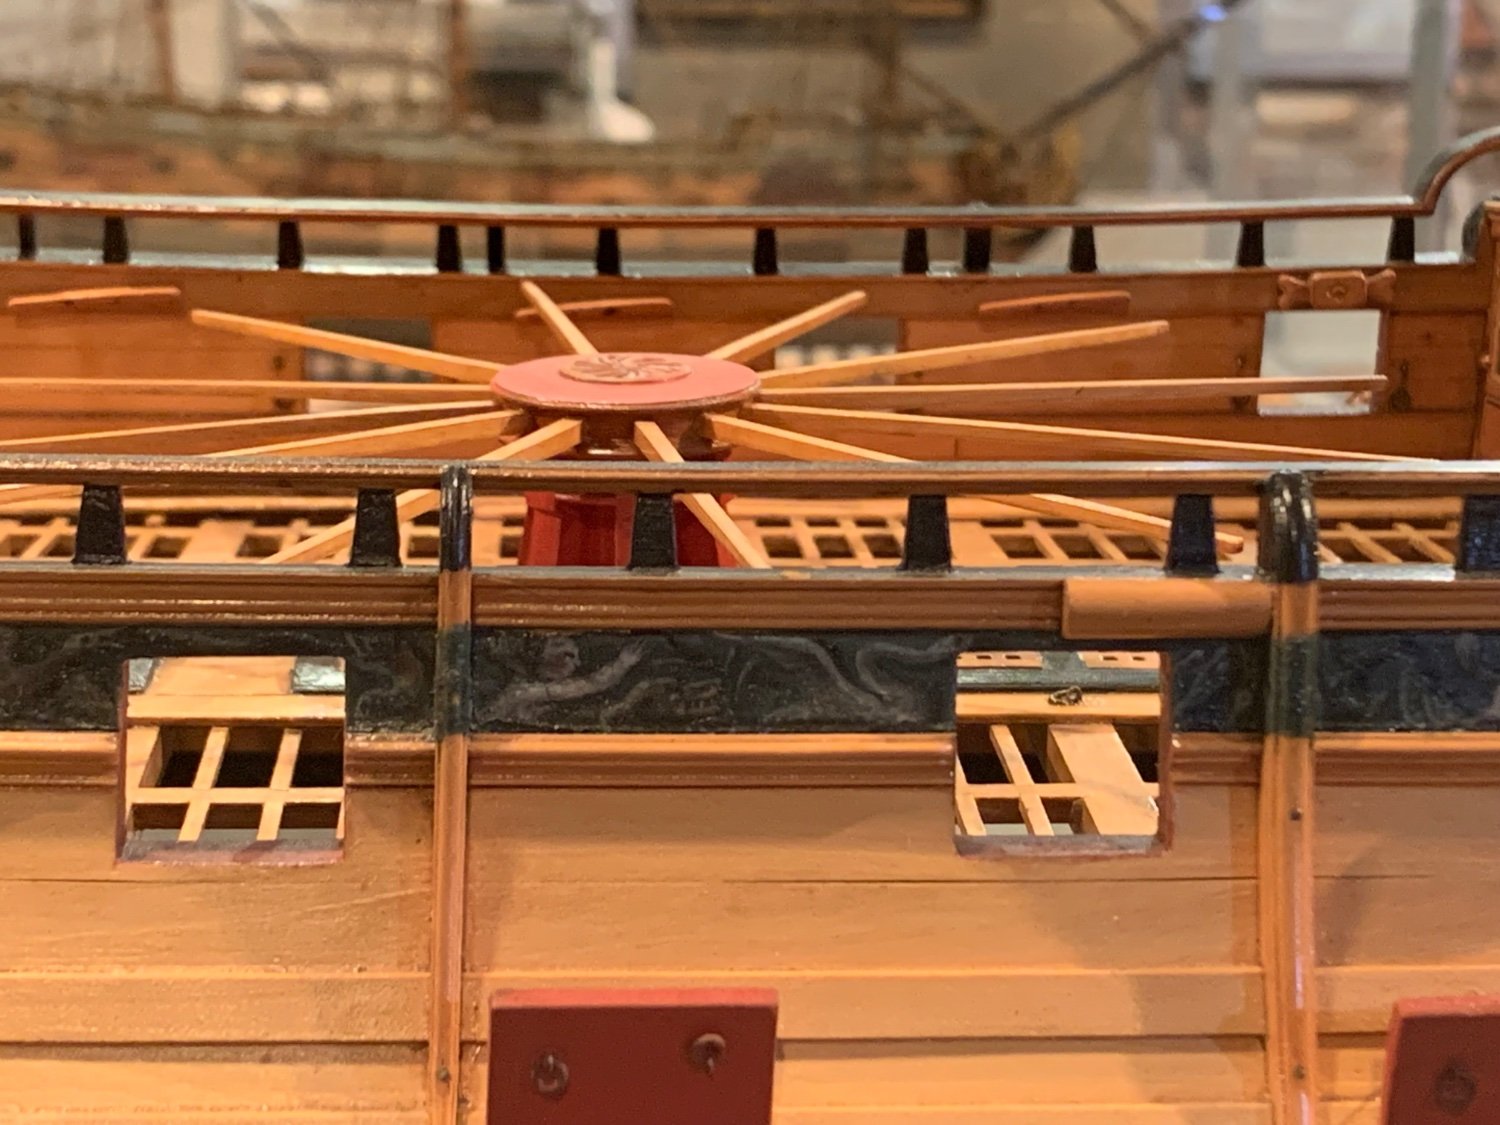
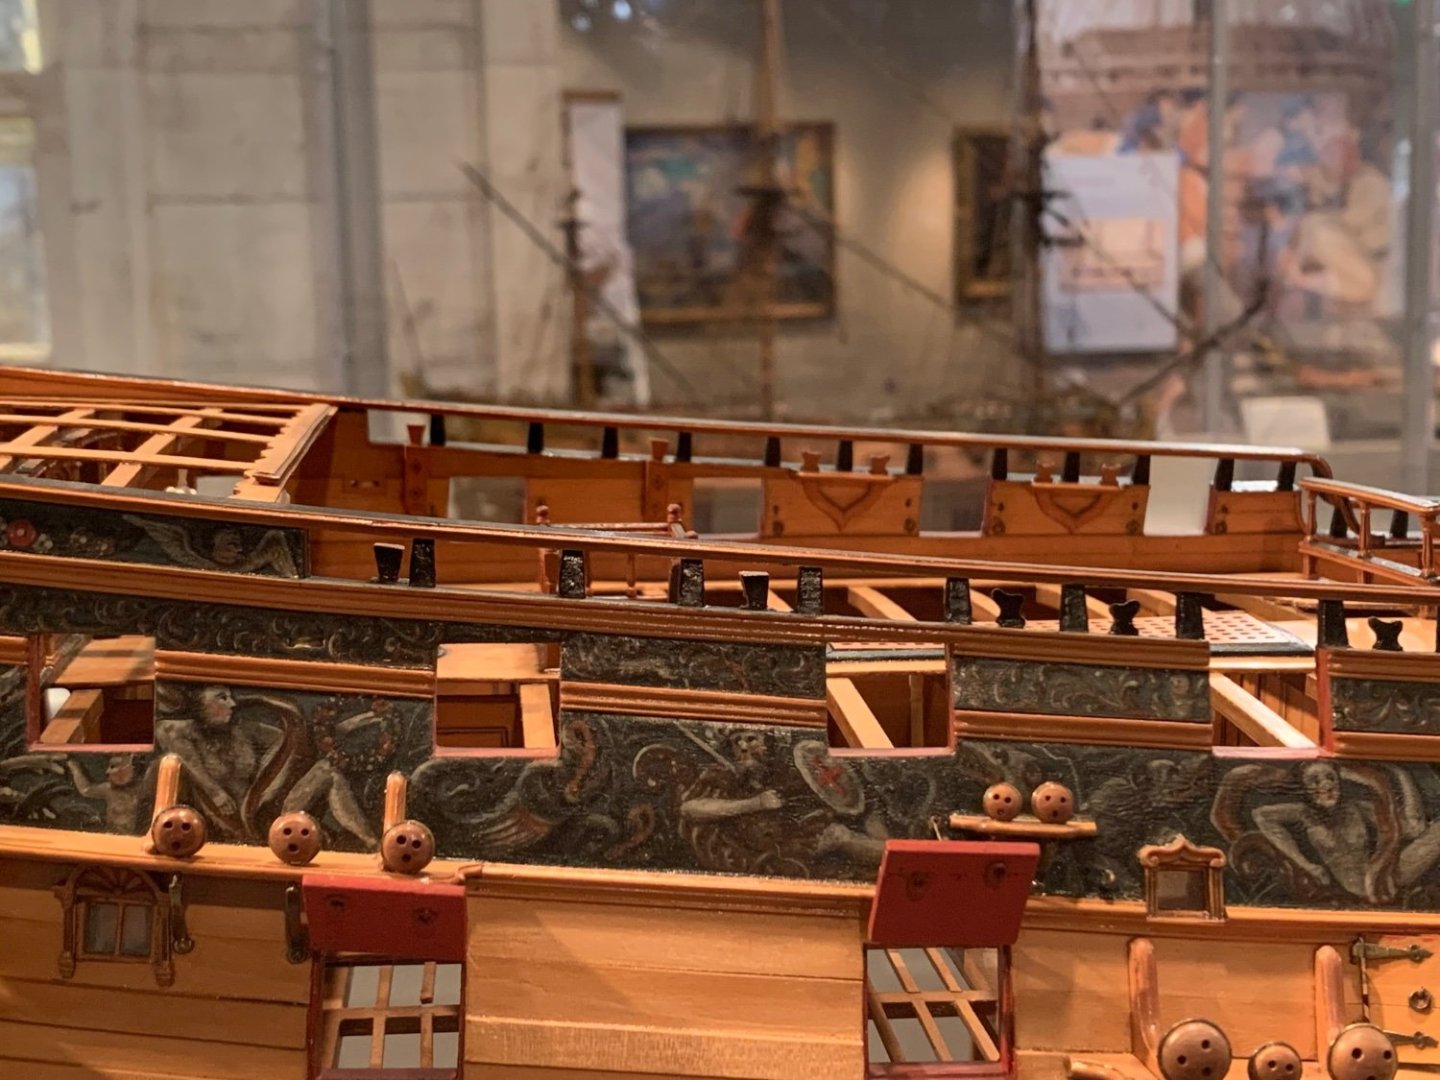
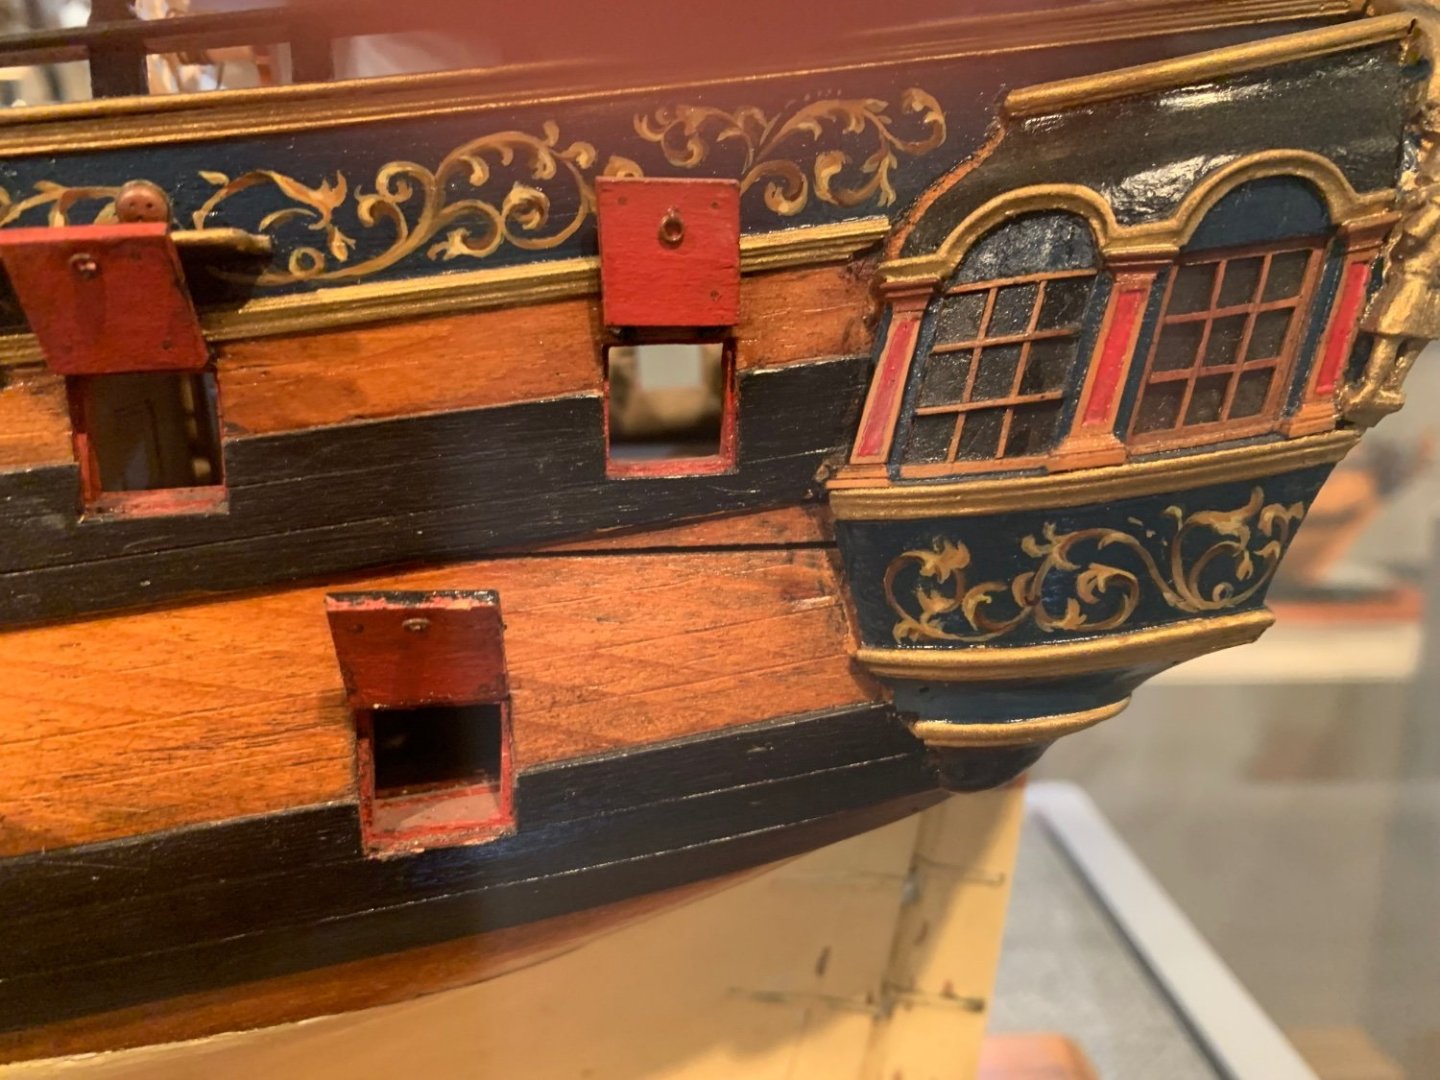
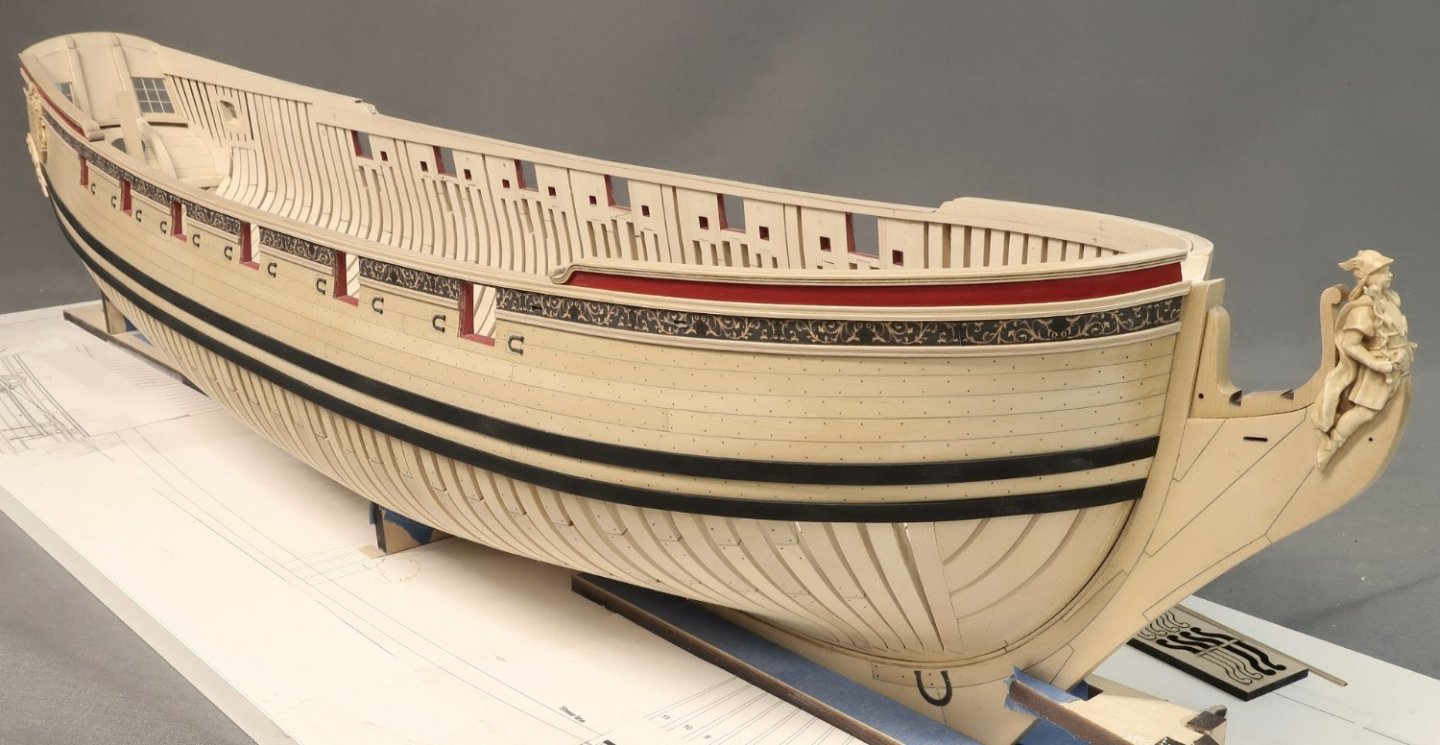
Ok some better pictures now that the starboard side is finished. When I finish the molding and friezes on the port side chapter 3 will be completed. Chapter 4 will entail finishing the stern outboard to a certain point. The carvings and moldings etc...along with the rudder. Once that is all done I will start on the interior platforms and fittings. That will be chapter 5. Now I have decided to go in a decidedly different direction with the friezes. I was unexpectedly inspired while down in Annapolis. Seeing the Rogers collection always does that for me. I was inspired by a few contemporary models for ships of the same size which actually had very dark blue or almost a black/brown field for the friezes. Yes I still like the tradition friezes you always see on models of the period which have a lighter blue field. But I have done that so many times it has grown tired for me. So I developed yet another frieze choice with a darker field. This was frieze on my model is actually developed from photos I took of the contemporary model in the Rogers collection...brought into photoshop and repurposed for Speedwell. Placing them both on the model...the more traditional blue and this newer inspired design, I decided to go out on a limb and take a chance on it. So far I like it very much. Both colors and choices will be made available when I finally release this model as kit. I will try and release the first installments once I get chapter 4 completed. I hope to anyway. That is my plan.


-
Thankyou for saying. That is an interesting idea. I am quite happy with the printed friezes. But i do wonder what that would look like. I will certainly give that some thought. chuck
-
Thank you for saying…LOL busy working away on Speedwell and testing some molding and frieze concepts. Literally playing in the shop and taking pics with my phone so the photo quality is iffy.
-
Indeed the interior will be added. I am going to try to include all the same detail Greg added to his wonderful model and as shown in the Seawatch 2 volume set. Chuck
-
Nicely done…
-
Wonderful progress. I remember the same feeling at that point. Seeing those pumps in position and the deck beams completed really make the model look different. It energized me to move to chapter 8!!!!
- 840 replies
-
- 4
-

-
- winchelsea
- Syren Ship Model Company
- (and 1 more)
-
Really nice work. Well done.
-
Beautiful work Mike!!!
-
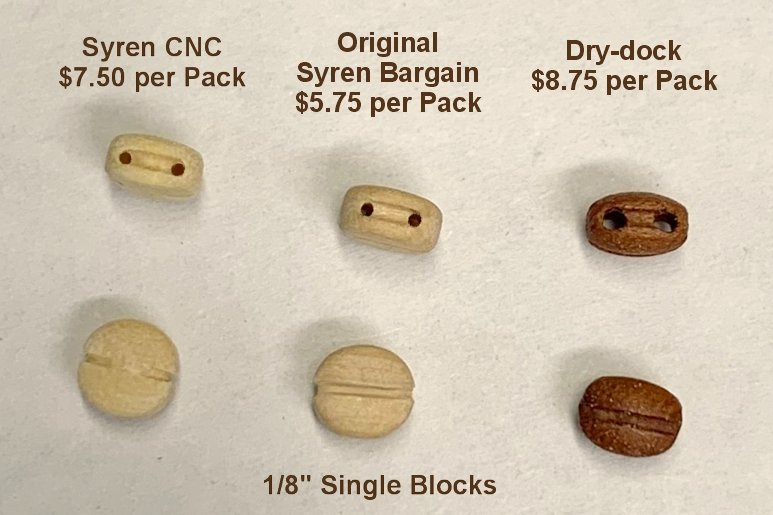
Same here Druxey...Maybe its just nostalgia but I think I actually prefer my original blocks too. But in fairness, I learned so much during the process of trying to perfect block-making over the past year. I think my original hand-made blocks are even better this time around because of that work. And you cant beat them for the price. I dont worry about the strop groove because once the block is stropped you cant see it anyway. It will take me a little while to make them in all sizes but I am happy report that I have some help this time around. CNC is very slow....and there is so much more waste in terms of wood use than my old hand-made method as well. So there are benefits to still making them as well. This is why in spite of them being made by hand I can offer them up much cheaper. I outsource the CNC blocks and they can make about 500 blocks max per day at this point. When I make them by hand I can do around 1200 to 1400 blocks. How crazy is that? Especially nice when my son-in-law is making a batch, LOL. Chuck
-
1/8" single BARGAIN blocks are now in stock. I will finish this batch of 1200 blocks tomorrow and start on doubles. While I was busy packaging them up I decided to do a comparison photo between my Original Hand Made BARGAIN blocks and my new CNC blocks ...both are 1/8" single. In addition I added a Dry-dock single of the same size and took a brutal close up photo with my phone. I dont know what all the fuss is about with the other guys blocks. I only had a package of their pear versions...if that is actually pear I dont know. In addition I was pleasantly surprised at how close my old hand-made blocks look to my new CNC versions. I am glad I have help now to make both so its not a chore to make either of them. Having worked for the last 10 months at those CNC blocks it certainly help me improve my skills when it came time to make them by hand again. I hope you dont mind me saying that I am pleased with the results for the hand-made Bargain blocks. Photo Just for fun!!!
-
I dont think Im in any of those pictures. I was taking them. I will look through them all and post one. Chuck