MORE HANDBOOKS ARE ON THEIR WAY! We will let you know when they get here.
×


Remcohe
-
Posts
610 -
Joined
-
Last visited
Content Type
Profiles
Forums
Gallery
Events
Everything posted by Remcohe
-
 I understand why you dreaded this part, yet you executed it beautifully. Remco
- 3,618 replies
-
- 5
-

-
- young america
- clipper
- (and 1 more)
-
You have some nerve to cut the margin plank after it's fixed to joggle the ends deck planks. Remco
- 191 replies
-
- 8
-
-
- young america
- clipper
- (and 1 more)
-
Cutter Cheerful 1806 by rafine - FINISHED
Remcohe replied to rafine's topic in - Build logs for subjects built 1801 - 1850
Very nice planking Bob, Il like the subtle differences in the shades of the holy. Remco- 525 replies
-
- 3
-
-
- cheerful
- Syren Ship Model Company
- (and 1 more)
-
Piet, given your current scheme the post should be green and not red, as the last band below the post is already red. The caprail yellow and if you can pul it of a thin yellow band below the posts. Or if you are opening the paint cans anyway you can alter the whole scheme to something like the Batavia. Remco
-
I'd say go ahead and paint them. Remco
-
Mark, I think it might work. Although a file would probably fill up very quickly so maybe you want to adapt a regular cutting tool and turn the duplicator 90 degrees and feed the tool from the side as usual. only one way to find out... Remco
- 1,207 replies
-
- 5
-
-
- sloop
- kingfisher
- (and 1 more)
-
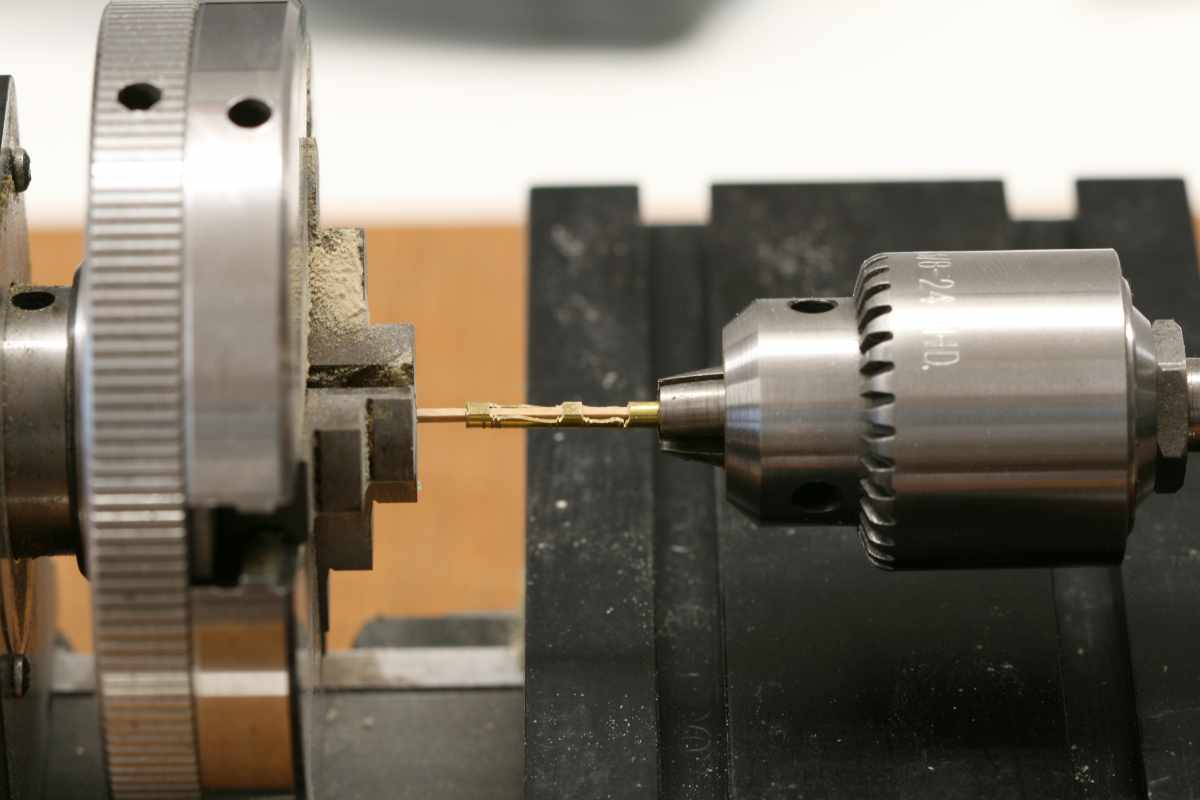
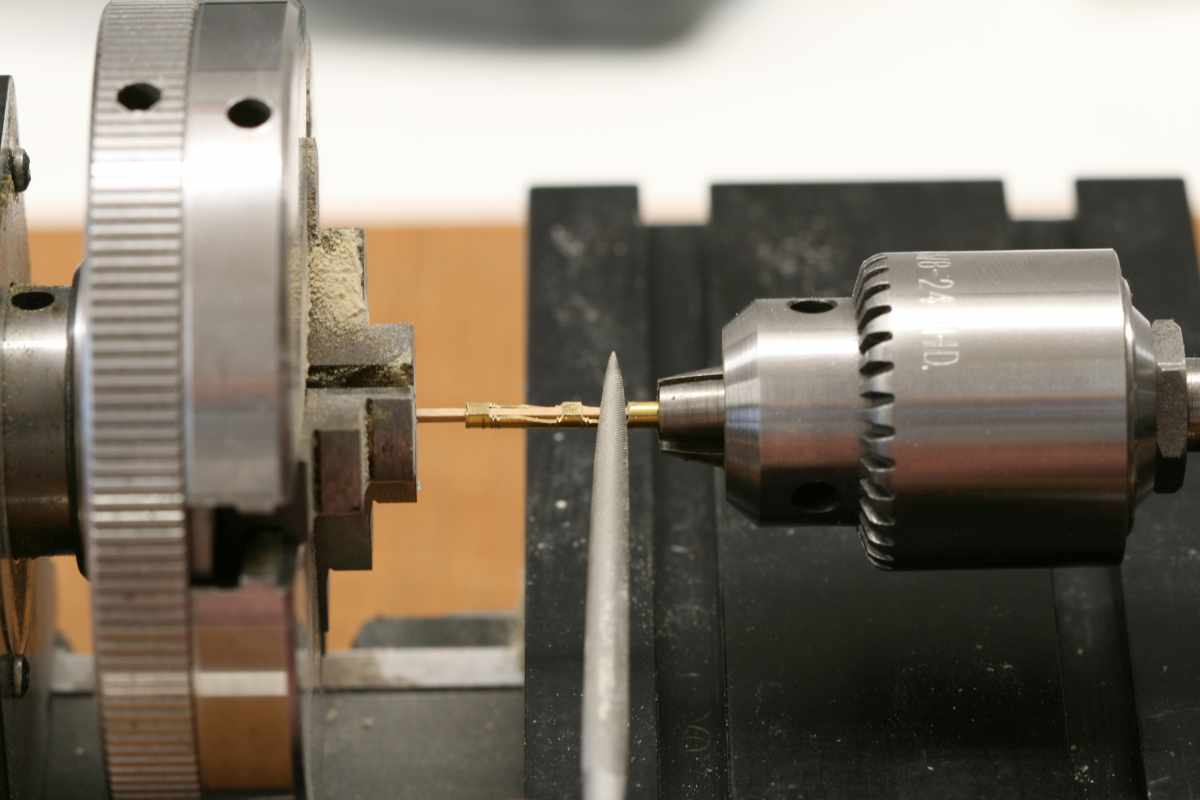
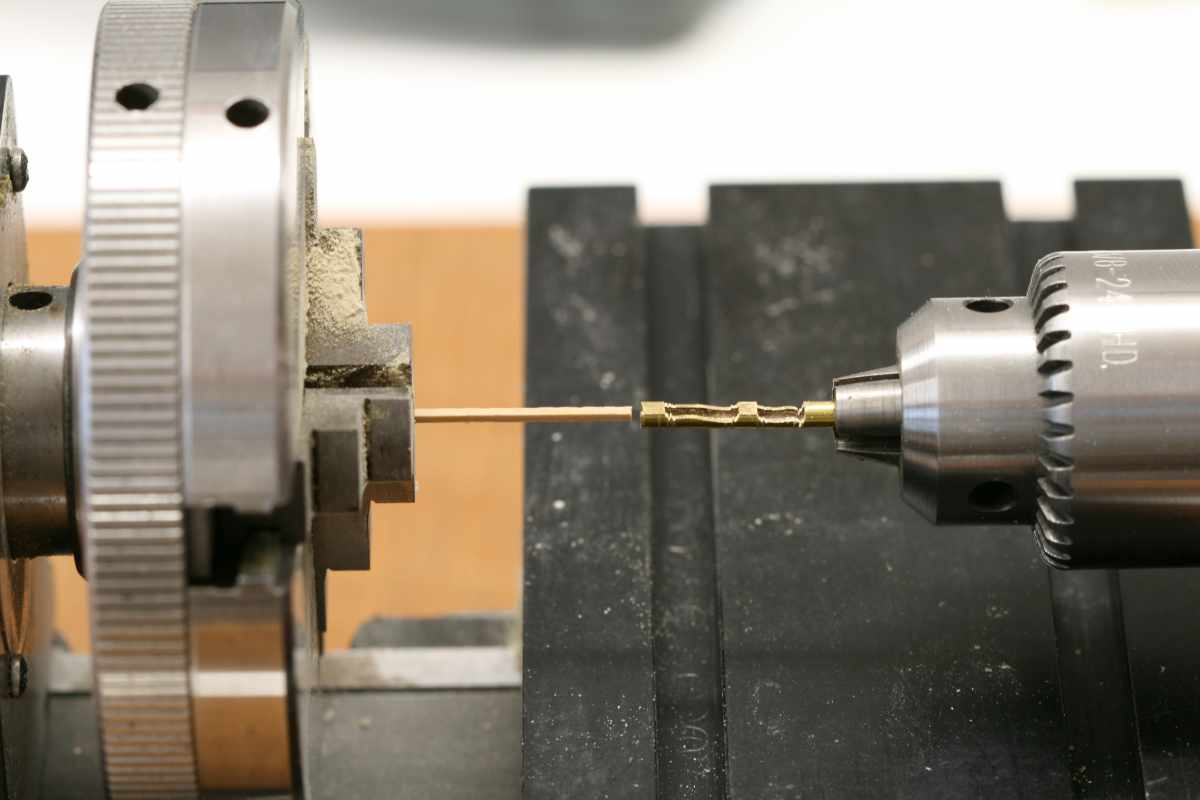
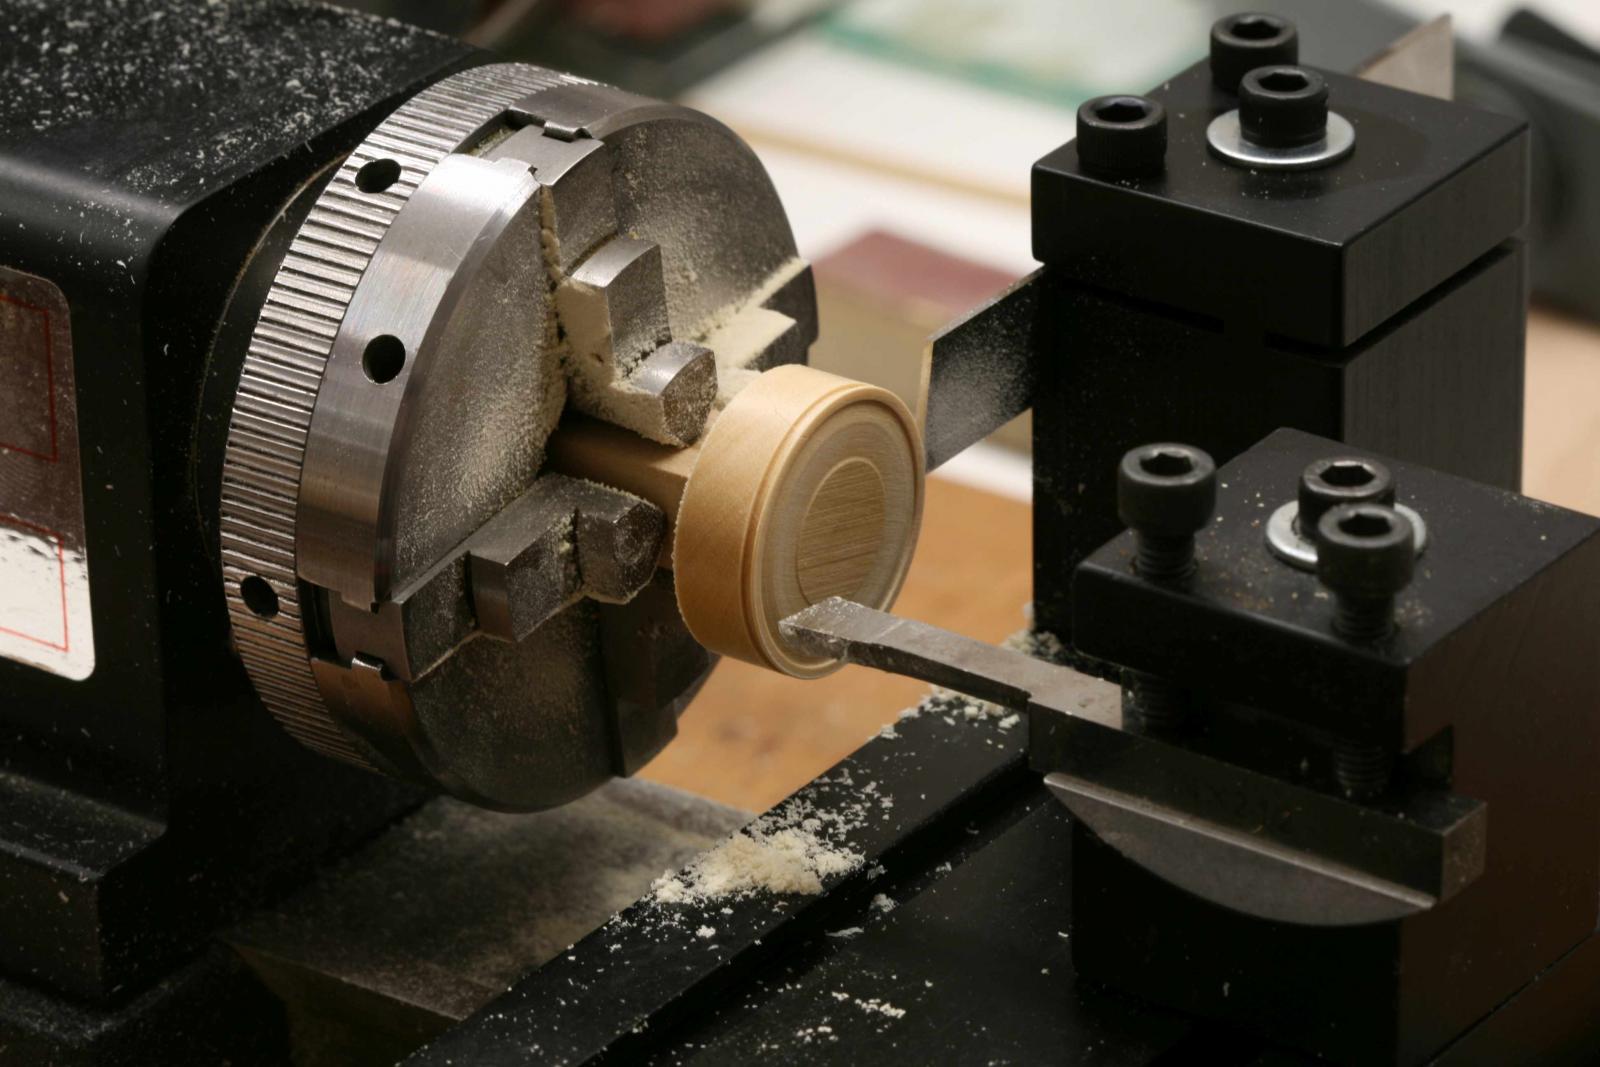
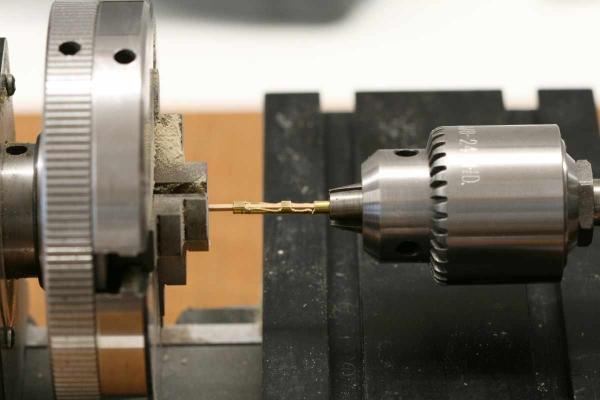
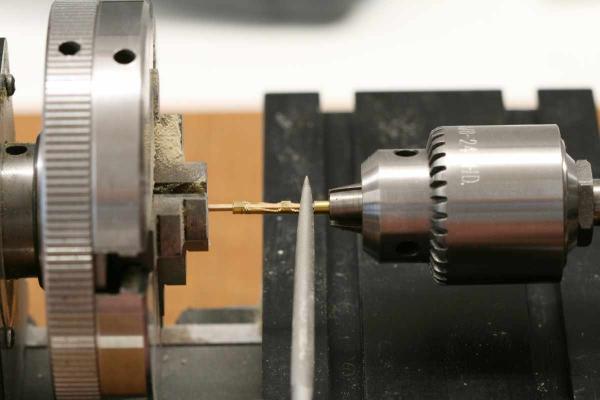
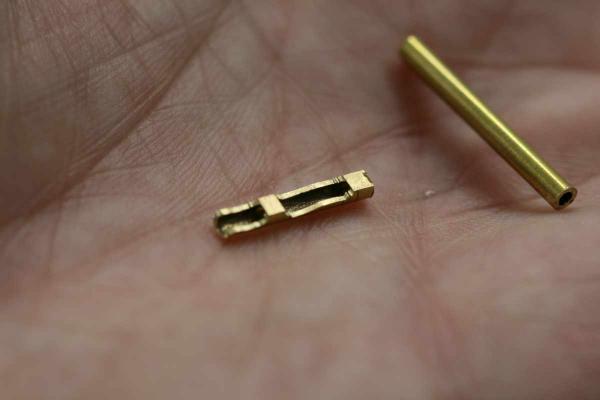
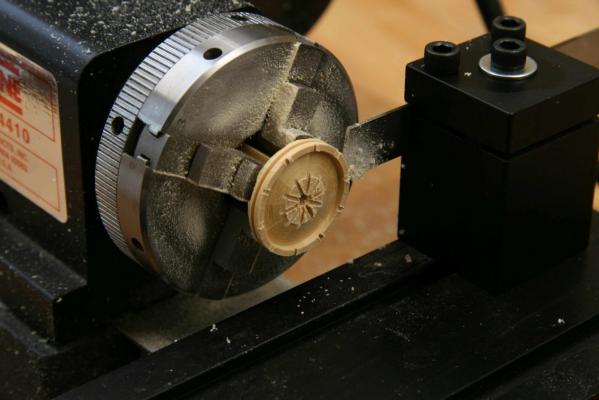
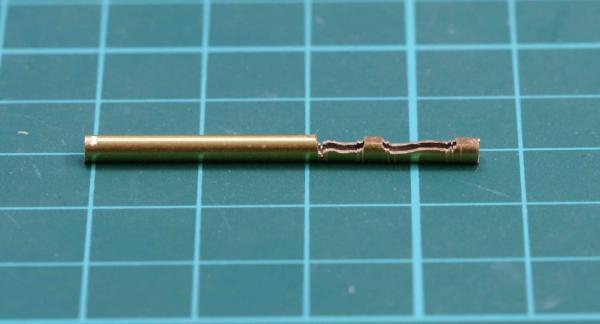
Thanks all for your very generous comments! Mike Y and Pat figured it out, I expected more of you would have Here is the setup on my Sherline It takes some practice to get it right as it is not an exact science. The inner diameter of the tube is a bit bigger than the stock so in the beginning it will flex under the pressure of the file, once the spoke gets thinner it will push against the file due to the centrifugal force. Practice makes perfect as always. After today no more spokes, I accidentally bumped into the jig and broke it :-( Remco ps TFFM refers to the excellent collection of books The fully framed model vol 1-4 by David Antscherl and Greg Herbert

- 1,207 replies
-
- 31
-
-
- sloop
- kingfisher
- (and 1 more)
-
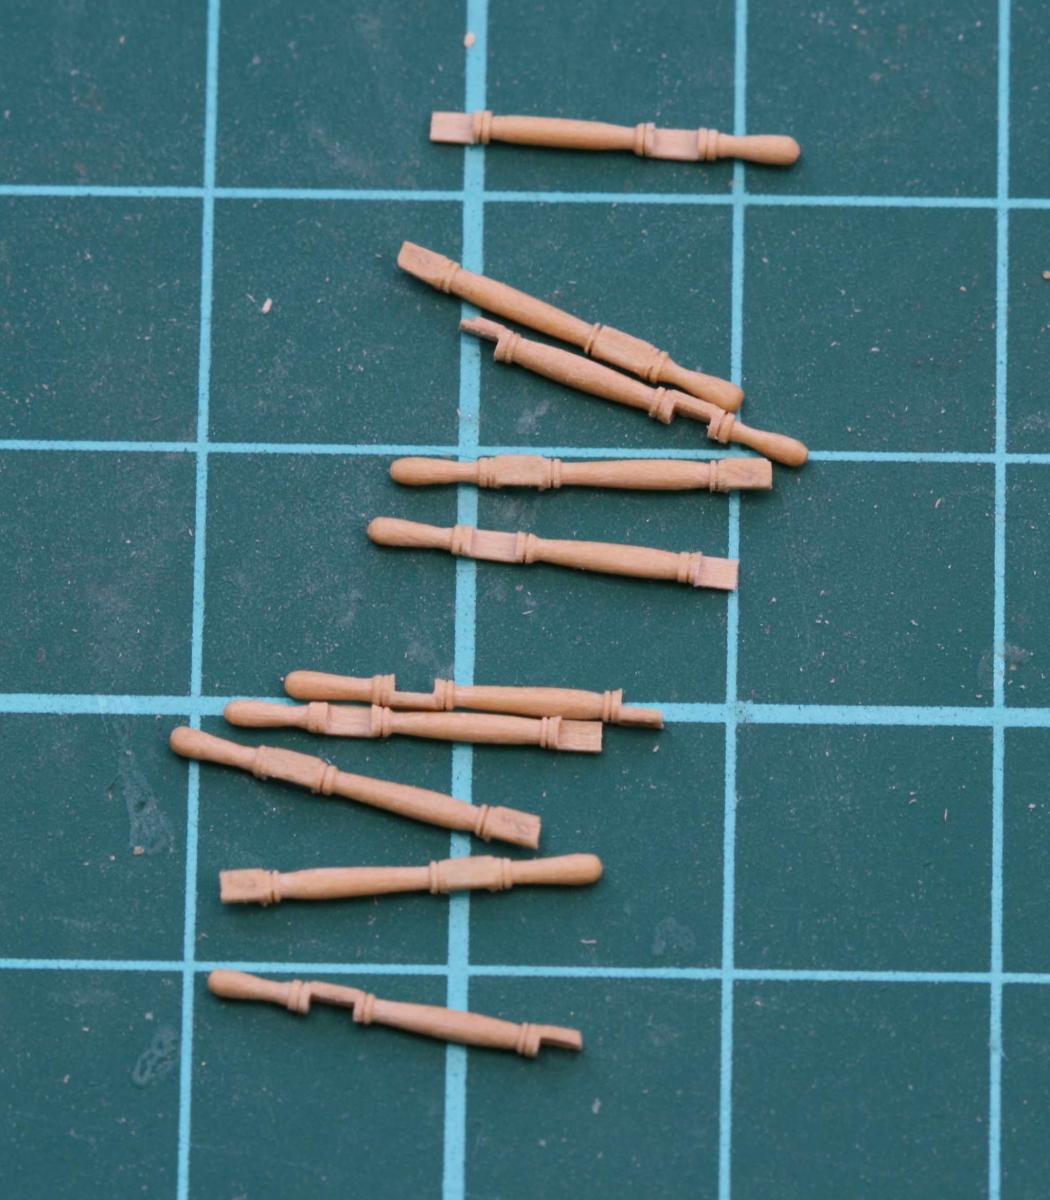
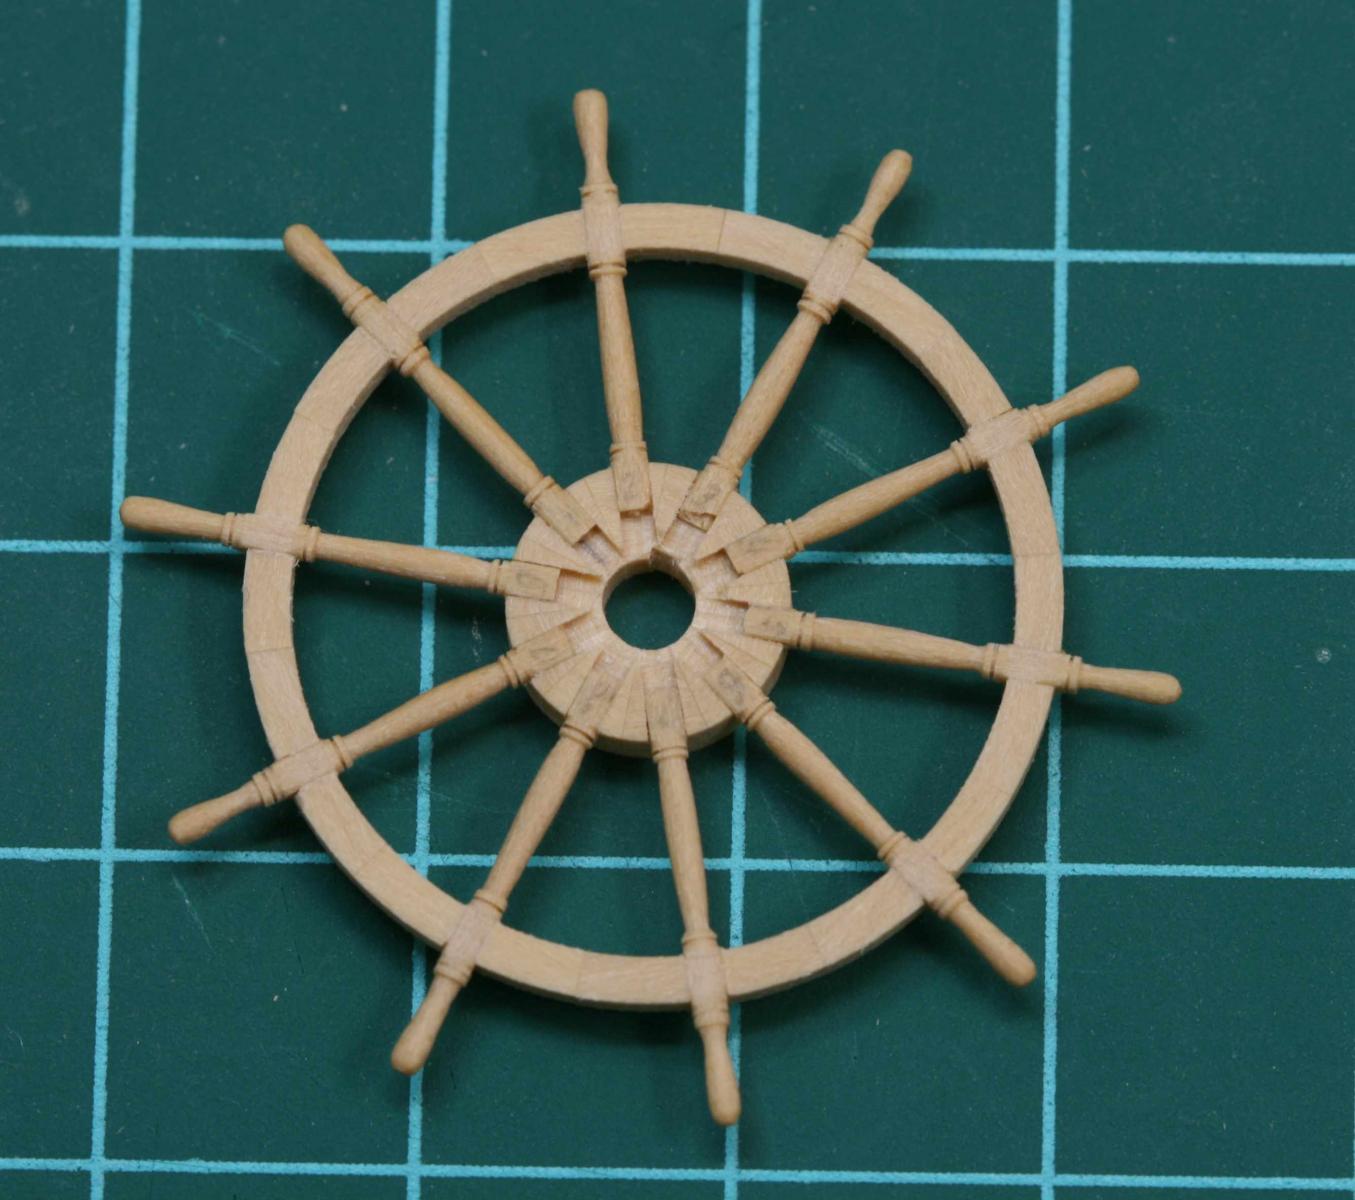
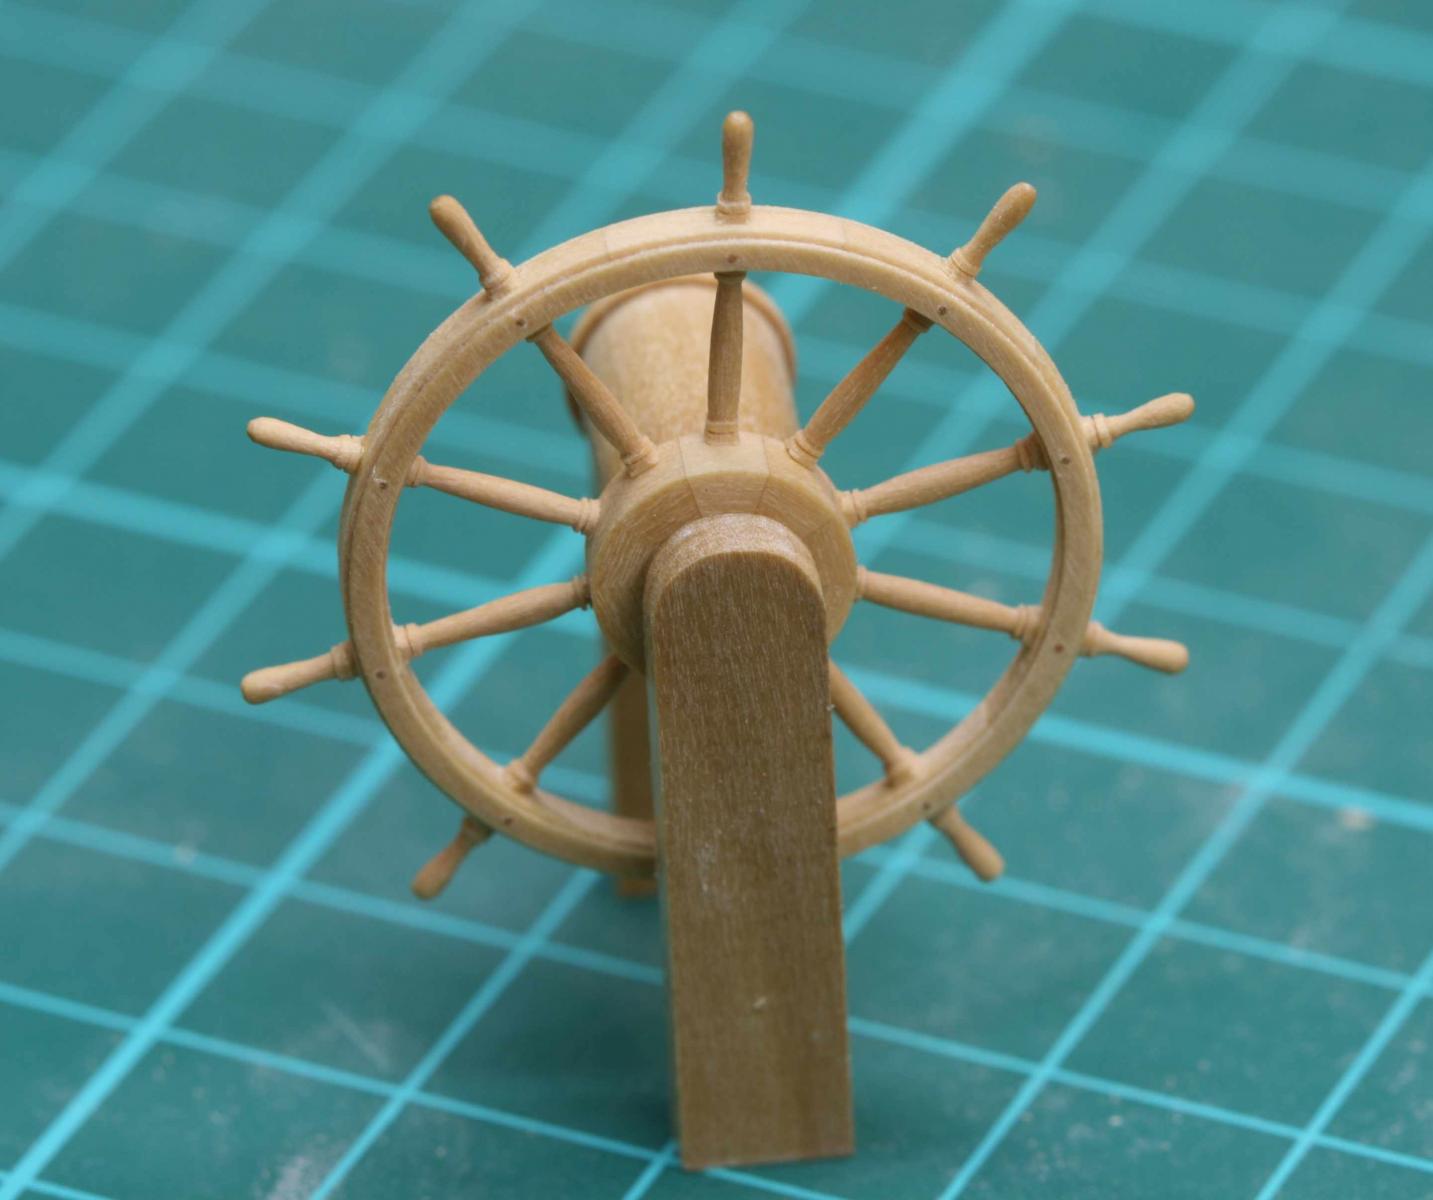
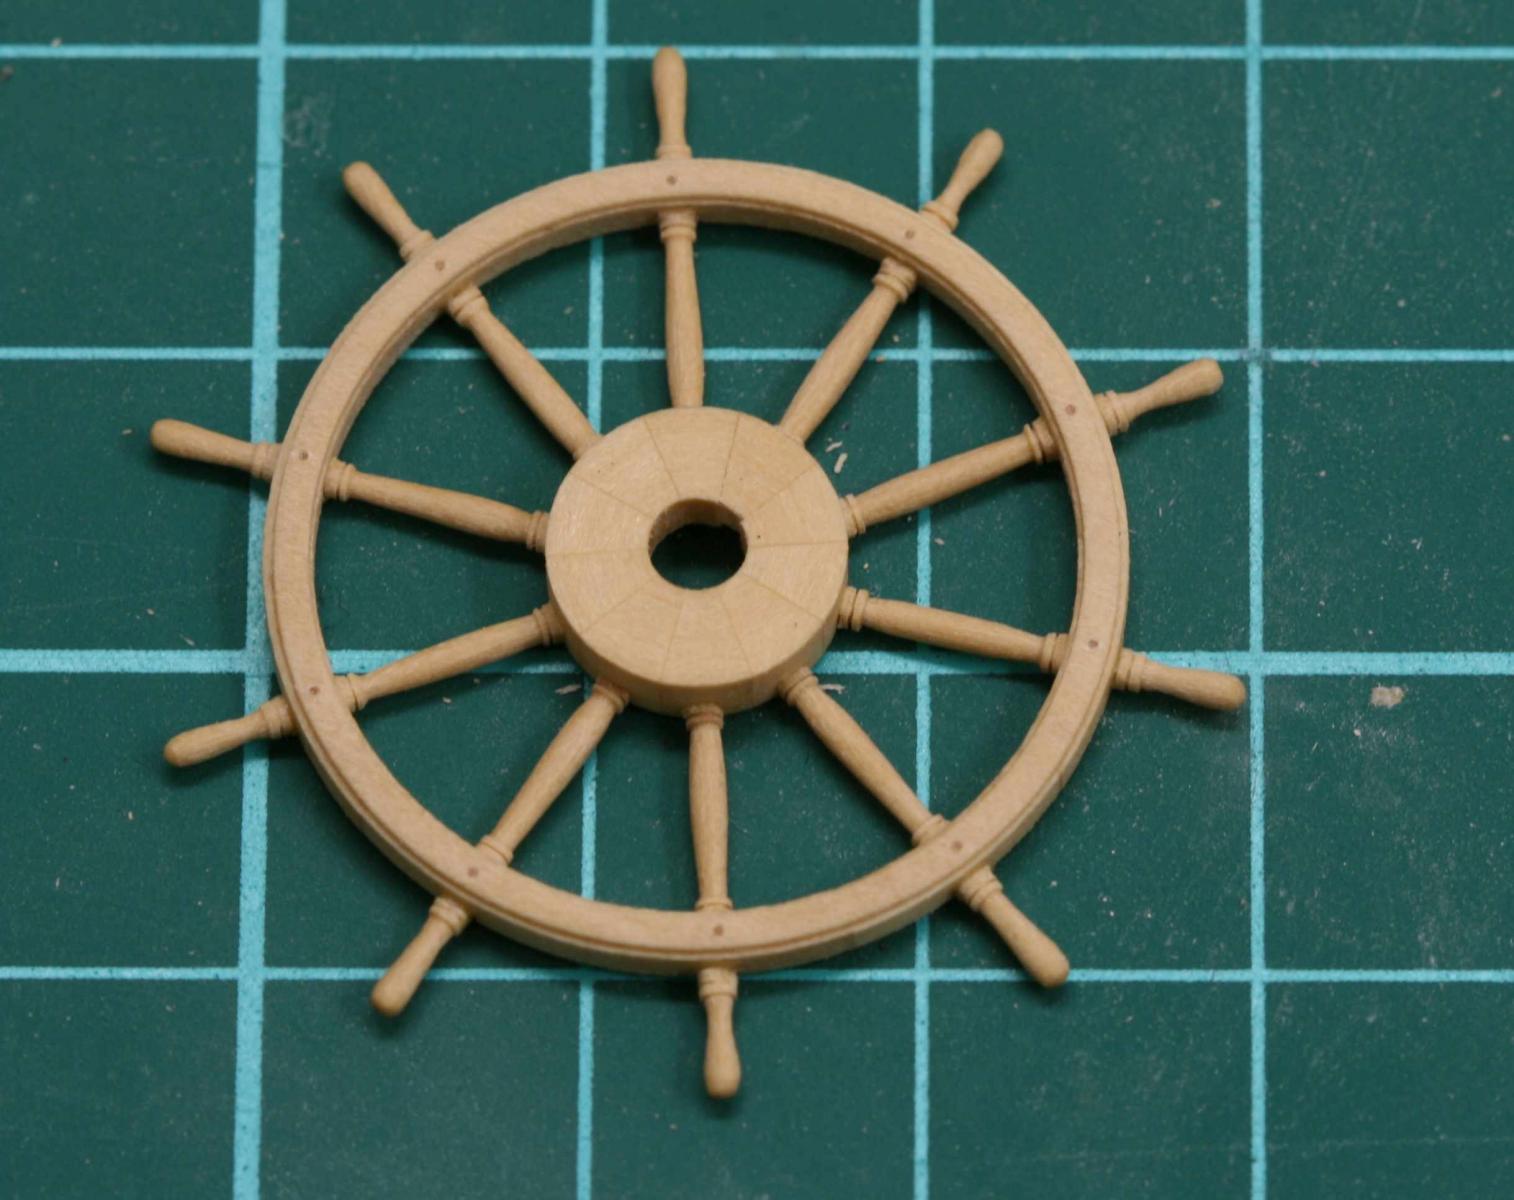
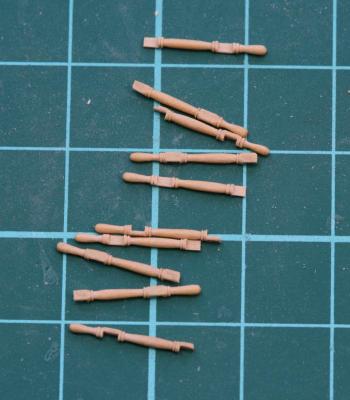
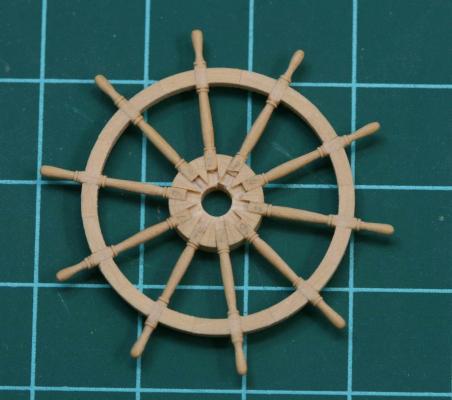
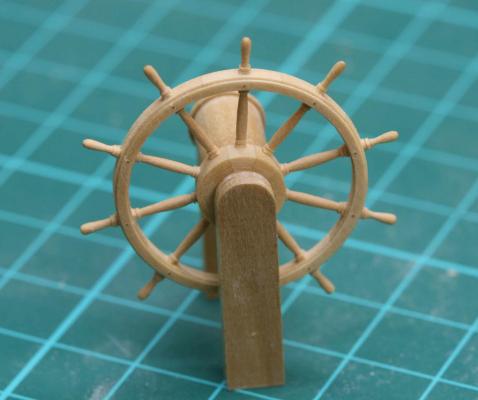
And now for something completely different. I took a break from the tedious deck work, intrigued by Garus' steering wheel on his excellent Victory and especially his duplicating device, I build the steering wheel. Using the technique described in TFFM 2 and 3. Not easy but lots of fun, frustration and multiple redo's later, the results: Remco


- 1,207 replies
-
- 48
-
-
- sloop
- kingfisher
- (and 1 more)
-
Absolutely stunning. Remco
-
It all turned out beautiful in the end. Oh yes and "measure twice, cut once" and all the other hard earned lessons we all learned over the years. Still I tend to forget them very quickly and I don't know why. Maybe a shipwright is stubborn, luckily I'm very skilled at redo's ;-) Remco
-
That sure looks great Greg. Do you have a picture of the finished stove, it would be a pity if we couldn't admire the result. Happy Thanksgiving. Remco
-
Excellent. Great tip to use a hollow template for the spokes. Remco
-
HMS Naiad 1797 by albert - FINISHED - 1/48
Remcohe replied to albert's topic in - Build logs for subjects built 1751 - 1800
Really great. Not easy to have the beam ends fit snug against the hull, especially where the hull starts to curve in two directions. You did an excellent job. Remco -
Looking very good Piet. Not easy to rig those guns under the poopdeck! Remco
-
So you're doing a good job from my point of view. Best wishes for the Admiral. Remco
-
Jan, I don't remember where I got it. I probably bit the bullet regarding the shipping costs. I searched for you and if you get it from amazon (uk) the shipping costs are ok: http://www.amazon.co.uk/Extended-Liver-Sulfur-Patina-Oxidation/dp/B004PLZ4SS Remco
- 1,207 replies
-
- 2
-
-
- sloop
- kingfisher
- (and 1 more)
-
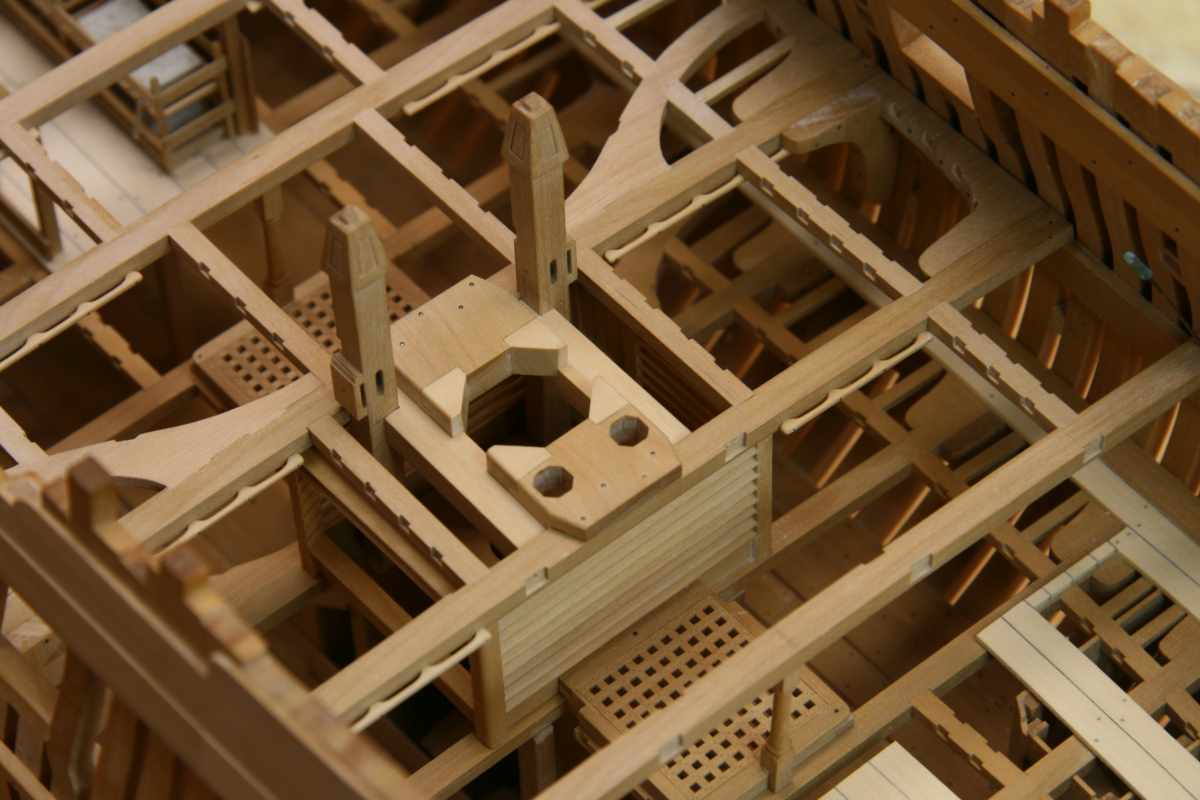
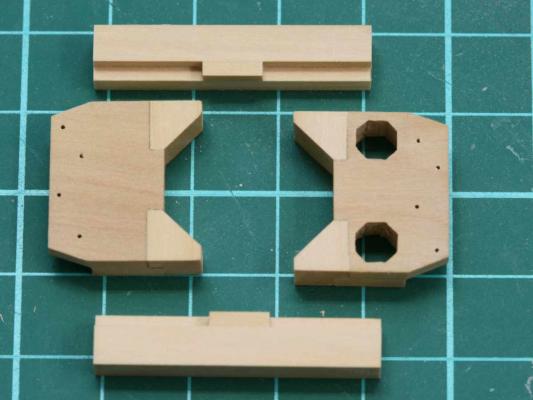
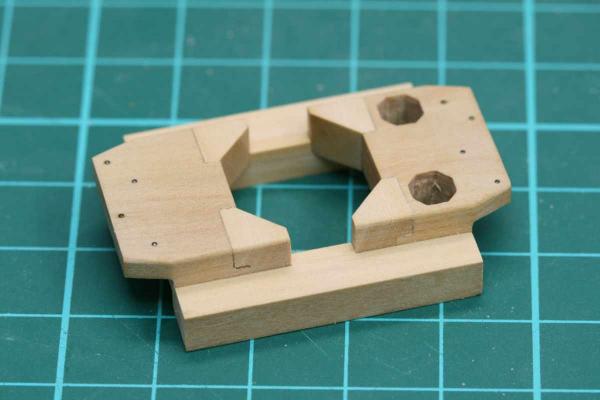
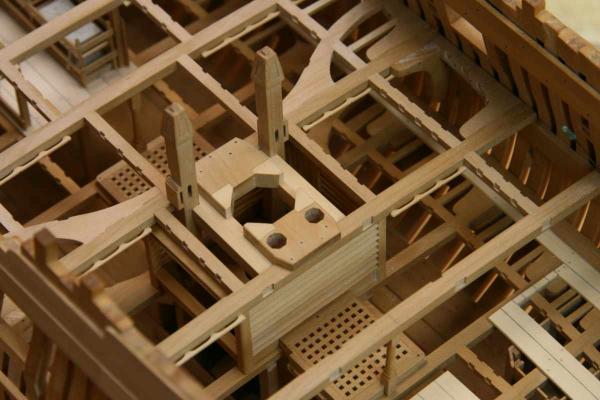
I made an error in the building sequence and I should have installed the main mastpartner earlier. Now I got a bit into trouble getting it in at this stage. I had to take a shortcut and omitted half lapping the carlings under the deck beam. After the gratings are installed this won't be visible, but I'm confessing this error anyway :-) Getting the pump tubes right was a bit of trial and error but after not to much work they were in place without to much hassle, I guess I was lucky today. I added iron bands at the end of the tubes from thin paper. Remco

- 1,207 replies
-
- 35
-
-
- sloop
- kingfisher
- (and 1 more)
-
I like how the 'blackened' strops turned out, much better than having them really black, this looks more convincing. Remco
-
I really admire the detail you are putting in these little workboats. It's a joy to watch you work. Remco
-
Cutter Cheerful 1806 by rafine - FINISHED
Remcohe replied to rafine's topic in - Build logs for subjects built 1801 - 1850
The 3 holes look great Rusty, indeed no easy task. Remco- 525 replies
-
- 3
-
-
- cheerful
- Syren Ship Model Company
- (and 1 more)
-
Nice port Mike. I don't think there is a silver bullet to do this, maybe the closest thing might be 'patience' Remco
- 967 replies
-
- 6
-
-
- hahn
- oliver cromwell
- (and 1 more)
-
Very nice progress Ed! Though I thought the same as Jan, quite a hazardous setup IMHO. I prefer to use a table saw to performs such cuts. Safer and faster if you take the time to set up a simple jig. Remco
- 3,618 replies
-
- 7
-
-
- young america
- clipper
- (and 1 more)