michael mott
-
Posts
5,200 -
Joined
-
Last visited
Content Type
Profiles
Forums
Gallery
Events
Everything posted by michael mott
-
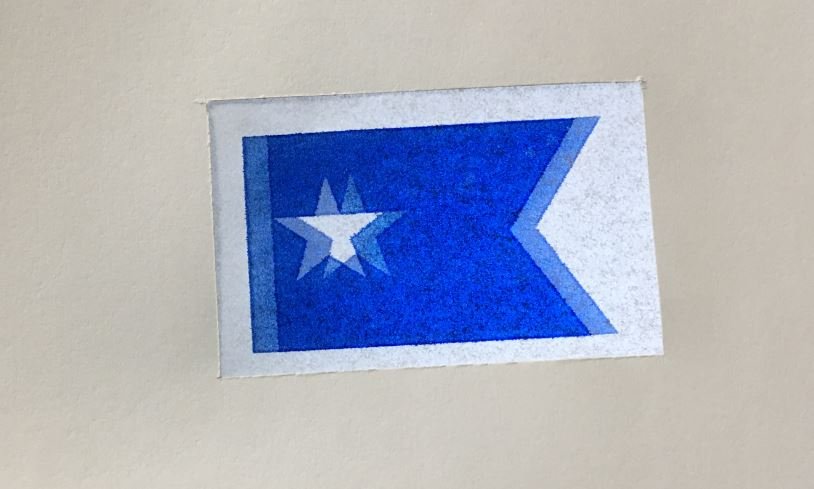
 Hi Colin Happy new year to you Sir. Colin I have just finished reading a a fair bit of information regarding the ship and shipping lines that are associated with this model. Turns out that it was a rather interesting. source information from Wikipedia 1. keel laid in Germany in 1914 2. halted construction during WW1 3. launched in 1920 as München 4. handed over to the British as a war reparation before entering service 5. she was immediately sold to the Royal Mail Steam Packet Company 6. She was renamed the Ohio and began service in 1923 7. in 1927 she was sold to the White Star Line , and renamed the Albertic 8. she served the north Atlantic route between Britain and Canada from 1927 until 1930 9. The Albertic was laid up in the River Clyde 10. she was eventually broken up for scrap in japan in 1934 One of the things i am curious about are the flags that were on the model, the masthead flag on the foremast although almost completely faded to white appears to have been an American flag the one at the masthead of the aft mast was the disintegrating blue flak of the white stare line, although the white star lines official flag appears to have been red The flag on the small staff off the aft mast was a very faded blue ensign and the flag on the stern flag post is a red ensign that does not appear to be of the correct proportions My guess is that all these flags have been put on this model during various repairs by well meaning people to make it look "good" I somehow doubt that this combination would have been carried out by Bassett Lowke, but I could be completely wrong in my hypothesis. What to Do? Michael
- 749 replies
-
- 8
-

-
- albertic
- ocean liner
- (and 2 more)
-
It was not rocket science to sort this out the ensigns are listed here Michael
- 749 replies
-
- 3
-
-
- albertic
- ocean liner
- (and 2 more)
-
John, one of the things that occurred to me is that I made a new flag, I need to make one that looks like it was made a long time ago but not so rough that it looks bad. I think it needs to be just a little faded. I will see how I get on with the ensign which turned out to be a blue one not a red one. And I am not sure about the flag protocol I thought that the blue ensign was a navy one. Michael
- 749 replies
-
- 4
-
-
- albertic
- ocean liner
- (and 2 more)
-
Albert, the carving is absolutely wonderful. Any Pictures of earlier stages of the figurehead? Michael
-
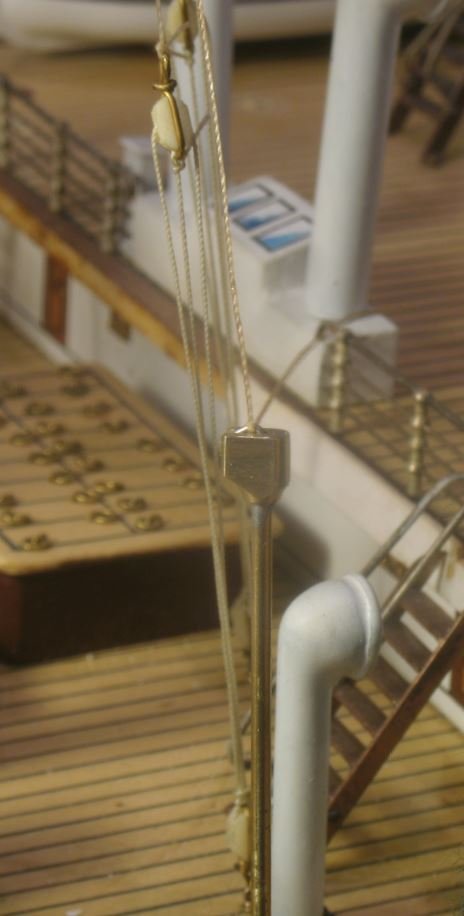
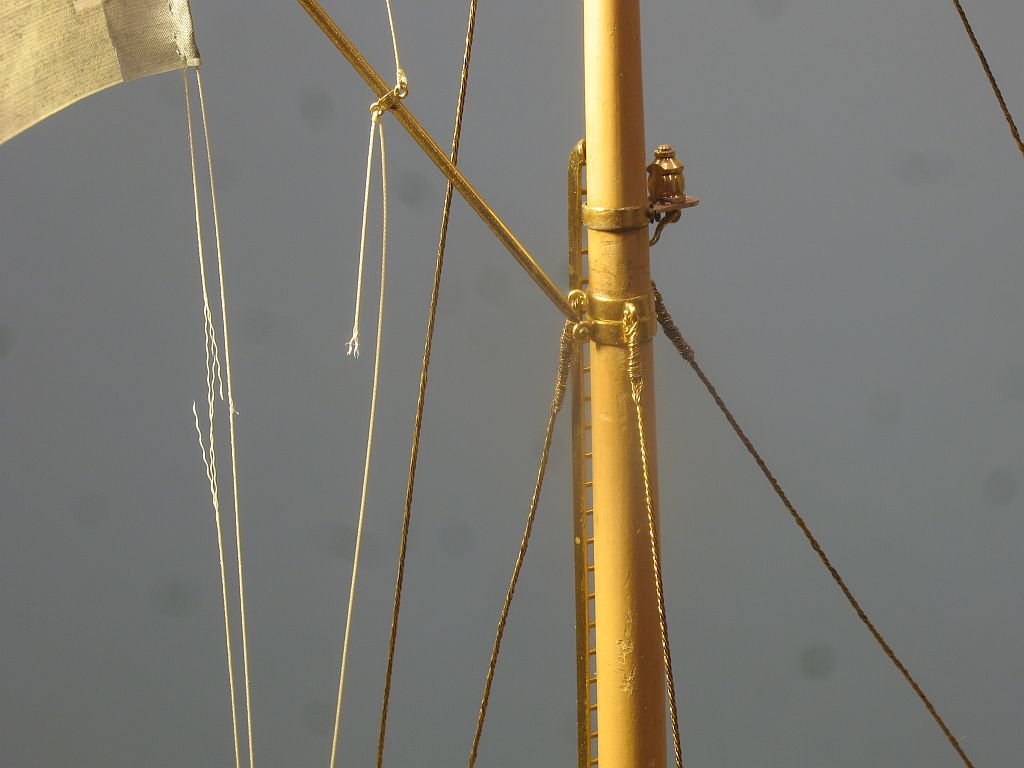
A little more work on the rigging, After seeing the small clip clamps I cannot remember where I thought that I would make myself one out of the scrap box This clamp was very useful in holding the soft rigging lines which have all been repaired now on the two masts and the associated derricks. Michael

- 749 replies
-
- 19
-
-
- albertic
- ocean liner
- (and 2 more)
-
Beautiful workmanship on the Decking GL Michael
-
Looks Good a nice solution to the pin rail issue. Michael
- 742 replies
-
- 4
-
-
- constitution
- frigate
- (and 1 more)
-
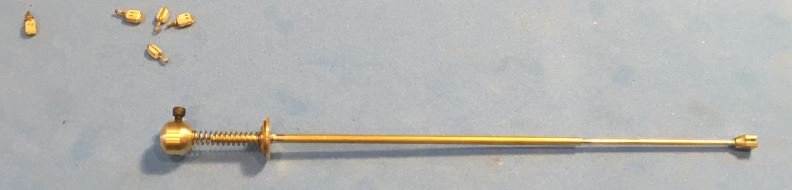
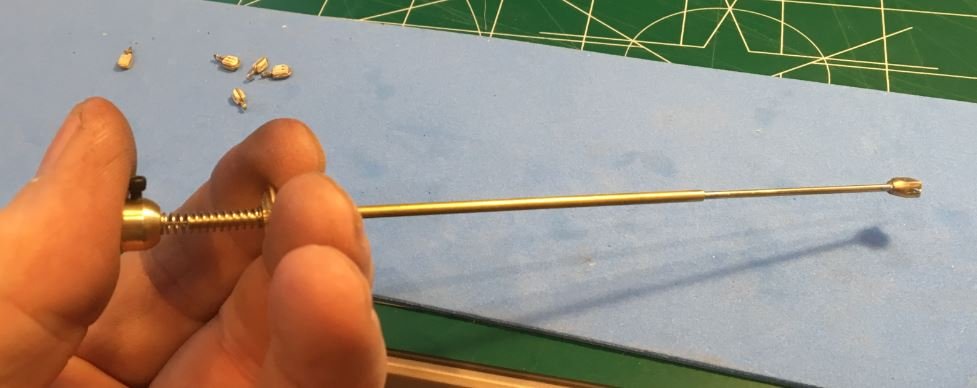
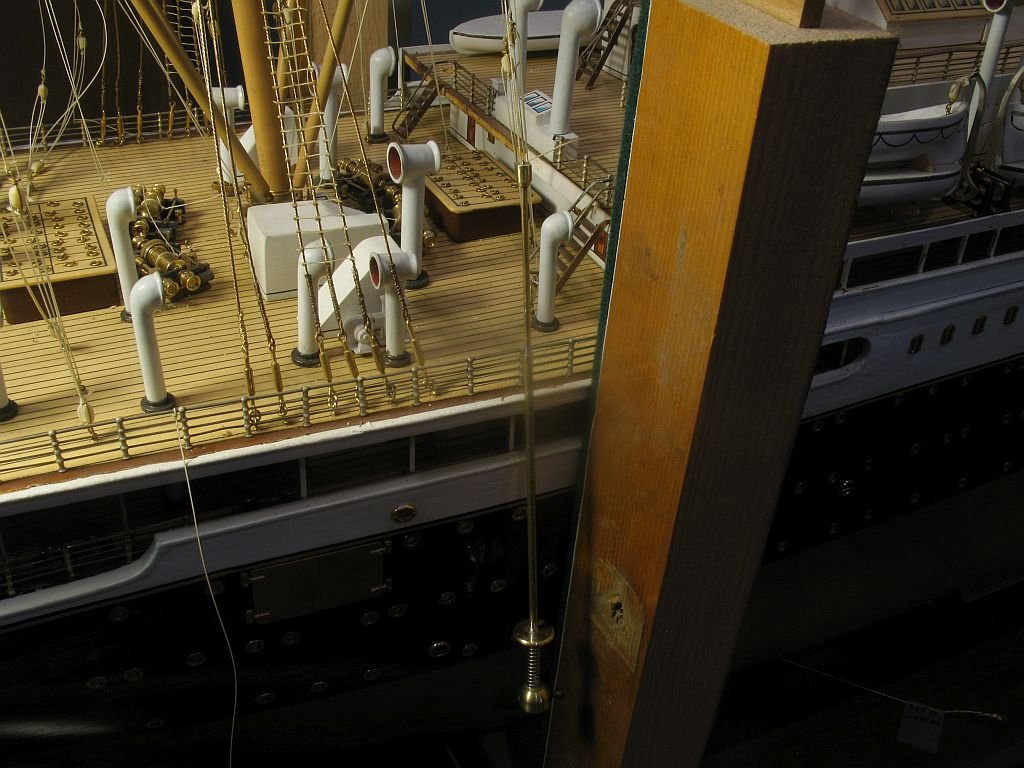
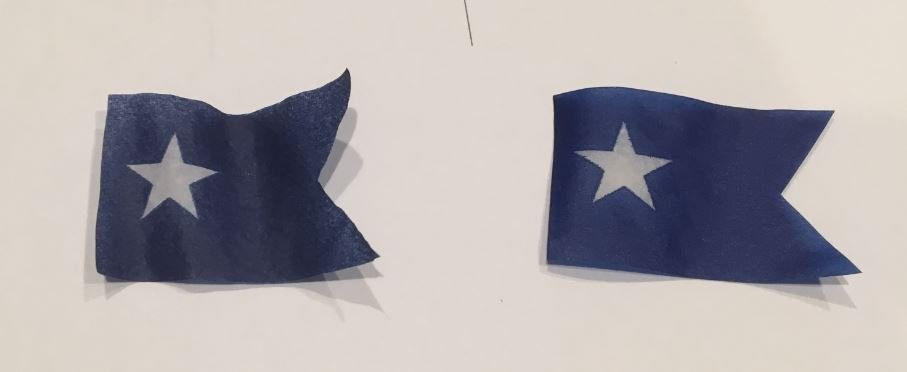
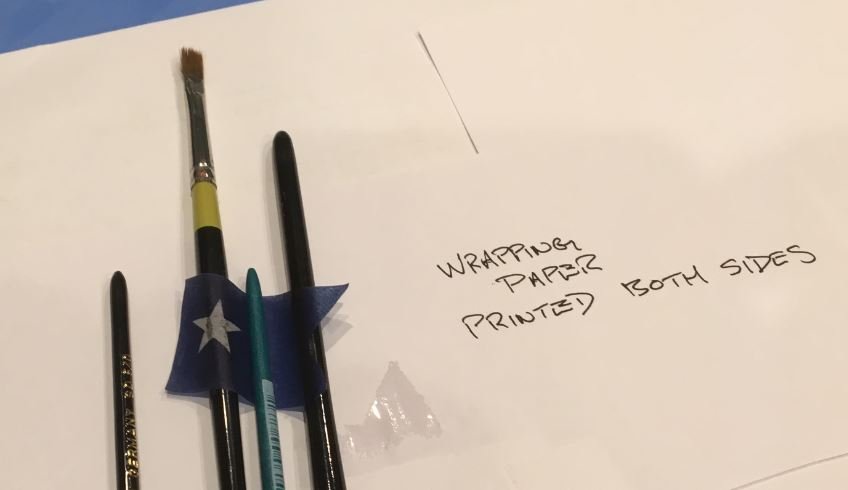
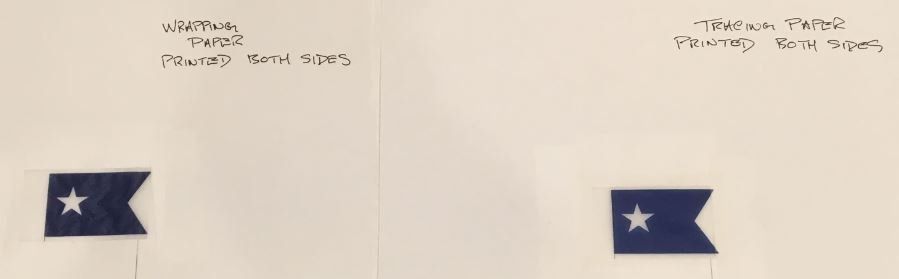
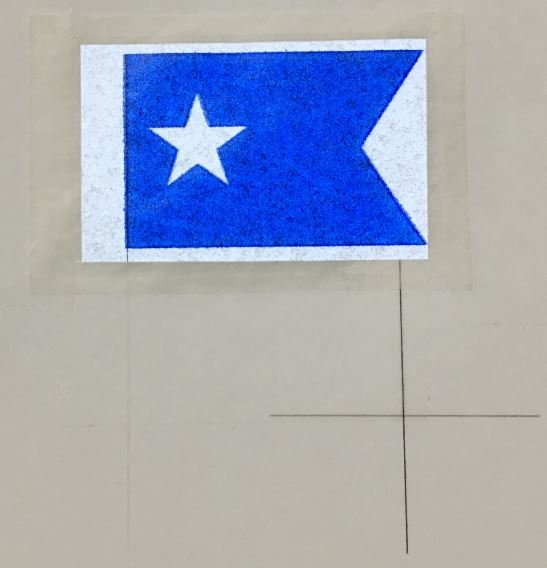
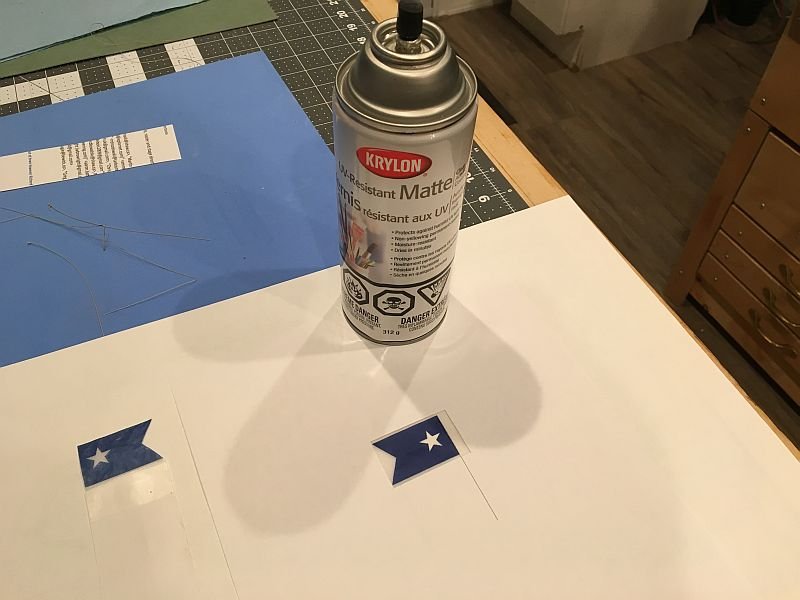
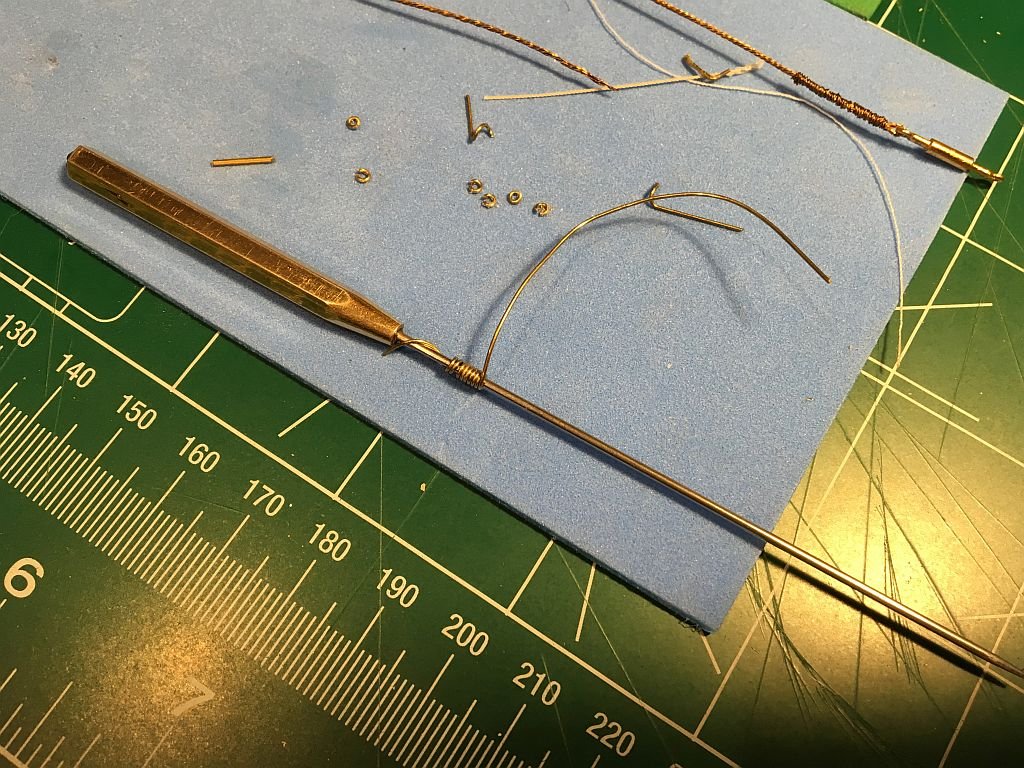
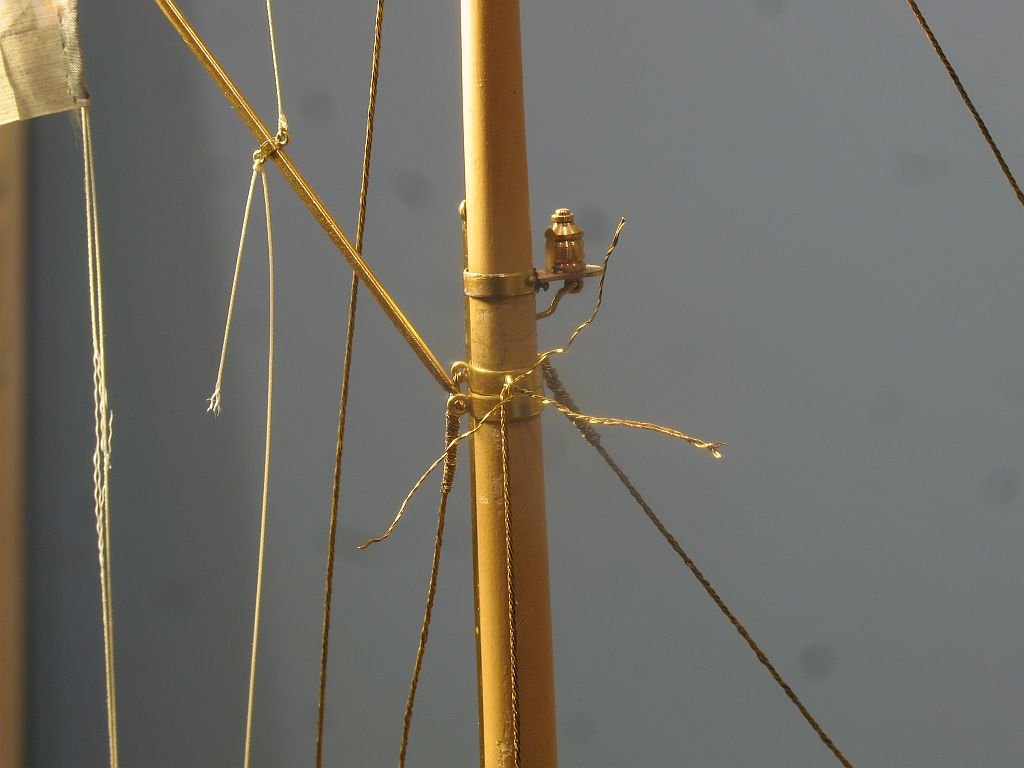
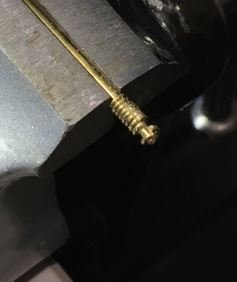
Thanks for the likes and fine remarks. A couple of updates regarding the flags and the cable stays. First the flags following the link to Chuck's method of making the flags from wrapping tissue I did some tests After following exactly the method Chuck described I wondered about printing on both sides of the paper. While waiting for my Silkspan to arrive. I also tried some tracing paper. First i needed to set up two pages in Corel Draw showing each side The next set of tests to print on both sides followed the first steps by printing the flag on a single sheet of letter size paper then cutting out a window where the flag was and taping a small rectangle of tissue paper with some "magic tape" printing the image again. Then switching to the next page and reinserting the paper to print the revers side. the first time the register was off by about an 1/8th of and inch so a bit of adjusting and a new page new window etc and repaeated the process it took a couple of tries to get it perfectly matched . Next I did the same for the tracing paper then took them out to get sprayed with the Krylon UV resistant matte The next picture shows the re wet flag being draped over some paintbrushes The next picture shows both flags the paper one on the left and the tracing paper one on the right. So when the Silkspan comes I will see how that looks, the one thing that I notice with the papers so fare is that the white area in just a bit too transparent. Next we move on to the cable stays, Seem I am still tinkering with the look of them especially where the new stay is mixed in with the old ones, The funnels will have a complete set of new stays and they look pretty good I'm OK with them. First I needed to make some more jump rings these were done by wrapping some .028 brass around a former then slicing them off with a jewelers saw The old broken stay was unwrapped from the turnbuckle and a new ring fitted to the eyebolt on the deck, the new cable made by twisting 4 sets of 3 .006 wire 240 times clockwise, then grouping all 4 sets and twisting them 150 turns anticlockwise to produce the final cable this was then coloured with the hot air soldering gun set to 480F following the Basset Lowke method of winding the end, two sets of the three strands are folded down and the other two sets are wrapped around. Mine is a tad shorter but that is OK some of the others will need to be reset so I will match them up. The last shot shows the stay before it was completed and the sorry state of the red ensign. Michael
- 749 replies
-
- 20
-
-
- albertic
- ocean liner
- (and 2 more)
-
Beautifully executed Keith. Happy new year and i look forward to the rest of the finishing up of you yacht. Michael
-
The good news is that one of the hobby stores in Edmonton has ordered some for me. should be in in a couple of weeks. I shall play with some alternate tissue to get more familiar with the process. Michael
- 749 replies
-
- 5
-
-
- albertic
- ocean liner
- (and 2 more)
-
Carl and Druxey, thank you for the information. I shall make a trip to the hobby store for some silkspan, i have acrylic paints. Thank you again Michael
- 749 replies
-
- 3
-
-
- albertic
- ocean liner
- (and 2 more)
-
A happy new year to you Ed I hope your Christmas was as good as you expected it to be. And again thank you for your detailed account of the processes that broadened my knowledge base. Michael
- 3,618 replies
-
- 5
-
-
- young america
- clipper
- (and 1 more)
-
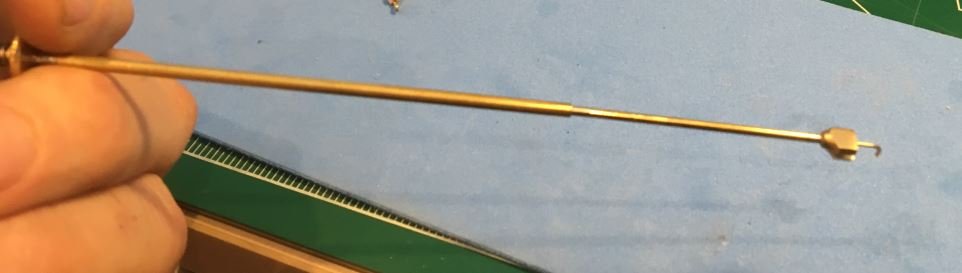
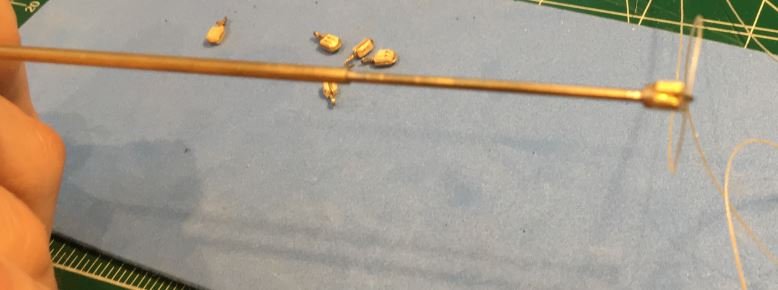
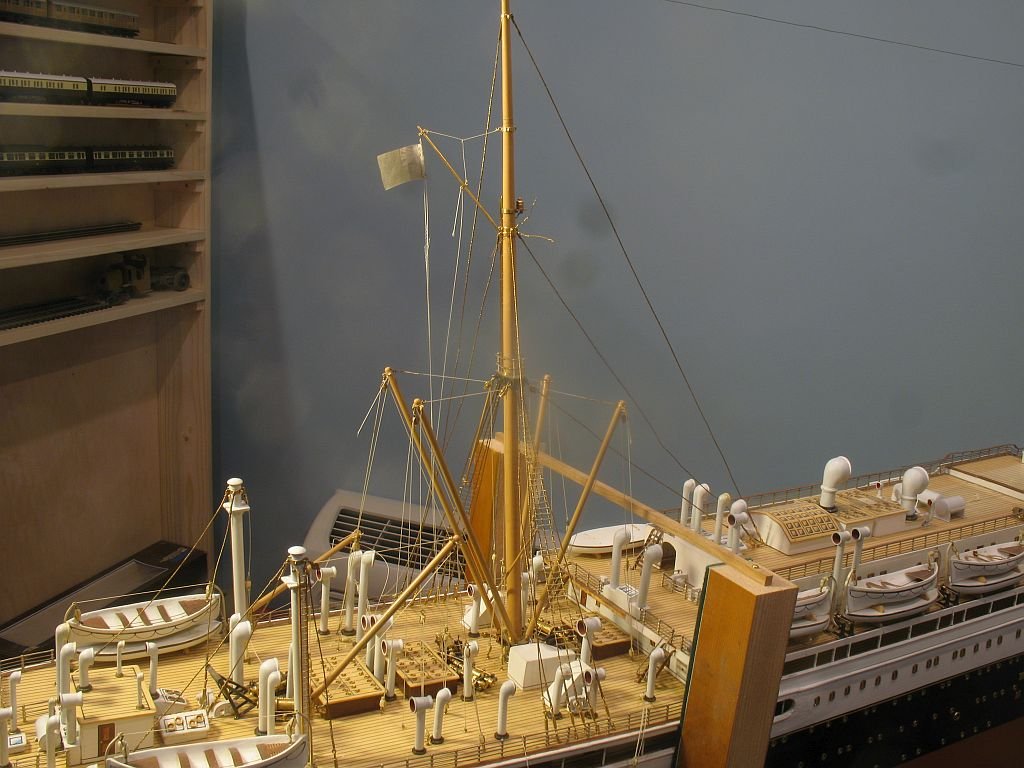
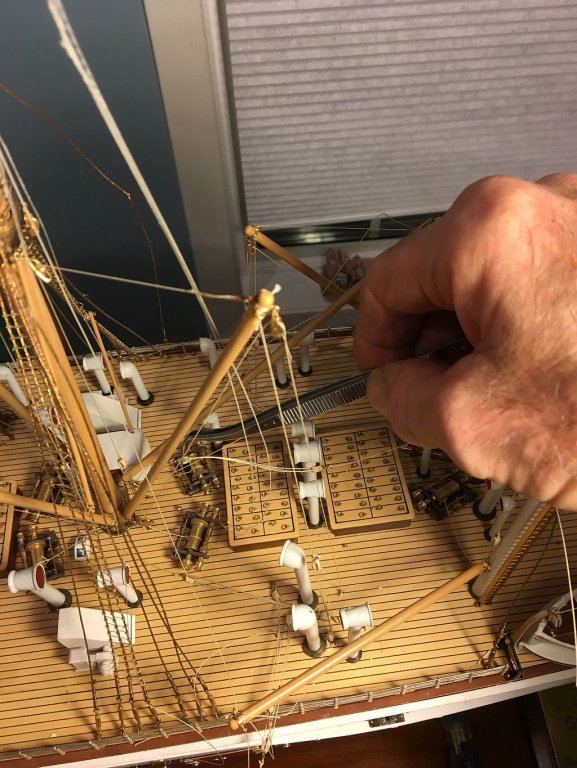
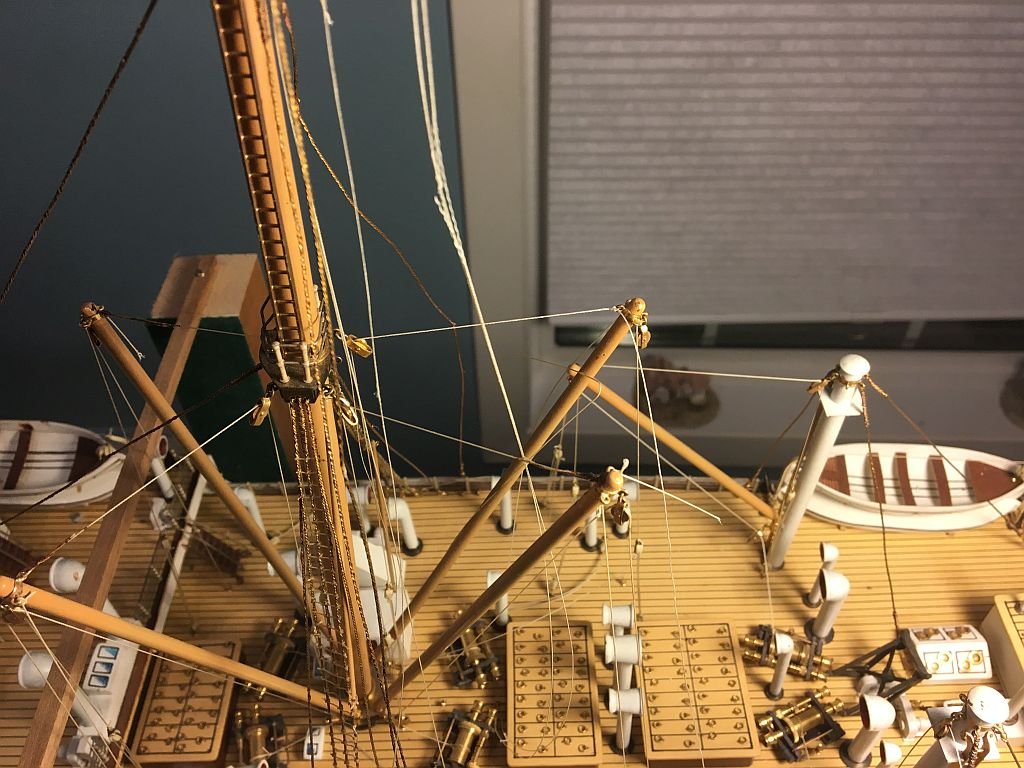
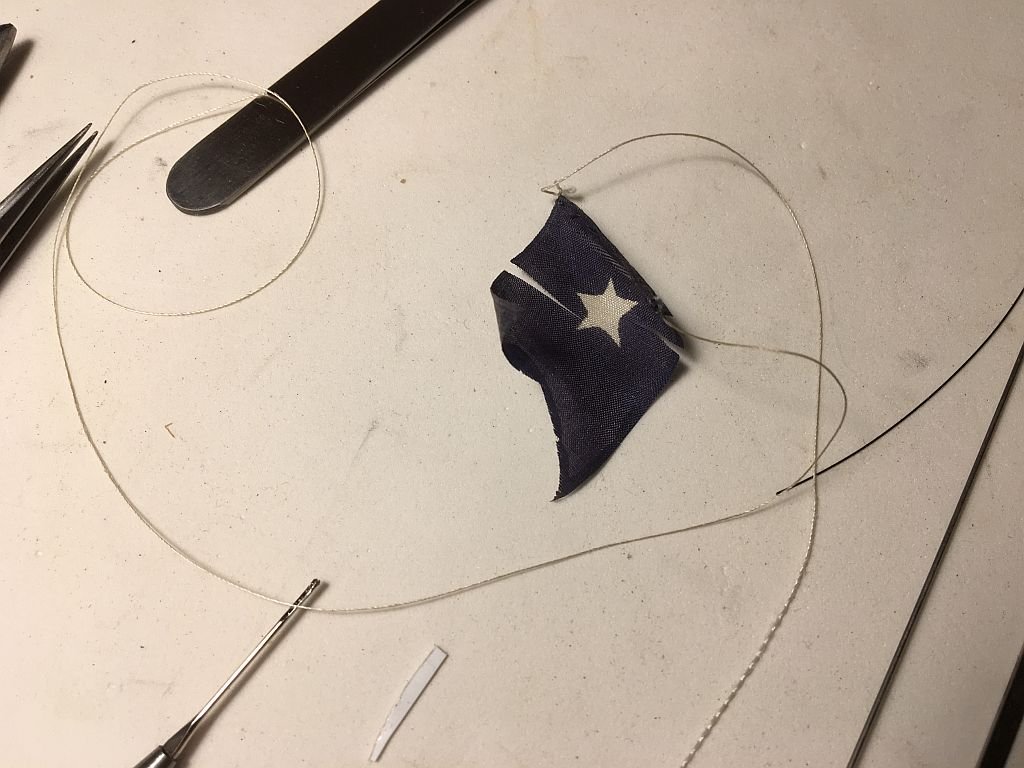
Thanks for the well wishes, Dinner was great Keith. I have made a start on some of the damaged derrick rigging, I also decided to leave the earlier repairs alone until I bring the client in to see the progress I will then discuss it with the client. I had to make a couple of special hooks to thread the new lines through the winches and the block at the base of the mast. this work is making me think a lot about the sequences of the production because I know that these were commercial builds and that time would have been a determining factor. The first picture shows retrieving one of the snapped lines on the starboard aft derrick, I only replaced the single line from the block to the forward eyebolt on the top of the derrick as the lower portion was still in good condition. The other lines was a bit more difficult because it was tied to the winch, threading it under the drum needed a small bent hook, easy enough to make but fiddly to manipulate and pull the line under the drum. I tied the new line exactly the same as the port winch, it looks a bit strange to me because I would think that there would be a few turns on the drum, but all the other winches are a single turn and I don't have any desire to change them all in any case. the next picture shows the starboard derrick fixed except for clipping off the end of the hitches. The next picture shows a serious problem, the lines to the aft flag at the top of the mast were snapped and once the flag was removed it basically fell apart. I think that I am going to need to make another and I have no experience with this so any suggestions would be of great help. I have a feeling that the flag is silk. Michael
- 749 replies
-
- 15
-
-
- albertic
- ocean liner
- (and 2 more)
-
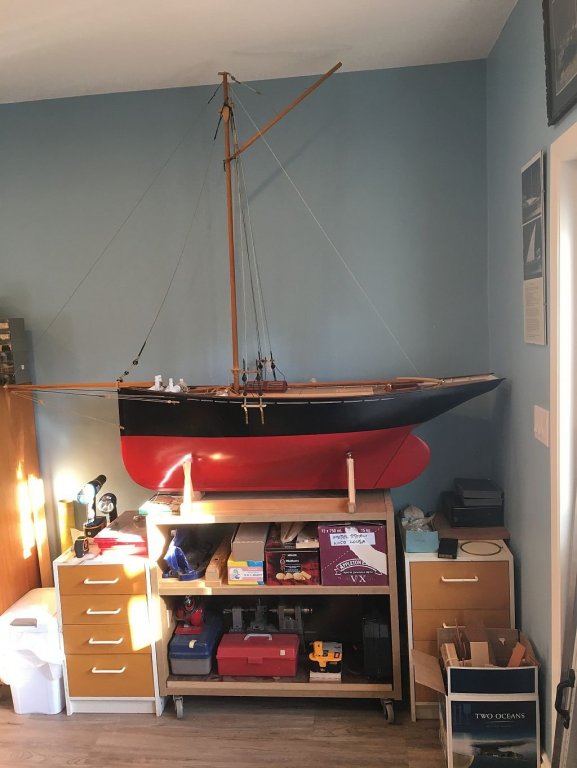
Thank you all for continuing to follow this slow build. As soon as the restoration of Albertic is done I will be getting back to the cutter, meanwhile she is now safely sitting in waiting in a quiet part of the workshop Merry Christmas everyone. Michael
-
Wow Vic, some of us document every last inch and and some of us just build. Wonderful looking model, I like the size and that you are going to sail her. Michael
- 213 replies
-
- 2
-
-
- la couronne
- 74 gun
- (and 2 more)
-
Just catching up Nils, she is looking very nice. Michael
- 692 replies
-
- 4
-
-
- eagle of algier
- chebec
- (and 2 more)
-
Thanks Carl I had a couple of good long naps today. Michael
- 749 replies
-
- 6
-
-
- albertic
- ocean liner
- (and 2 more)
-
Druxey, John, By leaving as much of the original finish as possible I was able to complete the loops freehand, I just took a deep breath and went for it. I reasoned that if I had not been happy with the result, I would have redone it with a template. Not a lot of progress this evening just a little more very thick humbrol to fill divots in the collapsed lifeboats that sit under the aft four boats. and I painted and hung up the new blocks to dry. I am a bit under the weather, woke up yesterday with no voice, its back a bit today but very faint. Michael
- 749 replies
-
- 8
-
-
- albertic
- ocean liner
- (and 2 more)
-
Hi Dick, well that took care of my evening. What an amazing amount of time and care you have put into this project. The comment about it being a thesis is not far off, I have seen lesser work called as such. It would be interesting leaning over your shoulder as you revisit the old drawings, paintings and engravings going from one to another as you determine the reality of another detail of the real ships. Those little aha moments that put the next piece of the puzzle together. Thanks for doing this model and for sharing all the knowledge you have gained so far. Michael
-
I like the extra tab at the left side, also the explanation of the glue up procedure. Michael