


Trussben
-
Posts
2,007 -
Joined
-
Last visited
Content Type
Profiles
Forums
Gallery
Events
Everything posted by Trussben
-
 Good on ya Chris, steps look fantastic! Ben
 -
My Admiral says the same thing about me Bob, I tell her it's the sign of work in progress! Ben
- 1,477 replies
-
- 2
-

-
- essex
- model shipways
- (and 1 more)
-
Looks great Rusty! Ben
-
Hey Greg, The fate of Version 2 was decided by trying to do the hawse holes before hand, it didnt go to well so I decided to do them afterwards, start with small drill and gradually increase size with file/reamer. I really hope to get to that point over this weekend. ben
-
If you want something smaller but to get used to full framing why don't you try an Echo cross section from Greg and David, also they don't take up a lot of room which you will need a lot of if you build that 120 gun monster. Ben
- 290 replies
-
- 2
-
-
- confederacy
- frigate
- (and 1 more)
-
Feeling any better Chris? Ben
-
Nice Toni, I think two or three colors is enough for my tastes, maybe boxwood above the wales and holly below, should contrast well with the black wales and my Swiss pear, that's what I'm thinking anyway. Ben
-
Thanks Toni, it helps to know that others have been through the trial and succeeded! Ben
-
Thanks for the support Druxey, yeh if I can get to the square frames I should be good! Strike the if I can and replace with When I. Ben
-
Well Allan, it seems you have learnt some very important things, keeping chisels razor sharp is a big one for me! Glad the ultra reverse blades are working well for you, just remember they don't last forever cutting hardwoods like Castello. A big one for me on the chocks was leaving a tab on them so I could manipulate them against the disc sander and keep refining the fit until perfect, once you master this the chocks are really easy to do. Keep going man! Ben
-
Hahaha!!! That's a good one Pat!!
-
Glad to hear you are now passed all of the dilemma on the length. Ben
-
Oh I can relate buddy, I have the same thing with my Confed, you are a lot closer to the finish line than I. I did the Echo build and am well into my Pegasus build, with the Confed sat on the sidelines patiently waiting her turn, which will come I'm sure when I need a rest from Pegasus, proberbly when I complete the framing. Do what makes you happy, start something completely different like the Gros. Just start modeling again and it will all come back. " if you build it, they will come " Ben
- 290 replies
-
- 2
-
-
- confederacy
- frigate
- (and 1 more)
-
Thanks Druxey, I would say to this point in the build, these have been the hardest things to make, I thought the transoms were bad but these have really tested my patience, time and faith! Ben
-
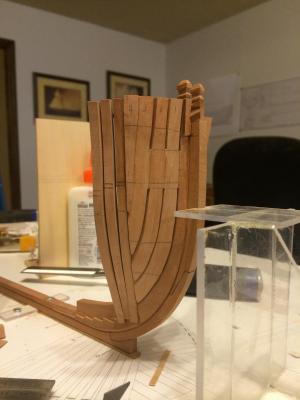
Here are the starboard side hawse timbers finally completed, they are V3.0, versions 1 and 2 didn't make the mark but were good for practice, I finally found a way that gives decent results so the port side shouldn't take too long, they are only partially faired inside and out and left a little oversized as a precaution. Working away all week so maybe get it done next weekend. Ben
- 889 replies
-
- 18
-
-
20???
-
Hey Rusty, looks great but did you mistakenly use a strip of pear on the second strake of the wales? Looks a lot darker? Ben
-
Nice to see you getting ready for the planking Augie, have fun. Ben
- 2,191 replies
-
- 1
-
-
- confederacy
- Model Shipways
- (and 1 more)
-
Very nice. Ben
-
Hey Hamilton, Are you a member of the NRG? They have a mentor program available for members. Ben
-
I also notice that the pics seem to show 4 runs of planking landing on the same bulkhead?? Ben
-
Looks good from here Rusty! Is it an issue with the planking or the framing?? If your not happy you can always tear all the planking off and start again! Lol! Really is there that much difference between them?? Ben
