gjdale
-
Posts
4,894 -
Joined
-
Last visited
Content Type
Profiles
Forums
Gallery
Events
Everything posted by gjdale
-
 Merry Christmas to you too Gary. My best Christmas present so far - seeing an update to your wonderful Alfred! I agree with Druxey on the deck colour - let it settle for a while and I'm sure you'll be pleased with it.
 -
Your mast looks great Rob, well worth the extra effort. Merry Xmas to you and yours.
-
Merry Xmas Rusty, I hope Santa brings you a lathe/mill so you can make your canons
- 421 replies
-
- 1
-

-
- granado
- bomb ketch
- (and 2 more)
-
Just dropped in to say Merry Xmas to you and your loved ones Augie. Looks like Santa found you a new fishing buddie:
- 2,191 replies
-
- 4
-
-
- confederacy
- Model Shipways
- (and 1 more)
-
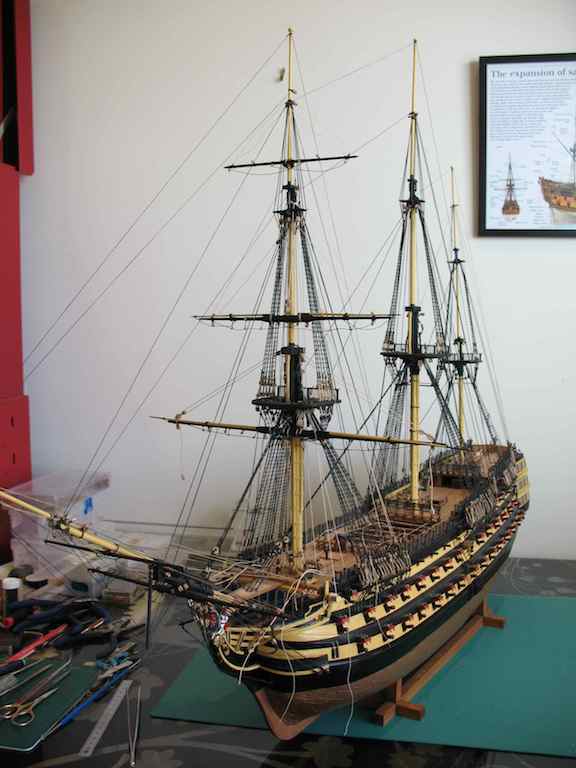
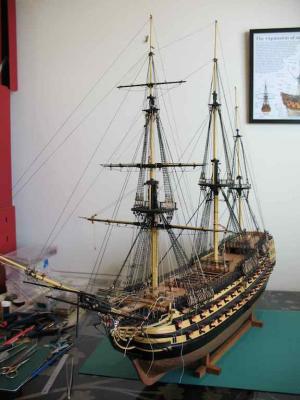
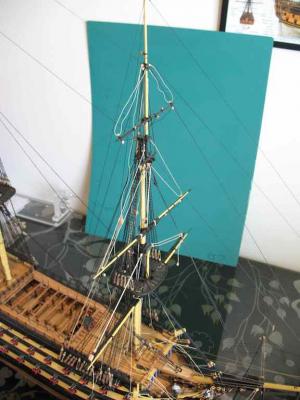
Thanks John. Some minor progress to report just ahead of the big fat guy with the red suit... I've now completed attaching all of the yards to the Foremast, complete with Jeers/Tyes, Truss Pendants/Parrals, and Lifts. Getting this far has required a great deal of cross-checking between the kit plans, Longridge and TFFM. I would NOT like to be attempting this based on the kit plans alone!!! That said, the kit plans for the most part aren't actually too bad - once you can understand them..........although there are a few inaccuracies, most of which it is possible to correct at this stage (though not all). Longridge is great for accuracy, again when you can understand what he is saying. He tends to be somewhat brief at times, and his writing can be difficult to fathom unless one is already an expert in 18th century rigging. Antscherl, in the TFFM, provides a good counter to both, making both Longridge and the kit plans more intelligible. Although Antscherl is writing about a Sixth rate ship, there is a very high degree of alignment with that of the First rate. For the most part the differences are just the size of lines and blocks, although there are a couple of minor variations in rig. Anyway, between the three of them, I'm making some progress, although I would say that I have spent probably twice as much time reading, studying plans, and re-reading, as I have actually rigging. It really is like a game of chess as you try to figure the next move and the one after, and the one after......... A couple of pics to show where I'm at, and to keep you-know-who happy. It's quite difficult to see some of the lighter coloured line in the first photo, so I improvised a back drop with my cutting mat for the second shot. There is no tension on the lifts or tyes of the topmast and topgallant yet as there is no counter tension to stop the yards sliding up the mast. That will come when further rigging, such as braces, has been added. Now, to do it all over again with the Main Mast................... Merry Christmas one and all. May your Christmas stockings be full of Ship Modelling stuff. :D
-
Just found your build, Dick. Looks to be a very interesting project with some great progress. I'll follow along for the ride too. Cheers, (yet another) Grant
-
Hi Einstein, Nice to see another Mamoli Victory builder aboard. It would be a good idea if you were to start a build log and show some pictures of any issues you might have - that way you'll get a broader spectrum of advice from people who might not be familiar with your particular kit/plans/instructions. I've just checked my plans and had a peek inside my hull, and yes, I would plank that deck. Now might be a good time to warn you that the instructions for this kit are, shall we say, not great. If you follow too closely, they will paint you into a corner, particularly wrt installing canon on the quarterdeck. I would also advise throwing out the metal gun port fittings and making your own timber ports. Don't wish to appear too negative when you're just starting this one - with a bit of kit-bashing and a lot of thinking/reading ahead, it does make up into a very nice model. If I can be of any further assistance, don't hesitate to ask, either through your own build log, or send me a PM directly. Cheers, Grant
-
Mississippi Sternwheeler by kpnuts
gjdale replied to kpnuts's topic in - Build logs for subjects built 1851 - 1900
Thanks for the info Ken -
Mississippi Sternwheeler by kpnuts
gjdale replied to kpnuts's topic in - Build logs for subjects built 1851 - 1900
Nice model Ken. Where did you source your Vic Smeed plans? -
Hi Daryl, Just wondering if you've got an update on this interesting project?
- 16 replies
-
- 1
-
-
- river queen
- finished
- (and 1 more)
-
Really enjoying this Colin - thanks for re-posting.
-
Thanks B.E. - very pleased to have aided and abetted a fellow modeller in the acquisition of new toys (er, I mean tools)! . I feel it was the least I could do after all of your assistance to me. Welcome back Jeff and thank you for the kind words. Your Vic bow section is looking fabulous.
-
Glad that was of some help Jeff. Keep up the great work - that looks like a really nice little kit and you're doing a great job of enhancing it.
-
Hi Jeff, Fabulous work so far - looks great. Re your question on coppering and gore line, I don't have the book in front of me right now, but I'm pretty sure that Longridge says in the text that there are 12(?) rows of coppering parallel to the waterline (ie working down from the waterline). This would form your gore line, and then come up from the keel letting the copper tiles follow a line of "natural" curve. I hope that makes sense.
-
Looking forward to seeing the re-posted pics Colin.
-
Hi Michael, and welcome aboard. Thank you for your very kind words. I have been silently following your pilot cutter for some time now and have been quite humbled by the standard of your work. I'm looking forward to completing this build so that I can do something in a slightly larger scale - probably not quite as large as yours though!
-
Very nice Bob. That Holly sure does go well for deck planking. When the visitors start getting to be too much, just sneak back off to the shipyard and lay "just a few more" planks.
-
Sounds like a plan Brian - I'm rather partial to a nice single malt myself. Drop me a PM when you're next headed this way.
-
Thank you Brian. Do you get up to Canberra at all? I'm always up for an adult beverage or two and a chin wag!
-
Thanks Mobbsie and Sjors. These were very easy to make, and while you could call it "mass production" of sorts Sjors, it was nearly all "handraulic". The trick is to use only the tiniest amount of glue in the first stage, which makes the final separation easier. Mobbsie, I haven't decided yet whether to paint them black or leave them "au naturale", but I'm leaning towards paint.
-
Thanks Augie - it's not an original idea though. I'm sure I picked that up from someone else here at MSW!
-
Ouch David! What bad luck! Looks like you've done a nice recovery though.
-
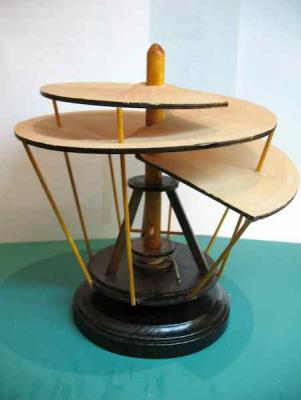
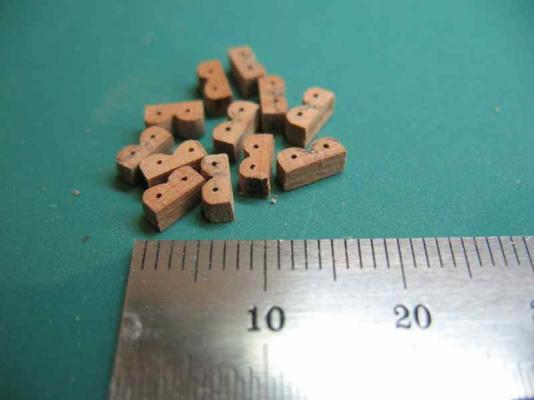
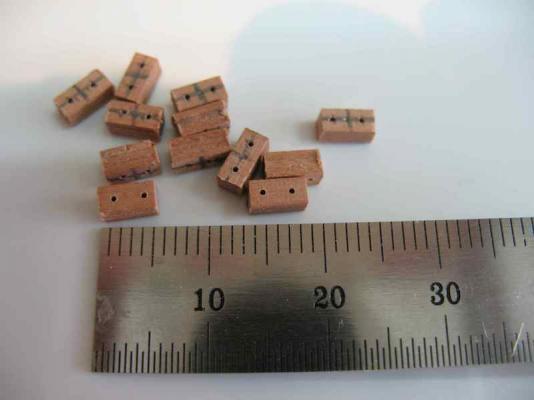
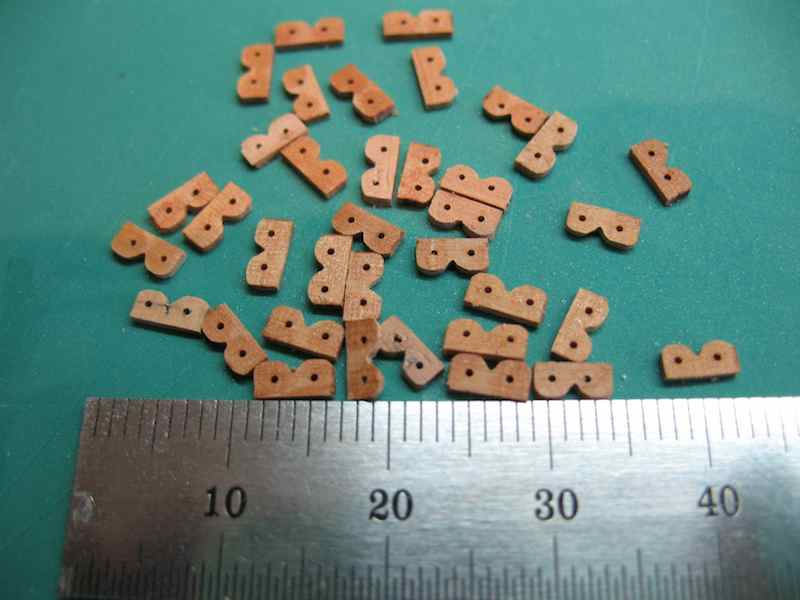
Haven't managed a lot of time in the shipyard lately, but the block party continues and the yards are slowly taking shape. I completed belaying the Truss Pendants, Jeers, and Lifts on the Fore Lower Yard, and have just completed attaching the blocks for the Fore Topsail Yard. I've decided to attach each yard to this (or relevant similar) stage before proceeding with sheets and braces etc. The Topsail Yard is attached to the Mast via a Parral instead of Trusses. The Parrals are made up of a series of "Trucks" (essentially egg-shaped wooden beads) separated by vertical "Ribs". The kit does not provide for the Ribs, so consulting once more with Longridge, I decided to make my own. Longridge provides a good diagram (with dimensions) and description on pg 213 (and Figure 139). To make the Parral Ribs I first cut a strip of 1/32" x 3/32" Swiss Pear into pieces approximately 6mm long and then spot-glued these together in gangs of three and the ends tidied up on the Byrnes disc sander. They were then roughly marked (by eye) to find the approximate locations for the holes which were then drilled with a 0.5mm bit. The "B" shape was then drawn (again by eye) onto the gang, and filed to shape with a triangular needle file, finishing with a flat needle file. The gangs were then given a 15 minute soak in bath of Isopropyl alcohol to soften the glue before carefully separating them again. The results are quite pleasing - and of course I made about double the number needed to ensure the God of the Space-Time continuum gap is fed appropriately! I was also a little side-tracked lately by completing this little model of Leonardo da Vinci's Aerial Screw that was given to me for my birthday recently (I beg the Mod's tolerance for this one off-topic pic):