gjdale
-
Posts
4,894 -
Joined
-
Last visited
Content Type
Profiles
Forums
Gallery
Events
Everything posted by gjdale
-
 Glennard2523, To answer your question, if you are planning to build Victory, then the "bible" is "Anatomy of Nelson's Ships" by C. Nepean Longridge. Despite its title, it is really about building a model of Victory. The authors model was, until recently, on display in the British Science Museum.
- 439 replies
-
- 2
-

-
- victory
- caldercraft
- (and 1 more)
-
Thanks everyone for the kind words, encouragement and "likes". I forgot to mention that the light coloured thread seen in the pictures is from Chuck. I can't even begin to describe how vastly superior it is to anything I've used before and it looks........ well, like rope I guess Bob - you are so right! After all this time, I couldn't wait to see at least one yard in place. John - here is a link to a thread started by Alexy for his serving machine. It includes pictures and a link to a video demonstration. He will quote you a price and shipping via PM. I think it is a well made machine and works as it supposed to. Alexy is very prompt in responding to queries, and postage to Australia was very fast indeed. Of course, it's more expensive than a home made one, but worth the expense in my opinion. Usual disclaimers. http://modelshipworld.com/index.php?/topic/1594-serving-machine-20-not-just-serves-ropes/?hl=%2Bserving+%2Bmachine
-
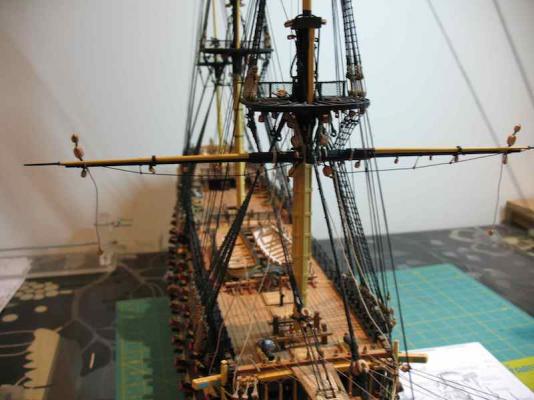
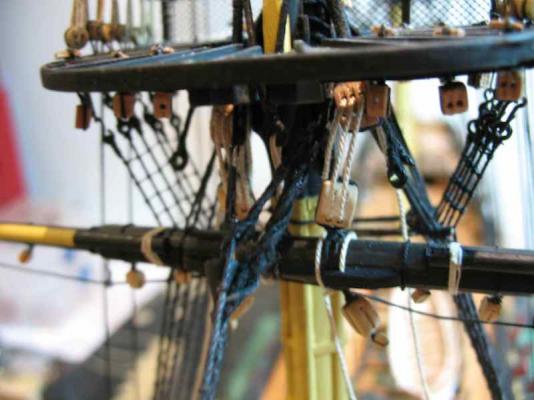
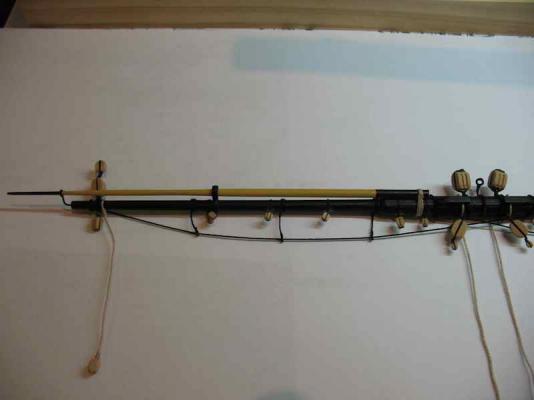
Thanks Marc - you are too kind! I decided to install the Fore Lower Yard before moving on to the next yard - figured it was probably going to be safer on the model than sculling around the shipyard! I had previously decided that I was not going to serve any of the lines on this model, but I made an exception when it came to the yard slings. I wanted to have a play with my serving machine (Alexy's product) and I'm quite pleased with the result. The sling has an eye in one end, and a thimble seized into a bight. It then wraps around the mast with the "tail" end passing through the eye and then being stopped back to its standing part with three round seizings. Here is the result: The yard was then attached by lashing the thimbles in the sling and the sling collar (on the yard) together. The truss pendants are then fitted to hold the yard against the mast, and the Jeers were then reeved. Here is a few shots showing the yard in place. You can see a mixture of kit-supplied blocks and my own blocks in these photos. The kit blocks were fitted to the masts and tops before I decided to start making my own. Blocks have been seized in the lower end of the Truss Pendant falls, but these have not yet been reeved and belayed. Likewise, the Jeer falls have not yet been belayed. I was about to rig the lifts, when I realised that the previously installed lift blocks on the mast were incorrect. So I took them off, spent an hour or so stropping some new ones, and then while attempting to fit these, managed to drop them into the space-time continuum void between the model and the desk. I decided that was probably a good time to stop for the day!

-
Beautifully executed, as always, Rusty. The wood combinations are very nice too.
-
Good for you Sjors in deciding to re-do something you weren't happy with. I'm sure you will be well satisfied with the results.
- 1,873 replies
-
- 1
-
-
- occre
- san ildefonso
- (and 1 more)
-
ancre LE BONHOMME RICHARD by Jeronimo - FINISHED
gjdale replied to Jeronimo's topic in - Build logs for subjects built 1751 - 1800
Beautiful Karl. Simply stunning!- 662 replies
-
- 1
-
-
- bonhomme richard
- frigate
- (and 1 more)
-
Richard, If the handles are hard to turn, just check that the axes aren't locked (each axis should be able to be locked in place individually). It's an easy mistake to make - don't ask me how I know!
-
I knew it would work out well. Terrific, in fact, Rusty!
- 421 replies
-
- 1
-
-
- granado
- bomb ketch
- (and 2 more)
-
Hi Mobbsie, Great job on the re-do of the mast platform blocks. They look great and I know you will be much happier with them. I still think this was the cause of your "block" (pun intended)! The burton pendants look very well done too. You'll race ahead from here my friend - looking forward to seeing completion photos next week.
- 1,279 replies
-
- 3
-
-
- agamemnon
- caldercraft
- (and 1 more)
-
Hi Pat, I use TurboCad for Mac, so things may be a bit different, but I had exactly this problem when I started out and sought advice directly from the guru - Wayne Kempson. The answer was to re-scale using Expand/Shrink within Transformation Tools. Your software may be slightly different but the principles should hold true. Here is Wayne's description to me of how to re-scale using three points: On your drawing set up the perpendiculars and the keel line (which should already be done anyway). Let's say the aft perpendicular (AP) is to the left, etc. Then draw a line parallel to the AP at a distance from the AP equal to the length you are looking for. This is the new forward perpendicular (FP). Now, extend the keel line to this new line. Now you have three points defined by the intersection of the keel line with the AP, the old FP, and the new FP. For your three points, the AP intersection is your anchor point, the intersection with the old FP is the source or start point, and the intersection with the new FP is the destination or end point. This should do it. The above is an exact quote from Wayne. I've since upgraded to a newer version of TC for Mac and do it slightly differently, but this method should still work. You could always PM Wayne direct (which is what I did). I hope this helps. Cheers,
-
HMS Naiad 1797 by albert - FINISHED - 1/48
gjdale replied to albert's topic in - Build logs for subjects built 1751 - 1800
That's looking lovely Albert - the sign of things to come, I think! -
Excellent dissertation (if not "tutorial") Ed. Looks like it is well worth the extra time at the computer to save time and effort in the shipyard later.
-
Cad Programs
gjdale replied to michaelpsutton2's topic in CAD and 3D Modelling/Drafting Plans with Software
TurboCad for Mac is very good. It's not free, but it's relatively inexpensive. -
Great work Rob.
-
Neat idea Rusty - I'll be interested to see how it turns out. Though with your track record, I'm sure it will turn out superbly!
- 421 replies
-
- 1
-
-
- granado
- bomb ketch
- (and 2 more)
-
Thanks for that tip Danny - I'd already started collecting some of the sawdust from the Byrnes Saw with that in mind. I'll do the same with the sanders. And yes, I do already have the Byrnes Disc Sander as well - what a beaut little machine THAT one is too! And thanks Lawrence and Dragzz for dropping by.
-
Love your approach Ed. And some of we "lesser mortals" are watching your process with great interest in the hope of one day emulating it!
- 3,618 replies
-
- 2
-
-
- young america
- clipper
- (and 1 more)
-
Funny you should mention that John................... Watch this space!
-
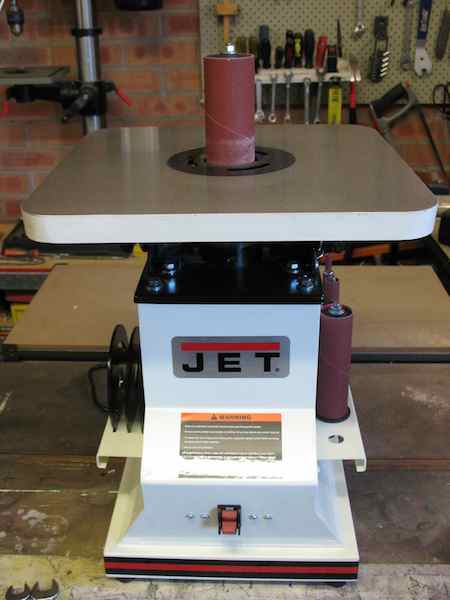
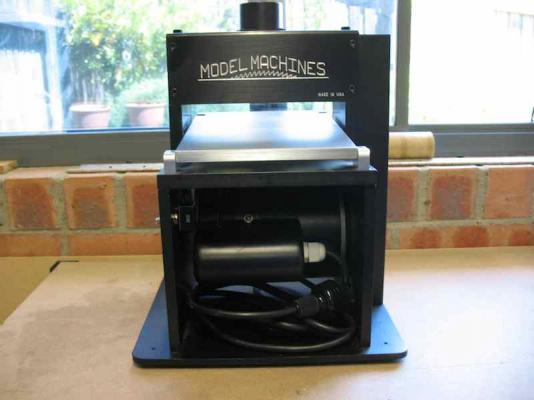
Thanks for all the kind comments folks, and for the "likes". Mikec - the small black machine is the Thickness Sander by Jim Byrnes. The larger machine is an Oscillating Spindle Sander. Re your second question, the answer is no, I do not intend on installing sails, but I have included the blocks anyway. I'm a bare yards kinda guy.
-
Joe, It's a model kit. Shouldn't take too long to make - the box says for ages 8+. Perhaps I should ask John (JimLad) to put me in touch with the nine-year-old who was so full of advice about his Stag model
-
Very clever Danny, and a beaut little tutorial as well!
-
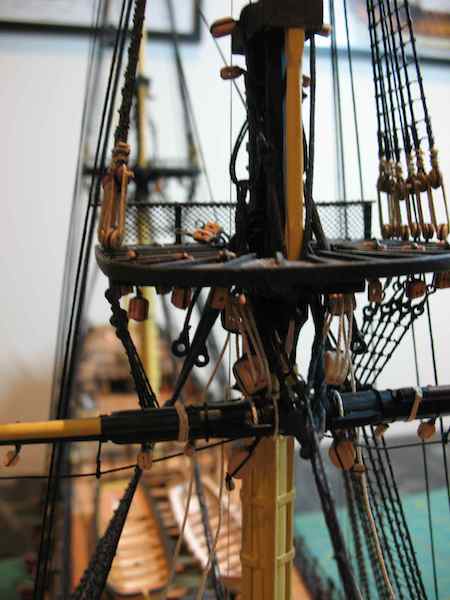
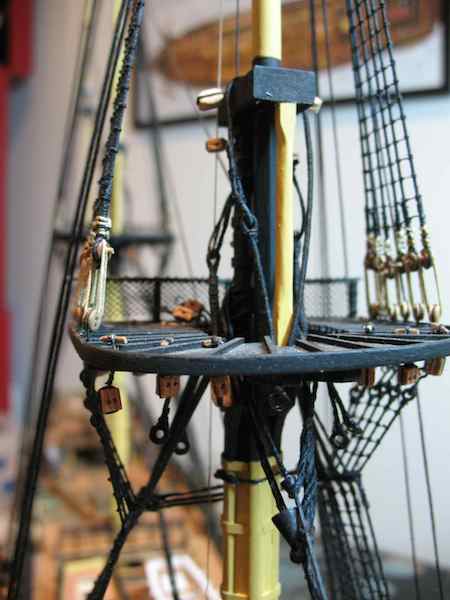
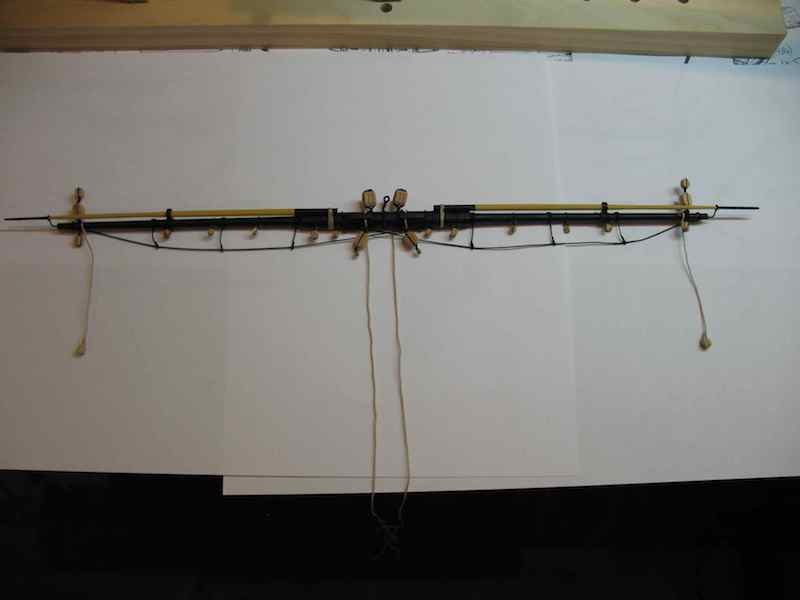
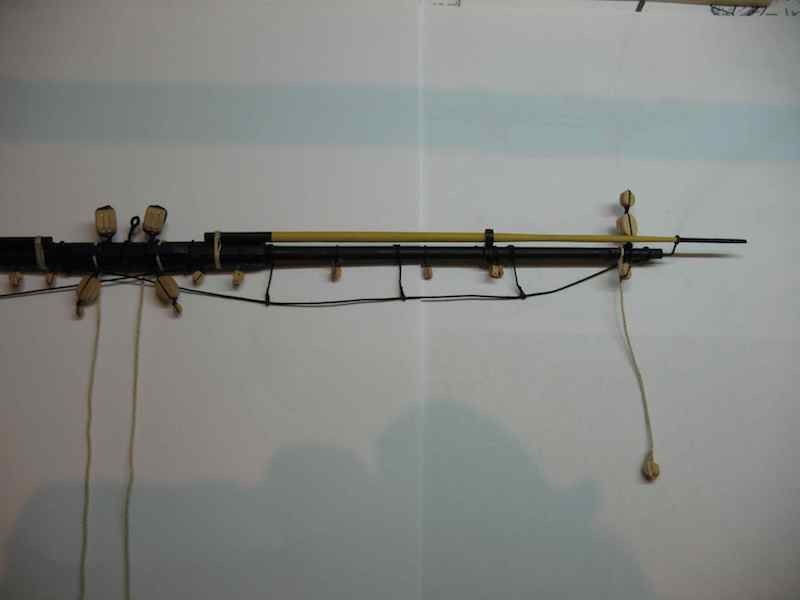
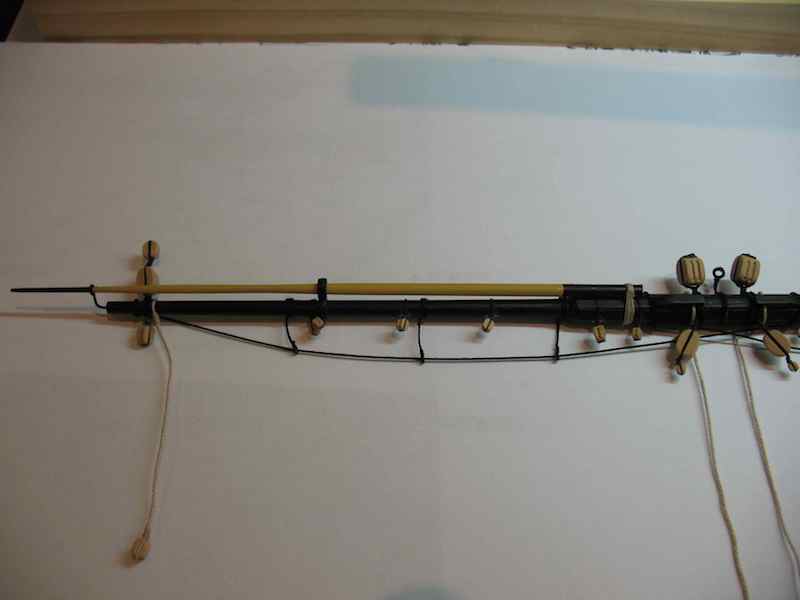
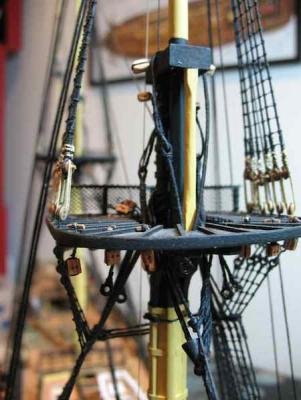
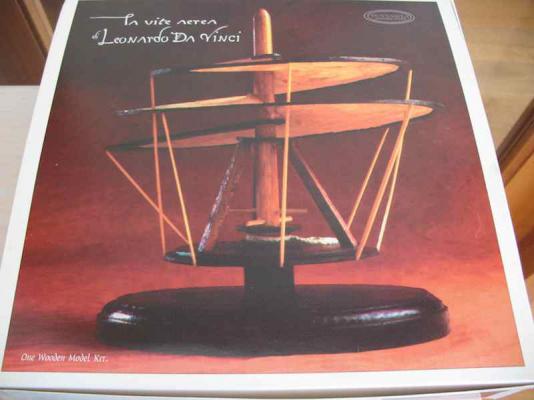
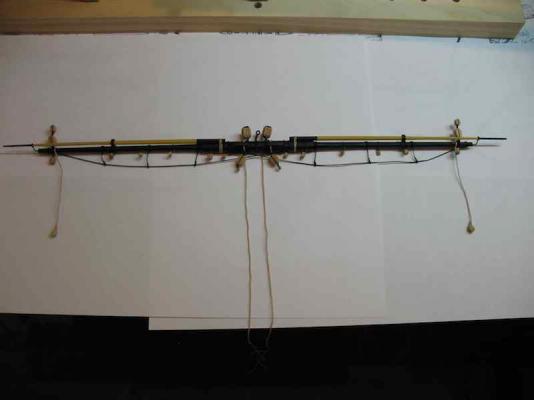
Thanks again Wayne, Mobbise, Augie, Lawrence and Mick, and all the "likes". Today I added the horses (foot ropes) and the stunsl booms. The horses are spliced over the end of the yard, and then threaded through the stirrups before being spliced again just outside the sling cleats. In reality, the inner end has a thimble that is lashed around the yard. Inspired by Blue Ensign, I also "cheated" by using the splice on the inboard side. The last item to attach were the stunsl booms, which had been pre-made and simply required lashing at the inboard end. With that, I declare the Fore Lower Yard complete and ready to be attached to the ship. You may have noticed that I also had a birthday during the week. Well, all I can say is that I must have been a very, very good boy this year! :D I hope the mods will indulge me a slight diversion here. My darling wife obviously thinks I need to spend more time in the shipyard, and bought me this: I was also allowed to buy this for myself: And during our recent holiday, we saw a Leonardo da Vinci exhibition in Venice. Knowing my love of his drawings of machines, my son gave me this: Plenty to keep me busy once I eventually finish this project!


-
I found this link elsewhere on the forum and subsequently purchased a set. http://www.scaleplasticandrail.com/kaboom/index.php/all-other-subjects/all-things-tools/73-cutting-tools/118-50pc-microdrill-set-03-to-15mm Ordering is done direct to Allan Sidney. I have the email address somewhere - if anyone is interested just PM me and I'll dig it out.