HOLIDAY DONATION DRIVE - SUPPORT MSW - DO YOUR PART TO KEEP THIS GREAT FORUM GOING! (78 donations so far out of 49,000 members - C'mon guys!)
×


aliluke
-
Posts
1,359 -
Joined
-
Last visited
Content Type
Profiles
Forums
Gallery
Events
Everything posted by aliluke
-
 Hi Martin I don't use a rabbet. I just butt the deck planks to the edge of the coaming. I set up the planks first and make the coaming fractionally larger than the set up. I then gently sand the coaming back until I get a really tight fit. I don't use a rabbet or ledges to support the grates either I just make that a super tight fit as well. I also have very little curvature on the coaming such that you couldn't even measure the difference between the high and low point. I know people put much more curvature on them. I'm not sure which is more correct.
- 467 replies
-
- 1
-

-
- fly
- victory models
- (and 1 more)
-
Actually Spyglass the projection of my coamings above the deck is still too high even with the inset. According to the FFM it should be about 2mm at 1:48 and I'm at 2mm at 1:64. Martin the beauty of insetting, if done accurately, is that you get a very clean line to the coaming and it looks correct. You need to cut the planks back from the false deck cut outs to give the coaming a little ledge to fix to. Up to you of course - I note that B.E lays his on top of the planks rather than insetting them and who can question his results!!!
- 467 replies
-
- 1
-
-
- fly
- victory models
- (and 1 more)
-
Ray That is stunning. Master class. I look forward to the next phase but I'm sure you are revelling in the finish of the hull - you deserve to be!
-
Hi Martin I agree with Spyglass. My coamings are 2 x 3mm boxwood. I think that is the correct size and I did box joints at the corners as you have done. I then slightly round the corners but only down to the lower leg of the joint. I also insert them into the planks rather than sitting them on top of the planks. They can be seen in my log.
- 467 replies
-
- 1
-
-
- fly
- victory models
- (and 1 more)
-
I reckon this issue is one for your eye. My AVS coils are probably wrong but I can live with them and like them. John's photos show that there is a lot of rope around and I guess that whether you are presenting for inspection or in port or just hard running a ship at sea would make a big difference. John's first photo is of a ship that lacks discipline! I worked on a commercial rope rigged ship - a freighter - and we took a lot of care with the ropes. I would always coil the ropes after use and tie them off when their use was completed. This was simple wrap between the hands and the elbow followed by a quick half-hitch before being placed on the pin or cleat. We would leave them loose coiled while working but tie the coil off also, as you show it, when in port and not working. So I say it depends on so many conditions and moments in a ships day to day aspects. You can choose! The ropes as you have them look exactly right to my eye for a certain configuration of the ship at a certain time.
- 803 replies
-
- 2
-
-
- colonial cutter
- modellers shipyard
- (and 1 more)
-
Great looking work Jason in every regard. Superb. One wee thing that Dirk put me onto is miniature rivets from Scale Hardware www.scalehardware.com I used these for the bolts on my Syren Models cannon carriages. I used the brass ones with the 0.7mm head. You can see them in my log as well as Dirk's. Might be a nice little add for you on forthcoming parts.
-
Brilliant work Ollie. I see the Jacobs Creek is empty - just as it should be when you are celebrating your fine work!
- 803 replies
-
- 3
-
-
- colonial cutter
- modellers shipyard
- (and 1 more)
-
Hi Nigel Your deck looks amazing. I enjoy doing the decking as a good deck makes the model sing. Yours is singing at full voice! Great work.
-
Hi Bob You are very hard on yourself. Your work is absolutely amazing. Your model looks so clean and crisp. Brilliant - have a tot you deserve it.
-
Looks amazing Ollie - just brilliant. I had the flag question with my AVS and made two flags for it. My wife, with her good eye, said how much they diverted attention from the model = she hated them. I left them off. She was right. They catch the eye and take away from all else. If you had sails on her flags are a positive add but without sails a flag is a distraction. In your last photo my eye goes straight to the flag rather than to all else you have done. My opinion again - I may be out of favour with others here with this thought! BTW - put it in a case. We only have dust here, the stuff you describe is not on the menu for model presentation...
- 803 replies
-
- 3
-
-
- colonial cutter
- modellers shipyard
- (and 1 more)
-
Good luck with the carving Martin. If you can pull it off it will a lot easier to handle than the cast metal kit part. The deck looks great - is it holly?
- 467 replies
-
- 1
-
-
- fly
- victory models
- (and 1 more)
-
Wow there is so much stuff out there. I'm fluent in Sketchup and AutoCad. I have a passing knowledge of Microstation and Archicad. I have a little bit of Revit knowledge. From all the programmes that I've engaged with Revit is the winner - no contest. For modelling a compound curved object such as a ship you need a parametric programme - none of the previous listed in my experience deliver this with ease. Attached a chess set model I did in Sketchup - it shows its simple power and it's ability to deliver simple curves. That said I would be looking for a more parametrically aligned programme for ships. I've no idea which would be the best one and I'm interested about the thoughts on this thread.

-
Driven to the wall or driven nuts...The results are fantastic. Hats off Bob. I'm going slightly mad with my little bits at the moment but I'll keep striving for fit and symmetry. There is no other way to do this craft in my opinion. Good stuff by you - I get mad too but in the morning it all feels alright.
-
Hi Ollie I'm not a fan of cases - it turns a model into a massive object which I know I can't deal with in my house. So I live with the dust and the model feels much more free and delicate. Careful cleaning with a soft brush deals with the dust issue but even the dust you can't get to gives it a certain patina which I don't mind. My opinion maybe rare here on MSW...
- 803 replies
-
- 1
-
-
- colonial cutter
- modellers shipyard
- (and 1 more)
-
Ollie The cradle looks amazing - I mean that! A softer option than the pedestals but a good one. The rest of the rigging looks spot on as well. Great stuff.
- 803 replies
-
- 1
-
-
- colonial cutter
- modellers shipyard
- (and 1 more)
-
The product I use is probably not available in the US - it is Wattyl interior timber putty and is water based. The product you show is non-hardening and can't be sanded. The Wattyl putty fully hardens and can be sanded. I don't pre-seal the planks first and have no issues with bleeding. My deck is holly strip. The best way is to trial whatever you find on a few planks off the ship.
-
Really nice work all round Joe. Your experience shines through. I'm going to keep following - Granado is a great subject. I'm a big fan of wood paste for the treenails - effective, fast and easy. By making the paste almost the same colour as the deck they become invisible at most angles. This is the way it should be at this scale in my opinion.
- 302 replies
-
- 1
-
-
- granado
- caldercraft
- (and 1 more)
-
Hi Rich I don't know anything about Victory but just found your log. Your work is looking really good. Going back to your deck planking post...keep that caulking really fine IMHO. At 1:72 it would nearly be invisible. I know a lot of builders here go for Sharpie's or archive pens. An HB pencil does the trick for me. A thin line and no bleed into the planking. I reckon treenailing is a good way to go. Just match your treenails to the colour of the planks using wood paste and you can't see them. I'm not trying to be being clever with that comment - you can actually see them but only at certain angles. It adds a detail that works in certain respects. I definitely do not favour black treenails and a deck covered with them like measles. Your second planking looks top notch - I don't think I can add much more. Victory is a major mission!
-
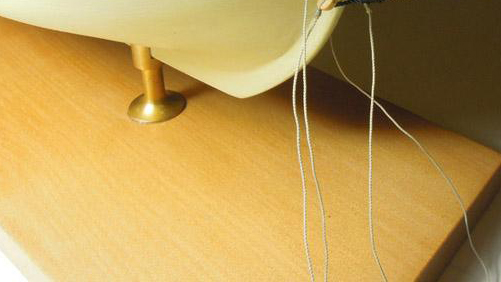
Continues to look amazing Ollie. A great piece of craft. Not sure what you have in mind for mounting but a little trick I did for the AVS is as follows: - Easily found brass pedestals. - The trick is to rebate the base board so that the base of the pedestal is recessed into the base board. This is epoxy glued in place. This makes it very stable. The ships keel can then be epoxy glued onto the pedestals with no other treatment required - but I did add a panel pin from underneath into the keel. Solid as a rock. I also like the pedestal being flush to the baseboard rather than sitting on top of it. Just a thought, you may have better plans. Attached.
- 803 replies
-
- 4
-
-
- colonial cutter
- modellers shipyard
- (and 1 more)
-
Welcome Ian Who is the manufacturer of your Bounty kit? I haven't seen one like it before and some aspects of it are a little odd - I refer to the cannons for instance. Not a criticism just a query. P.S - I'm silly it's Billings. I thought your name was Ian Billings!
-
Fascinating kit Marisstella. I really like the fact that you design, manufacture them and also log them here. Not many do that - Chuck and Chris Watton come to mind. It shows a real commitment to the craft and makes me tempted to try your unique kits.
-
Hi Robert Just came across your log. You are doing some really nice work there - very clean and crisp. I like the contrast you are setting up between the upper and lower planking even though I'm more a fan of the painted hull. I'll follow along.
-
Hi Curtis I echo Ken and Ryland's thoughts. I think the last photo in my first batch on my log shows the degree of fairing of the filler at the stern. A reasonable gauge is - if the first layer of planking is tending to snap at the turn up to the counter you haven't faired enough.
-
HMB Endeavour by mikec - Eaglemoss
aliluke replied to mikec's topic in - Kit build logs for subjects built from 1751 - 1800
It looks superb Mike. I'm glad you are dusting it off for continuance.