


flying_dutchman2
-
Posts
1,735 -
Joined
-
Last visited
Content Type
Profiles
Forums
Gallery
Events
Posts posted by flying_dutchman2
-
-
1 hour ago, gjdale said:
Looks like an interesting diversion Marcus. Think I’ll pull up a chair and follow along too.
The more the merrier. It is a diversion of ship building and it is related.
Little known fact. There have always been windmills, but the Dutch took it a step further. They invented the 'saw mill'. Using the power of the wind attached to the saw and all of a sudden you had a powered saw.
Cog has plans of a sawmill, called the Eenhoorn, which is located in Haarlem and up to this day it still runs. On there website they describe what you have to do when you have a log and want to have it sawed into planks. I have seen this mill when I lived in the Netherlands.
Marcus
- Elijah, mtaylor, popeye the sailor and 4 others
-
 7
7
-
Osmosis; Thanks for joining. The project has some challenges.
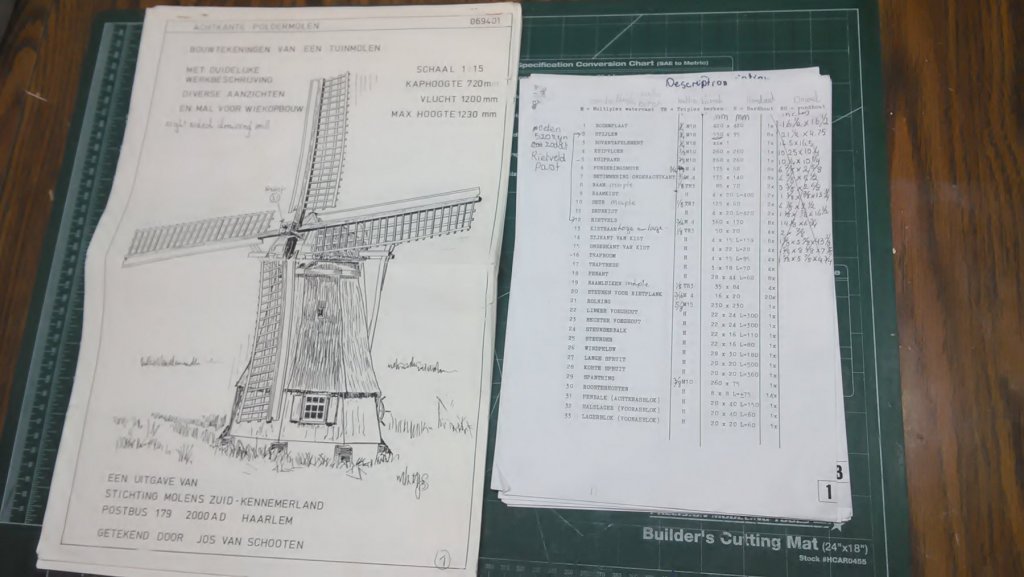
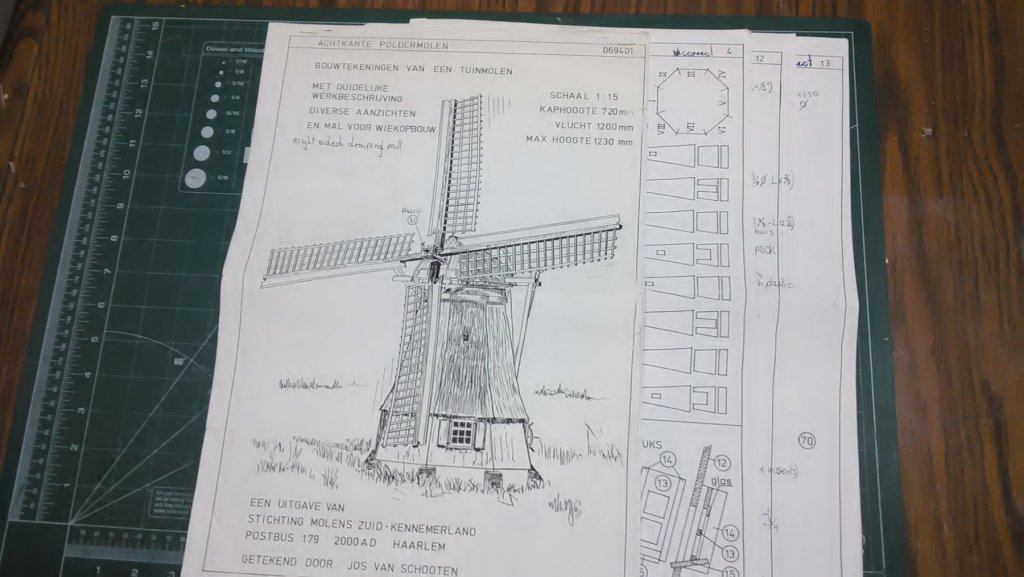
Note for everyone: I have a difficult time translating Dutch windmill lingo to English. I am using the Dutch to English Van Dale which is equivalent to the Oxford dictionary. So when I describe a part and I am using the Dutch name for it, it is because I can't find the English word for it. Maybe some of the Dutch modelers checking out this thread can help out.
Thanks.
Cog,
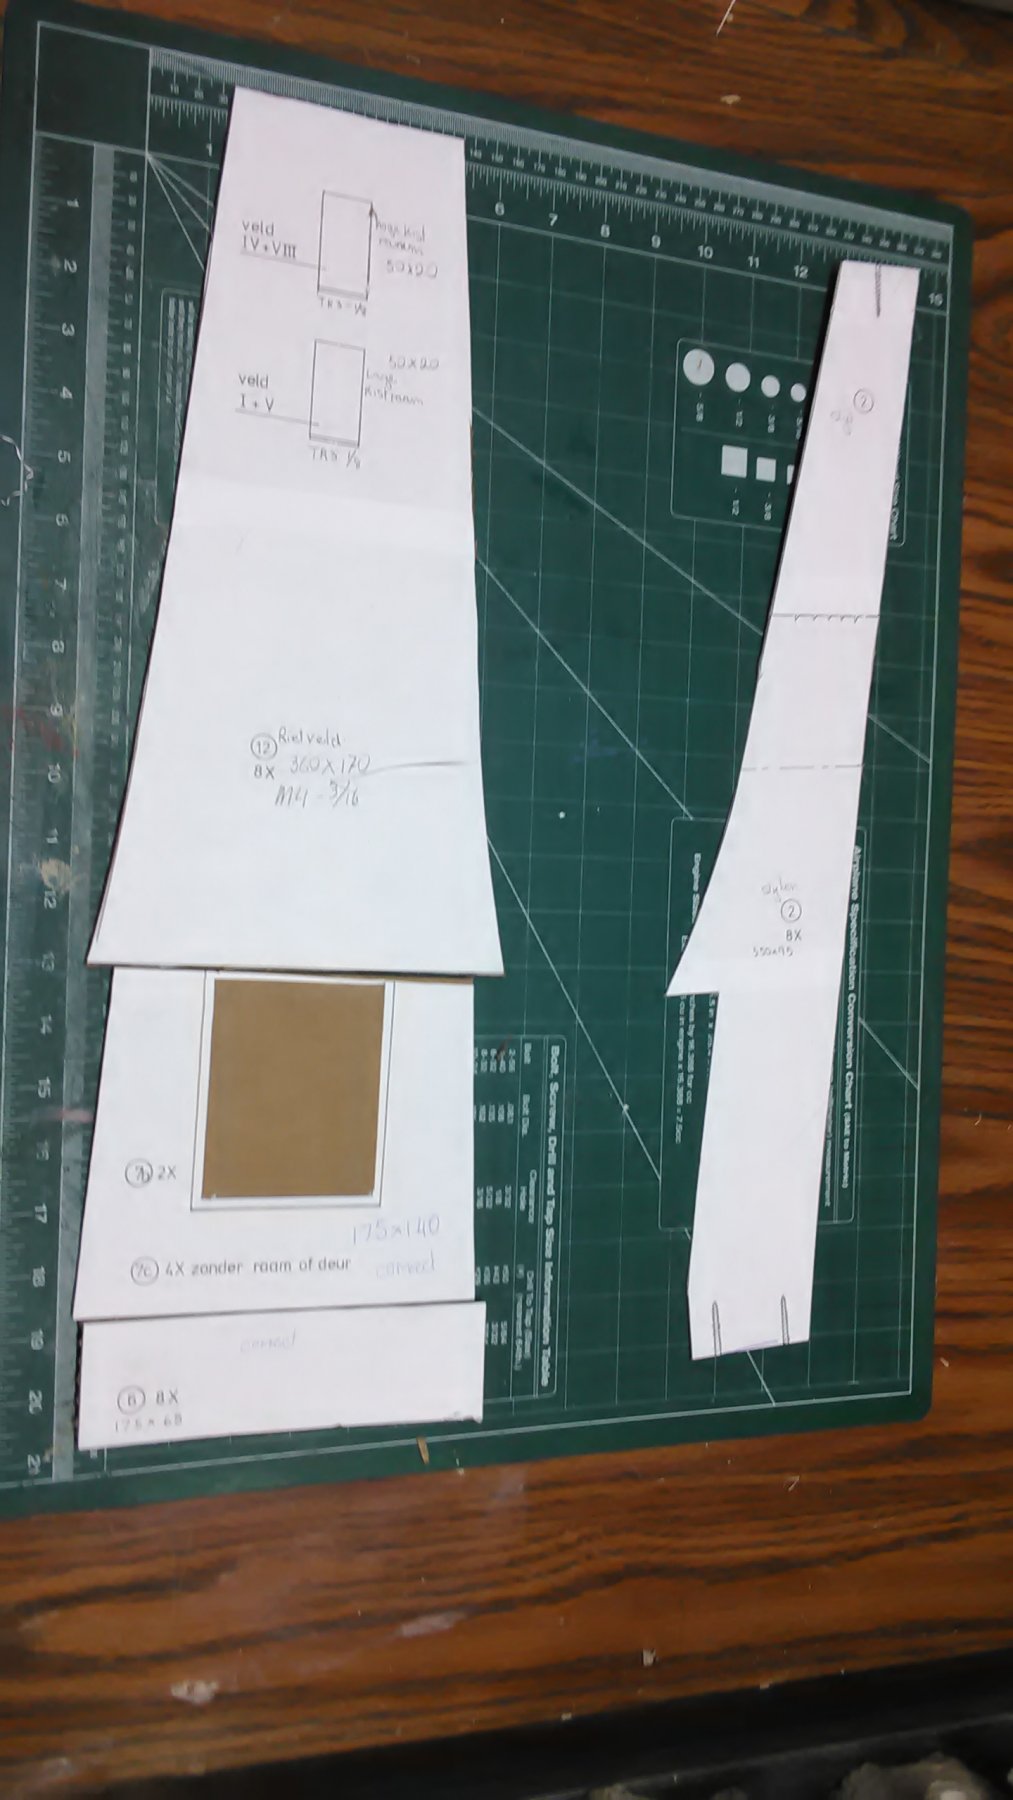
Some of the measurements given on page 1, 2, and 3 are not the same as the actual drawings. Number 2 (stijlen) needs to be longer. I cut out one of the copies and dry fitted no. 6, 7 and 12 on it. No 6 template is too short (funderingsmuur), but the width given on page one 68mm is correct.
What I am trying to explain is: don't assume the plans are correct. Some items are and some not. Compare and check.
Marcus
-
Besides building ships, I build windmills as well. This eight sided drainage windmill is a replica of one that is still in existence. When my father retired from the Dutch foreign service he worked in this mill as an accounting manager and gave me the plans of this garden windmill.
Dimensions:
Roof height 28-1/2"
Max. Height 48-1/2
The plans, dimensions and how to build it are all in Dutch. So first I took all the measurements and recalculated them in inches so I know how much wood to purchase. Once I have all the wood I can go back to mm.
The axel and other metal parts for the vanes I searched on Google, got a picture and recognized what it was so I know what to ask for in the store and I know my plumbing lingo.
This goes for some of the wood as well.
In Dutch M18, stands for multiplex watervast and the 18 is the thickness of the wood in mm. So in English the M is plywood for outdoors and 18 is about 3/4" thick. Did this with all the M's. Other wood involved is 1/8" Baltic birch and hardwood (any type). The outdoor plywood I can get at a big box store. I have plenty of hardwood in all sizes.
Other parts are copper and aluminum tubing, outdoor glue, tile glue to imitate the straw sides, glossy paint, primer, acrylic paints, etc. Waterproofing I am also using a spray can with that foam in it and lots of lacquer.
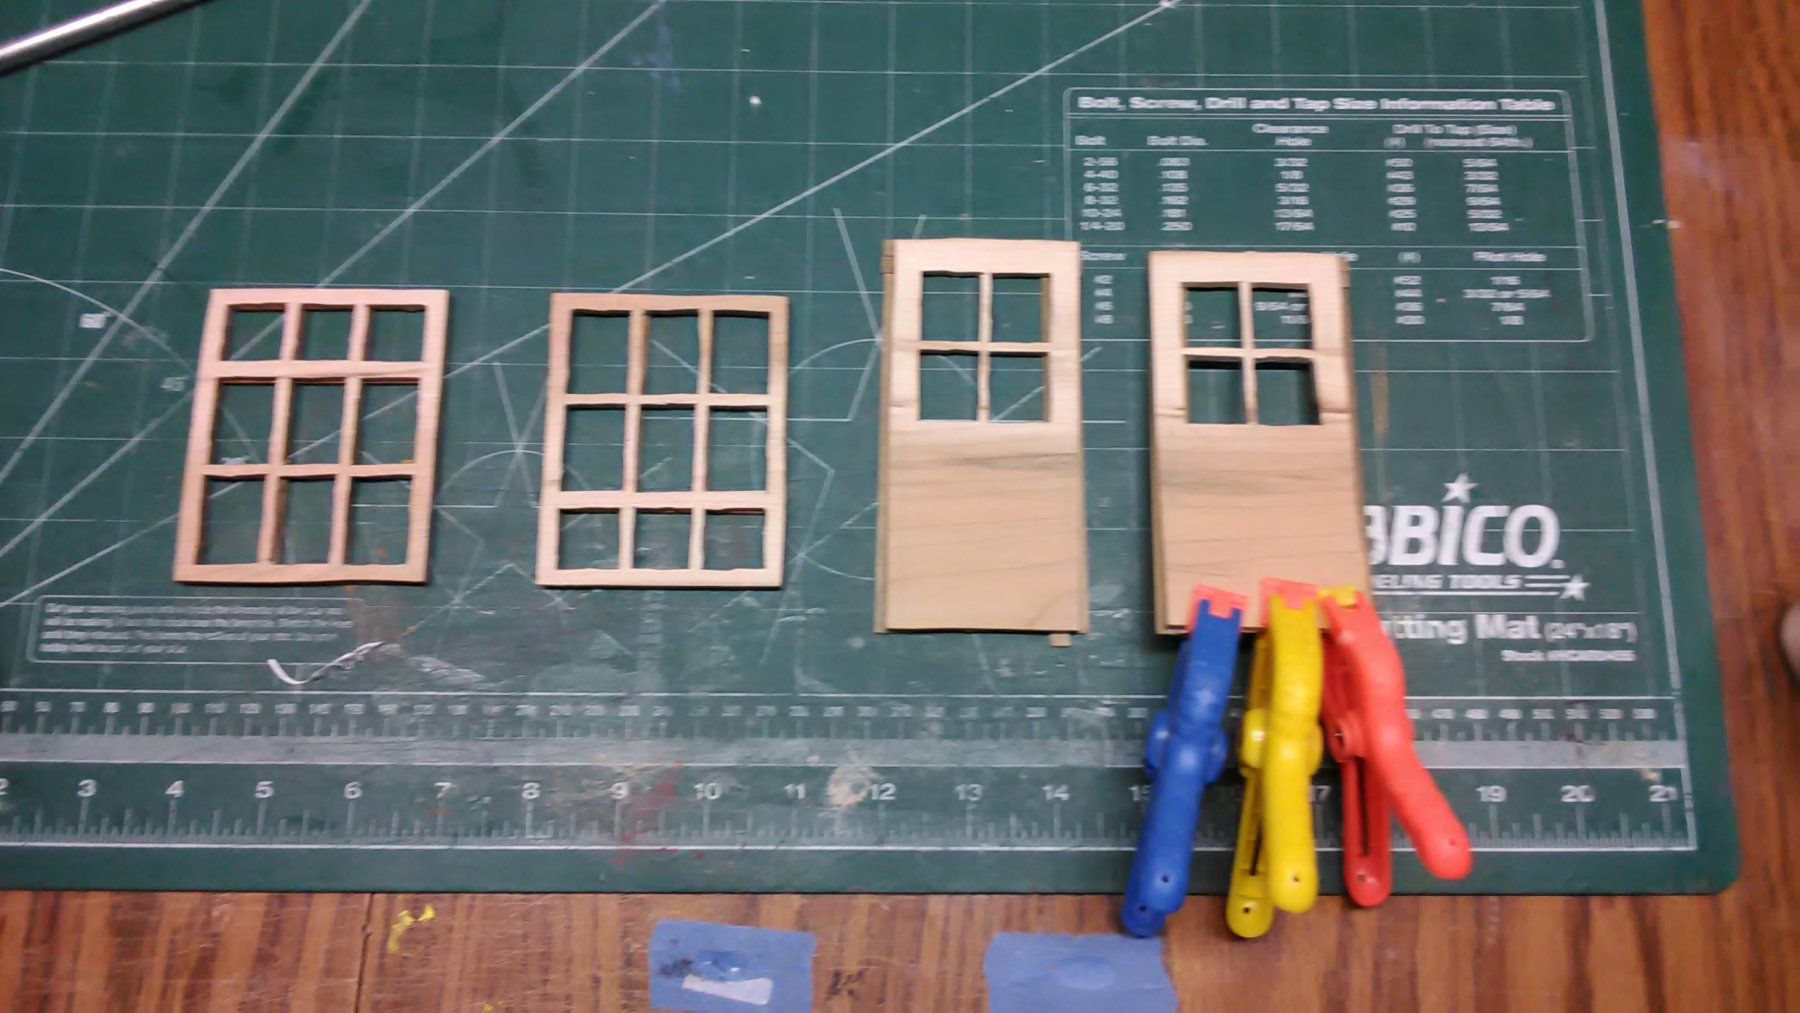
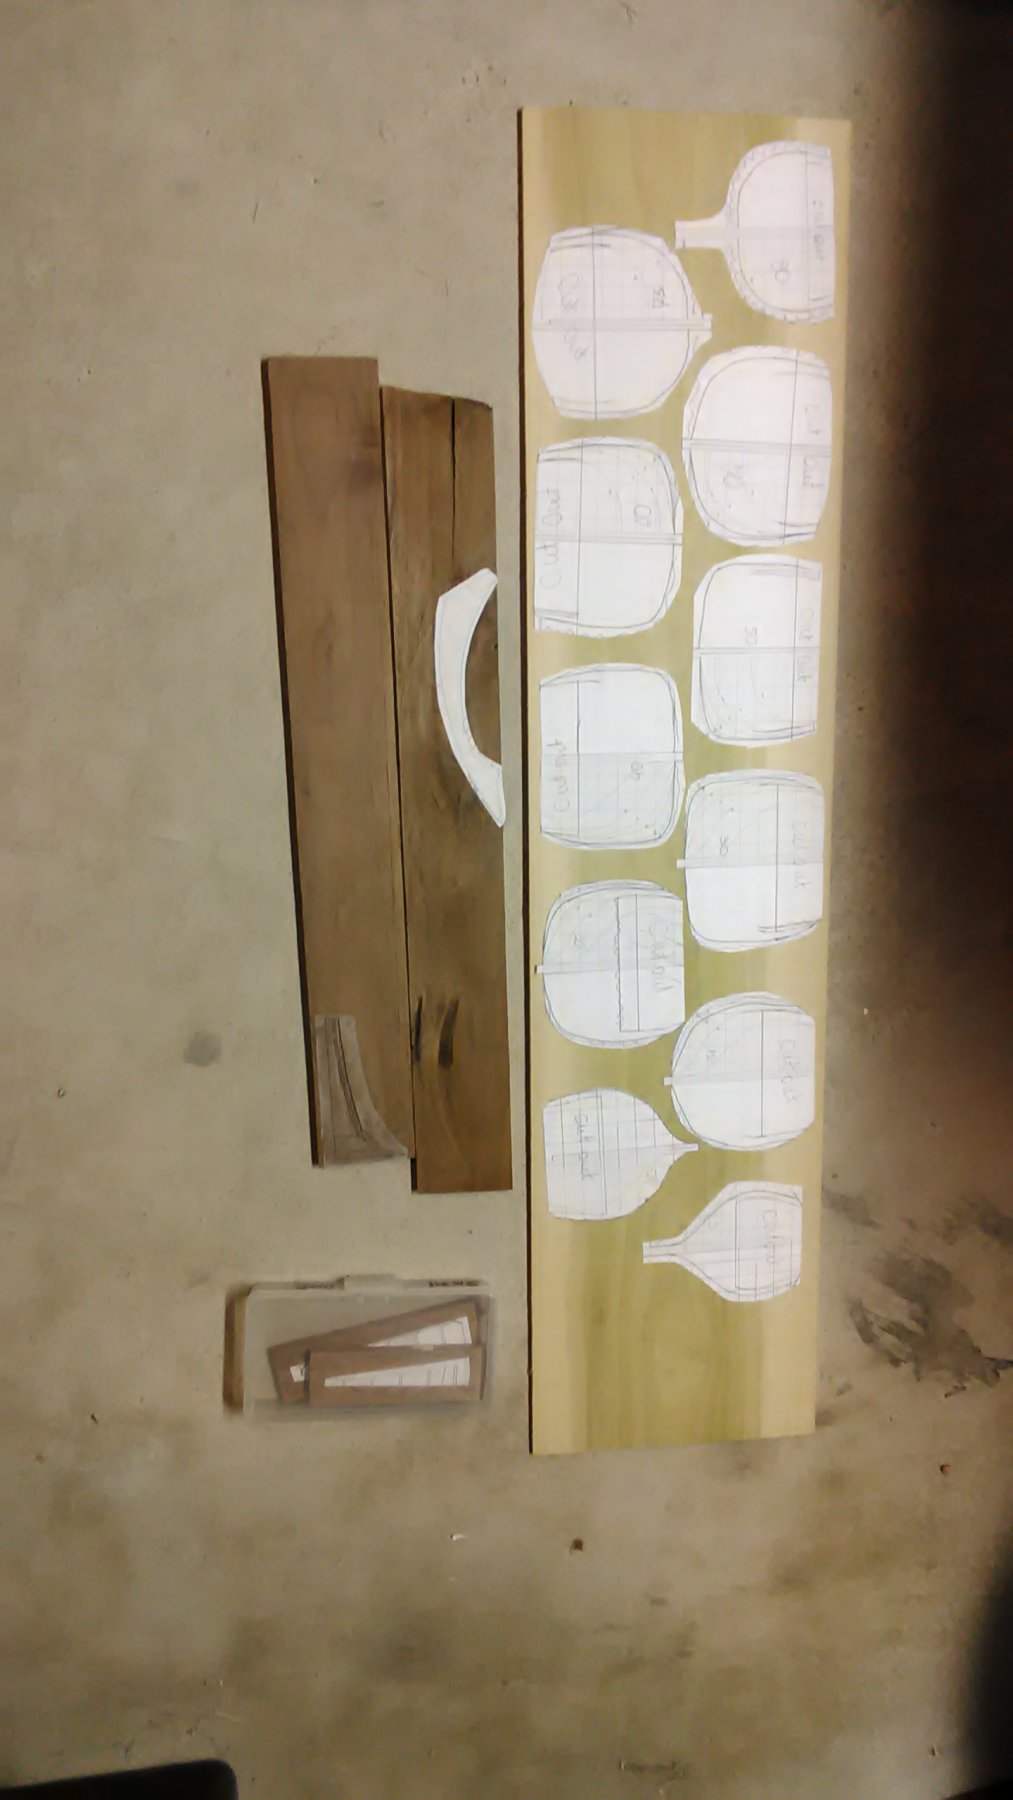
Xeroxed two copies of the plans and started gluing templates on stiff cardboard and cut them out.
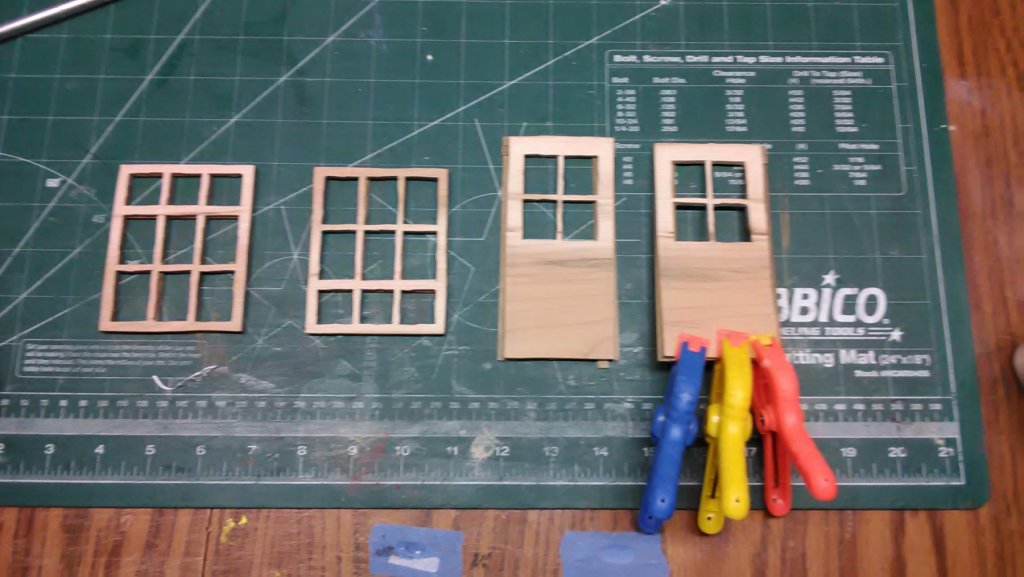
Also cut out the 2 doors and 2 windows. Instead of using glass for the windows I'll use plexiglass. These will be painted van Dyk green.
Marcus

- lmagna, Landlubber Mike, gjdale and 19 others
-
22
-
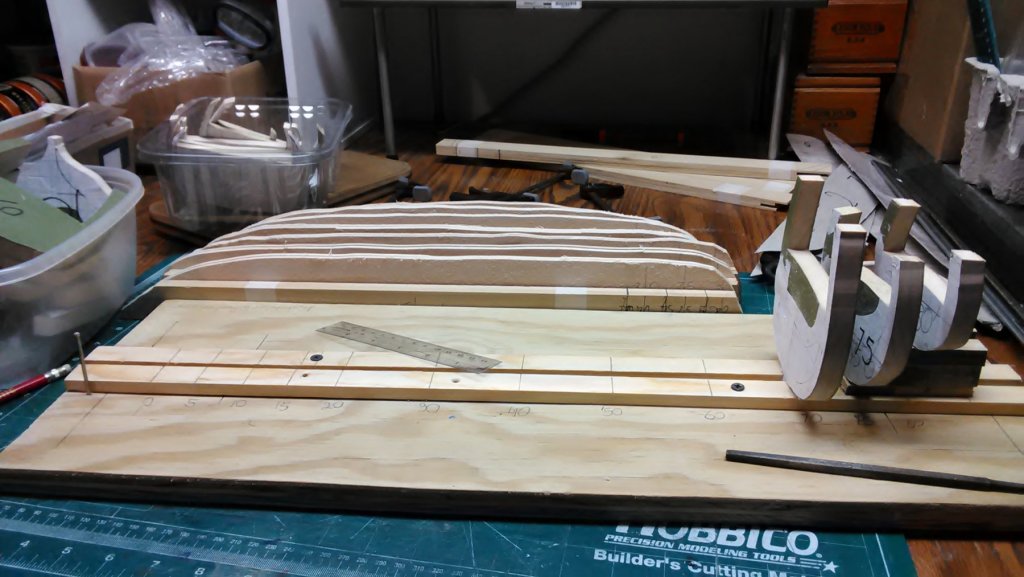
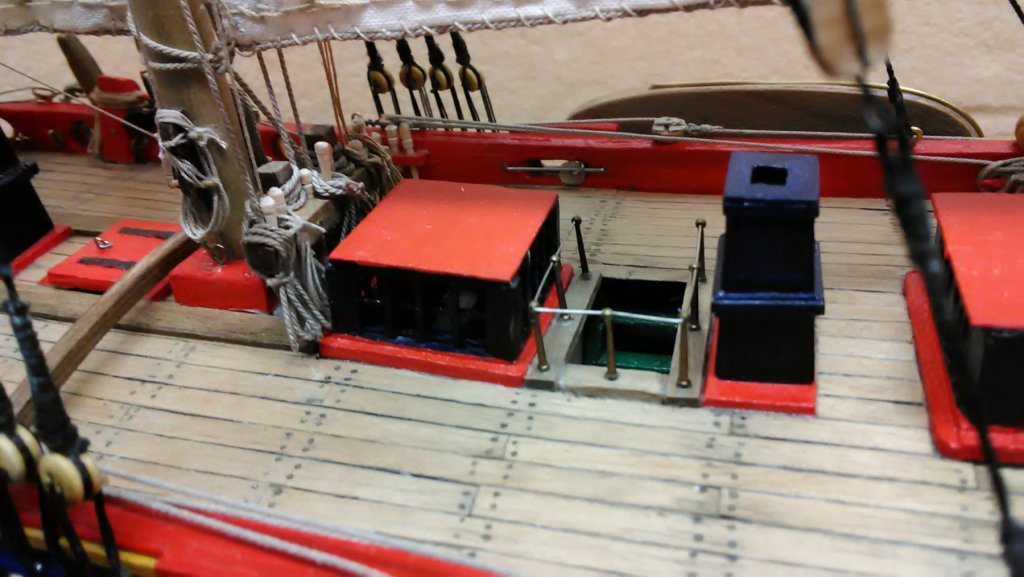
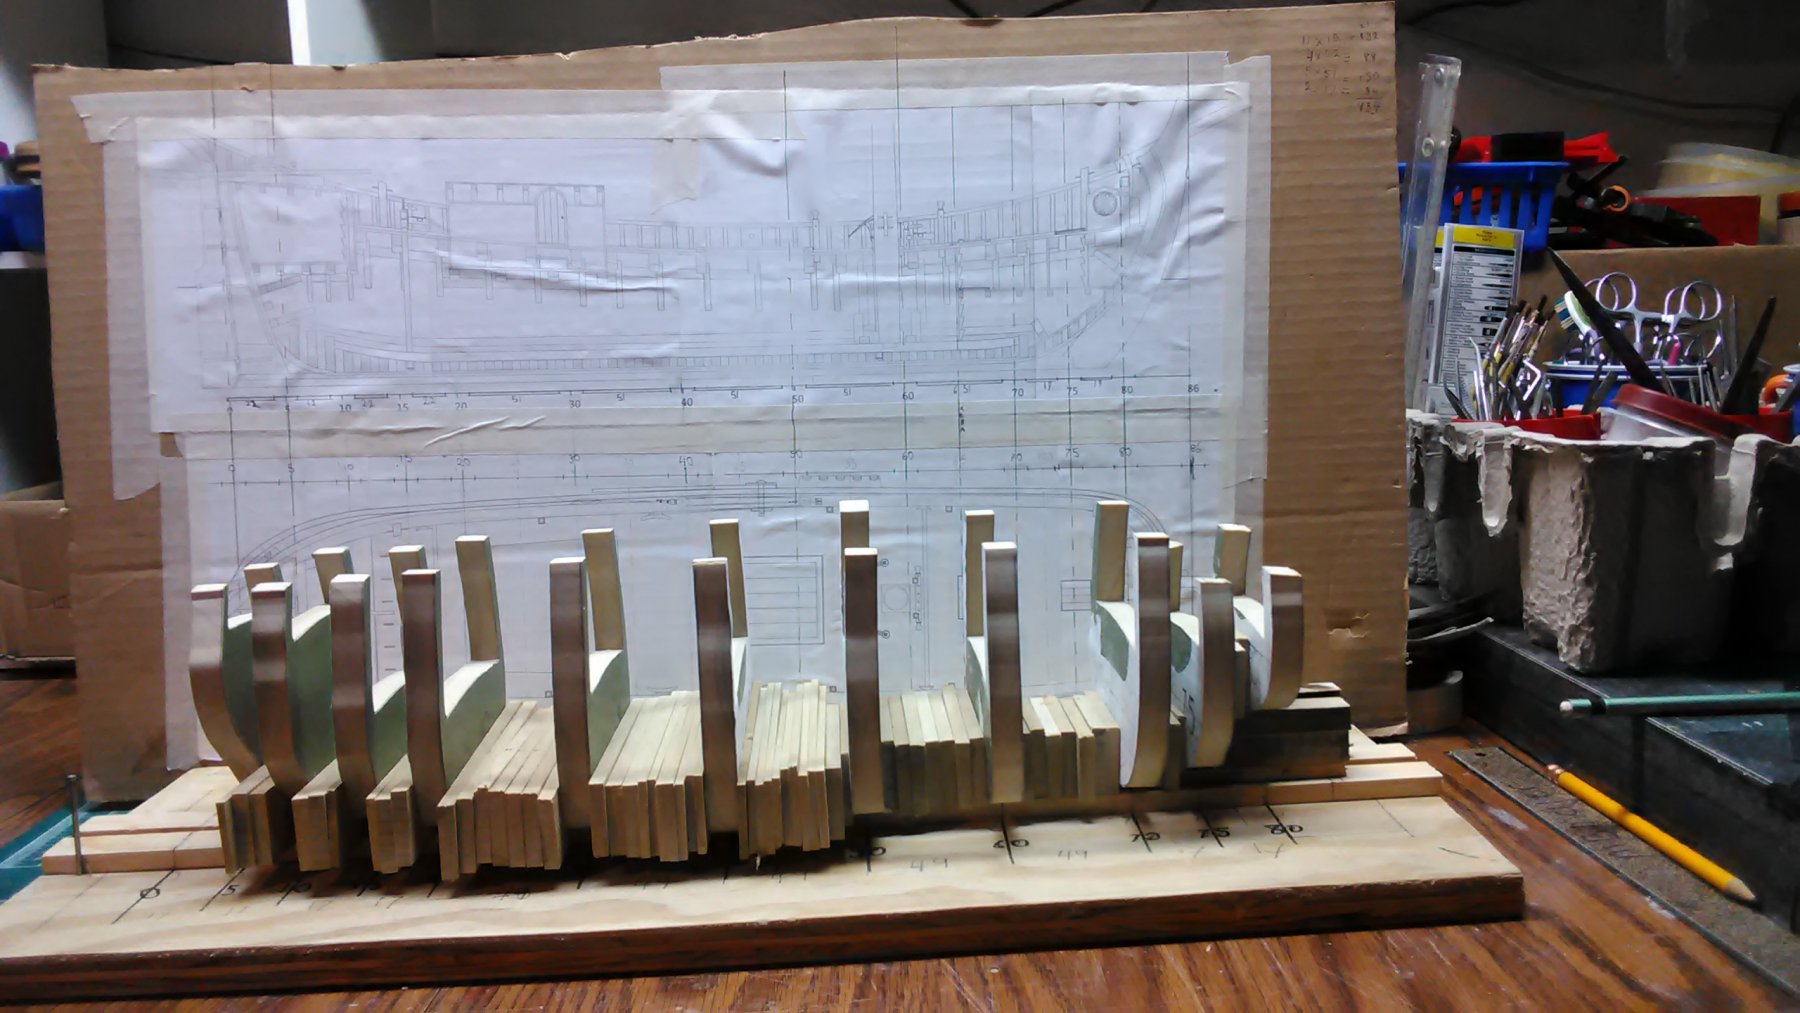
Set out the bulkheads and used spacers in between them. This whole setup is going to be glued together and the empty areas will be filled up with balsa.
Compared to the Utrecht, this process has taken me about a days work. The Utrecht took weeks and I also didn't know what I was doing.
Marcus

-
Jan:
Yes, interesting to say the least. As you said, not much information on these boats. Ever since I got the book and plans I have been studying these ships and this one is very different. I also like that it is going to be a large model.
Hans Peters:
Thanks for the interest. You need to put your wijdschip build on MSW. Doesn't matter if you are a beginner. We all started somewhere (gewoon doen). Furthermore, it is another ship I want to build and want to see your progress.
With your trade in inland shipping you have an understanding of these ships.
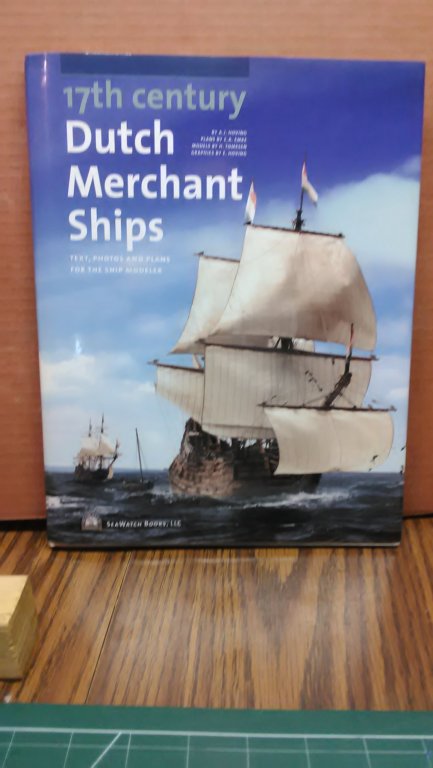
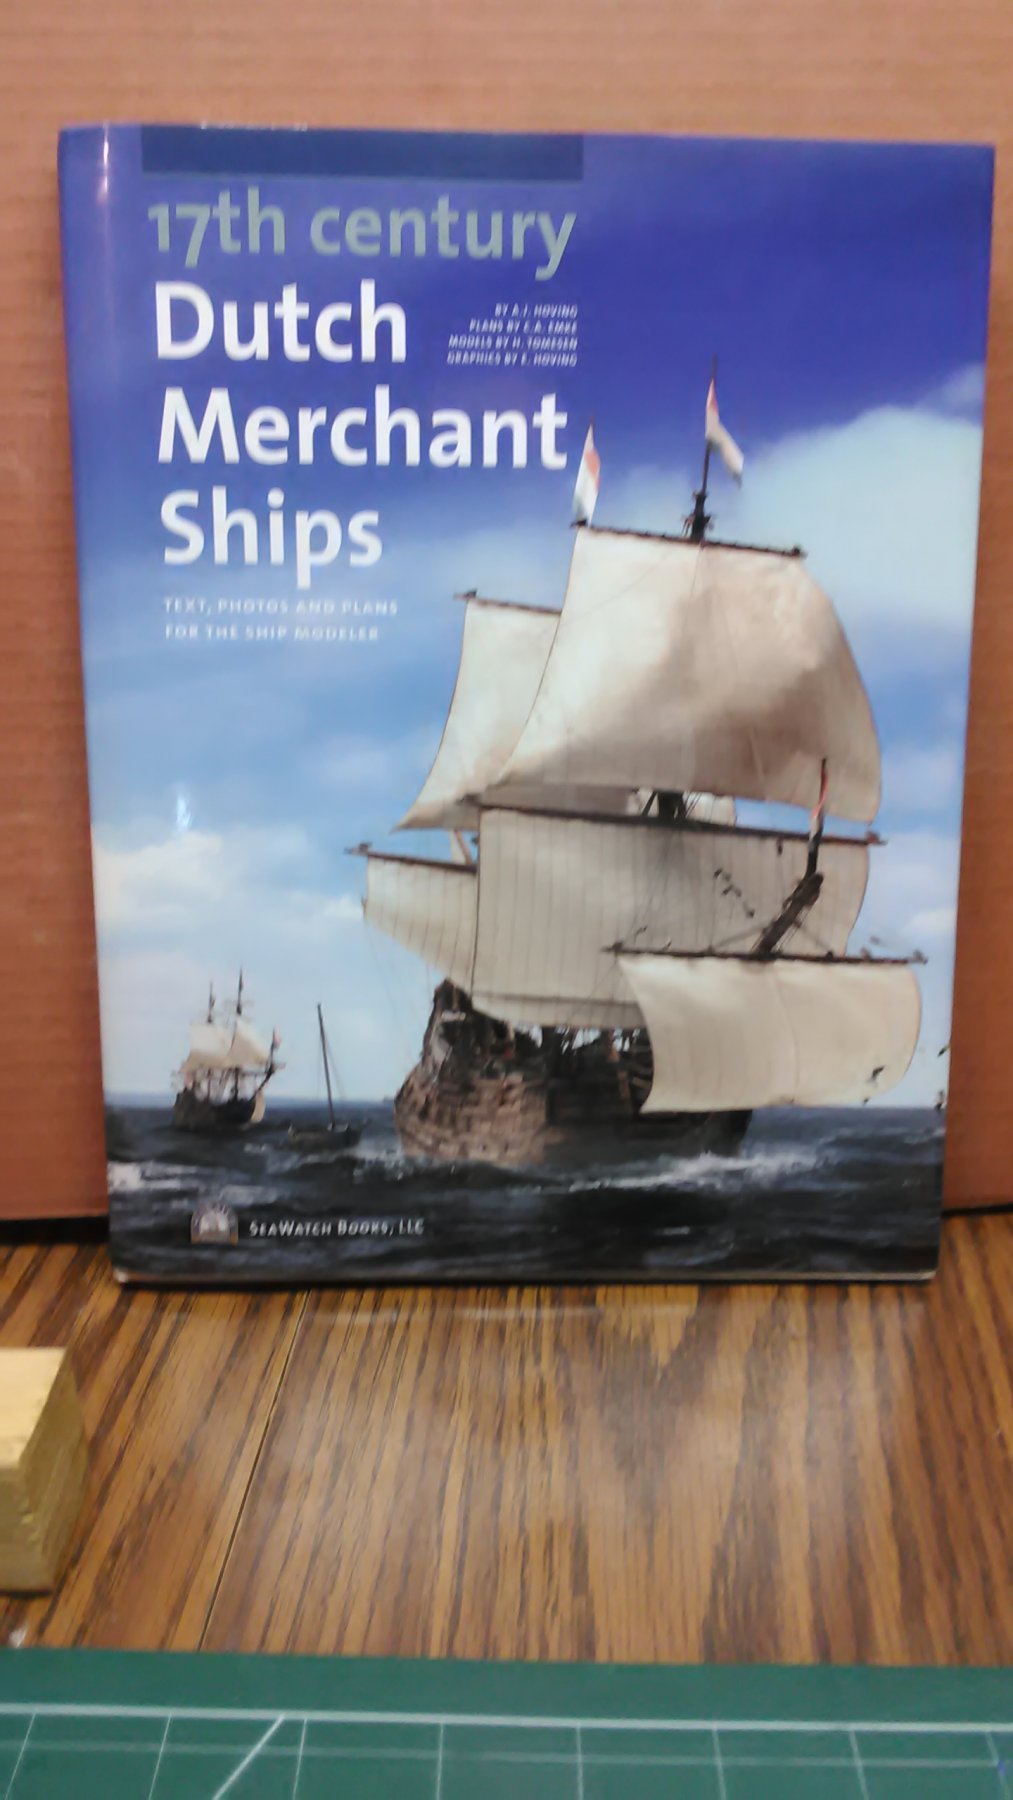
I know of NVM. I had a subscription on their magazine when I lived in Amsterdam. They have excellent plans. I'll check them out again. What is available in Europe is not always available in the US. I was very excited when SeaWatchbooks published the 17th century Dutch merchant ships.
Marcus
-
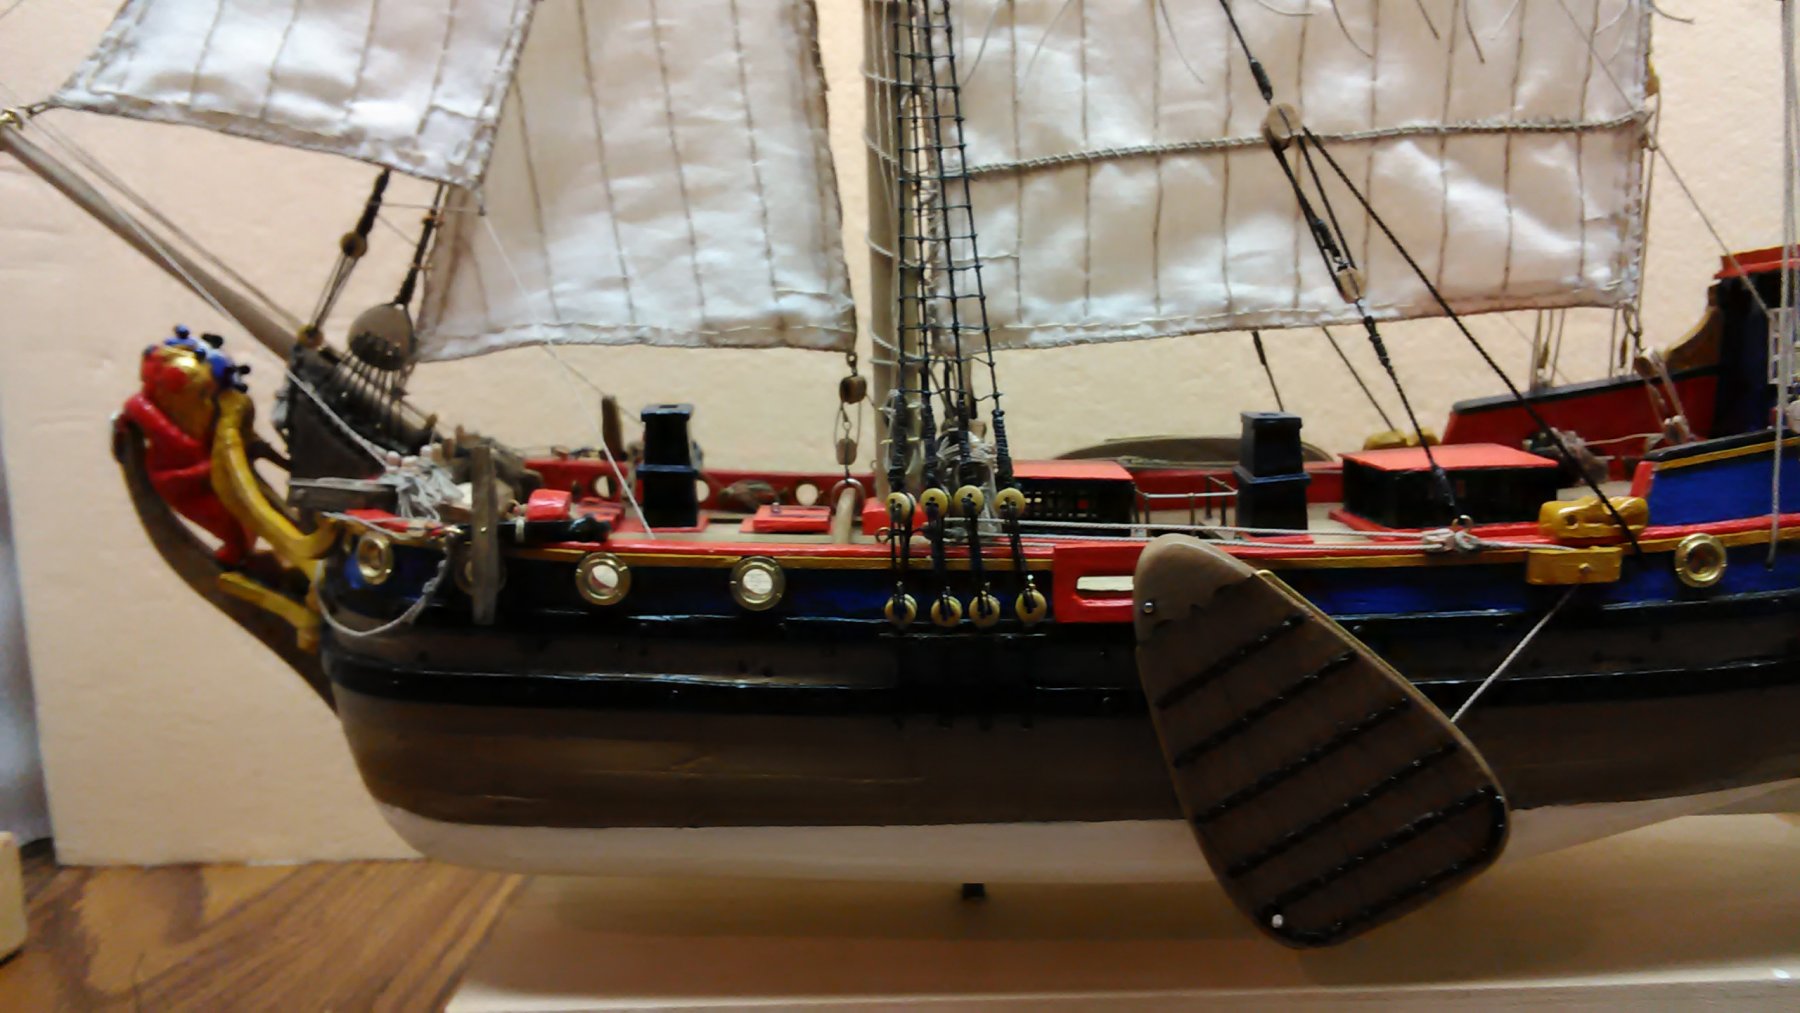
Cut out the bulkheads and starting to put then in a template. Made from 1/2" poplar. Yes, a bit thick, but it is hidden.
Since I joined a woodworkers club, I am getting everybody's cut offs and then some. I received a lot of walnut in small sizes, so the Boyer will get a stem, keel, sternpost and rudder from walnut. Looks pretty good. Also 3 thick wales on each side will be walnut as well. Like the Utrecht, they will be laminated to get the thickness. I have succes with bending this wood.
Marcus

- hexnut, Omega1234, kees de mol and 9 others
-
12
-
Beautifully done. Both the sails and the rigging look good.
I pawned my Mary off to a friend who is an arborist, and in return he is going to take down a 70 year old Russian elm that got hit by lightning last year, (a $1500.00 savings for me). I built a display case for her as well.
Marcus
-
Ondras71, Mark and Jack, thanks for showing an interest.
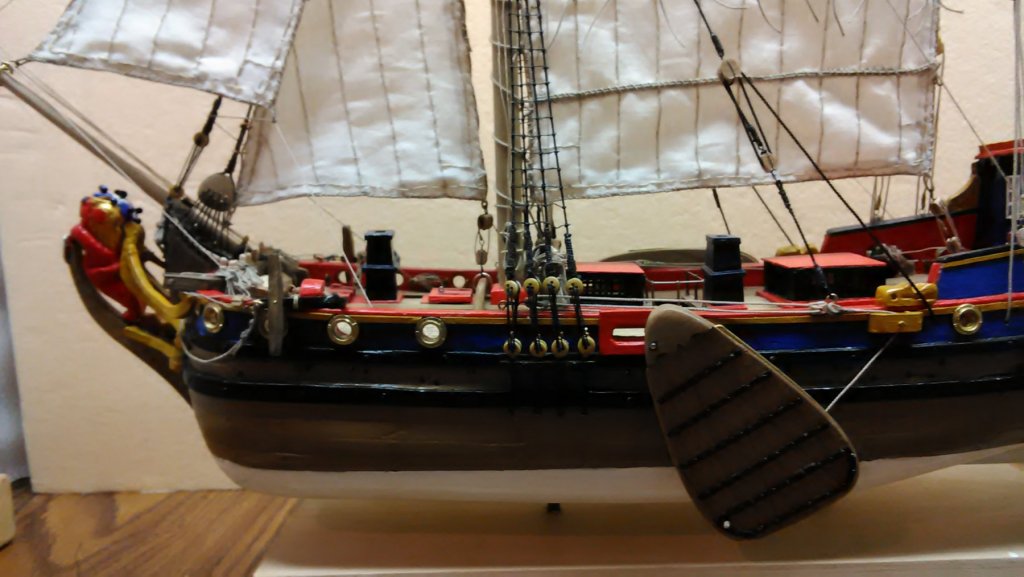
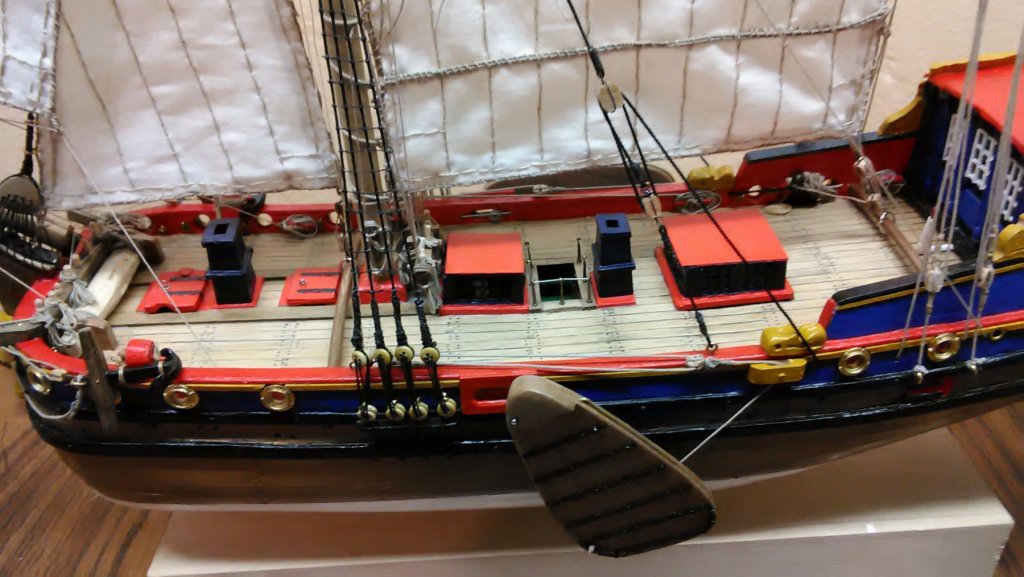
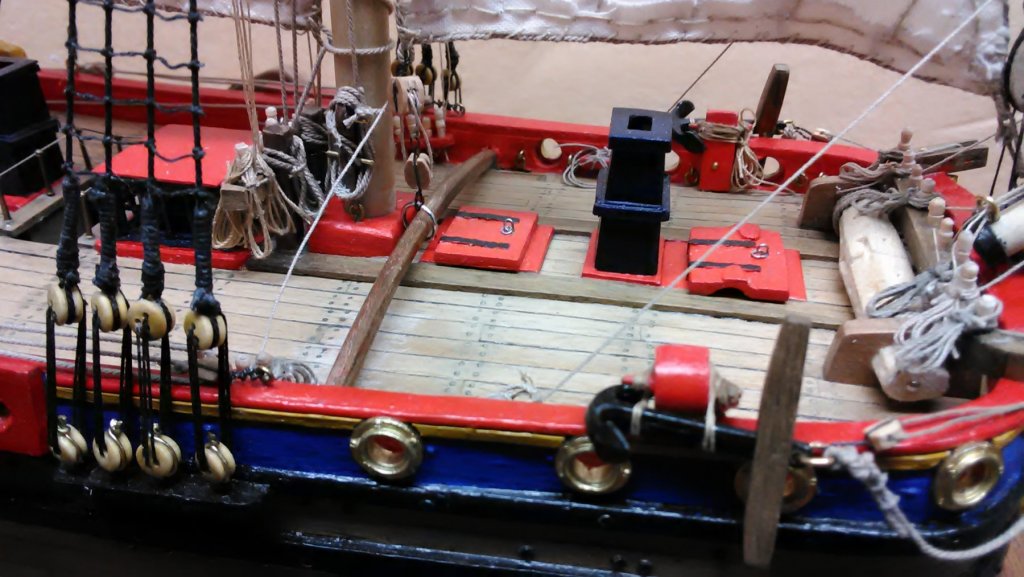
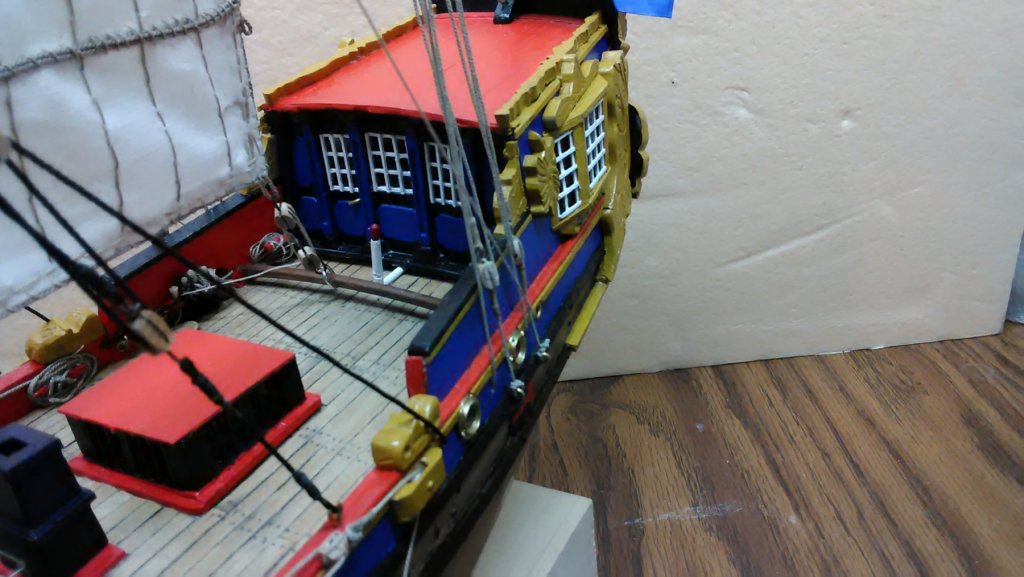
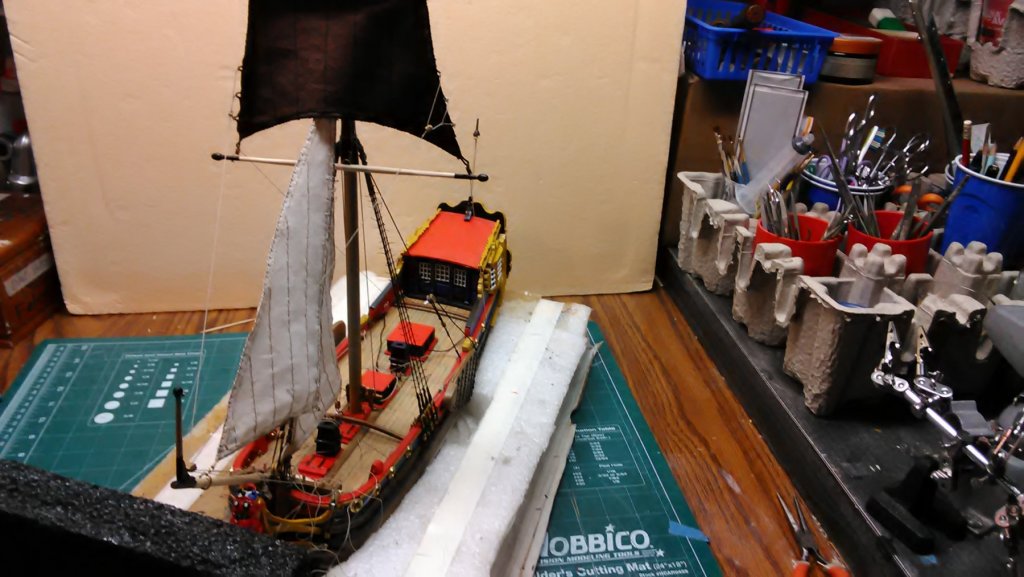
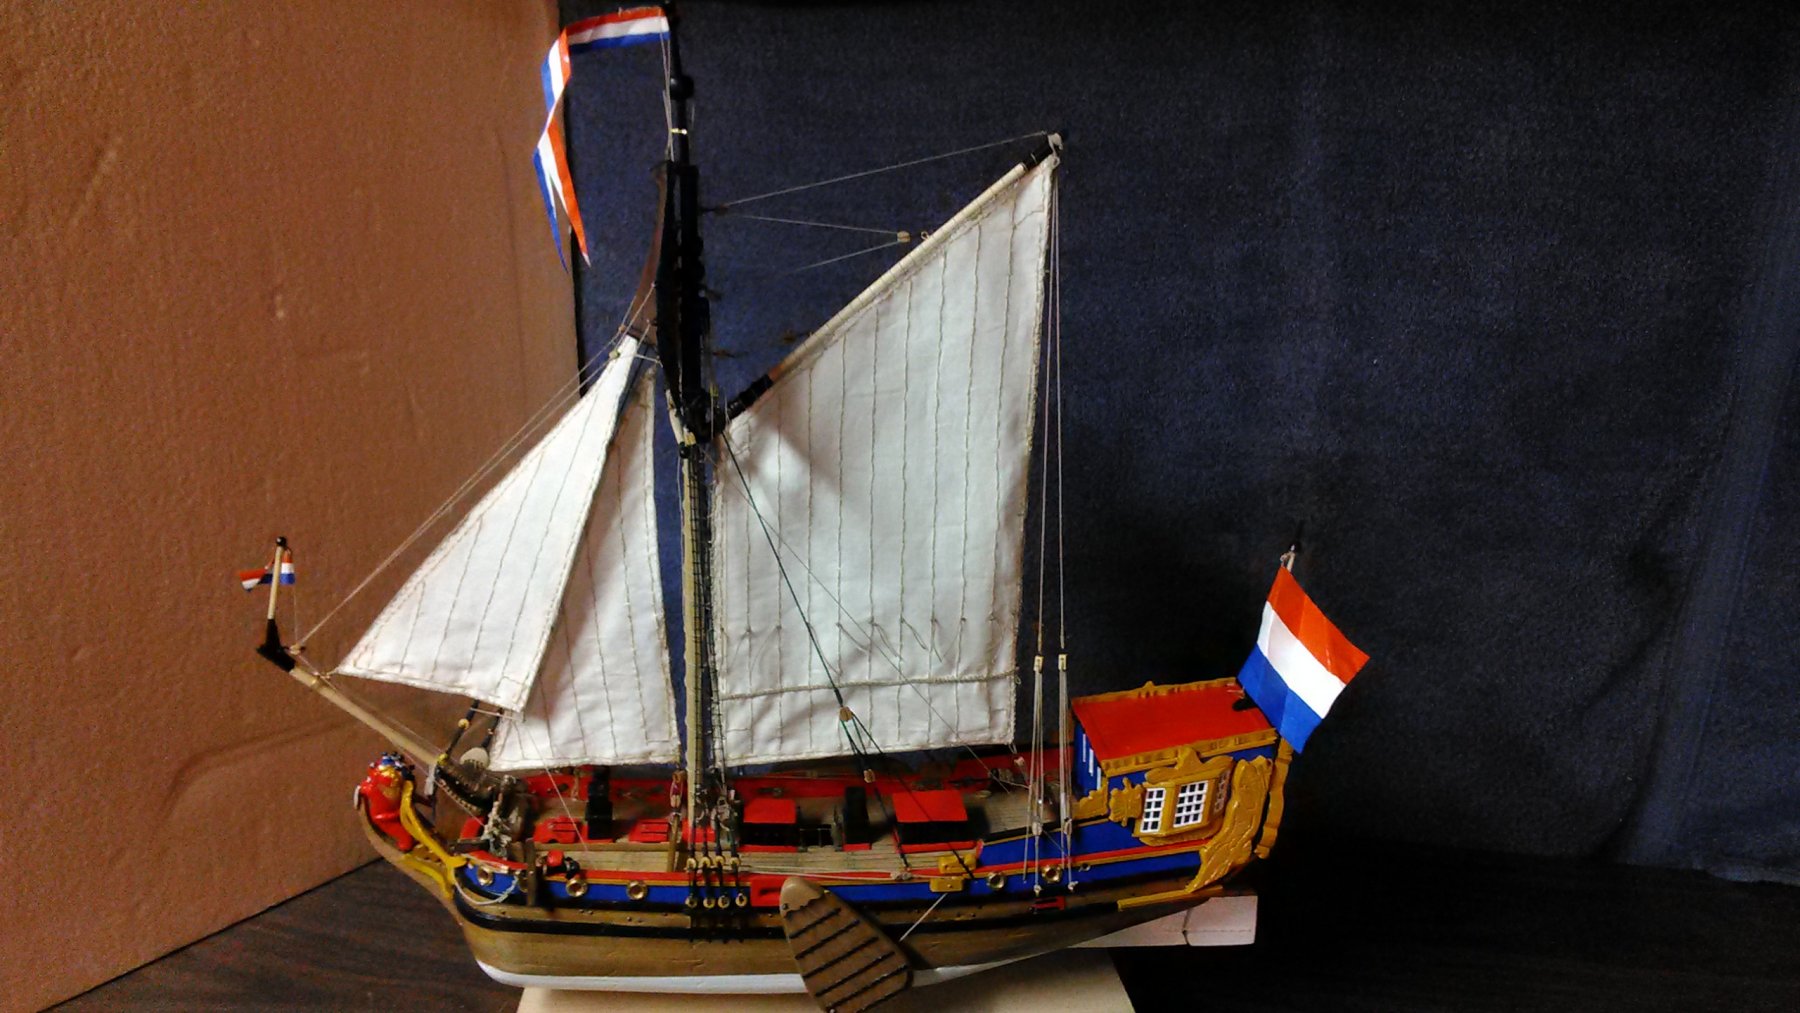
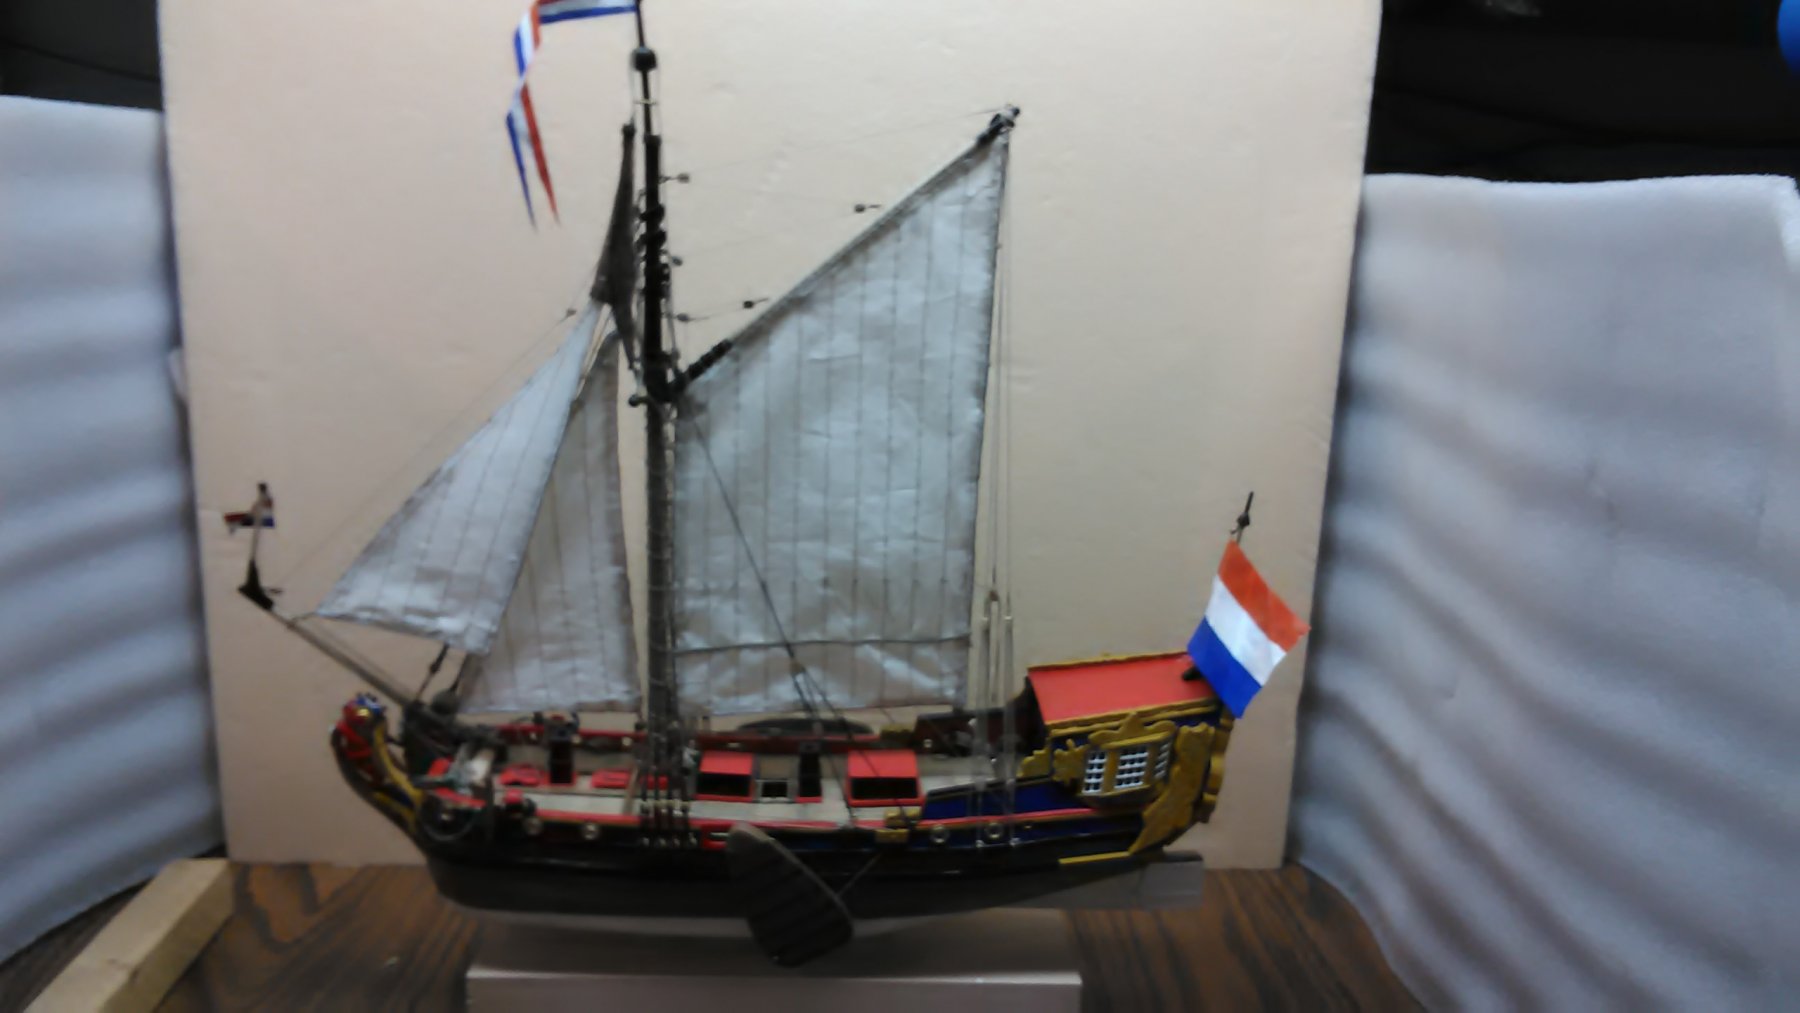
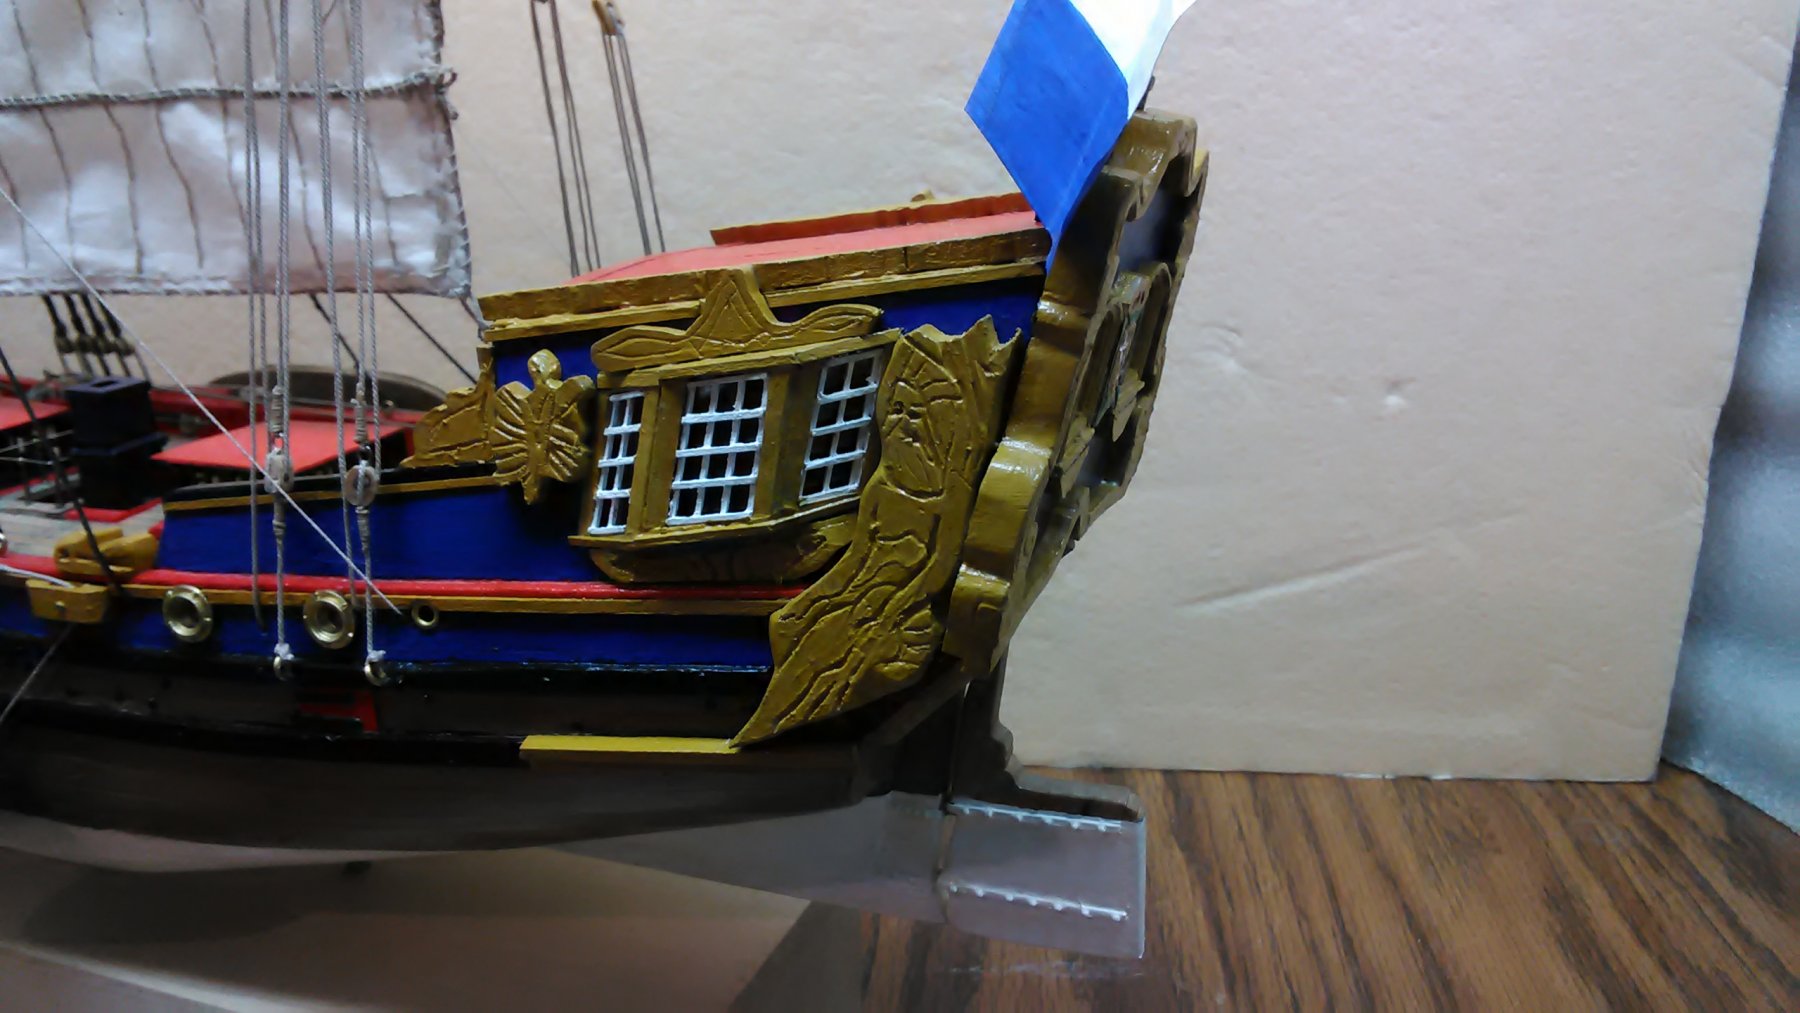
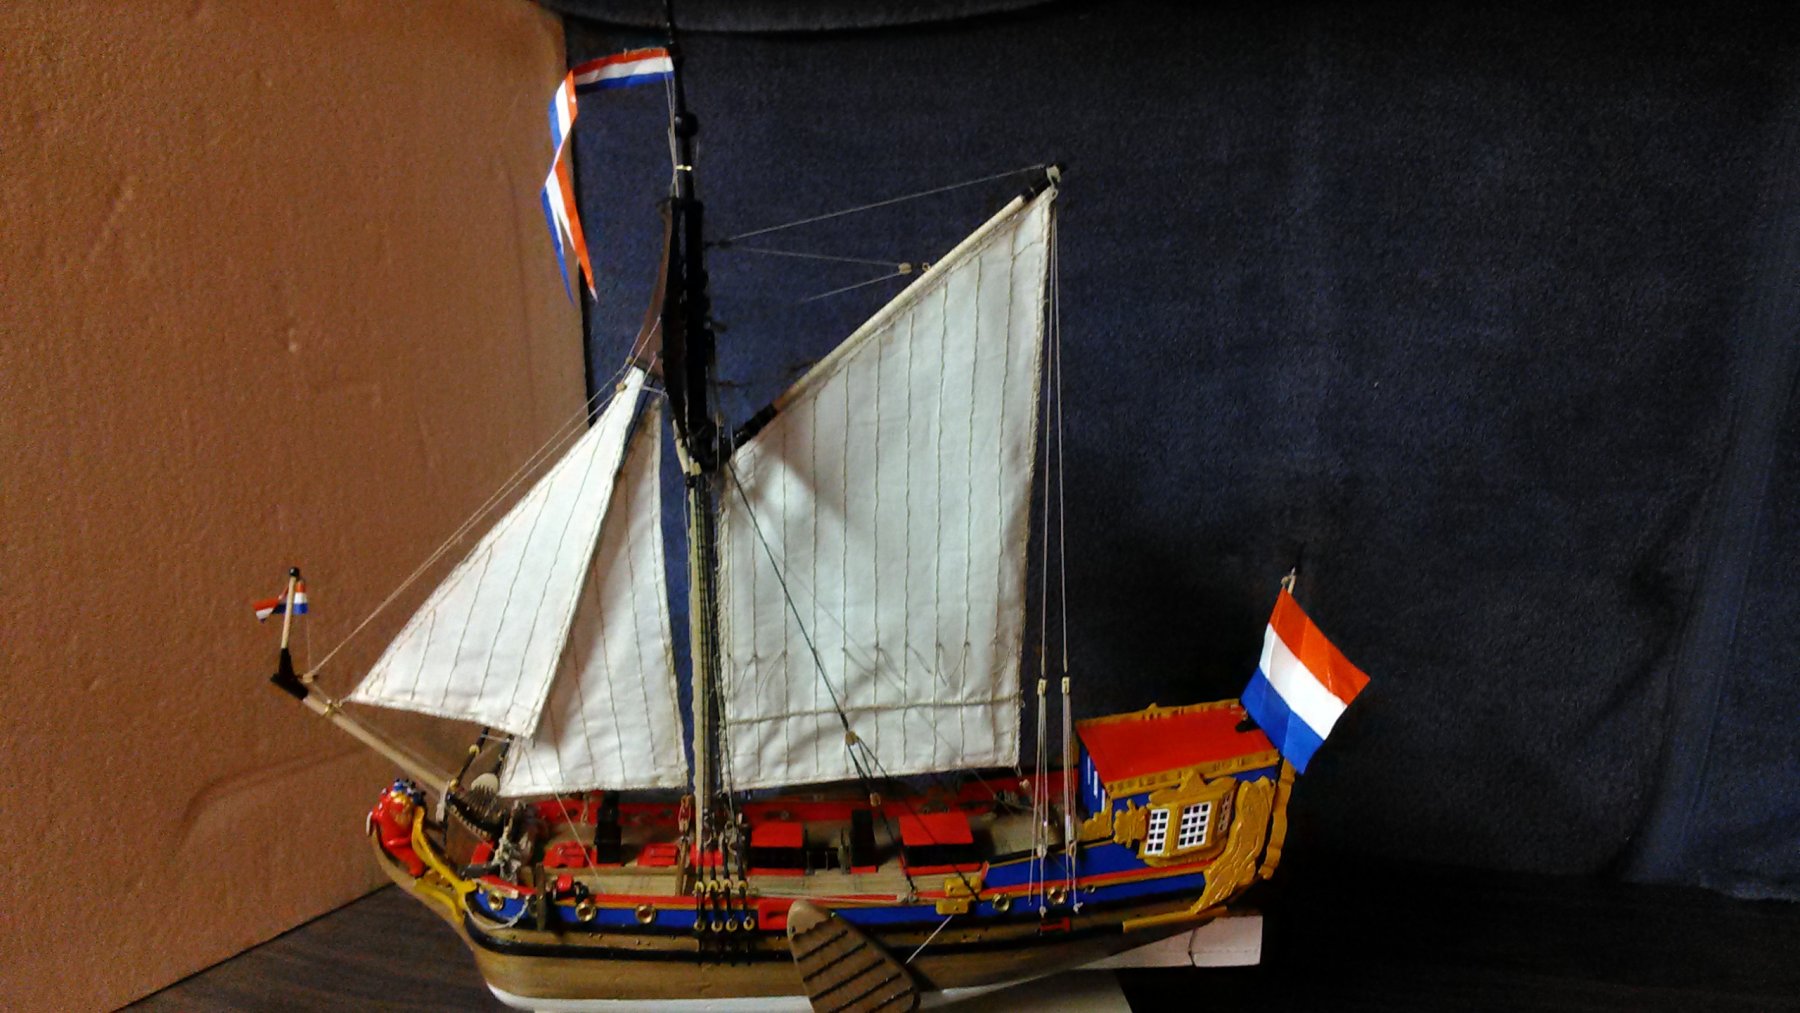
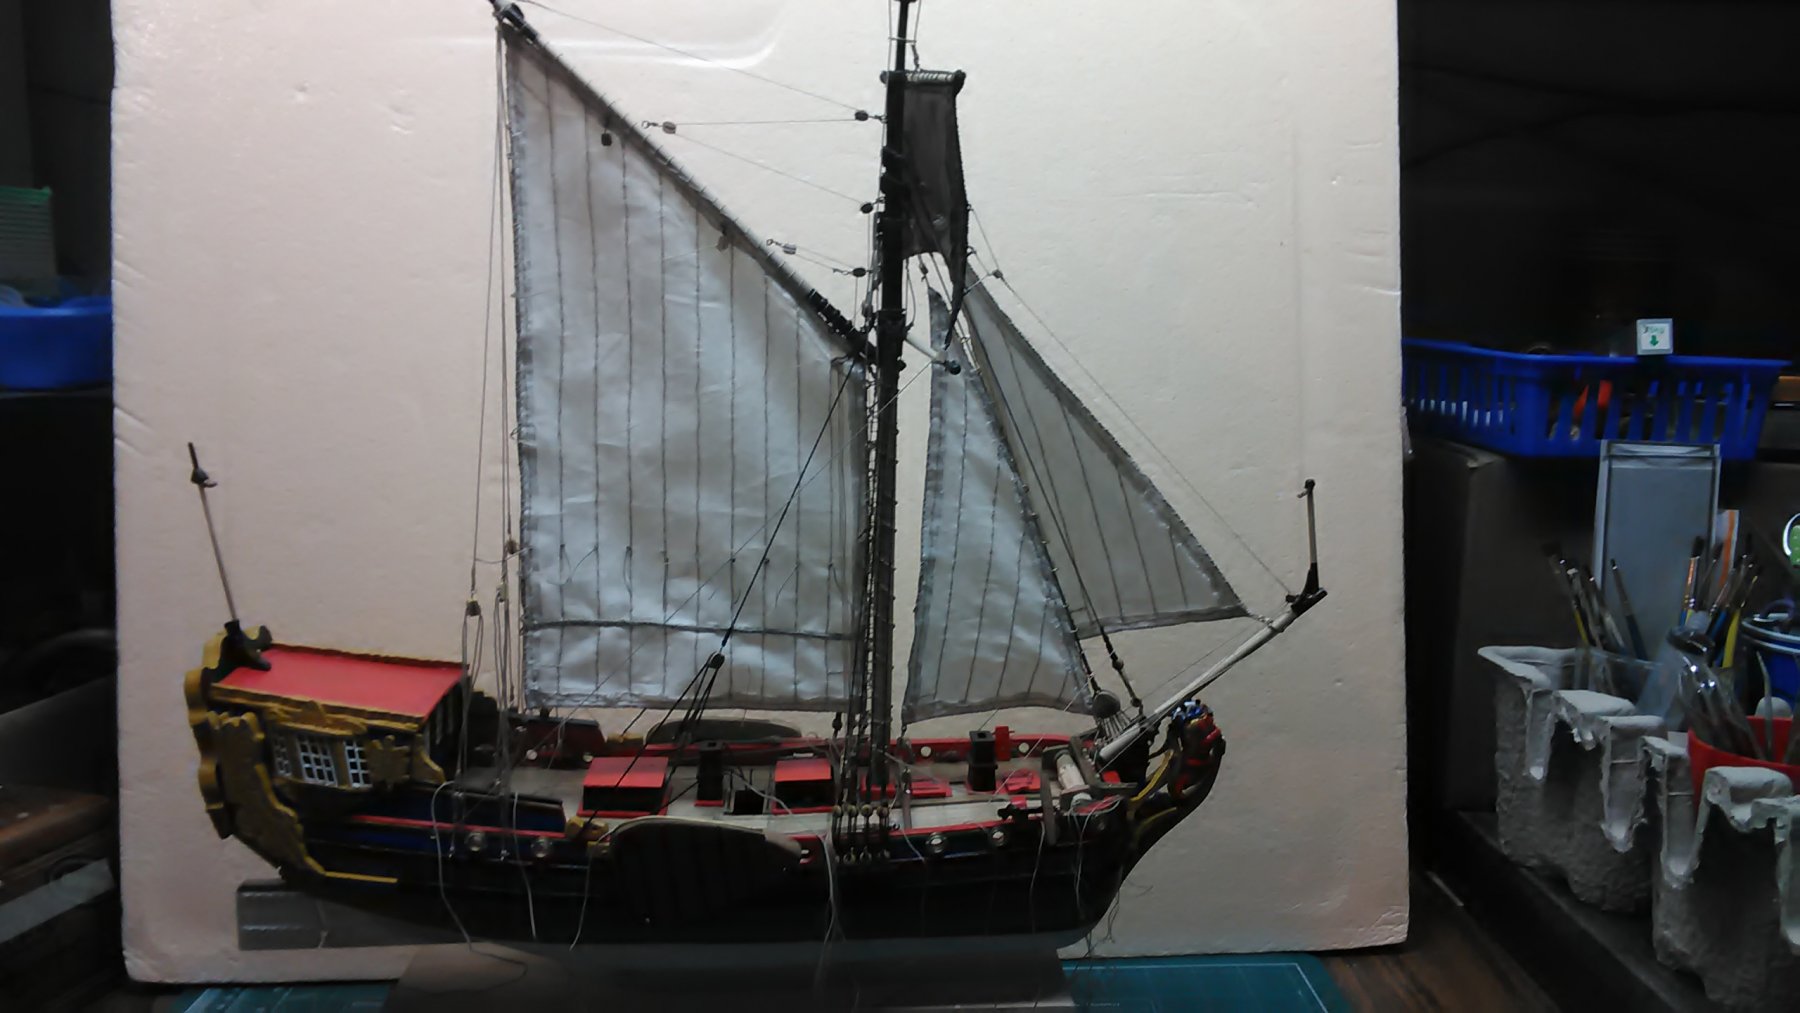
This build has the same rigging and sails as the Utrecht plus more. It has a mizzen mast with what looks like a lateen sail and the bow sprit has an added sail too. The stern is a bit pear shaped, similar to a Fluit, just not that extreme. At around 53 cm in length this will be a large model
Marcus
-
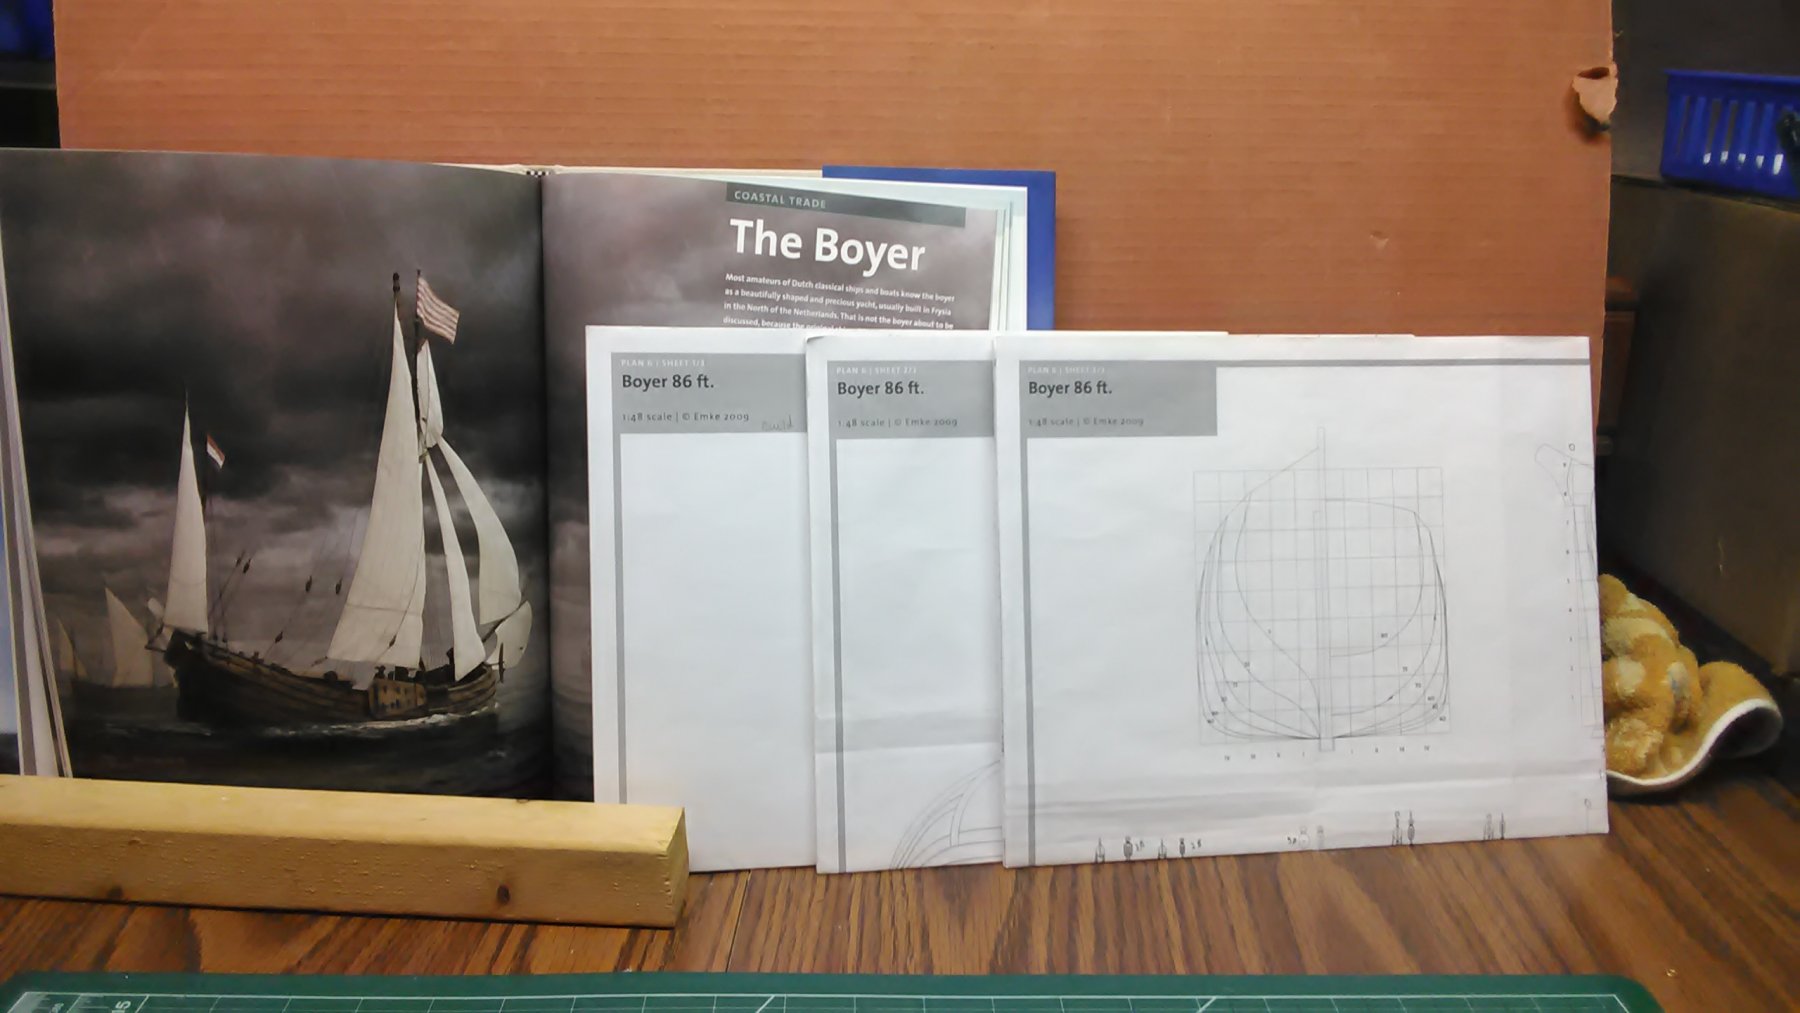
After my yacht, Utrecht, I decided to start building several 17th century Dutch merchant ships and the first one is a Boyer. The plans are from Ab Hoving and Cor Emke published by SeaWatchbooks.
The Boyer was a small freighter, often seen in the entire North West European area. In literature it is suggested that the Boyer was developed from another ship, the 'heude', a Southern Dutch inshore vessel, which, in order to be able to sail the higher waves of the open sea (albeit in close vicinity of the coast), was buoyed up (heightened)in the sides; hence its name.
Like every ship type, the Boyer is a compromise, which by its little draught and relatively large loading capacity was able to sail both at sea and on shallow waters. For the former, a deep keel performs best, for the latter the flat bottom. The solution for the Boyer was finally found in the application of leeboards, which came into use in the second half of the 16th century. They lessened the drift, allowing at the same time for a flat bottom.
The Boyer could perform both inshore and close to the coast and was seldom larger than 22 meters. Its characteristics are the round shape with little deadrize and round bilges, upper planking with much tumble-home ending in the helm port transom, a curved stem and a set of heavy wales, emphasizing the handsome sheer.
They sailed close to the coast and could reach cities that were situated relatively far inland, like Berlin, Cologne, Warsaw and Breslau. Wine, fruit, hemp, pitch, tar, wool cloth and spices were the lighter cargos often shipped by boyers.
Note: this is going to be a slow going build as at the same time I am building an 8 sided drainage windmill, scale 1:15. It is a replica of a windmill still in existence.
Thanks for reading.
Marcus

-
-
Piet,
Those guns are looking good especially at that size. Excellent workmanship.
Marcus
- cog, popeye the sailor, Canute and 2 others
-
5
-
Patrick ; Thanks for the compliment. I am all about the details (just like you).
Carl : Thanks. I built mostly Dutch ships. There are so few people doing that. So if I built them other modelers might follow suit.
Mark: Thank you.
Piet: I am glad you enjoyed the built. Will save you a seat for the Boyer built and if you are interested a seat voor the windmill built.
Marcus
-
I finished the Utrecht, this weekend and she turned out pretty good for my first scratch boat. I want to thank Jan (especially your pictures) , Piet and Carl for the suggestions.
Next boat is a Boyer, from the 17th century Dutch merchant ships book, this will be slow going as the next 3 seasons my time is spent mostly outside. At the same time I am going to build an eight sided polder mill (achtkantige poldermolen voor de tuin). I will post progress on that build in the thread for non-ships.
I want to thank everyone for following my build, and before you leave the room, please stack up the chairs in the corner.
Marcus


-
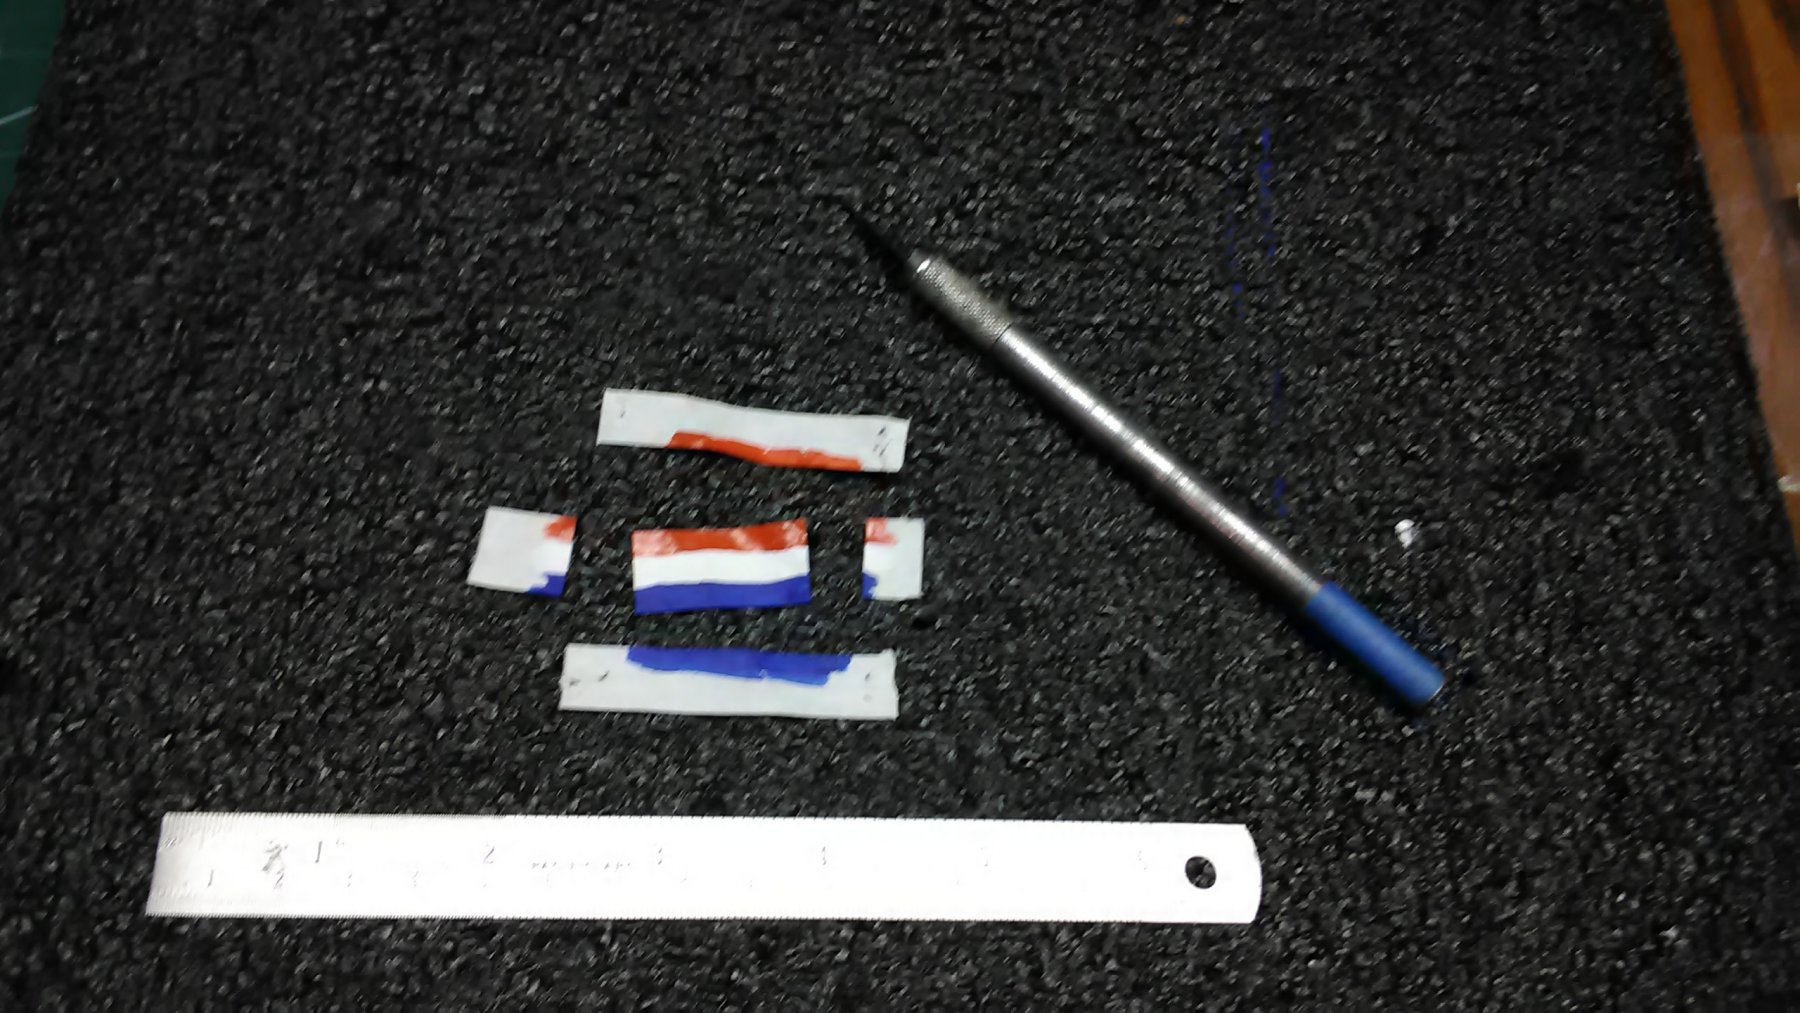
Some more pictures of flag making.
1. Here I removed the handles and all you have left is the flag itself.
2. Here I lightly score the flag to get a crease.
3. The crease is made, the string is laid into the crease and with little glue shut it.
Let it dry and install it.
Marcus


-
My method of making flags is by Gus Agustin, an expert model ship builder. Below are the steps for people who are interested. I've altered his method somewhat.
Flag making by Gus Agustin.
1. I copy my flags from the plans of the ship.
2. I trace the flag on clean white paper on both sides in pencil.
3. Trimmed it on 2 sides using the third and fourth side as a handle to work with.
4. I then crinkle the paper into the waves and folds that I want. This kills the memory in the paper. The waves and folds will depend on how you want to display the model with flags. This and step 5 will take some practice, but remember that paper is cheap, so have fun with it.
5. This is the most important part of making flags. Once you've crinkled your flag, dip it into a bowl of lukewarm water, lay it out on piece of glass (or I use a tile) while still wet, and play with it using toothpicks to reshape it again with the waves and folds you desire, than set aside to dry. I give it 24 hours to be completely dry before I handle it
You've now given your flag a NEW memory. You can open it and with a little pressure with your fingers it will go back to the shape you created.
6. Now you can start painting, starting with the lightest color than going to the darkest. I use acrylics and even if the paper is white, I still paint it white.
7. Once you've completed one side with the 1st color, set aside to dry (I do 2 coats); then do the other side. (again I do 2 coats).
8. Proceed with the next color and repeat step 7. When finished painting, trim the handle (3rd and 4th side) but don't forget the tabs (top & bottom) so you can attach to the mast or ensign staff.
This is where I do it differently. I trim all sides and don't use tabes, instead, I fold one side (about 2 mm) of the flag over, add a long piece of string and glue the fold with the string in it. Weigh it down until dry. Once dry attach it to mast or other area.
At this point you can still play and refold the flag to the desire wave you want.
If the colors are too bright, I use Dulcote to flatten the color.
You have now made your flag. Don't be disappointed if it is not perfect, remember it's your first flag. With enough practice, you will get what you want. I use acrylic paint which is water base. You can fold and twist your flag and the paint won't chip or flake off. Water color paint will flake off and oil base paint takes too long to dry.
Marcus

-
-
I am pulling up a chair as well and after you talked about herring, I wanted some.
Marcus
- Piet, kees de mol, cog and 3 others
-
6
-
-
Two questions:
1. The rope that hangs loose from the sheet main sail and foresail, how is it belayed?
2. How are the leeboards positioned when it is in the display case? One up and one down? Both down?
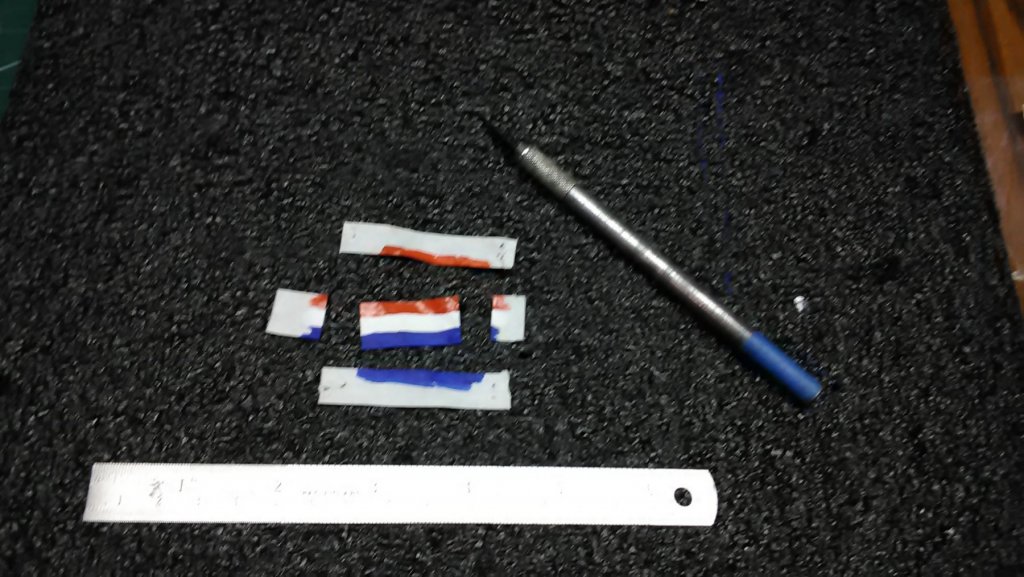
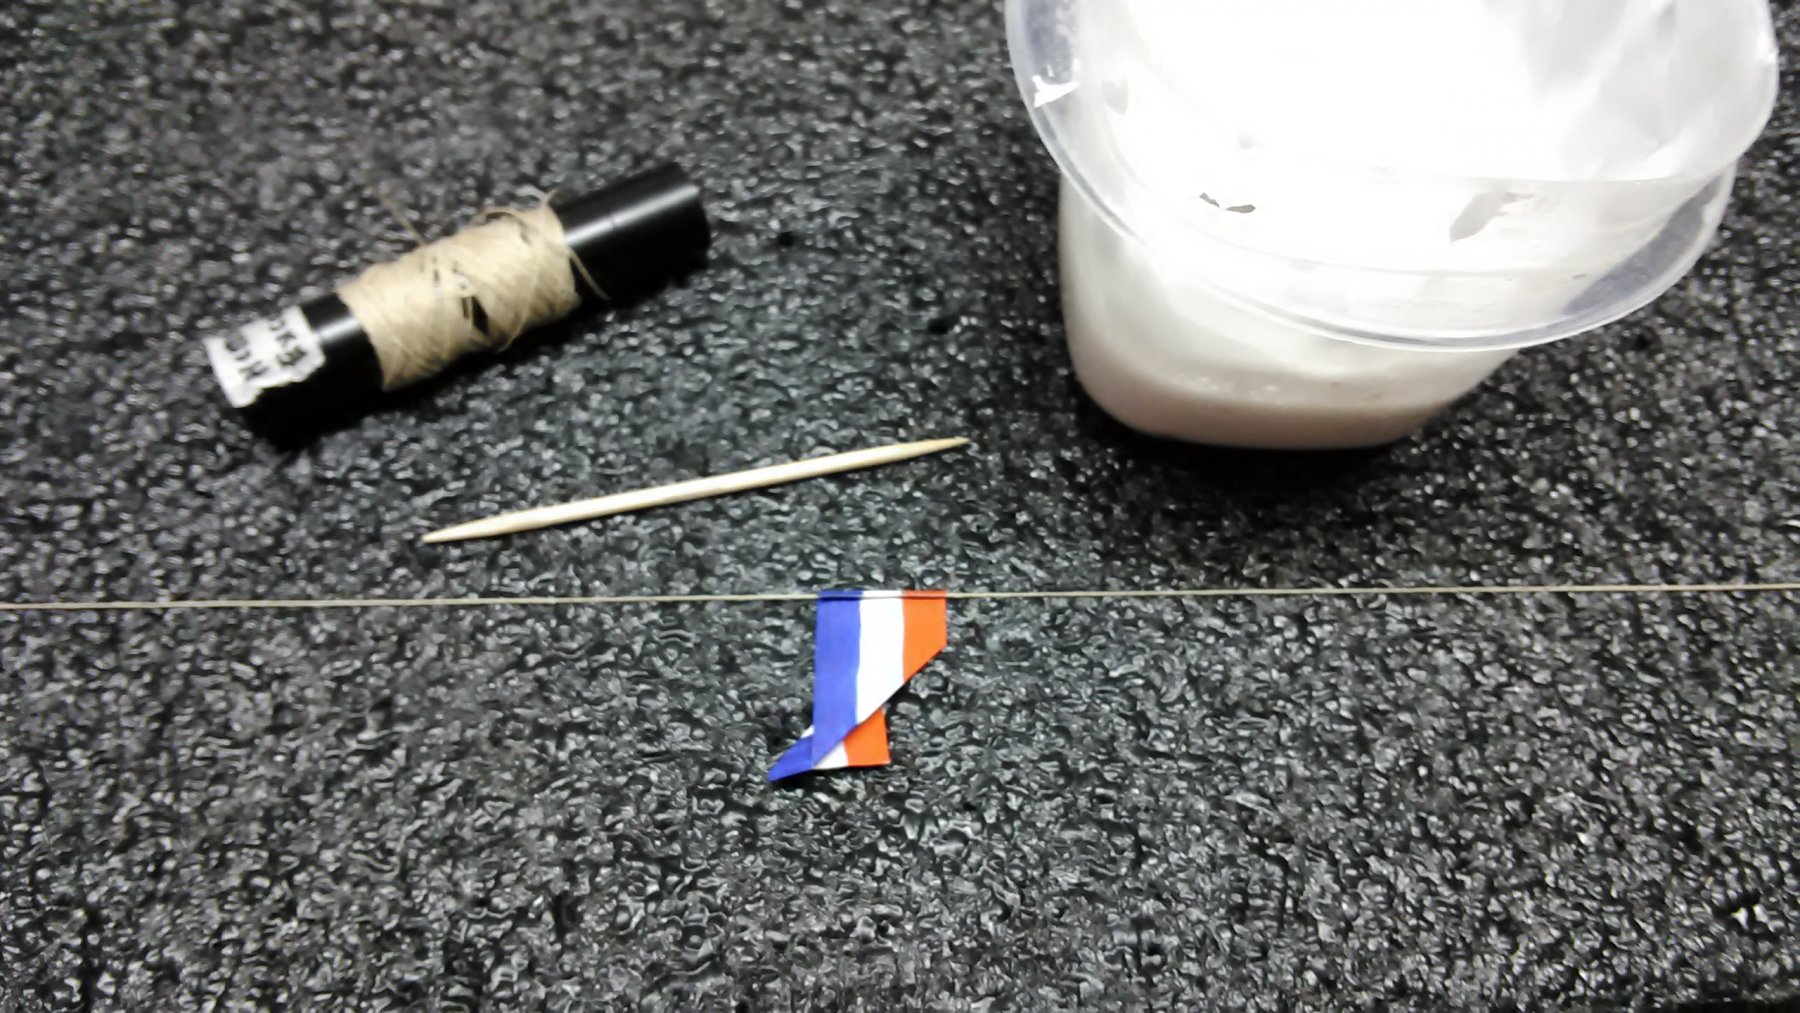
Flags are painted on one side. The other side is tomorrow. Then a layer of Dulcote, and install on boat.
Marcus
-
Hartmut, Thanks for the compliment.
Jan, thanks for the suggestion, thought about changing to that but I used the plans.
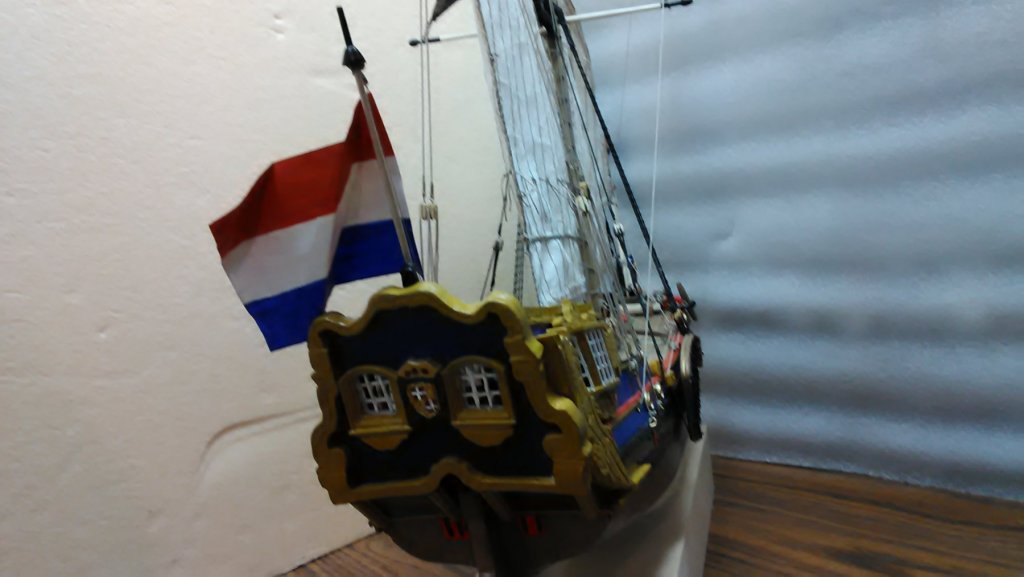
Piet, thanks for the flag information. In the SeaWatchbook the flag of Utrecht is too difficult to create in the scale of the boat. It will be Dutch flags on the jib, the pennant and on the pavilion. Orange, white and blue (oranje - blanje - bleu).
The plans show a red, white and blue flag with the shield of Utrecht in the white area and a lion on each side of the shield. Too detailed to make it look good.
Marcus
-
Thanks for the compliment, Piet, and all the likes.
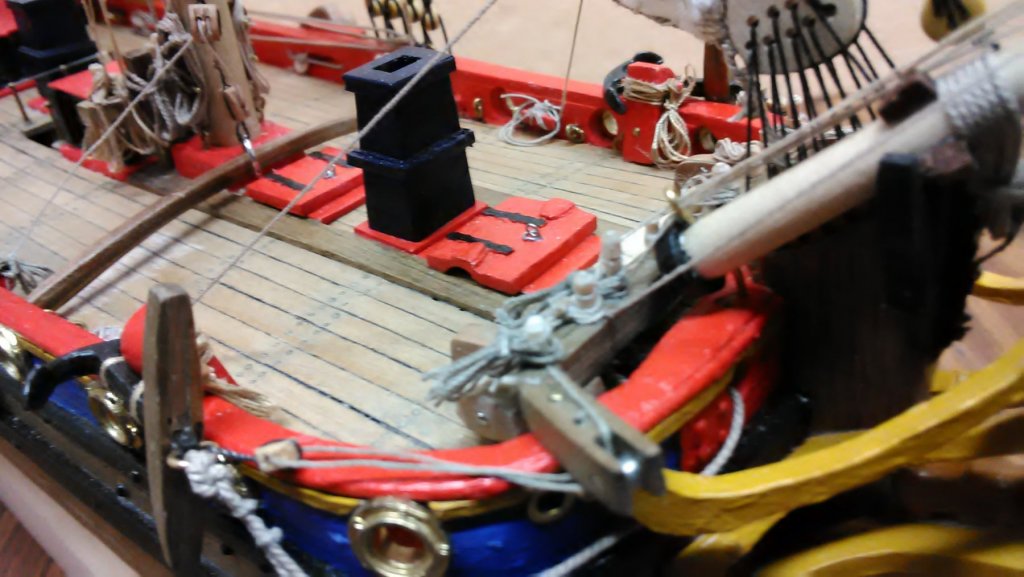
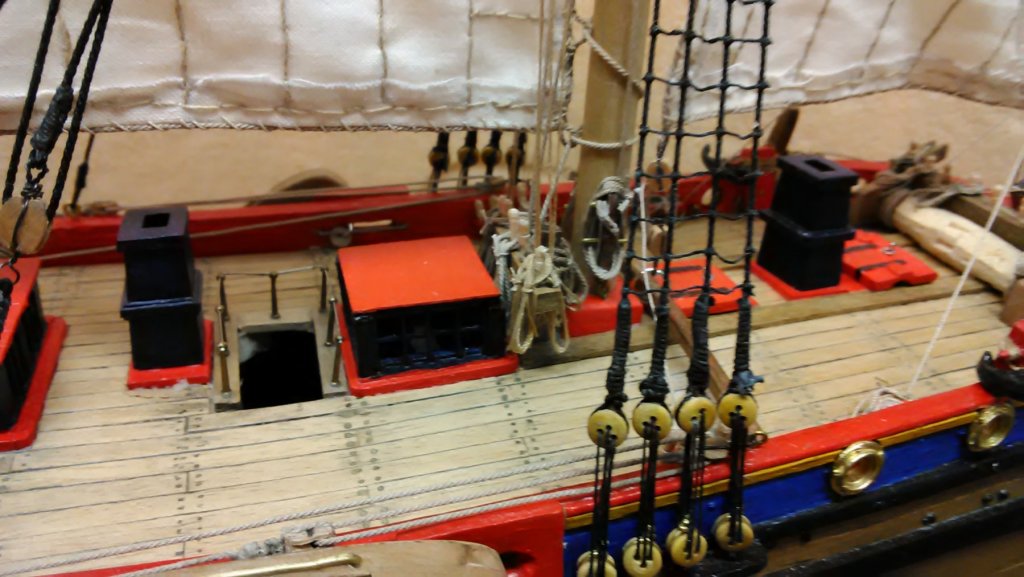
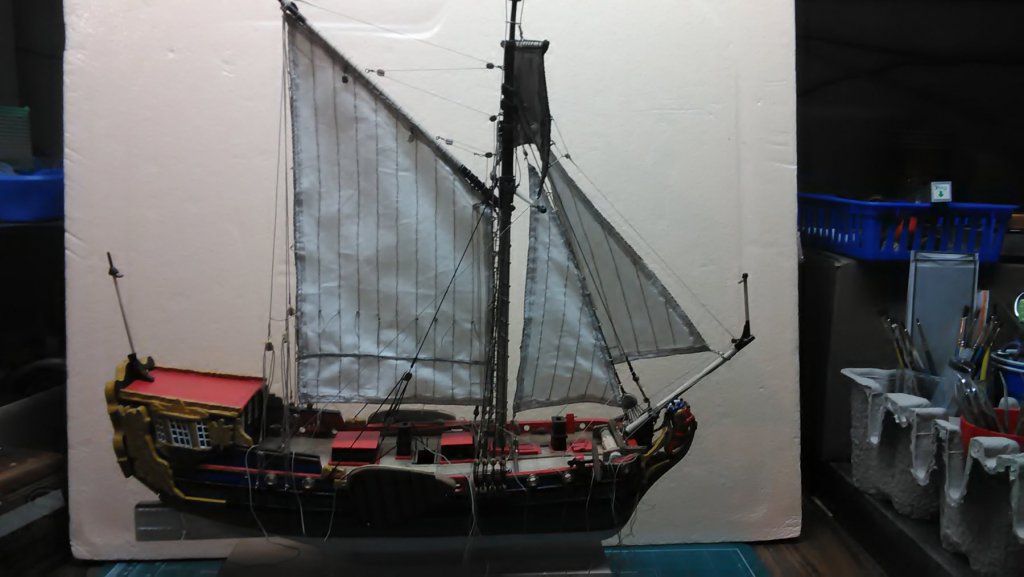
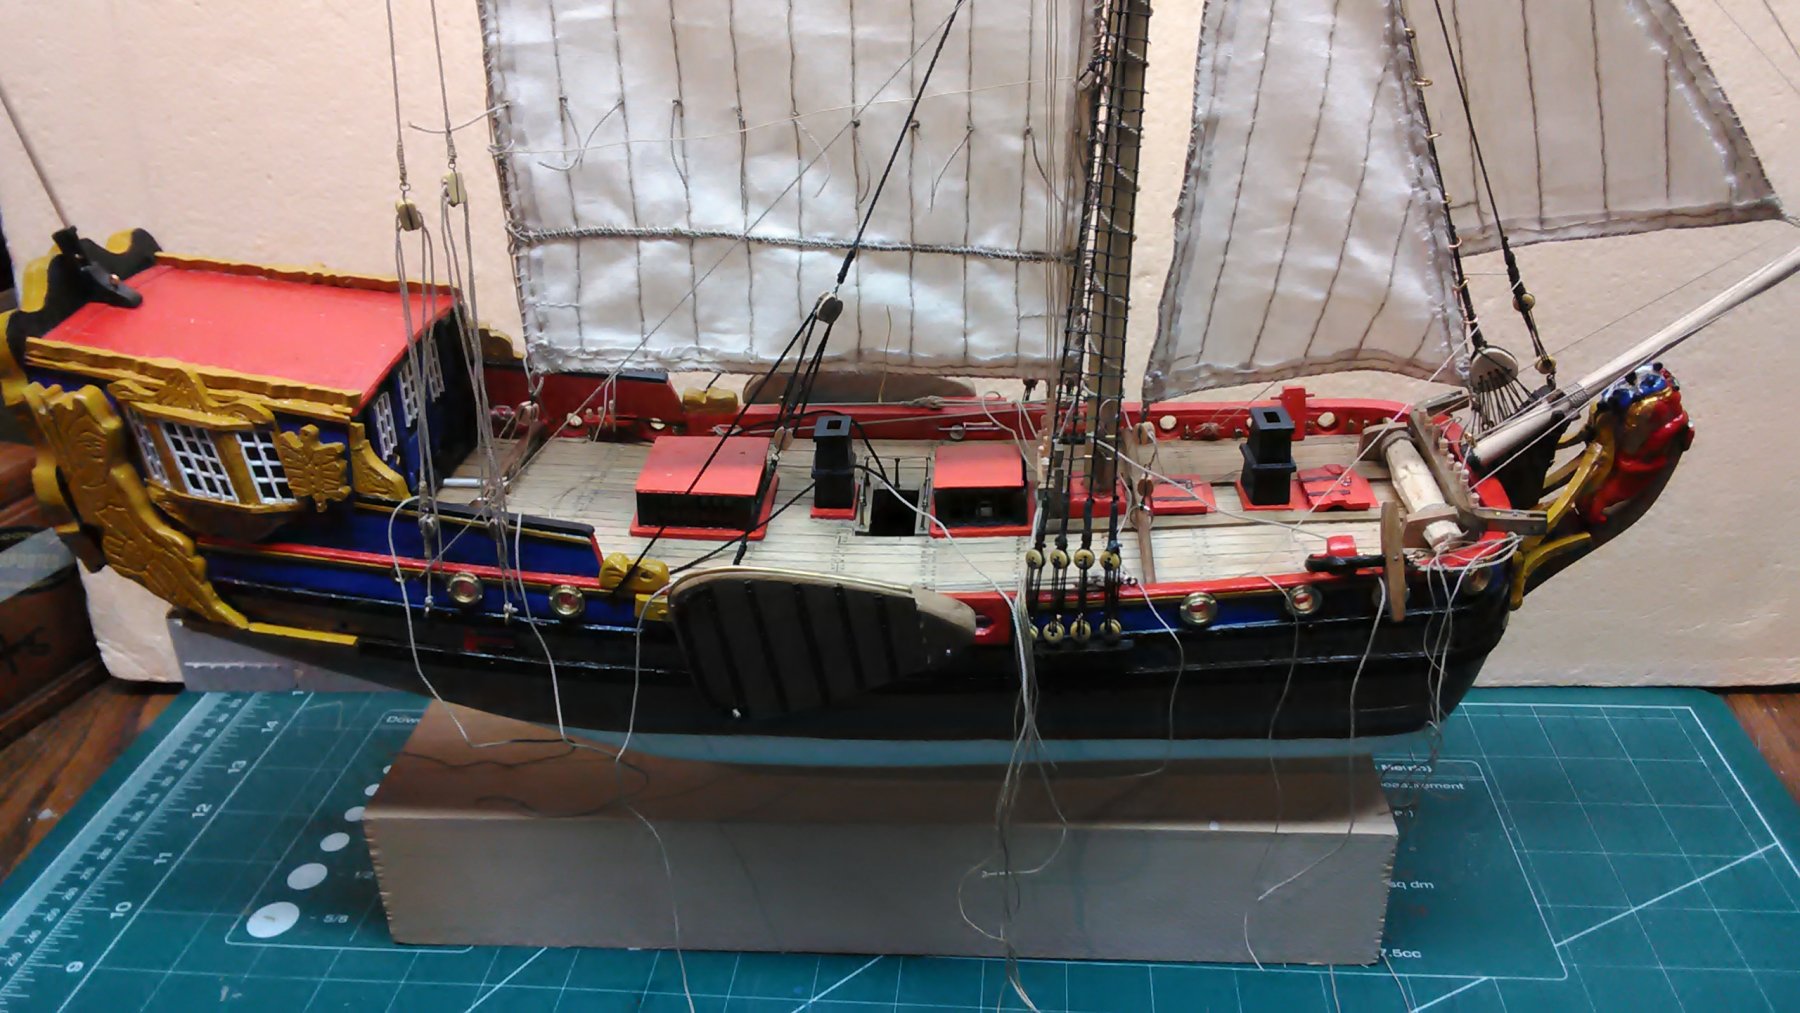
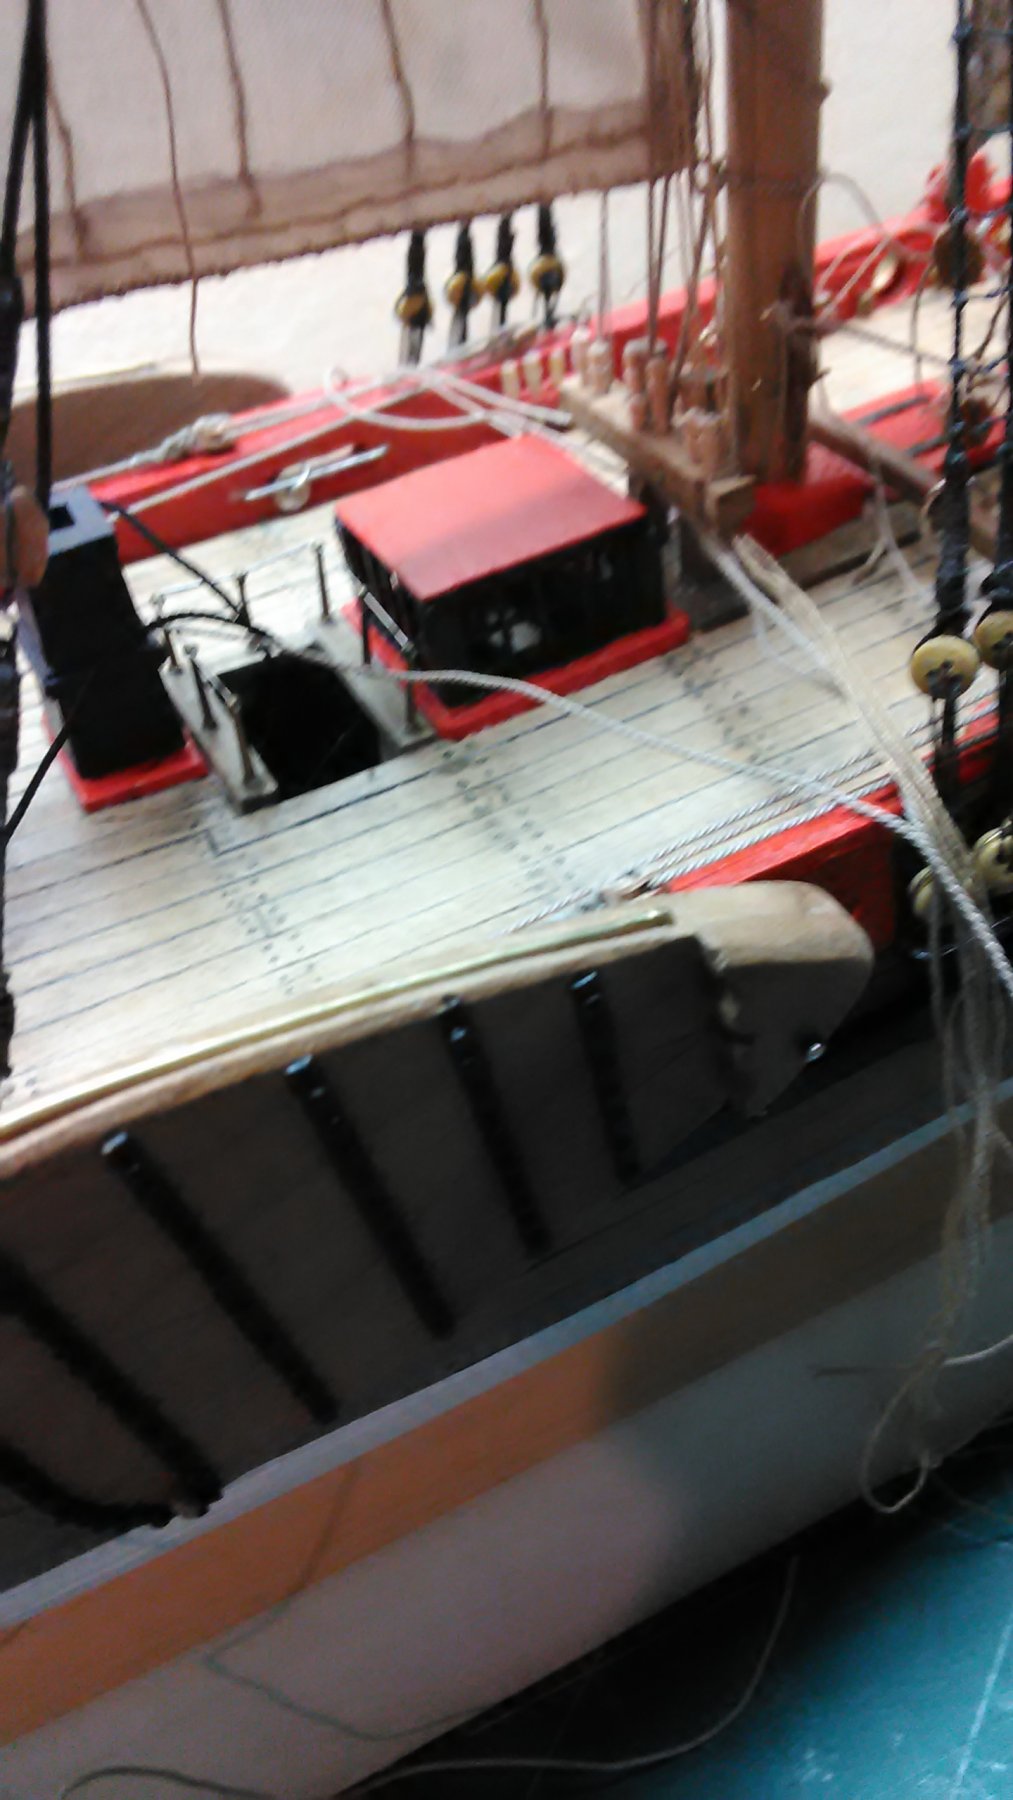
Finished installing the Gaff Vangs, two for each side and the new bit.
Except for belaying all the rigging, flags, and another deck item, she is finished.
The flag on the jib in the plan is from the province of Utrecht, but in the book it is a Dutch flag. So it is a decision I have to make.
Then on to making a display case. There are several people in my woodworkers club that make these. I might have them make the frame and I will add the Lexan.
My wife wants the Utrecht on display in the office, which will replace the Mary (Royal Yacht). I have to find a home for her somewhere else.
Marcus


- mtaylor, Piet, Landlubber Mike and 5 others
-
8
-
Well done. She is looking good.
Marcus
-
Thanks for all the likes.
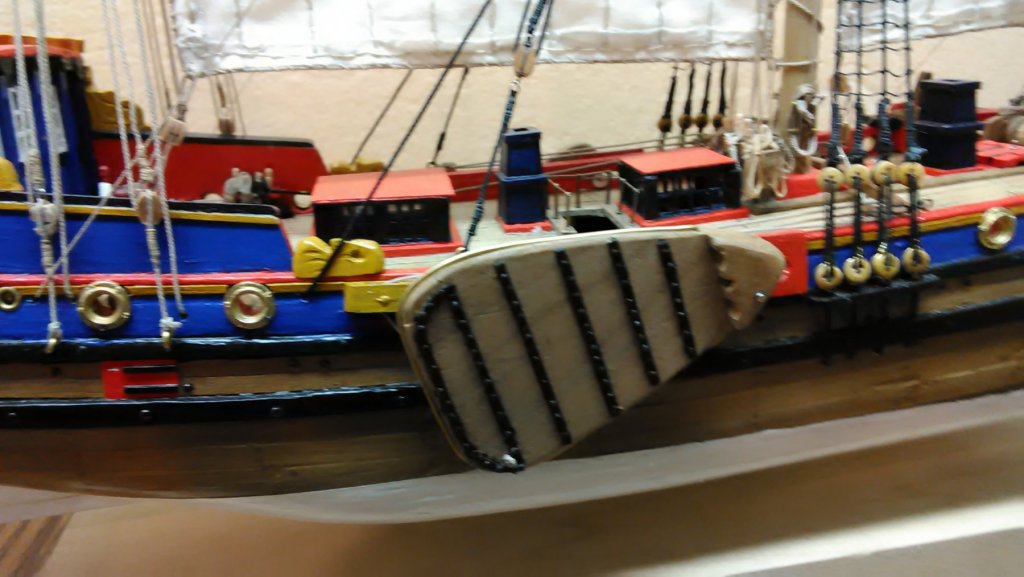
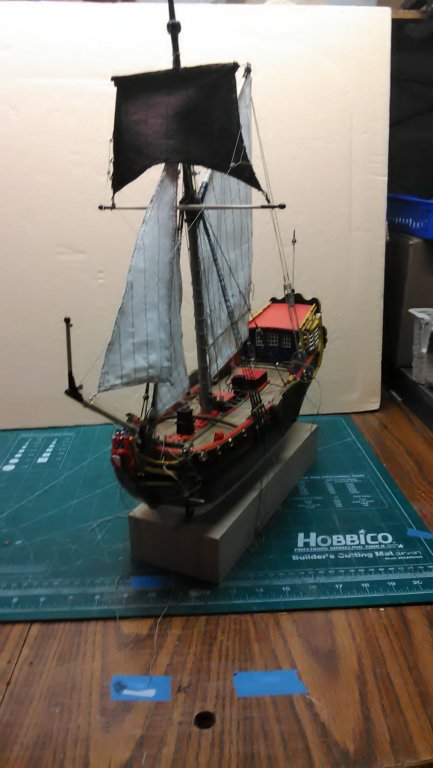
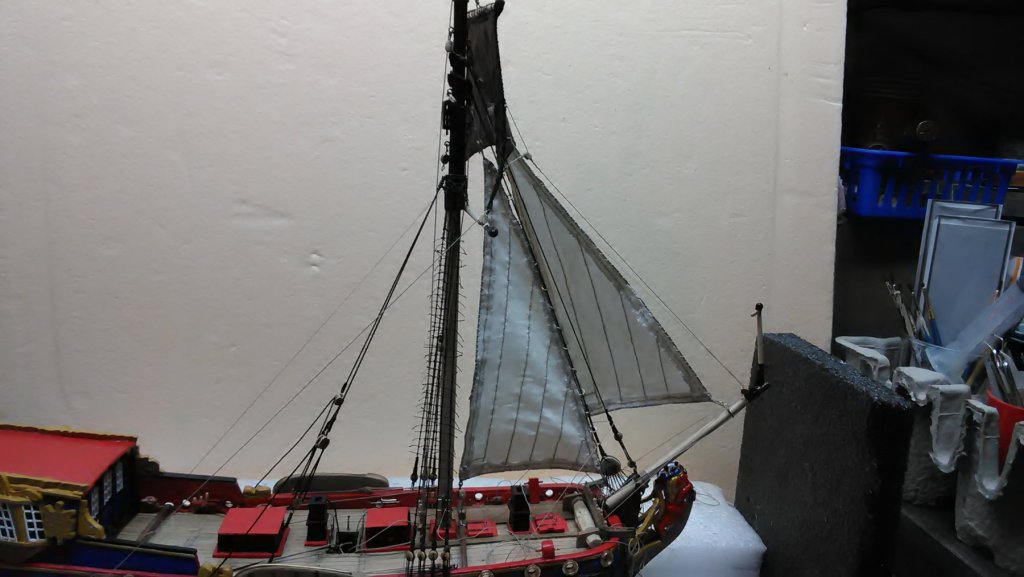
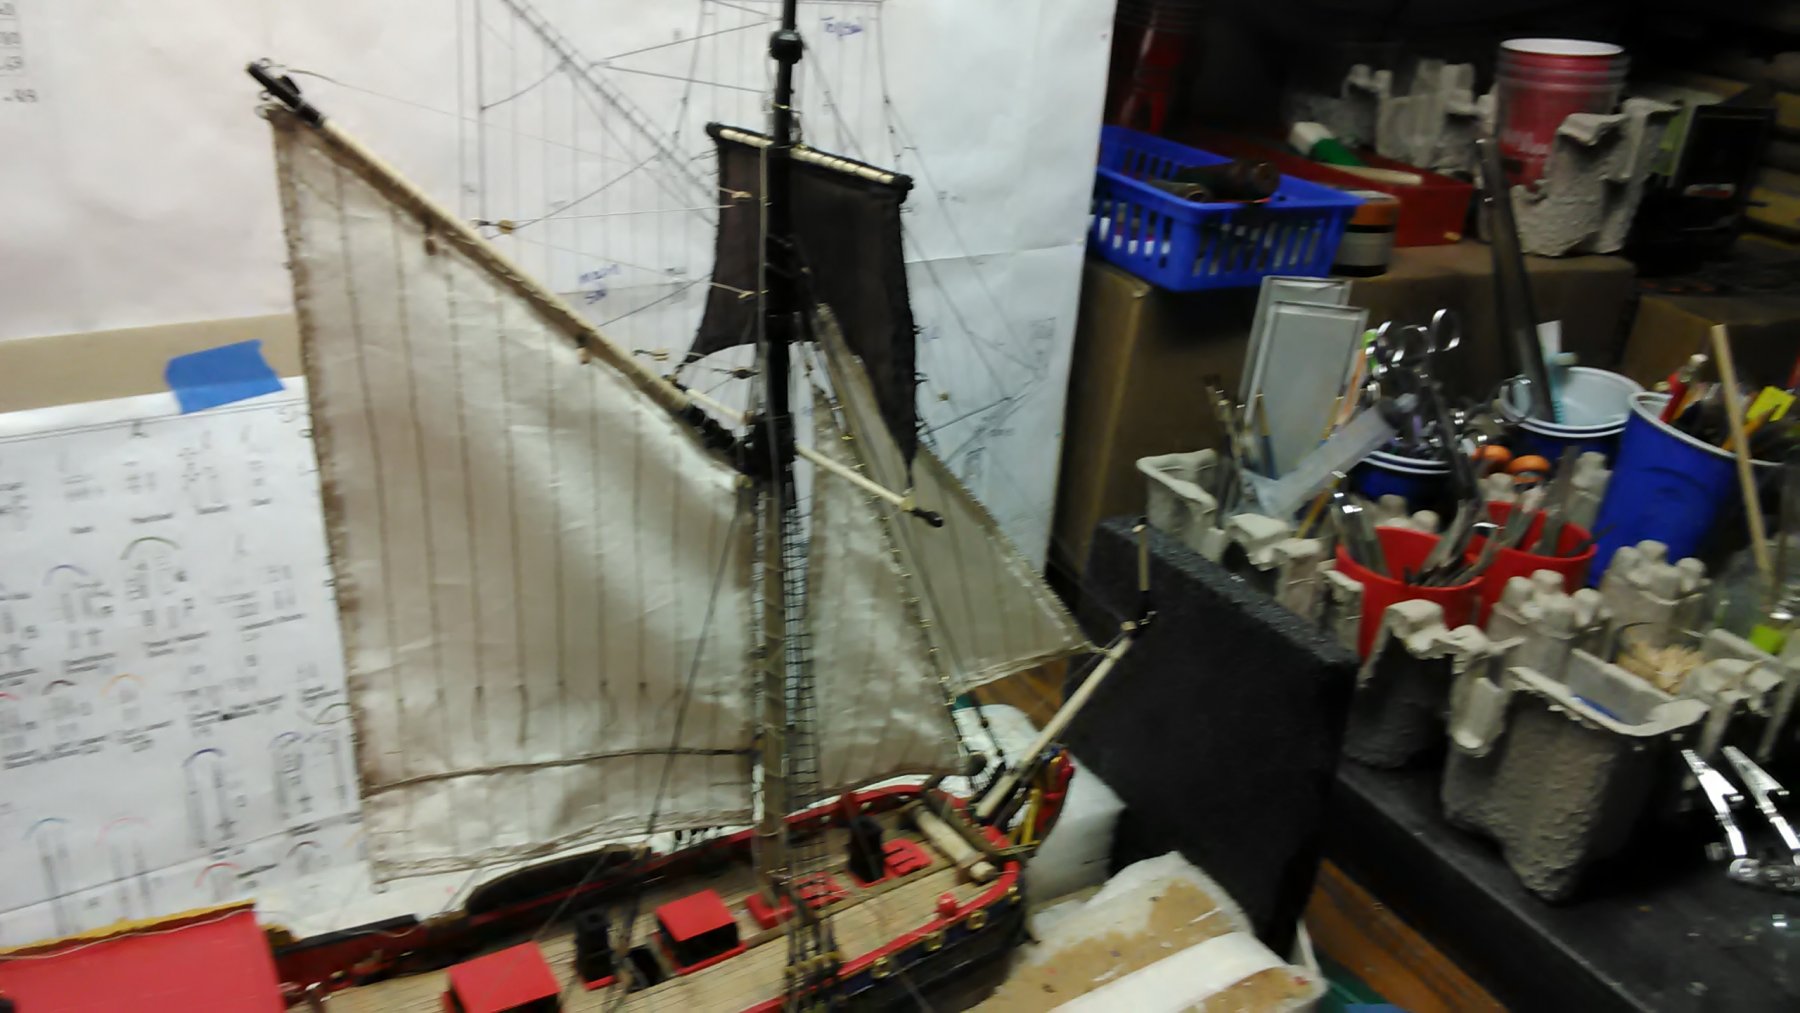
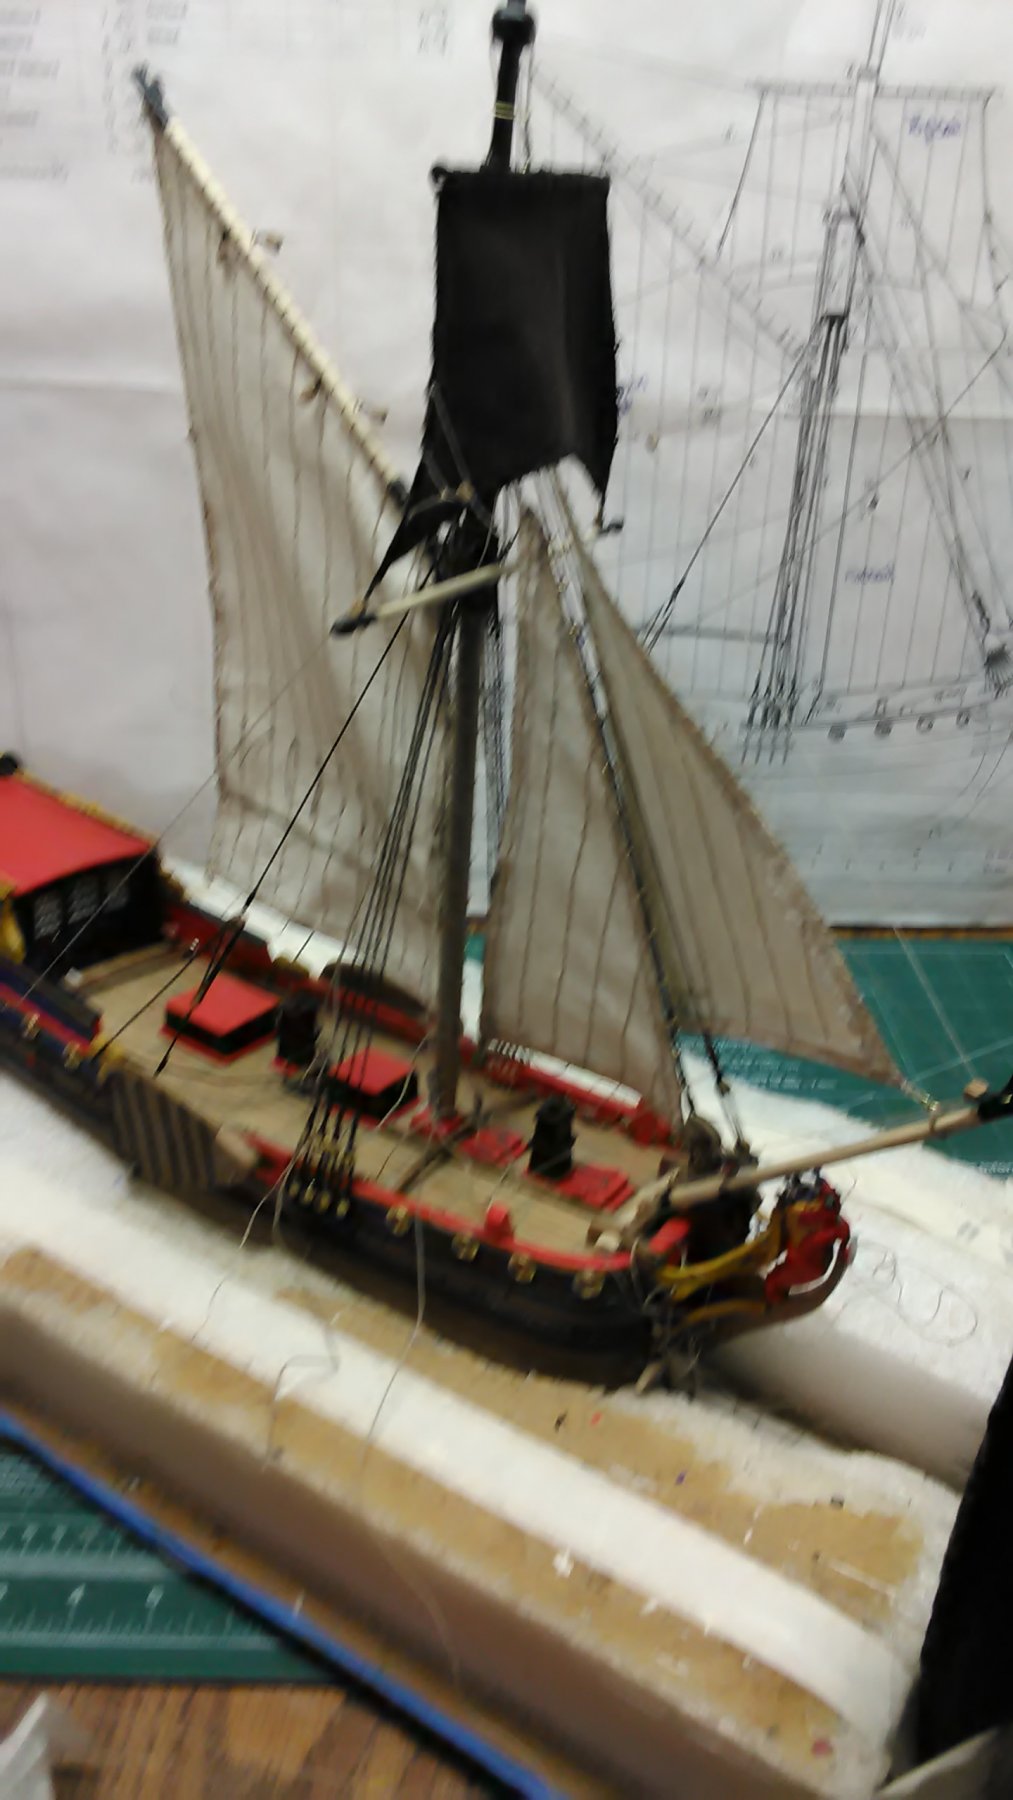
Installed all sails with the rigging still loose. I am very pleased with it so far. I have to redo the bit. I pulled it out when I put the rigging in the hole and then put the belaying pins in.
Next boat I plan to install the bit before the deck goes in. I can glue and nail it to a frame or make the posts very long and use CA to glue it to the hull. Something will come up.
Marcus


- cog, YankeeD, Richard Griffith and 5 others
-
8
-
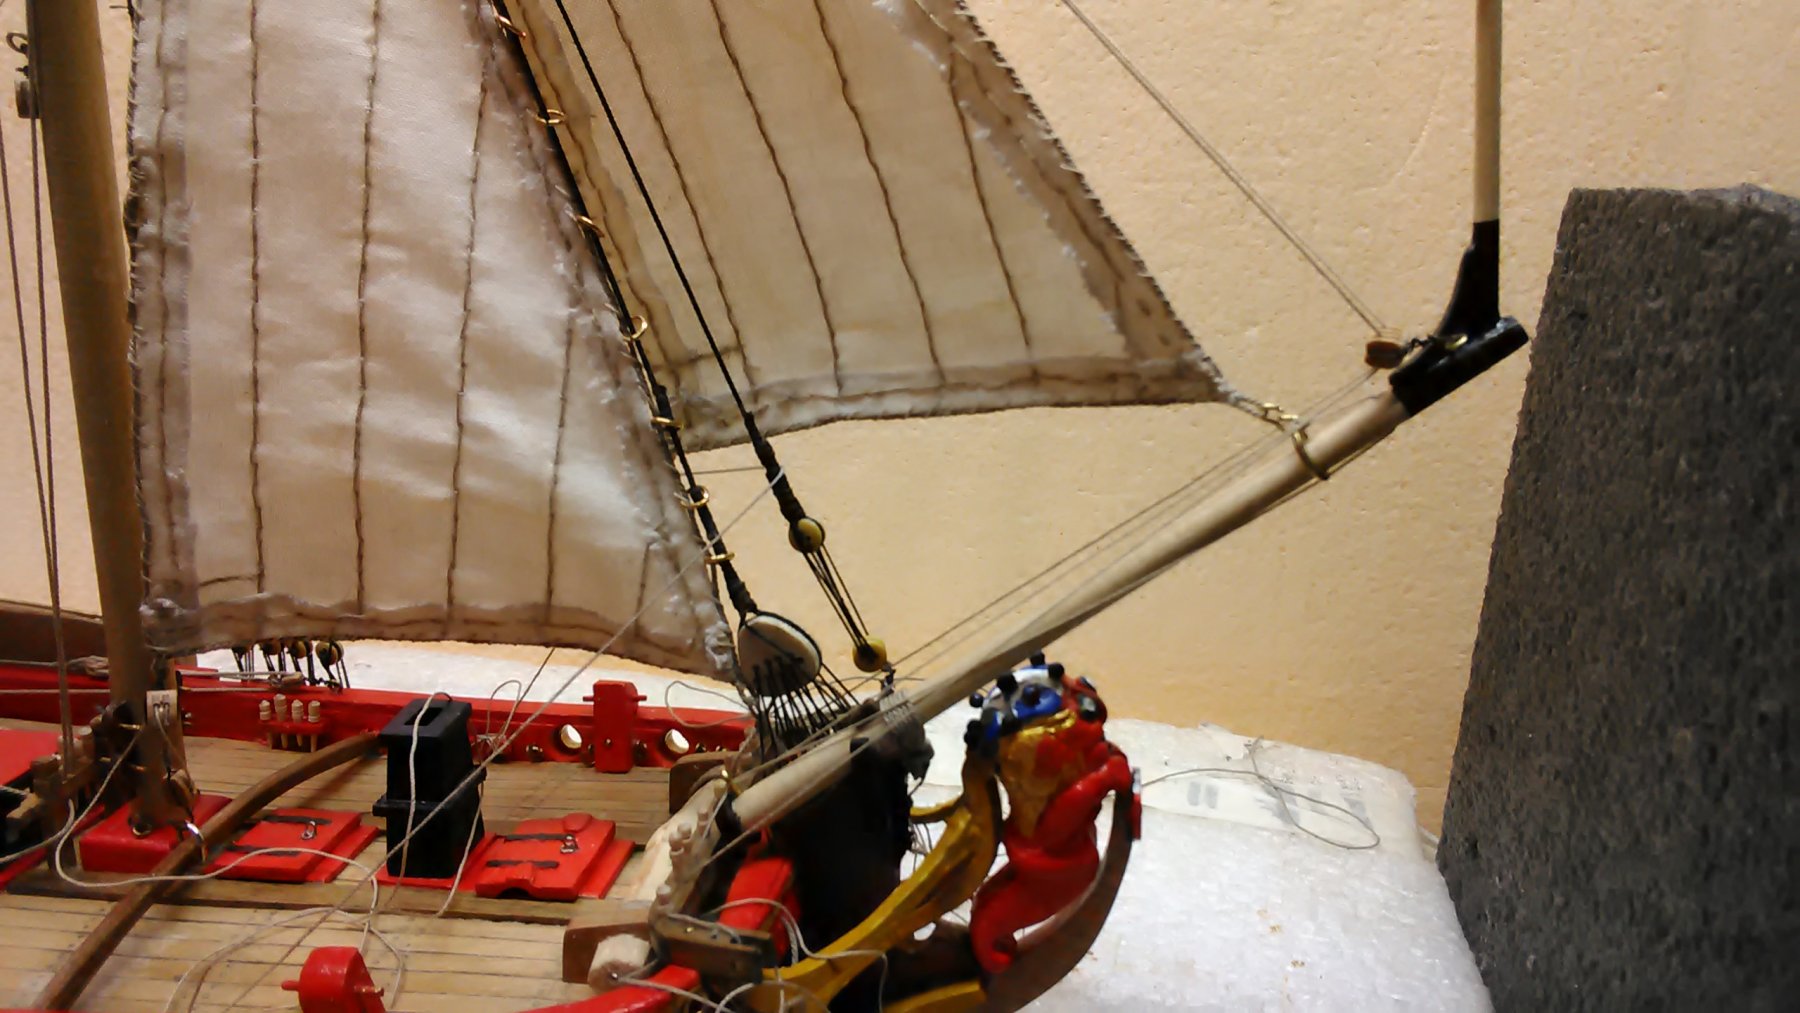
Thank you for all the likes.
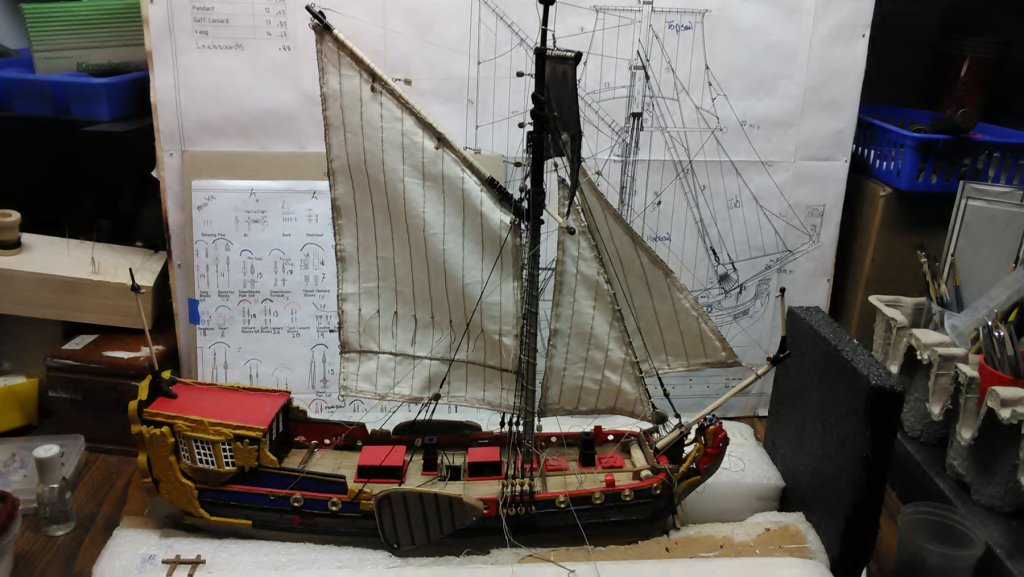
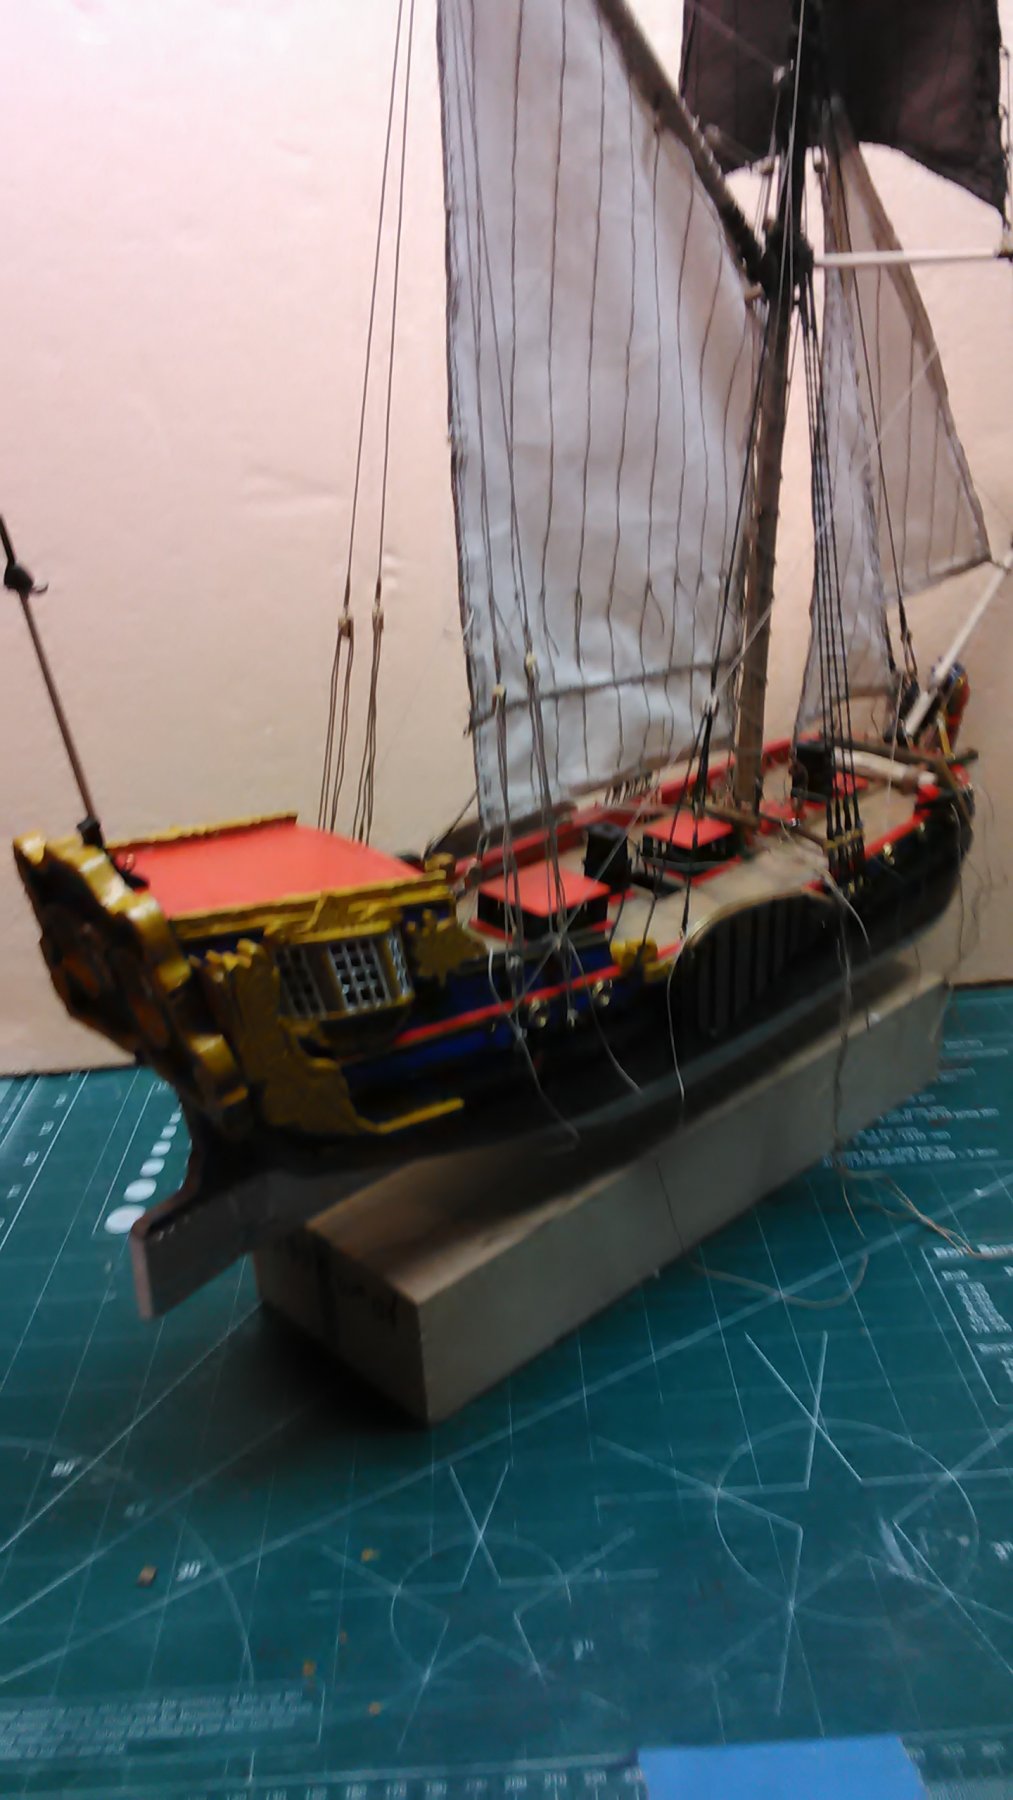
Something very interesting in the plans. Especially for the people who have the Utrecht from SeaWatchbooks.
Look on Sheet #7. Look at the Sheetblocks Foresail, note the diagram. Then go to Sheet Foresail diagram. Look at it closely, what do you see?
In the diagram on the left side, the side view shows a double block and on the right side, the front view shows a single block. OOPS
OR you are supposed to shove 2 turns of roping in a single block.
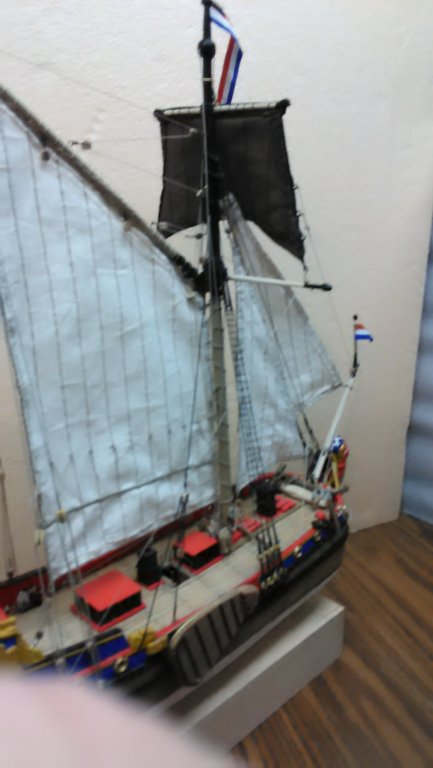
Anyway, finished installing the foresail and the jib. The rigging is still loose so towards the end I can still adjust it.
Marcus


Eight Sided Drainage Mill by flying_dutchman2 - FINISHED - scale 1:15 - Achtkante Poldermolen
in Non-ship/categorised builds
Posted
Patrick, thanks for joining.
Marcus