
HOLIDAY DONATION DRIVE - SUPPORT MSW - DO YOUR PART TO KEEP THIS GREAT FORUM GOING! (89 donations so far out of 49,000 members - C'mon guys!)
×


capnharv2
-
Posts
727 -
Joined
-
Last visited
Content Type
Profiles
Forums
Gallery
Events
Everything posted by capnharv2
-
 Moonbug, If the author and/or company is interested in pursuing it, a case could be made for denying them profit since one less book was sold. That being said, I don't think it makes business sense for them to pursue copyright infringement because somebody posted one page from one of their books But I've been wrong before. . . . Harvey
 -
The pennants look great Geoff! Did you use white glue to help them hang straight? Harvey
-
Cutty Sark by NenadM
capnharv2 replied to NenadM's topic in - Build logs for subjects built 1851 - 1900
Looks good Nenad. One suggestion-if you can, make the vertical parts of the stand shorter, so the model sits closer to the ground. I find that longer stand supports tend to make the model easy to fall over (especially with the spars and rigging you'll be adding). Just a thought. Thanks, Harvey- 4,152 replies
-
- 5
-

-
- cutty sark
- tehnodidakta
- (and 1 more)
-
David, Thanks for the links. I've had some peripheral knowledge of bit grinding and angles, but I really need to practice more. Harvey
- 3,618 replies
-
- 4
-
-
- young america
- clipper
- (and 1 more)
-
Ed, Thanks so much for answering my questions. The photo of the parting tool on the Naiad is very helpful. I guess I'll go back to your Naiad books and build log if I need more information. What I meant about the rim moving deals with your last point. True, the rim can't move till it's parted off. The area I had problems was in the final parting of the rim. Once parting started to break thru, some of the spokes started breaking. Once one or two broke, the rim started moving. I suspect that my parting tool was dull and/or the parting tool pressure was too high, putting more load on the spokes. I also probably had concentricity issues. Even though I didn't disturb the setup of the block in the chuck, I was using a 3 jaw chuck. A couple things I've learned from this; -Unless I'm starting with round stock, I should use the 4 jaw chuck more. -Practice making and sharpening bits more (a lot of my sharpening experience has made the tool duller than when I started. I believe the only way around this is to practice more-and read more on sharpening bits) -Reduce tool pressure. I'm so antsy to remove a lot of material that I deform the stock. I need to take my time. And practice more. This has been a great help. Thanks again! Harvey
- 3,618 replies
-
- 6
-
-
- young america
- clipper
- (and 1 more)
-
Thanks for the description Ed. This looks similar to the way I made the wheel for my Constitution. A couple of questions. . . -What did you use to remove the area between the rim and hub? Do you have any photos of the process? -When parting off the rim and hub, did you have any problems with the rim moving around on the spokes before the hub was parted off? -Did you make 5 spokes going thru the center, or 10 spokes that stopped at the center? I particularly like that you cut slots for the spokes, then glued a cross grain piece for strength. I tried cross-drilling for the spokes, but I didn't get the spoke alignment very good. But then, I didn't use a 4 jaw chuck, and didn't have a rotary table at the time. Thanks again for an excellent demonstration. Another inspiring project. Harvey
- 3,618 replies
-
- 5
-
-
- young america
- clipper
- (and 1 more)
-
Cutty Sark by NenadM
capnharv2 replied to NenadM's topic in - Build logs for subjects built 1851 - 1900
Nice!!- 4,152 replies
-
- 3
-
-
- cutty sark
- tehnodidakta
- (and 1 more)
-
I suspect this has been shared on some other topic, but I want to ask anyway-With a plastic model this old, is there a concern or problem with the plastic outgassing and becoming brittle? I recognize that spars and other small pieces can be replaced if desired/necessary, but I've had some older plastic models that were warped and crack when trying to straighten them. Otherwise, I hope you have a great time with this kit! Just curious. Thanks, Harvey
- 87 replies
-
- 4
-
-
- thermopylae
- revell
- (and 1 more)
-
ooooooh. . . I love Morro Bay . . . Have fun. I hope you get plenty of rain (and snow in the mountains) this winter. Harvey
- 572 replies
-
- 4
-
-
- constitution
- frigate
- (and 1 more)
-
Who would have thought-water ballast!! Next thing you know, there will be hiking straps and trapezes for the Marines! Oh wait-we're not racing.
- 572 replies
-
- 5
-
-
- constitution
- frigate
- (and 1 more)
-
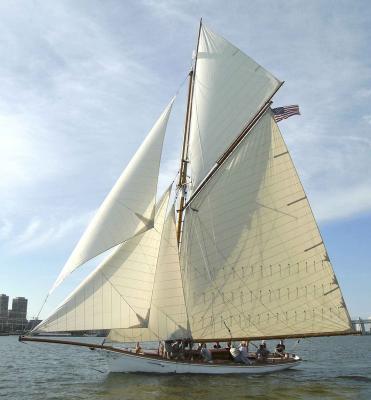
I looks to me like a main topsail with the tack cut wrong. Here's how it should look: The bottom of the sail shouldn't be squared off like that-the tack should come to a point for the downhaul attachment. If it were me, I'd trim the sail where it overlaps the gaff, and trim it to a point-like in the attached picture. There are a lot of different sail configurations around the world, but I've not seen this before either. I think it's cut wrong, but there are wiser people here who may have better ideas. Anyway, I hope that helps. Thanks, Harvey
- 11 replies
-
- 1
-
-
- gaff rigged
- pond boat
- (and 1 more)
-
I wouldn't worry how long it takes. I've been working on mine since 2007, and I'll be lucky to finish by the end of next year. But it's been fun!!
-
Cutty Sark by NenadM
capnharv2 replied to NenadM's topic in - Build logs for subjects built 1851 - 1900
Life has been very unkind to you recently Nenad. I admire you courage and desire to do the right thing for your family. And I sincerely hope life for you and your family will get better-soon. Take care. We're all pulling for you. Harvey- 4,152 replies
-
- 11
-
-
- cutty sark
- tehnodidakta
- (and 1 more)
-
Thanks so much for this build log Danny. I've learned so much from your various techniques, and it inspires me to do better on my models in work, as well as those yet to be started. Harvey
-
Working Comfortably on Upper Rigging
capnharv2 replied to capnharv2's topic in Masting, rigging and sails
Now things are getting interesting guys! Hornet, I like the roll around table. It looks handy. Something like that wouldn't fit under my desk, but it's giving me ideas. NIgel, the adjustable chair looks interesting. I've thought about things like bar stools, but I need some kind of upper back support to steady my hands. Your idea has me thinking too. Thibaultorn, thanks for th picture. It gives me a much better idea of what you're talking about. It looks extremely useful (and Harbor Freight isn't that far away). Back to my cave for some pondering. . . Thanks again! Harvey -
You know, Cap'n, you'd make faster progress if you started with a smaller bottle of bourbon (hic!) Harvey
-
Working Comfortably on Upper Rigging
capnharv2 replied to capnharv2's topic in Masting, rigging and sails
Thanks for the suggestions. I don't know if I can use them, but I appreciate the input. It's food for thought. Harvey -
If this has been addressed on a previous thread, please point me the right way (I looked a little and didn't see anything) I've run into this situation several times before. I finish the hull, deck furniture and lower masts of a model. Now I want to start on the topmasts, but the model on the desk is at an inconvenient height. If I sit at the desk to work on the rigging, it's above eye level and my arms and back get tired (quickly). If I stand up to rig, I'm not steady enough on my feet and it's hard to rig (or avoid breaking anything). I could try making a set of platforms of different heights, but storage and stability are a concern. I could stack books, but that's even less stable. To work comfortably on the rigging, I basically need a desk 32" high, 20" high, 15" high and 10" high. Alternately, I need a chair that can boost me (from sitting position) 12", 17" and 22". Note that the numbers I'm using are approximate. But I hope you get the point. Frank Mastini, in his book "Ship Modeling Simplified" had a sketch of his "Mastini Booster" which was basically a seat that set across the arms of his chair. At first I thought it was a good idea, but only if you have a solid, stationary chair with strong arms. I don't. So, what I'm looking for are solutions that others have for this dilema. I'd like to see how you rig your models within the constraints I've outlined above. And if all I'm doing is whining, would somebody please pass me the cheese (no blue or gorganzola please). Thanks, Harvey
-
Good job Mark! It's interesting that my POB (bought in the 1990's had the same problem with the Planksheer. Several other builders have also noted that problem. Is this something that ME never bothered to fix? Thanks, Harvey
-
Cutty Sark by NenadM
capnharv2 replied to NenadM's topic in - Build logs for subjects built 1851 - 1900
I am so, so sorry to hear of this Nenad. Please take care, and remember that we are all thinking of you. Harvey- 4,152 replies
-
- 5
-
-
- cutty sark
- tehnodidakta
- (and 1 more)
-
Ed, Thanks so much for starting this log. I have a 1:96 Mamoli Flying Cloud on the back burner, and this will help immensely. Harvey
- 191 replies
-
- 2
-
-
- young america
- clipper
- (and 1 more)
-
Toni, I'm so sorry to hear about Sadie. I hope her journey is a peaceful one. Take care, Harvey
