


realworkingsailor
-
Posts
3,273 -
Joined
-
Last visited
Content Type
Profiles
Forums
Gallery
Events
Everything posted by realworkingsailor
-
 Yeah... headrails.... everybody's favourite head-scratching, how-the-he** moment. Nice work you've done. Although... that second canon.... sorry to say.. but...uh.... he seems to be aiming a bit low...... Andy
- 536 replies
-
- 1
-

-
- diana
- caldercraft
- (and 1 more)
-
You think you guys are eagerly waiting my return... Just imagine how I feel anticipating my own return..... It's been a long year on the lakes and I can't wait to get home, take it easy and do the things I want to do...... Oh yeah... And actually sleep the whole night for once! Andy
-
If it's not available at your local hobby shop, you can get it from Microscale: http://www.microscale.com/Merchant2/merchant.mvc?Screen=PROD&Product_Code=MI-2 http://www.microscale.com/Merchant2/merchant.mvc?Screen=PROD&Product_Code=MI-1&Category_Code=FINPROD&Product_Count=1 Andy
- 94 replies
-
- 1
-
-
- santa maria
- revell
- (and 1 more)
-
Decals... Ok... First off have you got any microset and microsol? Both of those will go a long way to helping sett decals down on uneven surfaces. The other thing that helps is having a glossy surface on which to apply them. Don't worry, when everything is dry over coat with dullcote to seal them in and hide all the edges. First off, I use tepid water, not hot or cold. Dipping a decal in for about ten seconds is more than adequate. The the decal sit for another minute or so before you try to slide it off the paper backing. While the decal is sitting, apply a dab of microset to the area you want to apply the decal. Bring the decal (still on the paper at this time) to the area a d gently slide the decal off the paper into position. The decal should almost float in the microset (almost!). With a needle nose tweezer, carefully position the decal into place. You can now dab up any excess microset (along the edges). Gently press the decal to the plastic with a damp paper towel. When dry, apply microsol. The decal will wrinkle... It can be startling to see... But don't touch it!! It will settle down before too long as the microsol dries. When it does, take a very sharp #11 exacto knife blade and look for any bubbles that may be trapped underneath. Gently prick them with the knife and dab on some more microsol. Repeat this process until you are satisfied. Give everything a good 24 hours to dry thoroughly and over coat the decal with dullcote. This will seal and protect it from handling and damage. Andy
- 94 replies
-
- 1
-
-
- santa maria
- revell
- (and 1 more)
-
Careful... you might become addicted... Looks great, stay warm...... -16 the first week of November....... brrrrrr Andy
-
Thanks for stopping by and your compliments, Kimberly Lawrence, yeah.. I'm still at work. I've got about another month (25 days maybe) to go before hopefully I get to go home. And I'm still only sailing on the great lakes. Andy
-
More pics! That should keep your critics silent.... Or make them talk more... hrm..... Andy
-
Pictures!! Woo Hoo! Although... your Lion figurehead seems a little sticky-outy.... should he not be resting against the bracket behind him? (Or is he just sitting there for looks?) Andy
- 1,873 replies
-
- 2
-
-
- occre
- san ildefonso
- (and 1 more)
-
Actually.. the DCC thing is not as expensive as you may think... The NCE Powercab for about $200 is about all you'd need. (As long as the total current draw is less than 2 amps) http://www.ncedcc.com/component/virtuemart/?page=shop.product_details&flypage=flypage.tpl&product_id=3&category_id=1 That and if you happen to join a model railroad club using NCE, you can just take the throttle unit with you on club nights... Andy
-
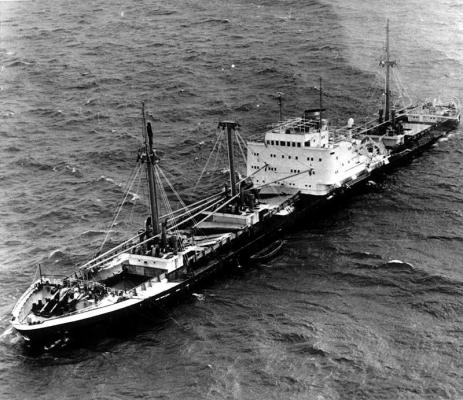
Didn't think that was cheating..... Anyway... Yeah, that's the Nordmeer. She ran aground in Northern Lake Huron in mid November 1966 (navigational error ). Efforts were made to get her off, and the crew stayed on board. 2 weeks later on November 29 a very bad storm struck, which put her in the condition you see here. She was declared a total constructive loss. Incidentally, that same storm was the one that sank the Daniel J Morell, with the loss of all but one crew member (Denis Hale). A coastguard boat that was removing crew from the Nordmeer was called away to assist looking for survivors of the other wreck. When I started sailing, there were still large parts of the Nordmeer visible above the water, but over the years, ice and waves have reduced her to fragments, and nothing is visible anymore. The last time I recall seeing any bit of her was some time around 2006 or so. Andy
-
Sorry, Mike, don't quite follow... Anyway... this is what I was thinking: http://www.tcsdcc.com/public_html/Customer_Content/Literature/Decoders/HO_Scale/FL-Series/FL4.pdf t These are 4 function function-only decoders from TCS. That means they have up to 4 lighting outputs, at 12 volts each. Simply hardwire one of theses into a DCC system. As a bonus, if you're doing this to multiple ships, you can run bus wires to where ever you need them and control them all from one station. As you can see, there are many different lighting effects to choose from, including flickering. Note that any function can be reversed to go out of phase with another, in other words you can set up two lights to flicker with opposing periods of light and dark. Andy
-
She hasn't moved from that location since that photo was taken.... At least, not in any horizontal direction....
-
Very nice Augie Let the plinking begin in earnest. I mentioned it to Ben a while ago, but Polyscale has a whole range of acryic washes (if you can still find them) one of which is a "basswood" colour. It might be something to consider below the wales to mute some of the differences in tone on the various strips.... should the need arise. Just a thought Andy
- 2,191 replies
-
- 3
-
-
- confederacy
- Model Shipways
- (and 1 more)
-
This one's not feeling too good.....
-
I've often thought of using a DCC system to add lighting effects to a ship. I'm sure it would be fairly easy to wire in a function only decoder and be able to control lighting areas individually. It should also make flickering lights easy to do. Andy
-
It's an exhaust gas scrubber... and there's one on my ship too........ BTW.. you ship is the MV Initial Salute http://www.shipspotting.com/gallery/photo.php?lid=1347053 Andy
-
I'd just try and copy what you've got on the white plastic bits. With a little refinement, it should look perfectly acceptable. Really, any generic late 18th century scrollwork would look fine. Andy
-
Looks good... if you're up for a challenge, why not try and carve that fancy moulding?
-
If I recall correctly, I made mine to stick out about 5-6mm, just a little bit inside the edge of the stern fascia. As for the hull opening, it should be just for the main central window. Andy
-
I've had to clear a fouled hawse once.... bad enough on a calm day in a river... never want to have to do that again....
-
Paint job is looking great! You're really starting to get the hang of this model ship building thing Andy
- 94 replies
-
- 2
-
-
- santa maria
- revell
- (and 1 more)
-
Thanks guys, for your support in this endeavour. It's all in the name of safety, Not just for ourselves, but how many out there have small children in the house, or grandkids that come to visit from time to time? I'm sure we're all very careful with not leaving chemicals like these lying around, but kids can get into the strangest places when they want to. Anyway, Someone brought up MEK, or Methyl-ethyl-ketone. A primary ingredient in many plastic cements. http://www.sciencelab.com/msds.php?msdsId=9927358 Slightly different for Tenax7R: http://www.emedco.info/rtk/common/wcd00025/wcd02597.htm I've having a little difficulty locating one for Ambroid ProWeld. If anyone happens upon it, post the link. Andy
-
Whether or not you choose to read the given information is ultimately up to you. I'm sure there are people here who never before gave a second thought to all the glues, paints and other solvents. Here's another one for you, Testors ELO paint remover: http://www.testors.com/media/document/MS.F522142.050911.pdf Another one off the Testors Website, Floquil Paint http://www.testors.com/media/document/MS.F110181.050911.pdf **Note that this is specific for each colour, in this case BNSF green. As each paint contains different pigment compounds, the MSDS will be slightly different for each. This is for Polyscale Acrylics: http://www.testors.com/media/document/MS.POLLYRR.062912.pdf **the same disclaimer to the above also applies. And finally, good old Dulcote: http://www.testors.com/media/document/MS.F130015.050911.pdf Testors has done a great job on their website by providing a pdf copy of the relevant MSDS linked below each product description. I still mutter at them for discontinuing Floquil and Polyscale..... Andy
-
My focus was intended to be on the liquids and gels that go by various trade names, but for which precious little information beyond "harmful or fatal if swallowed" or other similar simplified warning labels are applied. Everybody is aware of the toxic hazards of lead, however those effects are cumulative over a long period of time. I'm trying to help people become aware of, or be able to have a compiled reference of common modeling chemicals, their known toxic effects and, the really important bit, personal protection and first aid when handling these substances, or in the event of something untoward occurring. Andy
