
HOLIDAY DONATION DRIVE - SUPPORT MSW - DO YOUR PART TO KEEP THIS GREAT FORUM GOING! (Only 36 donations so far out of 49,000 members - C'mon guys!)
×


BANYAN
-
Posts
5,938 -
Joined
-
Last visited
Content Type
Profiles
Forums
Gallery
Events
Everything posted by BANYAN
-
 Greg, paravanes are large and bulky, and depending on where stowed could be difficult to manoeuvre around the ship unless there was a nearby derrick / crane that had a long enough reach to lift the paravanes and put them outboard (for lowering into the sea). I would have expected these to be closer to the quarterdeck or bow? Paravanes were mainly used for mine sweeping, or in a secondary role as a splash target for gunnery practice, depending on how they were configured. The configuration would make them either tow directly astern or swing out onto the quarters astern (minsweeping etc). See https://en.wikipedia.org/wiki/Paravane_(weapon) This article talks of them being towed from the bow, but in my time I only saw them used from aft - the bow m,akes sense for minesweeping purposes though. The magazines may have been for ready use ammo for the smaller guns? cheers Pat
 -
Hi Greg, unusaual for paravanes to be stored inside a turret? Some nice detail there. cheers Pat
-
She's looking mighty fine Russ, can't wait to see her with her sails. cheers Pat
-
Thanks you so much John and Mark; appreciate your comments. John - next job is to complete the HMCSS Victoria which I have been researching and assisting the build. Its' back in my hands now for final fit-out with hull and coppering completed. I will start a dedicated log soon. i will also be making a start on my HMAS Vampire (3D printed project) early next year. Mark - final photos this week I hope cheers Pat
- 517 replies
-
- 3
-

-
- Endeavour
- Artesania Latina
- (and 1 more)
-
Hi Alex, That deck treatment is a relatively new one (late 70's/early 80s (at least in the RAN - may have been a tad earlier in USN/RN) and is a specialised coating that not only serves as a metal deck preservative but also a non-slip surface for the deck. Back in the early 70s the RAN was still using deck-tread (sandpaper strips/patches glued to a painted deck surface) but in the late 70s started using a new treatment which had sand mixed into it; this then developed into this treatment which in the RAN was called DEVRON (a brand name I think) - I don't know where it was initially developed or by which company. It is applied direct onto a specially prepared deck, and if not abused will last several years. It is a fairly thick coating and very hard on the knees/skin. Some ships have this applied to cover the whole deck surface while other ships had it covering the majority of the deck but the last few inches near screens/bulkheads and the side were normal paint. I am not well versed in paint application techniques for models, but I would think that applying a slightly thicker paint and then using a dry brush in a random pattern may provide that look? That said, it would also depend on the scale as down at say 1:350 or so, the scale would not show this? You might also have to research the ship and see if you can find photos that show the paint pattern (full coverage or with paint verges) for the ship in the period you are modelling? I am quite interested in this as I am building a 1:350 of HMAS Vampire circa 1973/76 and this is the period this paint started appearing. In Vampire at this time, the main deck was DEVRON (with verges) while the superstructure decks were still painted and used deck tread. She did not get fullly covered DEVRON decks until the very late 70s. I hope this helps? cheers Pat
-
Thanks Wayne, some interesting references there; that will keep me busy for awhile Good luck with the publication of your research results. cheers Pat
-
As I have found out Per - a big scratch already which I will try to polish out with "Brasso" but at least it is on the back (nearest the wall) side of the case. cheers Pat
- 517 replies
-
- 2
-
-
- Endeavour
- Artesania Latina
- (and 1 more)
-
Where did you get such a small model/figurine of Anja and the other visitors? cheers Pat
-
Thanks for the feedback USS Frolic. It would be interesting to see if there are any references to/instructions for this practice (Wayne?); and also be great to see that model or read its description on the NMM site at least (any links available?). WRT ready use ammunition, I relate back to my own experience. In the modern navy (RAN) for some weapons, it was normally stowed in the appropriate stowage unless in refit or the like; and it was brought to the ready-use state as determined by the readiness state of the ship. I would assume that even back then, whether at war or not, the provision of the ready use ammunition would have been driven by the readiness state of the ship and that, even in peace, there was sometimes the threat of privateers etc (depending on op area), then there is also the daily (in some ships), or frequent exercising of the guns, and the morning/evening "stand-to" at dawn/dusk which would probably necessitate the use of shot-racks to store an appropriate amount of ready-use ammo? I think then that shot-racks would have been fitted (of some type), the presence or not of the shot is the remaining part of the discussion? This discussion has been interesting, and I for one, would like to see some further clarification on this latter point? cheers Pat
-
Les, I think all you need is already posted on several of the Endeavour logs. Certainly my log shows all of my deck furniture with my preferred design and colour. I must stress though these are my interpretation of what I think may have been the fit. The fit generally conforms to the AOTS with one or two exceptions where I have used the 'replica' as my source of information. One area that I think I do not comply with either though is the use of boat crutches on the gallows. The more typical, and perhaps more correct would have been to stow the boats on the spare spars. However, to my mind the spacing of the spars to accommodate the boat hulls, and their length overall, would have had the ends of the spars overhanging the midships pumps making them almost impossible to operate, and also possibly interfering with the working of the windlass. My solution was to use crutches and stows the spars between the crutches so that they are aligned longitudinally with the centre line and the ends then between the pumps. I have not fitted the spare longer spars in my model yet, only the shorter upper spars and mast poles. You might note that I also fitted a rudder post housing as well as the rudder post sock (on the transom). There are one or two comments in the log or journal that seem to justify the presence of the rudder post housing. There are several other discussions on the position of the wheel (not the overall wheel with standards, but whether fore or aft of the drum), the length of the jib, height of the mizzen etc in other logs you will find helpful - BUT - in the end you will need to decide what you wish to do based on your interpretation of the various bits and pieces of evidence, discussion points and what you 'feel' is right or wrong. cheers Pat
-
Wayne, thanks for posting this. WRT guns, I think Endeavour sailed with 10 guns, six (stowed in the hold) of which [edit: 6] were intended for use in fortifications of the observation site/camp while in Tahiti. In her log there is mention of various numbers of guns on deck at times (4, 6 or none). Certainly stowing/unstowing these would have been a pain, but I think (I would need to reread the log) there was a period when Cook believed they were in benign (enemy wise) waters and had some of the guns (not the swivels though) stowed. Also, as per my comment earlier, I have read in a couple of references that in extreme weather the ready use shot would be stowed away, but the guns would be weather lashed on deck. Those "instructions" you posted bear this out and sure did make stowing the guns an evolution to be avoided; but, with the use of the mast and other tackle, quite achievable in Endeavour via the midship hatches - BUT you would want to do it in harbour . The locations of the guns is also hard to determine and why in some models you see 4 guns on the Quarterdeck, and in other 6 guns in the waist. thanks again Pat
-
Yep same stuff Popeye - weighs less, won't shatter and more importantly, at least when I bought my acrylic sheet, cheaper than glass. Not now though as it seems glass is the cheaper option these days. cheers pat
- 517 replies
-
- 2
-
-
- Endeavour
- Artesania Latina
- (and 1 more)
-
Hi Les, 1. Sorry I have to disagree with USS Frolic in that, to the best of my knowledge, the ready-use shot in shot racks were not netted. The purpose and the design of the racks was to hold them securely - the idea was mainly to keep them topgether and stop them rolling; their weight was sufficient to stop them 'jumping out' and in very severe weather they would have been stowed as the guns could not have been used anyway. I would be very interested in any reference that shows they were netted so as to satisfy my curiosity now that it hase been piqued . 2. The binnacle was fitted just in front of the wheel where the helmsman and the Officer of the Watch could see it. Depending on the source you are using as your main reference, this could have been a double cabinet that spanned the skylight, or a single cabinet style moved from side to side as required. These were lashed to ring bolts in the deck. No one really knows exactly the style used in Endeavour, but rather use one typical for the period. I would recommend you invest in a copy of the AOTS or another source data reference especially for the rigging etc as that will answer many (most) of your questions. To answer some of the rigging questions we always need to refer back to a source and copying them here runs the risk of breaching copyright. It is much easier to answer if we simply point you to a page in the reference to clarify or answer the question and we do not then breach copyright. looking through the various build logs woill also give you a good idea of the deck arrangements, and some of the logs have good discussions about various items. cheers Pat
-
Hi Les, not sure if you meant a few more pics of the shot rack options or of the ship? WRT boats, she sailed with 5 boats in 1768 but the carpenter's punt was lost early on in the voyage (before even getting past Europe ). She was provided with a Longboat, Pinnace, Yawl and then there was Mr. Bank's private skiff. The AOTS provides good detail on these. However, there has never been consensus on exactly how (or even where) they were stowed, or on their type of construction. For example Ray Parkin and Karl Marquardt, in their respective books, suggest two slight differing designs for the longboat - one a slightly longer and narrow design and the other a wider but shorter design. The longer one being to be stowed on the gallows with the other boats nested, the other design under the gallows but no nesting. There is also debate as to whether they were of clinker or carvel construction. You can see which way I went I still have two boats to construct but they will not be on the ship. they will be displayed as under sail and mounted on clear acrylic rod at waterline level near to the model. cheers Pat
-
Hi again Les - hare are some more pics from another thread on one of the MSW forums which show some of the alternatives in real life: http://modelshipworld.com/index.php/topic/10099-cannon-shot-storage-on-deck/#entry300291 cheers Pat
-
Not a glass one greg, but an acrylic with wood base which is ready to go - I'll post a piccy in a couple of days. Just finishing the boat's oars and fitting the Common (tricolour) pennant and she will be ready for display. cheers Pat
- 517 replies
-
- 2
-
-
- Endeavour
- Artesania Latina
- (and 1 more)
-
The King Chuck carving came up pretty nice Dave. and the ship overall is looking good. cheers Pat
- 962 replies
-
- 5
-
-
- sovereign of the seas
- ship of the line
- (and 1 more)
-
Better than my carving mate cheers Pat
- 962 replies
-
- 4
-
-
- sovereign of the seas
- ship of the line
- (and 1 more)
-
Those Pontos blast bags look a lot better Greg; although the Tamiya turret details look reasonable sharp also. cheers Pat
-
Always room for improvement Denis I sit imagining those two small paintings and smile; I'll have to have a look at that site - The popeye cartoons are still a favourite. I look at my Endeavour (which I am just finishing) and lament some of the silly things I did back in the early years of the build which later affected the final finish - if we are not improving then we could call ourselves Masters and I have a long way to go before that (not in my lifetime at least ) cheers Pat
-
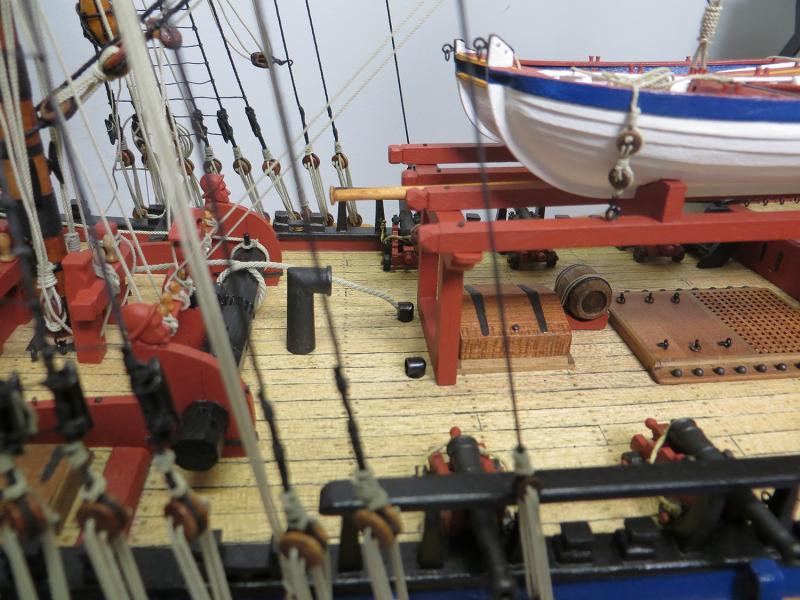
Hi Les, see the piccy of my fit below which shows the shot racks I have fitted. Please note that because of the scale I am working at, I have not raised the 'rack' off the deck as it would have looked wrong. These were constructed such that they held the individual shot in separate holes to stop them rolling around, even in heavy seas. I used small ball bearings as my shot which needs to be appropriate in scale and match the bore of the scale cannon. There are other discussions on this subject on this site where they cite the references and rules for construction. I know the MSW search engine is a little cumbersome but you should be able to find the discussions with a little patience. I think Daffi may have a discussion in his Victory or Thinking Things Through series of posts. I also think that Lavery in The Arming and Fitting of English Ships of War 1600-1815 may have a discussion if you have that? cheers Pat
-
Great progress there Ulises. That scribed panel would have been difficult to 'control' over a curved surface? cheers Pat
- 786 replies
-
- 3
-
-
- Royal Louis
- Finished
- (and 1 more)
