
DONATION DRIVE - SUPPORT MSW - DO YOUR PART TO KEEP THIS GREAT FORUM GOING!
×


BANYAN
-
Posts
5,951 -
Joined
-
Last visited
Content Type
Profiles
Forums
Gallery
Events
Everything posted by BANYAN
-
Great idea and good results. Thanks for sharing. cheers Pat
-
 Nice technique with soldering that ring into place Michael. cheers Pat
- 749 replies
-
- 4
-

-
- albertic
- ocean liner
- (and 2 more)
-
Cal, they would also have to be specific to the period of the ship you are modelling - best bet may be to make them yourself? Plenty of guidance and How to in the various logs and some plans in the database. cheers Pat
-
HMCSS Victoria 1855 by BANYAN - 1:72
BANYAN replied to BANYAN's topic in - Build logs for subjects built 1851 - 1900
Sorry there has not been an update for a little while, I am back at the PC drawing up the plans, and continuing the research. I am going to have to ensure a quality build noting the experience and abilities of the build followers cheers Pat- 1,013 replies
-
- 4
-
-
- gun dispatch vessel
- victoria
- (and 2 more)
-
Congratulations Russ; she looks absolutely grand! I am sure the client will be very thrilled with this model. cheers Pat
-
Wow what a comeback Glenn, I had been missing your updates. Those skylights are stunning. I will be making some for my Victoria project in the coming year and wish I had CNC. I have the mill but I don't think I would use CNC enough to get value-for-money; may need to investigate a little further noting the great results you achieve. You truly are the master of metal; those 'charley nobles' look great, and a neat construction technique. I am learning so much from following your build log; many thanks! cheers Pat
-
A Lorch Micro-Mill that never was ...
BANYAN replied to wefalck's topic in Modeling tools and Workshop Equipment
Now that you have almost completed your prototype, I'll send over my 'Lanco' for you to adapt Very nice work Wefalck; that will be a very useful mini-machine and a fine addition to your wonderful workshop. cheers Pat -
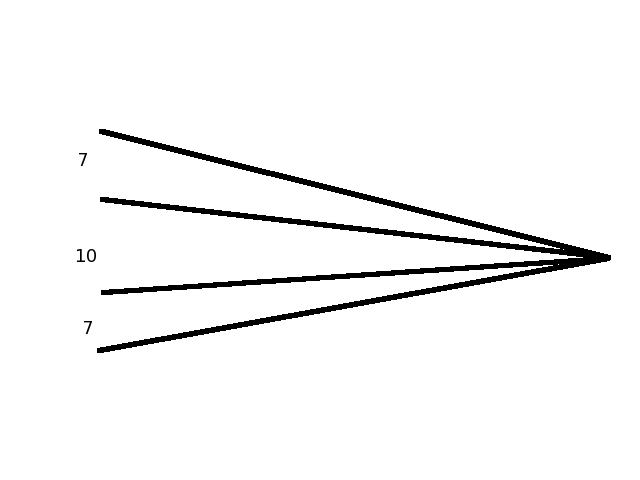
JT here is a rough copy of such a fan someone posted on this site I think (sorry cannot recall who). These are the proportions by which to reduce square stock to get an octagon (the 10 is the meat that remains). Simply place the square stock on the fan so that the edges of the stock meet the outer edges of the '7' fan lines, then mark the wood with the other lines. The lines should be ruled with a straight edge back towards the centre to reflect the angle of taper rquired. For some yards, not direct to the centre but to the point of transition from straight octagonal to taperered round. These then give you the guide lines to which you reduce the square stock with plane, chisel, file or.... Note: the square stock should be reduced to the appropriate thickness before starting, such that the width of the meat [10] ends up wide enough, that after rounding, is the correct diameter of the round - this takes a little calculation. Always better to err on 'bigger' so that you can reduce; harder to add Once you have the round, even in taper, it is relatively easy to maintain it with further sanding. cheers Pat
-
Go on Mike; serve them. If you have taken the time and effort to get it historically correct so far, you might as well get the rigging right to? It's not that hard once you get your jig/server up and running . You will get much more satisfaction from the fact you know it is correct. cheers Pat
-
Adapting what we have in accordance with our skills is the key Dave - I see a very nice capstan cheers Pat
- 962 replies
-
- 4
-
-
- sovereign of the seas
- ship of the line
- (and 1 more)
-
Nice work Michael, those stays especially are looking very good. cheers Pat
- 749 replies
-
- 4
-
-
- albertic
- ocean liner
- (and 2 more)
-
A real gem Russ. The sails look good in place and while i am aware you think they look too heavy; they look pretty good in-situ. cheers Pat
-
CNC and Laser cutter in one - that seems an awfully useful machine Christi - great pick-up mate. I hope it lives up to its claims and you get good use out of it - it certainly looks promising. Does it require any specialised software? cheers Pat
-
Major milestone completed with the running rigging Dave, she is certainly looking great! cheers Pat
- 962 replies
-
- 6
-
-
- sovereign of the seas
- ship of the line
- (and 1 more)
-
Not far to go now John - Christmas pressie to yourself??? She is starting to look liker a working boat now. cheers Pat
- 745 replies
-
- 2
-
-
- francis pritt
- mission ship
- (and 1 more)
-
Not a good thing Mark - back to hand cutting for a while...or can HMS Visa find some room after Xmas spending? cheers Pat
-
They would be small at that scale OC; but to me the driver would be the quality of the kit part. If it holds definition and shows the correct detail, stay with it; otherwise... cheers Pat
-
Quite a bit of detail even in the funnels - this should make into one very nice model Greg. cheers Pat
-
Good to see this little lady again Rusty; I hope you are enjoying making sawdust again? cheers Pat
- 310 replies
-
- 3
-
-
- cheerful
- Syren Ship Model Company
- (and 1 more)
-
Hi Dave, I am sure you'll get the hang of it if you are used to AutoCAD. There are a few 'quirks' with the program I am still trying to get to grips with but I am coming from a "know nothing' background; your experience will help a lot. My biggest errors were not using 'blocks' so I have far too many entities, and using the wrong line tools ending up in far too many nodes. cheers Pat
-
Following instructions in a tutorial is one thing Dave; understanding the principles another Still, I have learned a lot from the exercise. cheers Pat