BANYAN
-
Posts
5,952 -
Joined
-
Last visited
Content Type
Profiles
Forums
Gallery
Events
Everything posted by BANYAN
-
 Hope all went well mate, both the trip (all models arrived and returned safely), and the show? cheers Pat
 -
Thanks for the response Vlad, the simplest pf solutions is often the best cheers Pat
-
Good luck Rob, I wish you every success in your efforts. cheers Pat
-
Like the shackle you have made Vladimir, how did you do that? I have been able to do the main body but replicating a forelocked pin has eluded me cheers Pat
-
Great process Rob, I have been mucking around trying to form my 'boots' and having a lot of problems due to the severe rake of Victoria's masts. I also have to make some boom rests/shoulders on the mast with the same angle/orientation - I will give sculpting them a go I think. Nice work on your boots etc Vladimir, you offer an alternate method to consider but I think with 15 degrees of rake on the mizen, the moulding may be the better option to try first. Your build is coming on very nicely. cheers Pat
-
What a wonderful ride this build has been. Congrats on a first-class build Keith; it has been a joy to see your progress and high-quality work. She looks wonderful and so accuratly reflects the actual yacht. cheers Pat
-
Great to see you start on this little beauty Tony; look forward to seeing her progress with much interest. Your efforts of lofting should produce a nicely faired hull. As John says, a pity to see she has 'gone'. cheers Pat
-
Thanks Dave, very effective technique - had me fooled More nice work on that hatch. cheers Pat
-
HMCSS Victoria 1855 by BANYAN - 1:72
BANYAN replied to BANYAN's topic in - Build logs for subjects built 1851 - 1900
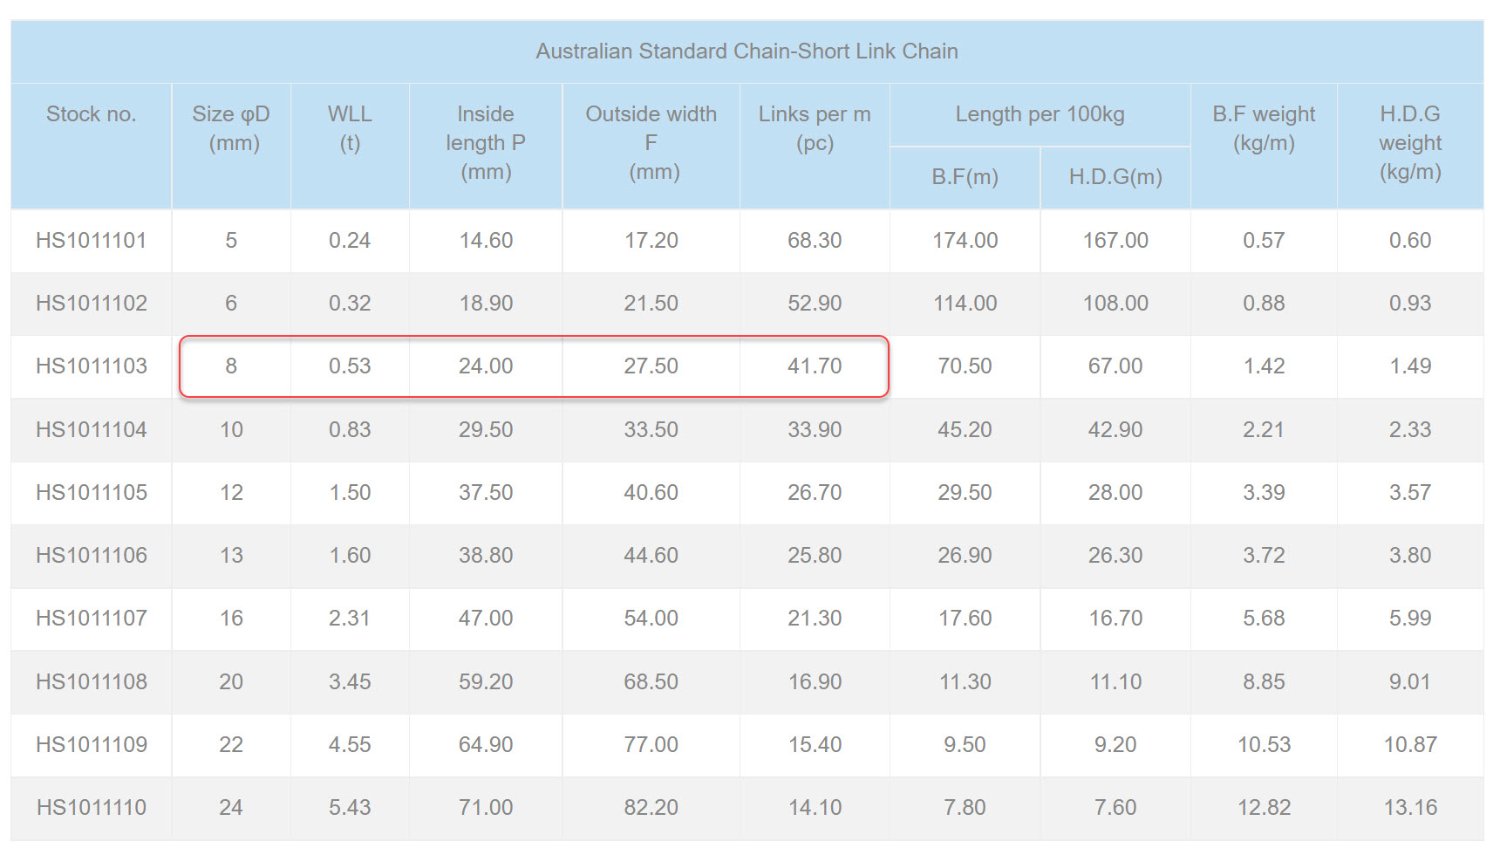
Eberhard, after a little more searching I have found a website that provides some guidance even if for steel short-link chain to Australian standards (Haosail Website) - iron links were probably a little larger? After applying the rules-of-thumb from Fincham, and using the table details for link width based on 8mm which is close to 5/16" chain listed in the Rigging Warrant for the TG tye), I arrived at the following. The overall dimensions for the Tye sheave slot were 6¼” long, 1 13/16” wide. As the topgallant section of the combined mast is 5 5/16” where the slot is cut, the width would not have left much ‘meat’ on the spar (about 1¼” either side) - noting they were also copper lined. I think this would seriously weaken the mast which still had the pole (Royal) extension above it. Even though the Rigging Warrant does not list any blocks associated with the TG Tye, I think I will use a gin block as that is what is used with the Topyard Tye. I would appreciate any further thoughts or suggestions? cheers Pat
- 1,013 replies
-
- 4
-

-
- gun dispatch vessel
- victoria
- (and 2 more)
-
HMCSS Victoria 1855 by BANYAN - 1:72
BANYAN replied to BANYAN's topic in - Build logs for subjects built 1851 - 1900
😁Thanks Rob. Actually, I am not too concerned with the model as I have also used smallest chain I can find. Simply trying to establish whether a sheath will have been cut into that part of the mast (TG stop) or a Gin/Other block used - but nothing listed against the chain Tye for TG in the Rigging Warrant. If a slot, there was not much meat left in the cheeks as a chain sheave was wider than for rope. I am leaning towards a block, even if not listed. cheers Pat- 1,013 replies
-
- 2
-
-
- gun dispatch vessel
- victoria
- (and 2 more)
-
HMCSS Victoria 1855 by BANYAN - 1:72
BANYAN replied to BANYAN's topic in - Build logs for subjects built 1851 - 1900
Thanks Eberhard, appreciate your time looking. Pity there isn't as much info available in contemporary literature. As you say, it should have been somewhat standardised by 1855. Thhe tid-bit on short-link chain on rollers is useful. The reason I ask, is that Victoria used chain for the tye (among other rigging that ran through blocks). For the topmast, gin blocks were specified for the chain tye in the Rigging Warrant, but no blocks are listed against chain for the topgallant tye. This infers a tye sheave cut into the mast at the topgallant stop. BUT as chain needs a wider sheave, and the mast diameter at this point is only 5.3" diameter, that would seriously weaken the mast. The chain is specified at 9/16" wire diameter but I would really like to find a rule of thumb for the chain width and for the slot. Fincham provides a rule of thumb for slot length (1 and 1/6) sheave diameter but I can find nothing on width for rope or for chain except for a comment by Fincham that the sheave for chain is shallower in the groove, bigger in the mouth and overall wider than for a rope sheave pully. cheers Pat- 1,013 replies
-
- 4
-
-
- gun dispatch vessel
- victoria
- (and 2 more)
-
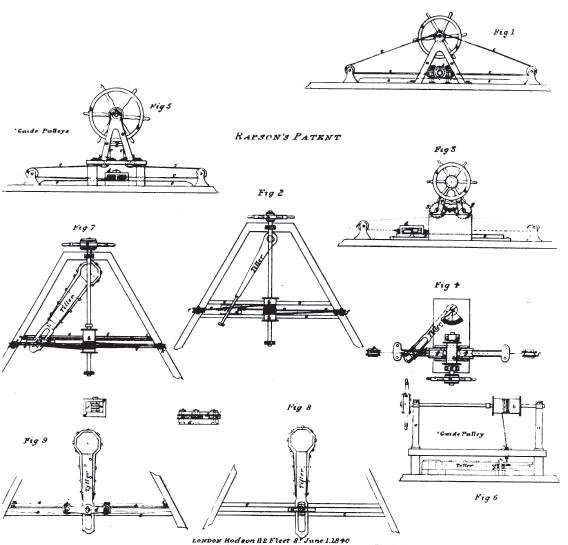
Hi Rob, sorry out of action for a couple of days helping one of my sons with yard work. 'Victoria' used the Rapson son which is under the grating you see. It used a short axel wheel on an inverted/back to front 'V' frame (opposite to normal) to cater for her short counter and leave room for the after pivot-gun. This put the legs of the support frame forward of the wheel and the wheel could then be mounted almost directly over the transverse/thwartship slide. In Victoria's set-up the tiller was abaft the helmsman, you can just make it out in the photo. That the reason for the grating over the system. cheers Pat
-
Ditto Rich's encouragement Vladimir, as a matter of fact your drive to redo rather than accept shows that you are going in the right direction (you wouldn't want to seem my redo bin ). cheers Pat
-
HMCSS Victoria 1855 by BANYAN - 1:72
BANYAN replied to BANYAN's topic in - Build logs for subjects built 1851 - 1900
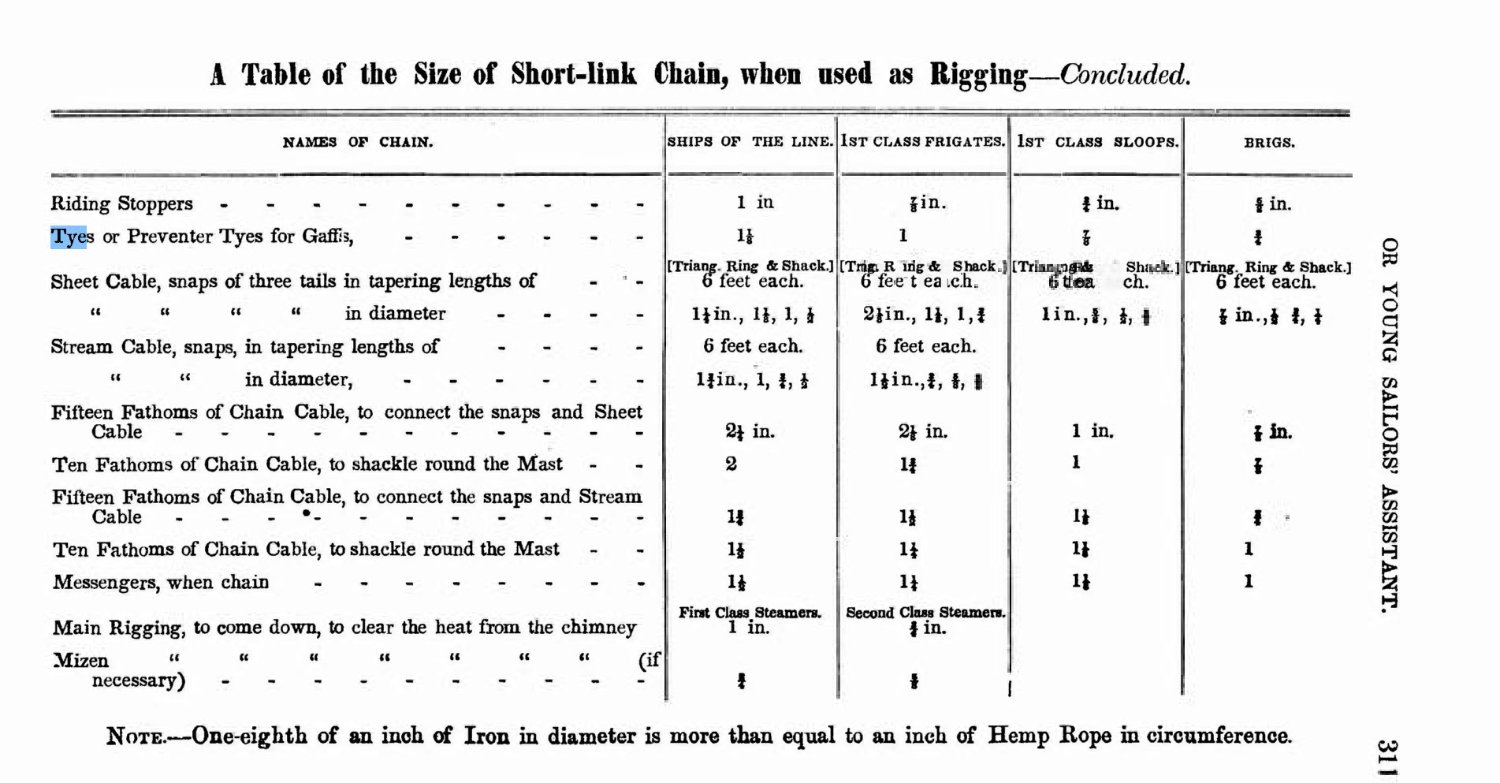
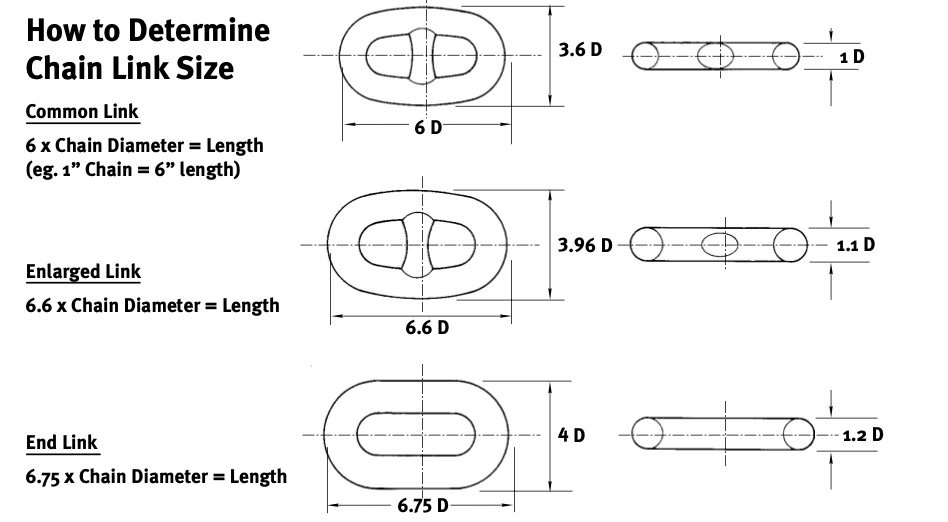
I am also trying to find some information on the rigging chain used. The Rigging Warrant expresses the sizes as say 9/16" which is the correct way and is the 'wire' diameter (thickness of the metal not the link). I have found some rules-of-thumb for determining the ship's anchor cable sizes, but not how to determine the overall size of each chain link. In the following drawing I am trying to determine the opposite to what they are - i.e. I have the wire diameter but need a link length and width (the latter in particular). Brady (The Kedge Anchor) 1852 - as shown in the table below - informs that chain used for rigging was called 'short link chain' in this period, but again gives it as 'diameter' - has anyone come across a 'rule-of-thumb for determining the chain link overall link size similar to that as shown for an anchor cable (third pic)? NB - this rule of thumb is for modern cable. I need this to determine the sheave size which in turn drives the sheave slot size - wider but shallower sheave grooves were used with chain. Any info/pointers would be greatly appreciated. Cheers Pat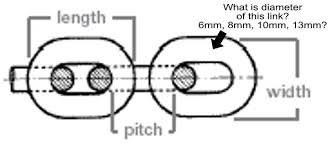

- 1,013 replies
-
- 10
-
-
- gun dispatch vessel
- victoria
- (and 2 more)
-
HMCSS Victoria 1855 by BANYAN - 1:72
BANYAN replied to BANYAN's topic in - Build logs for subjects built 1851 - 1900
Work progresses: I have now completed and fitted the lower studding/swing booms in their brackets etc - I will post a photo later. In the meantime, I have started on the fore-and-aft booms. I am about 75% complete on the fore-boom. At this scale (1:72) these do not turn out very big as you can see. I have had to resort to Turkish Boxwood for the jaws as everything else was breaking. It took me a while to develop a method for making them, but persistence paid off. I have started on the mast furniture, with the first hoop completed and to show the method, the outer one under construction. Due to their flattish overall shape, the only way to get these on is to use strip brass, bend to shape and join the band under the jaws once blackened. I have yet to shorten the length by about 5 or 6mm at the outer end - I have left a little on as I have yet to cut-in a sheave slot and I wanted some 'meat' left on so I can do this a little easier. I have also started on the spider band; the band is made and drilled for three eyes which I will solder into these holes then smooth the inner side of the band. The hole has been drilled for an eye under and over the jaws just forward of the hollow for the throat halliard and downhaul. The last thing will be to put in some simulated bolts through the jaws and boom. cheers Pat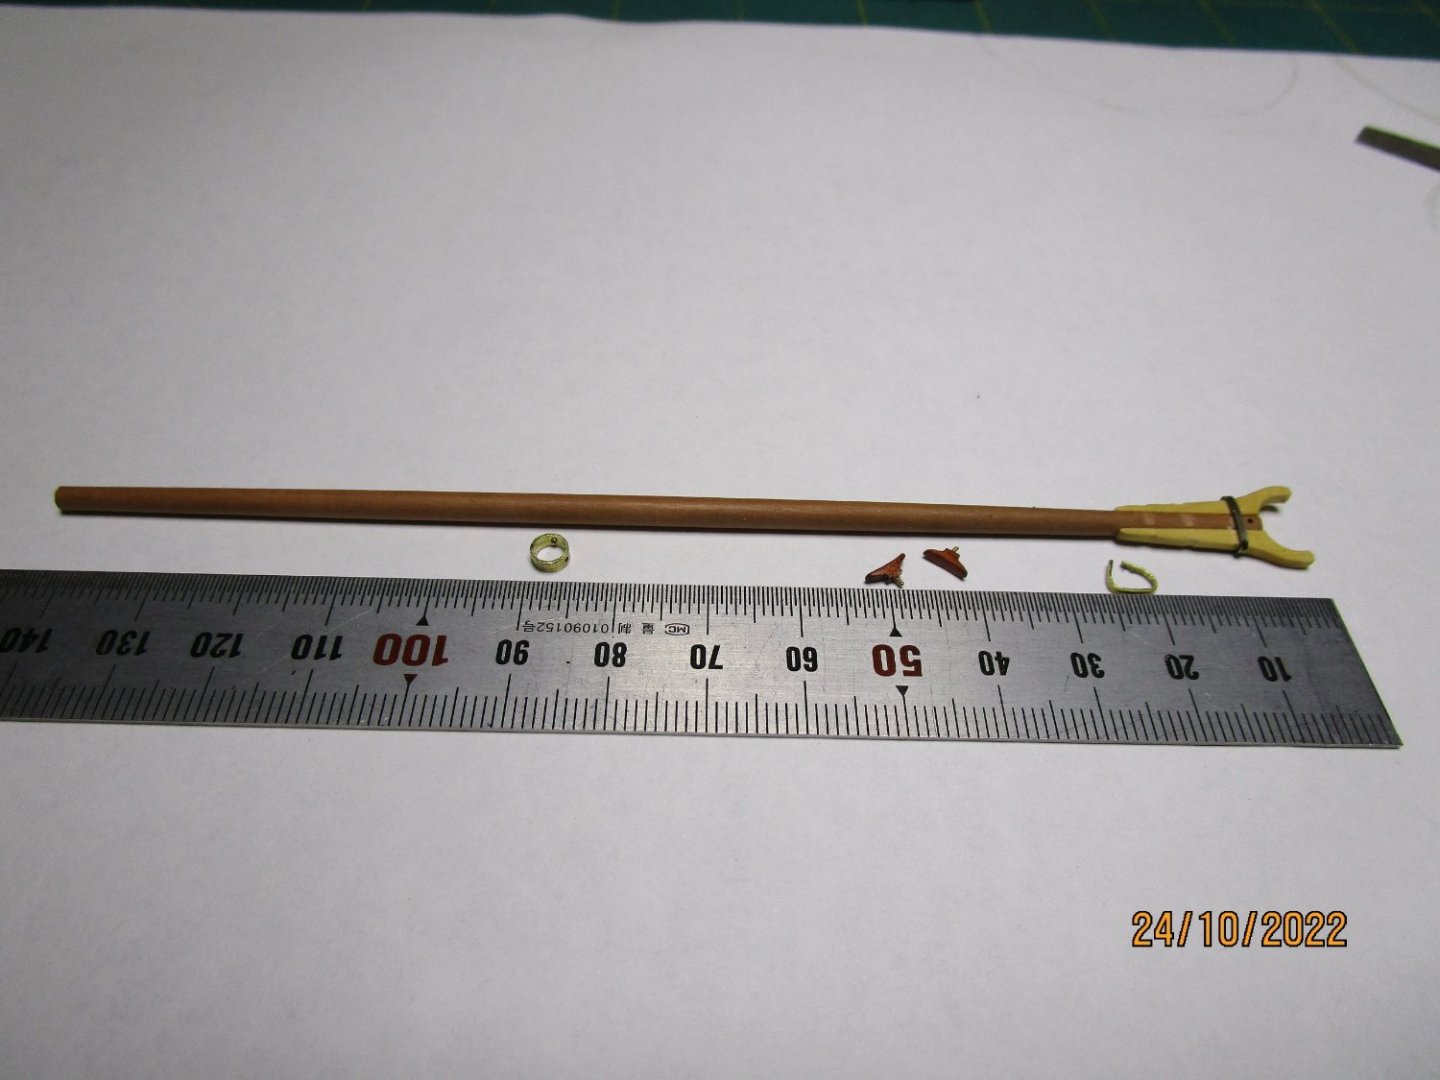
- 1,013 replies
-
- 9
-

-
-
- gun dispatch vessel
- victoria
- (and 2 more)
-
No worries about the times between updates; they are most welcome. She's coming along very nicely - looks great. cheers Pat
- 88 replies
-
- 4
-
-
- Australia II
- Finished
- (and 2 more)
-
Now that I have picked myself up off the floor, all I can say is Wow - WOW! That level of detail and your skilled execution of all the rigging components is simply stunning detail Keith. We have become accustomed to your high-quality work, but to see it all brought together like this presents such a wonderful bit of eye-candy. cheers Pat
-
Another nice clipper you're building Rob - I will follow with much interest. Not sure if you have seen this line drawing/sketch of your steering system (Figs. 2, 6 & 7). Your ship probably used the lighter form as at Fig.2? These were usually a form of the Rapson Steering for which a patent was granted and was exhibited in 1840. This is from a book of Patented Inventions for that year. A similar system was used in the Victoria. If you want more detail on the system just holler. cheers Pat
-
Amazingly clear and precise detail for that scale Eberhard; I'm impressed! I can see some value in that small blade and holder; are they readily available online? cheers Pat
-
What a beauty, take a bow Rob, this is one very nice build. I hope the heat from your 'fireplace' doesn't affect the model. It has been a real pleasure following this 'tour de force'. cheers Pat
- 3,560 replies
-
- 3
-
-
- clipper
- hull model
- (and 2 more)
-
Love those guns Dave; they look great. How did you do /or what did you use for, the small nails in the trucks? They look very realistic. cheers Pat
-
Really nice Glen, very effective and realistic. cheers Pat
- 134 replies
-
- 3
-
-

-
- Captain Kidd
- bottle
- (and 3 more)
-
Someone's been busy Looking good Vlad. cheers Pat
-
Those crewmen have really brought your build to life Rob; makes the model that much more interesting to view. cheers Pat