
HOLIDAY DONATION DRIVE - SUPPORT MSW - DO YOUR PART TO KEEP THIS GREAT FORUM GOING! (Only 72 donations so far out of 49,000 members - Can we at least get 100? C'mon guys!)
×


BANYAN
-
Posts
5,946 -
Joined
-
Last visited
Content Type
Profiles
Forums
Gallery
Events
Everything posted by BANYAN
-

HMCSS Victoria 1855 by BANYAN - 1:72
BANYAN replied to BANYAN's topic in - Build logs for subjects built 1851 - 1900
Thanks Eberhard. I had a good range of drill bits (0.3 to 3.0mm) optimised for brass that I had bought from Germany; they were great but the smaller ones (as you expect) were prone to breaking easily. Unfortunately due to their costs I have not replaced them. Can you get spade bits down to these sizes? I will have a look for straight fluted bits also; cost while a factor is not the driving consideration; to me, it is value for money. If they perform well and make the job feasible, then I would buy them. Do you have a recommended source please? Once again, many thanks for all of the advice you have provided along the way. The mast spiderbands proved relatively simply and my brass optimised bits worked great there in combo with my mill and a rotary table/block and vice. cheers Pat- 1,013 replies
-
- 2
-

-
- gun dispatch vessel
- victoria
- (and 2 more)
-
HMCSS Victoria 1855 by BANYAN - 1:72
BANYAN replied to BANYAN's topic in - Build logs for subjects built 1851 - 1900
Thanks again for the feedback Andrew and Keith. I think I have some solutions in mind now. Andrew: Thanks, I agree your comment re shape/angle of drill end for brass, but making my own is out of the question as I am drilling sub 0.5mm holes Based on the comments from you all, I think I now believe that what I have been using may be 'different melt point' solder even though there is a silver content. I will need to investigate that a bit further, but they do have some silver in it as they are definitely a little harder to cut than standard /soft solder (but only a bit more difficult). Keith: Appreciate the further feedback mate. Yep I do a fair bit of 'freehand' drilling using a micro motor handpiece (orthodontist type), so that is definitely one of the reasons I was/am breaking so many. I would very much like to use my mill with its sensitive drilling attachment and indexing attachment to drill these, but I have yet to fully develop a satisfactory jig (about 85% of the idea developed) - just need to find a way to support the ears a little once set-up. I have an idea for that (shaped wood block) but a bit distracted with other things at at the moment. I LOVE resistance soldering; did I tell you I L.... I can achieve the higher temps needed for true silver soldering (no flame) but only on bigger pieces (but not very large pieces (lots of surface area) where a flame is definitely needed. I find resistance soldering so much better for controlling the flow/placement of the heat. I can do a lot of joints in close proximity using differing melt point solders and placement of the probes. A tad expensive to purchase initially, but it has been one of the best value-for-money and fit for purchase items I have bought over the years. That was my retirement pressie to myself cheers Pat- 1,013 replies
-
- 3
-
-
- gun dispatch vessel
- victoria
- (and 2 more)
-
Ditto. Persistence pays off - looks good Steven. cheers Pat
- 740 replies
-
- 3
-
-
- Tudor
- restoration
- (and 4 more)
-
HMCSS Victoria 1855 by BANYAN - 1:72
BANYAN replied to BANYAN's topic in - Build logs for subjects built 1851 - 1900
Hi Eberhard and Keith, thanks again for your most welcome suggestions. Eberhard, there is a piccy at post https://modelshipworld.com/topic/14596-hmcss-victoria-1855-by-banyan-172/?do=findComment&comment=906095 This shows the ears before trimming etc. I am try to drill such that the OD edge is about .5mm from joint - I deliberately left them extended to facilitate drilling and planned to trim the ears back and shape them by filing. BTW, the solder is marked as 'silver' solder and seems to have good holding power. Keith, I had a heap of those but got rid of them as they were too brittle, and due to their sharp tip did not think they would be useful for brass. Well you know the saying - 'assume' is - makes an '***' out of 'U and Me' - in this case entirely out of me I will give them a try and see how they go. For the very small bands, the drilled hoop with soldered eyes seems to working. cheers Pat- 1,013 replies
-
- 3
-
-
- gun dispatch vessel
- victoria
- (and 2 more)
-
Hi Brian, WRT locks, the magazines, shell rooms and most store rooms (especially those containing flammables and attractive provisions), the 'spirits' store (if there was one) and captain's stores rooms would all have locks also. The sickbay (or medicines locker) may also have had a lock. cheers Pat
-
That skeleton came together very nicely Dave. cheers Pat
-
HMCSS Victoria 1855 by BANYAN - 1:72
BANYAN replied to BANYAN's topic in - Build logs for subjects built 1851 - 1900
Hi again Keith, posts crossed in the ether. I use resistance soldering, so at a low setting it melts either 145degree or 179 degree silver solder quite well. When drilling there is no glow developing at all, I put my finger on the band near the lug being drilled and if I feel heat developing I stop. However, it appears that the solder softens and either the drill bit edges grab the lug and pull it off while warm, or the heat is greater than I thought? cheers Pat- 1,013 replies
-
- 1
-
-
- gun dispatch vessel
- victoria
- (and 2 more)
-
HMCSS Victoria 1855 by BANYAN - 1:72
BANYAN replied to BANYAN's topic in - Build logs for subjects built 1851 - 1900
Thanks for the comments guys. Keith, I did try that with mixed results (unless I can do it consistently the ...) - I found the hole was so close in and at .6mm (has to be that size) there is very little meat left to solder to, so I thought drilling post soldering a better option - perhaps wrong approach so will experiment again. Eberhard, you're probably right. I did have a set of bits (from a German manufacturer/retailer) that were optimised for brass but I found they kept breaking to easily and at their very high cost have reverted to HSS bits. cheers Pat- 1,013 replies
-
- 1
-
-
- gun dispatch vessel
- victoria
- (and 2 more)
-
HMCSS Victoria 1855 by BANYAN - 1:72
BANYAN replied to BANYAN's topic in - Build logs for subjects built 1851 - 1900
Hi Keith, thanks for looking in. WRT the PE, I have an arrangement with a local railroad modeller whereby I do the rough artwork in CAD and export as it as a cdr file, he imports it, adjusts the items for best layout to maximise the stock, then etches the pieces for me. Works out at a reasonable cost and I don't have to learn yet another skill I have had to change tack a bit on the spiderbands as I was not having success drilling holes in the 'ears' - the heat generated was causing the soldered joint to let go even though I was using silver solder. I have reverted to soldering homemade eyes into predrilled holes in the band. I am still pursuing a solution to keep the drill generating too much heat when drilling the soldered ears; I need to find a was to locally cool and probably go much slower with the drilling. I have heard of a product called 'cool blue' either a gel or paste, which I might try. The earlier method will work for larger (greater than 3mm OD) bands so I have not given up on it. cheers Pat- 1,013 replies
-
- 3
-
-
- gun dispatch vessel
- victoria
- (and 2 more)
-
Pause it????? Just as I found it????? As the car ad used to say Bu.......r! A very interesting concept and I am looking forward to how you attacked these Greg. I look forward to the bigger project though. cheers Pat
-
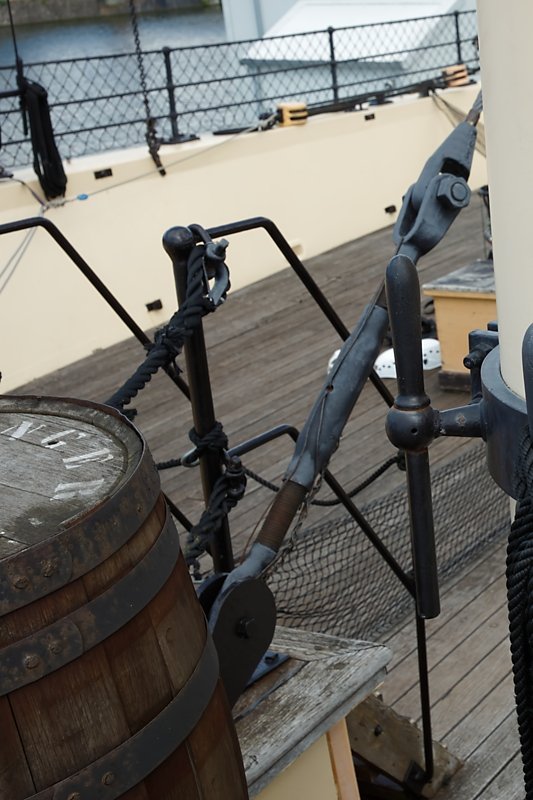
Hi Rich, I hope the following photo of the same type fitting (as my previous Underhill Illustration) taken aboard the SS Great Britain that I took while visiting Bristol, UK a couple of years back, although not showing the padeye, at least shows they were used in this era. The photo is a crop of the spiderband on the mast which is why the whole fitting is not shown. In this instance (and in the Victoria) used with a screw, but also could be used with a stay turned on a thimble as per previous illustration. I also agree with Rob's summation - with the many different methods employed during this period depending on the builder, purchaser and/or Captain, many differing methods could have been employed. But Underhill is at pains to state that usually, if one method is employed for one item, it was usually used throughout the ship. So whichever way you decide to go, there should be no issues. cheers Pat
- 3,560 replies
-
- 3
-
-
- clipper
- hull model
- (and 2 more)
-
That's a great solution to the problem Dave, those recessed/flush stringers should do the trick nicely. cheers Pat
-
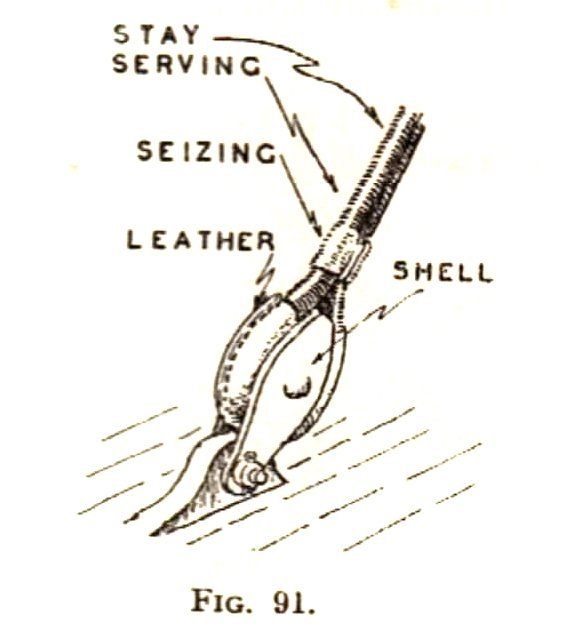
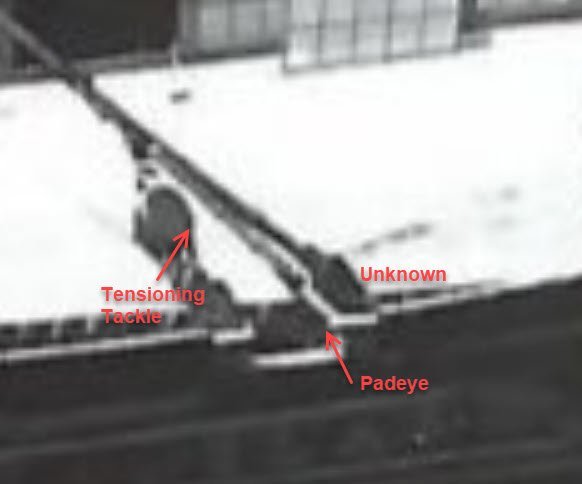
Hi Clipperfan, I think that the use of padeyes for all stays is a reasonable assumption but I know that in "Victoria" they did not set-up the mizen stays that way - they were set-up with large tackles. However, the bottom block was probably set-up to a padeye anyway. I think this was done to allow the respective stay to be slackened off when the main fore-and-aft sail boom was swung hard to either side (and also possibly used as a derrick to set up the accommodation ladder). In later photographs they overcame this by leading the stays further forward and probably set them up to padeyes. The padeye is the arrowed fitting - still trying to work out what the other might be, but possibly another padeye (but as big one ) . Some (doubled) forestays were laced together to a height above deck where they then split and went to either side - this may be an example but the separating point appears too low to be practical. Still pondering on this, but it is possible we are seeing a padeye with large solid thimble as shown by Underhill (Masting and Rigging of the Clipper Ship and Ocean Transport - Fig 91). I am reasonably convinced this was the set-up in "Victoria" (1855) as she used wire rope for the stays. She also did not use the laced forestays as she used the p[ort side stay as the staysail stay. Hope this helps? Sorry again Rob, can take this to a private discussion of preferred? cheers Pat
- 3,560 replies
-
- 1
-
-
- clipper
- hull model
- (and 2 more)
-
Rob, she's looking great. Your GotS could easily pass scrutiny as a movie model from some of those views. cheers Pat
- 3,560 replies
-
- 2
-
-
- clipper
- hull model
- (and 2 more)
-
Sorry to hijack Rob. Clipperfan, thanks again for those enhanced photos; they were clear enough that I think I can postulate that in this era, stayplates (as Campbell calls them) or padeyes (as Underhill calls them) were the common means of securing the stays at deck level. cheers Pat
- 3,560 replies
-
- 3
-
-
- clipper
- hull model
- (and 2 more)
-
Haven't heard that term in a while; a dib of that and dab of that (if it doesn't move, paint it) - or their other name (well used by stokers in the RAN at least) as 'mullets' - sorry to highjack cheers Pat
- 88 replies
-
- 6
-
-
- Australia II
- Finished
- (and 2 more)
-
I was wondering where/what you would look to next Dave. Great choice, this should make into a lovely model. It seems you have quite a bit of info to get a good level of detail. cheers Pat
-
Nice work on the masts and yards Rob, hopefully no tangles/knots in the many tail ends cheers Pat
- 3,560 replies
-
- 1
-
-
- clipper
- hull model
- (and 2 more)
-
NAIAD 1797 by Bitao - 1:60
BANYAN replied to Bitao's topic in - Build logs for subjects built 1751 - 1800
You keep amazing us with your craftsmanship Bitao; just wen you think this can't get better you provide items like this. cheers Pat -
Thanks Clipper, I think we have reached the level of resolution possible / captured by the camera. Much appreciated. I think there is enough there to allow me to make a fair assumption. Vlad, take care mate, hope all heals quickly - indeed you need those fingers. cheers Pat
-
That looks like quite the challenge Eberhard; good luck. Possibly not feasible at your scale, but I tired a similar approach at 1:72 in which I had the bulkheads laser cur for me designed with a breakaway outline. That is, the full bulkhead was used as the plug by which to plank, then the inner portion of the bulkhead could be broken away leaving a remnant that became the frame at that station. BTW love the lines shown in the boat plan you posted - very sleek. cheers Pat
-
John, I think Brian offers a good solution. All the skylights in my Victoria (1855) had ventilation of some sort incorporated - so this makes sense. cheers Pat
-
Verrrrry nice Glen; what a wonderful way to present your miniature. I have very much enjoyed the ride. cheers Pat
- 177 replies
-
- 4
-
-

-
- Independence
- bottle
- (and 1 more)
-
Nice editing and clear-up of that photo Clipperfan; shows some of the rigging details very nicely, especially the bowsprit. I am particularly interested in the forestay set-up to the bow knighthead. Can you zoom in to get a closer look? I have tried with you middle pic but that starts to lose resolution at the zoom level I need. The tackle suggests it is either being set-up/tensioned or it was used like that at this stage of her career? Thanks Pat
- 3,560 replies
-
- 1
-
-
- clipper
- hull model
- (and 2 more)