Gregory
-
Posts
3,172 -
Joined
-
Last visited
Content Type
Profiles
Forums
Gallery
Events
Everything posted by Gregory
-
 Rigging Period Ship Models by Lennarth Petersson might be a good reference for this model..
 -
Not many options for this in wood ship modeling.. You might take a look at this: Not to label you as a rank beginner, but there is some great information there about getting started in wood ship modeling..
-
Another one of my projects on the shelf that I hope to tackle some day. I will be watching your progress with interest. You may have already discovered this, but I find Pete Jaquith's log to be an excellent resource. He moved that bulkhead also.
-
Planking improvement
Gregory replied to Picard's topic in Building, Framing, Planking and plating a ships hull and deck
While it might be a little late for this build, the instructions for the Syren Ship Model Medway Long boat, available here: https://syrenshipmodelcompany.com/medway-longboat-1742.php is a great planking guide for this and similar builds. While the Medway Longboat kit provides pre-spilled planks, the same results can be achieved with edge bending. The videos found here: Will show you how to bend planks to make them lay flat on a curved bow and avoid the gaps you refer to up above. The same thing can be achieved with spiling, but spiling may not be practical with a kit, where wider stock for cutting your own planks has not been provided.
-
I think we need more information.
-
I Quoted Bob also.. My response happened after your post, so may have appeared to be responding to you, but I was responding to Bob.
-
If you noted in my post you quoted, I didn't speculate that they didn't have compasses, to the contrary, I suggested that they did. I discussed the lack of binnacles, as I have not seen any on contemporary models of cutters.
-
Some boats, like cutters may not have had binnacles because they were resigned to channel duty, and it was a piece of equipment they didn't need, and didn't need to worry about maintenance. Other ships or boats may have been part of a fleet and they relied on other ships to get them to where they were going. At minimum the captain or other officer had a compass somewhere that could be used when required. Last but not least, a kit manufacturer didn't bother to include it and/or they were following drawings that didn't include it. As a standard piece of equipment on many ships, it may not have been included in the drawings because it was assumed the ship would be fitted with one. I certainly don't have the final word so perhaps others will chime in.
-
In my experience it is how sharp the focus is, and the type of wood/material. It also depends on an what's called ' air assist ' , which is a stream of air directed at the cut focal point. Chuck could probably elaborate on this. I would say the biggest factor is the type of wood, and may have a lot to do with how much moisture is in the wood. I get a lot of char with plywood, which probably has to do with the glue more than anything. I get less char with AYC than I do with bass, which surprises me, because I would be thinking the AYC is more resinous..
-
What I like about 'Rigging Period Ship Models' is that there is an end to end illustration of every line. There are possibly errors about belaying points and other details, but that would have varied on actual ships also. While Lees is very detailed, I think more illustrations would be helpful.. If I recall correctly, Lees has little if any detailed belaying information. That may be because there was little standard in that regard
-
Do you have any other rigging references ( not necessarily the Bounty ) ? The necessary rigging to control the yards and sails of any 16th -19th century sailing vessel would have been virtually the same across many types of ships for the period in question.. If you plan on doing any future modeling, a couple of good books will help with either kits or scratch building. Historic Ship Models – by Wolfram zu Mondfeld has all the basic rigging. Rigging Period Ship Models by Lennarth Petersson is also very good, with every rope and line found on a 3 masted ship. Note that Petersson documented the rigging of a contemporary model, and sometimes models had errors, but the general arrangement would be pretty consistent. The Masting and Rigging of English Ships of War by James Lees is also very good, but not as user friendly as the other two books. Also it can be a bit pricey, but gooddeals can be found. You can rest assured, AL does not have a unique rigging plan for Bounty or any other ship. They have drawn upon standard references, as have all kit manufacturers, and sometimes ( often? )with over-simplification and outright errors. On the other hand, someone who has built the AL Bounty, might be able to share how they handled this particular problem.
-
The lines are of Cormorant .. Linked to above. It was Rattlesnake, renamed Cormorant after capture, then later renamed Rattlesnake. https://commons.wikimedia.org/w/index.php?title=Category:Ship_plans_of_the_Royal_Museums_Greenwich&fileuntil=Cullloden+(1776)+3.jpg#/media/File:Cormorant_(captured_1781)_RMG_J5106.png It is the basis for the MS and Mamoli kits. I
-
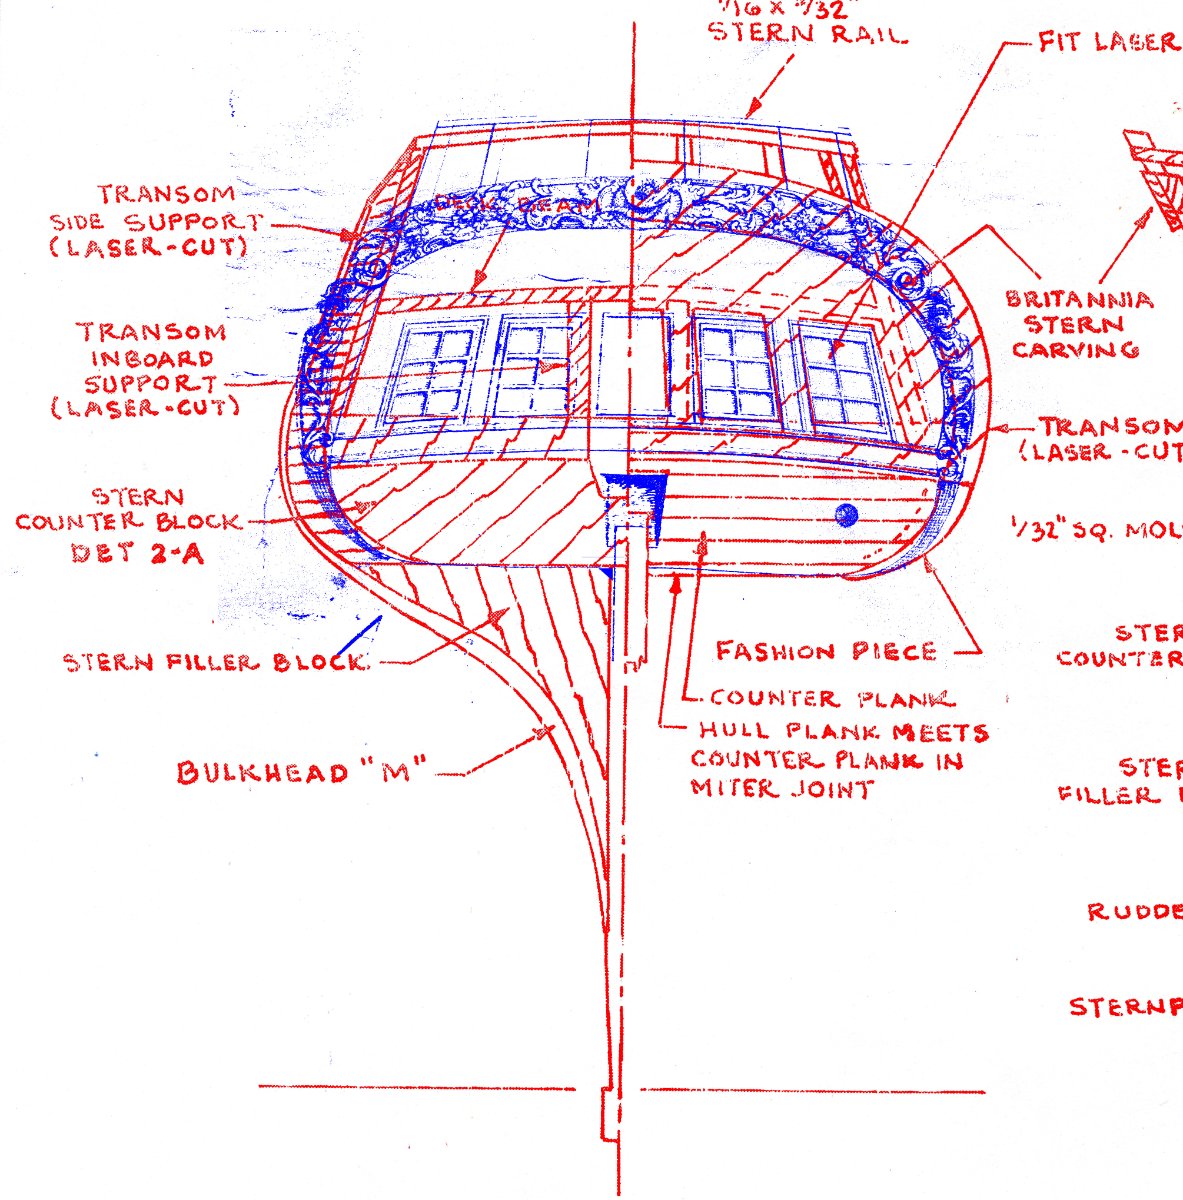
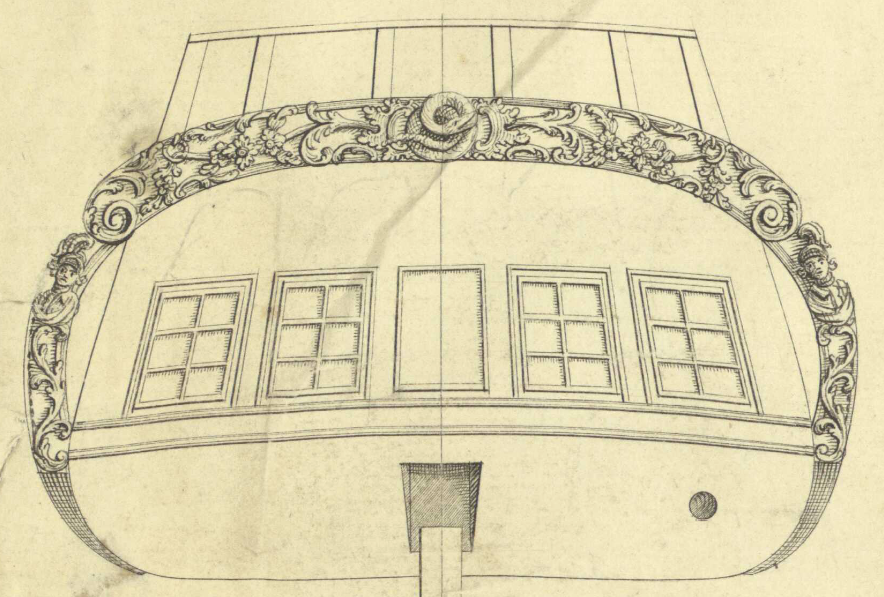
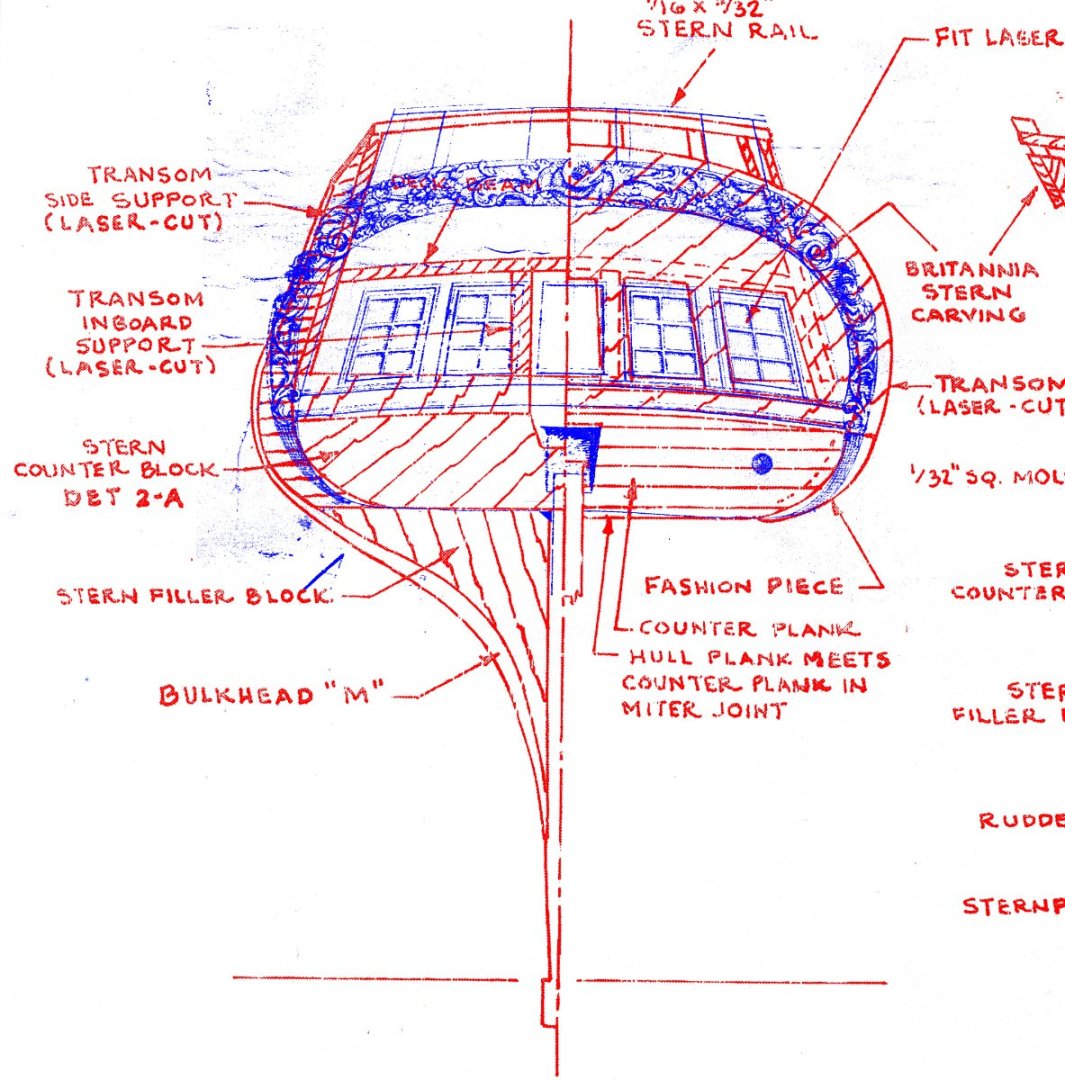
Hello Dave and everyone following this. I'm really glad the inconsistencies of the MS plans regarding the transom, and what is being done to overcome them, have come to light. At some point, I hope to get a good rendition of the transom as it appears on the NMM drawings. That would not happen if I had charged ahead with the MS plans as drawn. Clearly MS has produced the carvings as a piece to provide kit builders with something in keeping with the spirit of the ship as documented, rather than an accurate replica. This was done at a time when the technology we have today wasn't available. I have overlayed an image of the NMM drawing over the MS plans, and scaled it as accurately As I can. These are my upscaled plans of the MS Plans. The NMM overlay is from a copy of the plans I acquired from the NMM. However, the drawings available at WIKI Commons are better than my copy from the NMM. Note how the alignment is pretty good from the top of the stern rail to the bottom of the counter, but everything in between is problematic. It appears the MS transom is slightly bigger than the NMM drawings to accommodate their casting, rather than having created a carving to match the NMM drawings. I'm glad I discovered this before reached the point where I will attempt to duplicate the carvings, which will probably be a while from now. I hope the kit builders will not see this as a shortcoming beyond the technology that was available when this kit was designed. If you are going to use the MS casting; make it work for you. It is such a great subject and the MS kit is a great foundation for a finished model that anyone can be proud of. I think it is great how we can get together to decide how to get the best result we can. P.S. While I said ' everything ' between the rail and counter was problematic, I should say the problem lies mainly with the width. It looks like the layout and position of the windows is very good.
-
What type of model are you contemplating? Those blocks with the bolt through them appear to be part of some 20th or late 19th century sailing craft. I doubt they would have appeared on any 18th century or earlier ship. They haven't shown up in any of my research.
-
Several Rattle builders have discussed this. Dave talked about it here: In the following posts, other builders talked about how they dealt with it.
-
Order Question about Byrnes Model Machines
Gregory replied to NDK1963's topic in Modeling tools and Workshop Equipment
..Pun intended? 😁 -
The rudder post runs in front of it. I don't think a dummy window would look bad.. It's one of those things I think the builder should use their judgment.. I'm leaning toward a dummy window . I think it looks more balanced that way..
-
If I may.. That's the way it's shown on the NMM drawings..
-
Longridge says he based his blocks on 9" full size. That would scale to 2.28 mm.
-
Have you ever tried to secure scale polyester rope knots with white PVA ? The fibers in polyester thread are fine enough to produce fuzz, so the spun up threads result in a very porous material that the thinned white glue penetrates and bonds very well. I have had no issues using white glue to secure polyester rope knots.
-
I can't think of a good reason to use glue on ratline knots. Maybe on the outside shrouds to smooth up the cut ends. Is the Revell glue shiny when dry? If not, it could be a good choice. Otherwise shellac or white glue is a good choice. Hats off to the guy in the video tying off those ratlines with gloves on..
-
While we are at it, did Darcy Lever's book say anything about the use of studding sails in general. I have read they were only set in relatively light winds, and that the paintings of clippers, ( or any other sailing ship ) all heeled over, with all sails a' flying in a big blow, was an unlikely scenario.
-
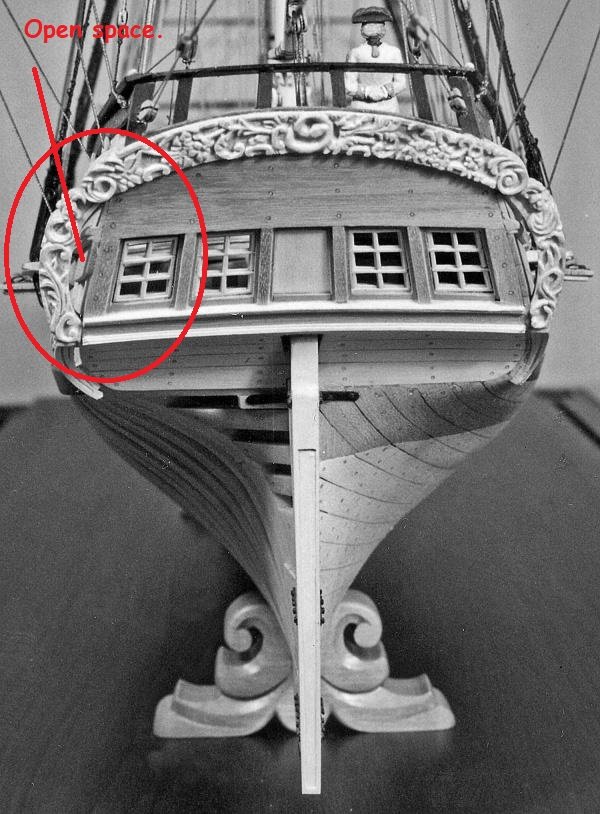
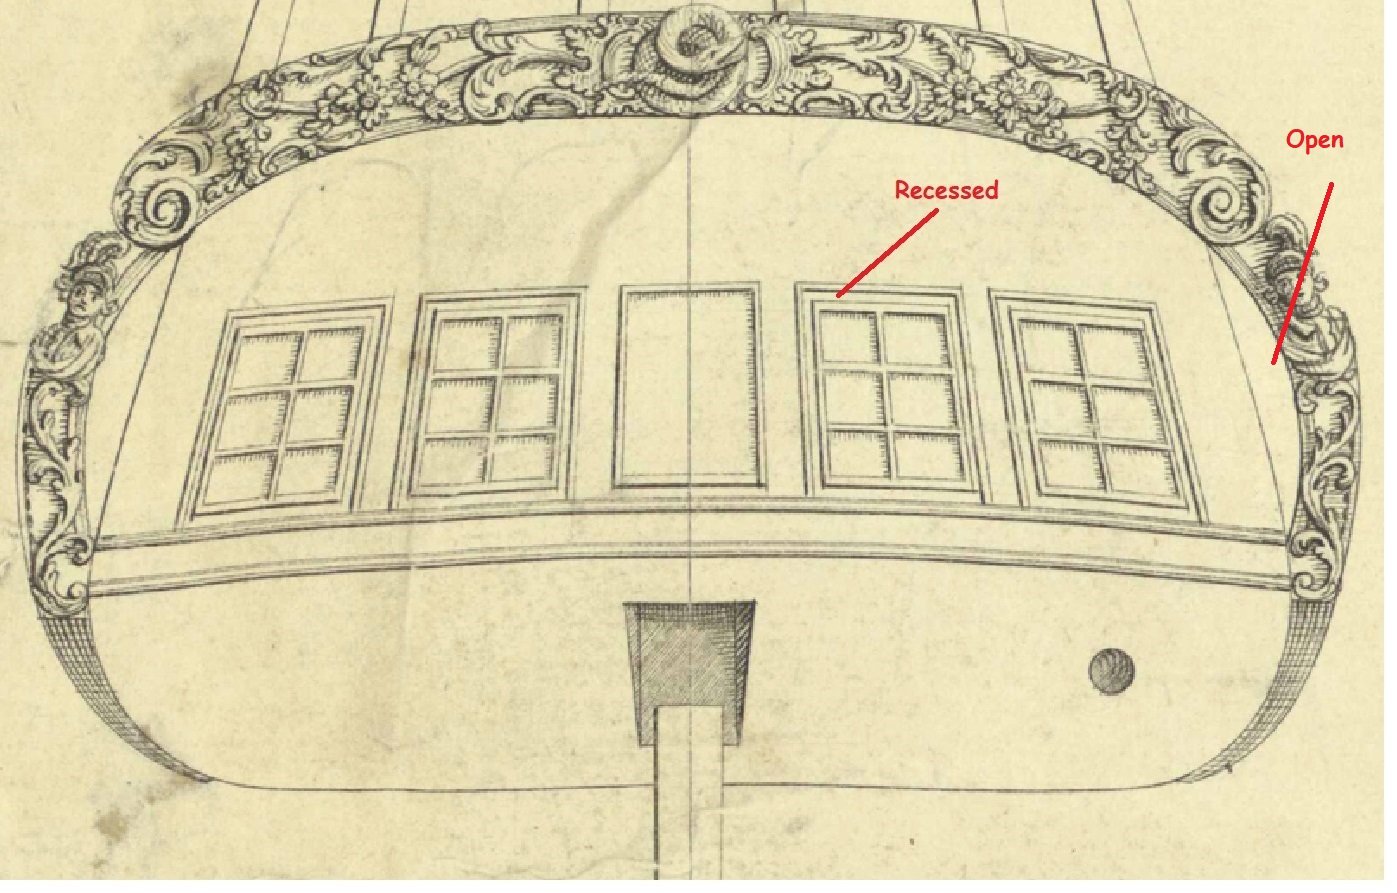
I'm sure you all have looked at the NMM drawings, but for what it's worth, here's a little review. I've indicated the area that appears to be recessed, but we can't know for sure.. Where I noted " open', Hahn believed this space was open and built his model that way. I don't recall seeing it open on any other models. I haven't decided how I will go on my model. I'm leaning toward closed, with the idea that the draftsman was just showing the lines of the stern framing behind the transom.
-
Gold/yellow details with a blue background seems pretty common... I'm not sure we have any reference for what the actual color scheme might have been.. From an artistic standpoint, some sort of consistency across the model would seem to be in order.. I'm going with wood myself..😁