

Gregory
-
Posts
3,168 -
Joined
-
Last visited
Content Type
Profiles
Forums
Gallery
Events
Everything posted by Gregory
-
 202mm x 64mm = 12,928 = 508.97638 inches = 42.4 feet, which sounds realistic for a beam of 30 feet..
- 341 replies
-
- 2
-

-
- Sophie
- Vanguard Models
- (and 1 more)
-
What was the reason given for his dissatisfaction?
- 341 replies
-
- 2
-
-
- Sophie
- Vanguard Models
- (and 1 more)
-
1:98 HMS Victory plans
Gregory replied to Rgpracer's topic in Building, Framing, Planking and plating a ships hull and deck
For future reference, if you know the measurements for the full size ship, you can divide that by the same dimension of the model and get an approximation.. Or Divide the full size dimension by the scale and see what you get. A length I see for Victory is 186 feet on the gun deck.. Divide by 98 and you get 1.897 feet or about 22.7 inches. So if your victory model is close to 23 inches on the gun deck, I would consider it close to 1:98.. Close enough that it is unlikely to be another common scale, such as 1:72 or -
The idea is to apply a heat source to the wet plank. Water is a better transferrer of heat than air. Not knowing how your steamer works, a small iron is probably better.. I believe a couple of our members use this or something similar .Steamfast SF-717 Mini Steam Iron
-
Take a look here:
-
Are you referring to: https://modelshipworld.com/forum/77-medway-long-boat-1742-public-group-project/ Your question appears to refer to more than one model..
-
2mm Sounds a bit thick for the amount of bend in that area. You might try thinning it down to at most 1.5 mm. Try soaking the strip before bending it in place, then let it dry before gluing.. Also note that it may tend to split more depending on the direction of the bend. Start your bend, and if it looks like it wants to split, try bending in the other direction.
-
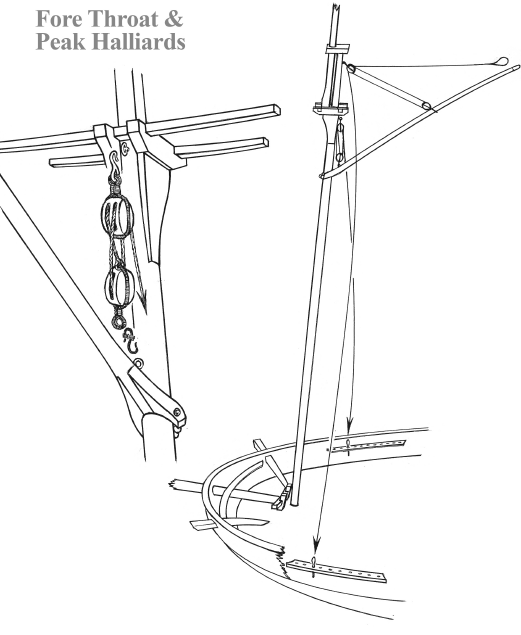
Has anyone referred you to Petersson's Rigging Period Fore and Aft Craft? One has to keep in mind that the author simply documented what he observed on a contemporary model. While the information appears to be accurate in many respects, some problems have been pointed out, here and there. Here are his diagrams of the the throat and peak halyard rigging for " .. a typical American schooner." Along with all the other information you have been provided, this should be of some help..

- 164 replies
-
- 3
-
-

-
- Model Shipways
- Finished
- (and 1 more)
-
Yes, they are Bob Smith..
-
FWIW, whenever I get an upload error, I change the format of the picture, say from .JPG to .PNG and it usually works..
-
I don't think the quoin would have been used to raise and lower the gun, rather it was moved into position after the fact.. I would go with what looks good..
- 642 replies
-
- 3
-
-

-
- winchelsea
- Syren Ship Model Company
- (and 1 more)
-
Accurate copper plating
Gregory replied to allanyed's topic in Building, Framing, Planking and plating a ships hull and deck
You did a great job with what the kit provided.. What is the actual size of those plates? -
Accurate copper plating
Gregory replied to allanyed's topic in Building, Framing, Planking and plating a ships hull and deck
I see coppering as a personal preference as to how you want the model to appear.. How many people outside of our community are going to look at a coppered model and say " Oh, those copper plates are too thick and out of scale.. " ? -
Accurate copper plating
Gregory replied to allanyed's topic in Building, Framing, Planking and plating a ships hull and deck
I wasn't suggesting the overlap was not used, in fact, it would seem to be essential, similar to the principals in laying shingles.. I was just questioning the usefulness/ appearance or lack thereof, when modeling.. -
Accurate copper plating
Gregory replied to allanyed's topic in Building, Framing, Planking and plating a ships hull and deck
How relevant is the thickness if you don't overlap? The overlap is not apparent in the images of the Cutty Sark and Constitution presented earlier.. Plus, there are various thicknesses available. I saw one that was .025mm. It doesn't appear to be listed in the specs, but if you ask, you will get a good answer from the seller/manufacturer.. -
Accurate copper plating
Gregory replied to allanyed's topic in Building, Framing, Planking and plating a ships hull and deck
Copper foil tape is available in 1/4 - 1.5 inch diameters. Those who are so inclined, can adjust the size.. -
Topmasts and Topgallant masts vs Lower Mast
Gregory replied to Tommy Vercetti's topic in Masting, rigging and sails
Historic Ship Model by Mondfeld has a lot of general information .. Can be a good place to start. Here is an example .. Topmasts and topgallants were for the most part made from single timbers and not built up like lower masts..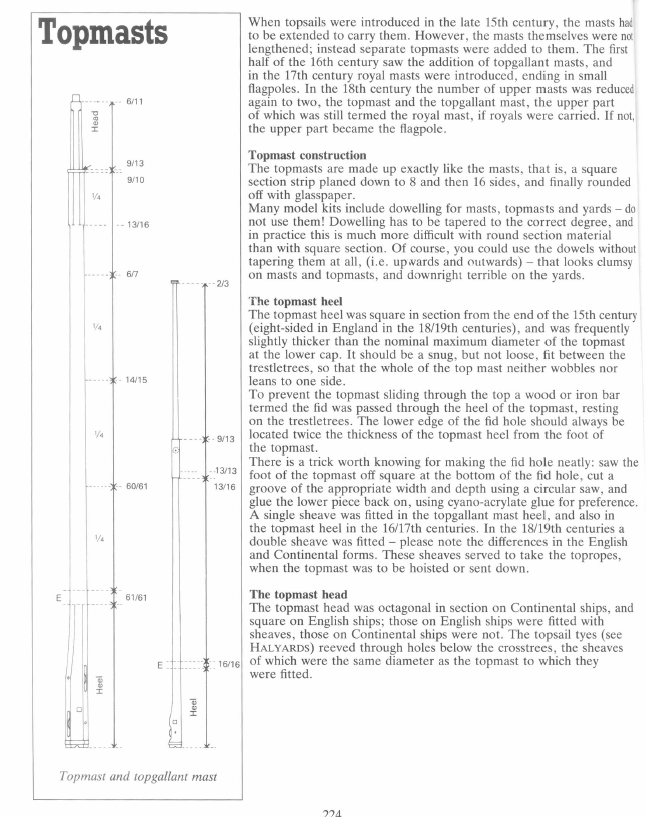
-
You might find this to be of some help:
-
A critique of the works of Nicolaes Witsen
Gregory replied to Philemon1948's topic in Nautical/Naval History
No money in it.. -
What about this.. A variation of your original idea.. Just a wood template that fits snugly in the port with a pointed awl that rests in a groove to mark your strip.. Of course you will be fine tuning the template to position the barrels where you want them..
-
Constitution?

-
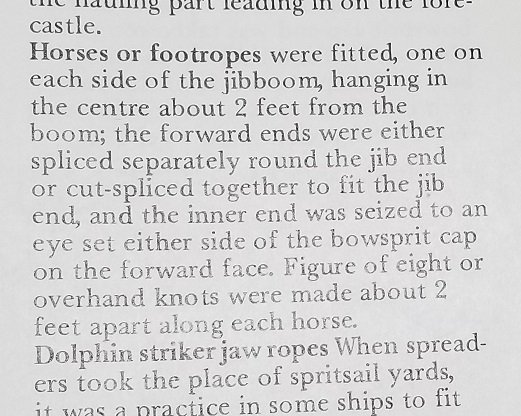
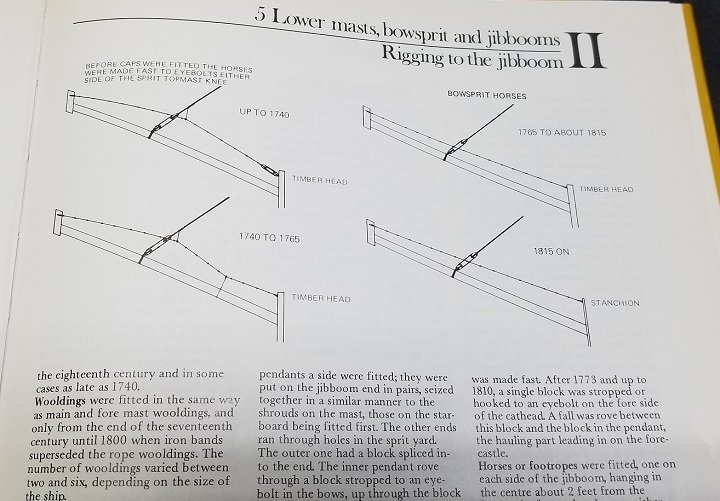
Here is what Lees says about jib boom horses: Sounds like what I had come to understand.. Note that there is no mention of stirrups for these foot ropes. Now, what about this.. Here are the illustrations for the bowsprit foot ropes. I'm having trouble understanding these.. Did they not stand on them, but just hold them while standing on the bowsprit. How did they do any work while holding on?
-
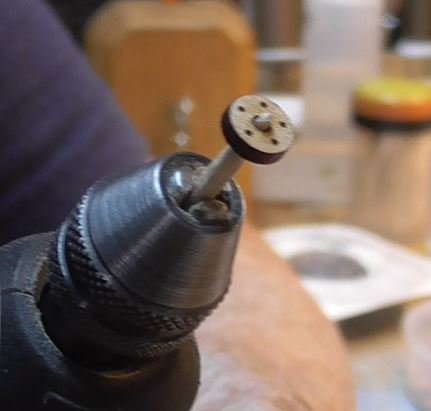
P.S. I had a few of these fly across the room before i refined the process. My spindle is a toothpick that I forced the truck onto until it was tight, but not so tight that it could not turn if the torque got too high. With hindsight, a little nut on the end of the toothpick would have kept the truck from going frisbee on me..
- 642 replies
-
- 2
-
-
- winchelsea
- Syren Ship Model Company
- (and 1 more)
-
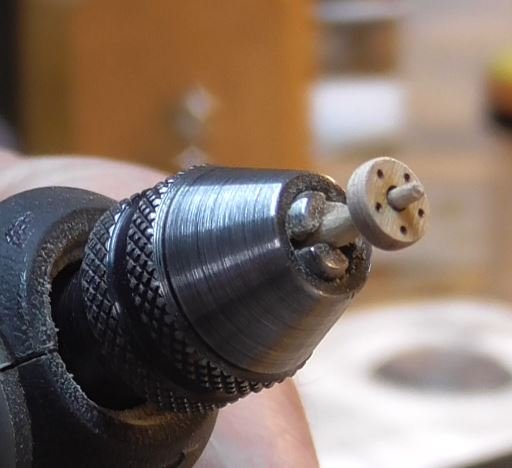
Rusty, I know you are a skilled craftsman, and possibly considered this, but I had great results cleaning my trucks on a low speed rotary tool.. Too late for you, but might help someone else..
- 642 replies
-
- 5
-
-
- winchelsea
- Syren Ship Model Company
- (and 1 more)
-
Looks like I stand to be corrected..