

Gregory
-
Posts
2,696 -
Joined
-
Last visited
Content Type
Profiles
Forums
Gallery
Events
Everything posted by Gregory
-
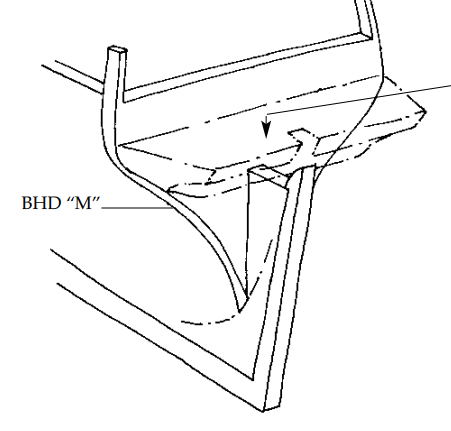
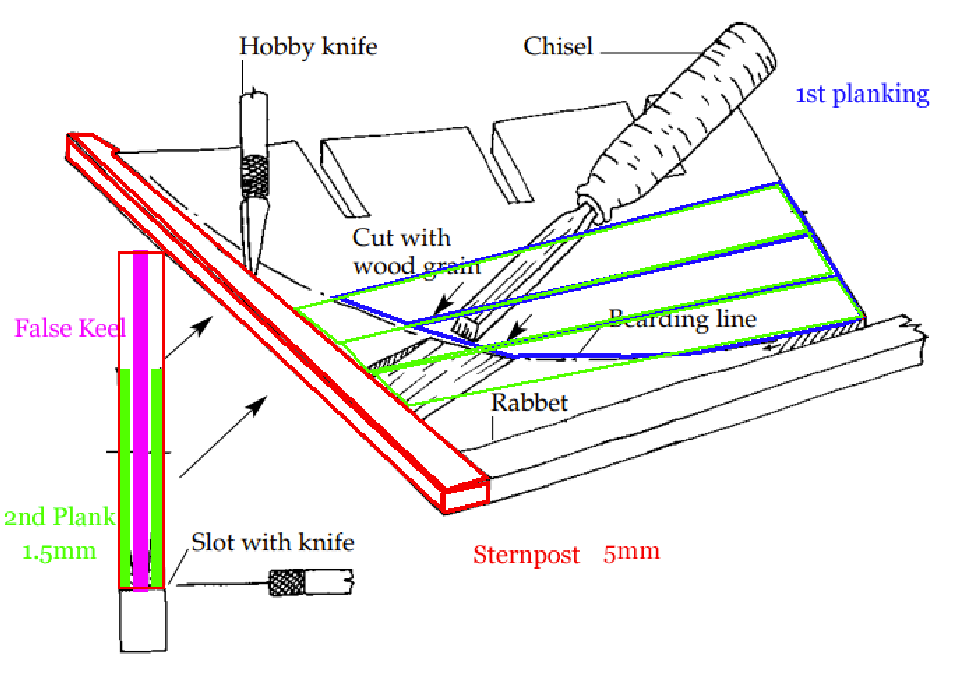
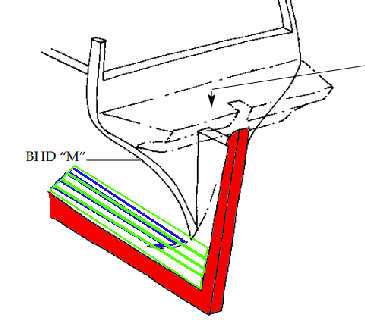
 Here are a couple of images from the ModelShipways Rattlesnake that I will proceed to mark-up and hopefully explain things. They show the keel and sternpost in place, but I prefer to do the bearding area on the backbone piece ( some call it the false keel ) before the keel and sternpost have been added. It's easier for me to do with sanding tools than a chisel. Here is my attempt at illustrating planking to the bearding line for a double plank POB kit. Your numbers may be different. If the sternpost is 5mm thick, and the 2nd planks are 1.5mm, taper from the bearding line to make the false keel 2mm at the stern post. This will make the 2nd planking flush with the sternpost. I also end the 1st planking at the bearding line and sand the ends so they blend into the false keel at the bearding line. The 1st planking does not show in the end-on view. Of course this is simplified and the finer details of how everything blends together have to be worked out by the builder. But hopefully this will answer the basic question of: Let me know if I made it worse or if I can try to clarify something. Here is a build log where Jobbie does his bearding line. It may help to better visualize things. Note, he accounted for the thickness of the first planking all the way to the stern post resulting in a very thin false keel. If you just run the 1st planking to the bearding line, this won't be an issue. P.S. I noted by reading further into jobbie's log that he got a tip about taking the first planking to the bearding line, and followed through with that..
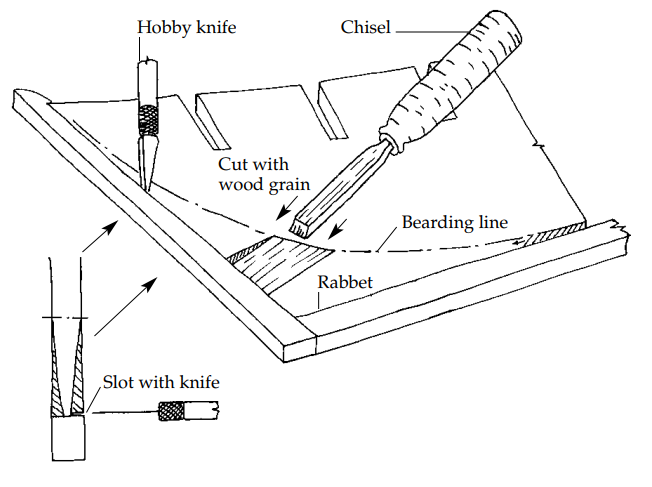
-
Give me a little time to put something together..
-
I don't know if this will work without pictures, but what you want is for the ends of the planking, both layers, to fit flush with the stern post; with that in mind you want to shave the bearding area to account for that. To some extent you can blend the 1st planking into the bearding area short of the stern post, so it won't necessarily be necessary to shave the bearding area to the total depth of both layers of planking. If you need more info just say so and i will try to round up some illustration.
-
There is always Chuck's method. Many have had success with this.
-
Nice touch.. People rarely add those reliefs to deadeyes, which can be a nice detail. I couldn't see if you have Chuck's Syren deadeyes, which do include the relief..
-
HMS Bounty - Artesania Latina model
Gregory replied to Drew Mackay's topic in Masting, rigging and sails
While not the AL kit, Dave Baxter's log of the Amati Bounty is very informative. He has asked lot of questions in other topics and his build reflects a lot of research. If you also look through his forum activity, you will see where he asked questions and got a lot of good answers. Dave Baxter's Activity -
Chris, your kits present a challenge to get more detail than already provided .. You have set a very high standard..
- 355 replies
-
- 4
-

-
- vanguard models
- Sphinx
- (and 1 more)
-
For black, monofilament is good also..
-
Home, bench top laser cutters.
Gregory replied to Bill Hudson's topic in Modeling tools and Workshop Equipment
Another table top laser with 'CNC' incorrectly part of the description.. There is no CNC function for this machine. No power rating in the Amazon info, but searching the questions indicates it is a 4w laser. No useful cutting power except for paper and card and the thinnest of veneers. Possibly a good starter for getting familiar with using a laser. -
Sorry Chris, I didn't mean to get personal.. I was sort of joking about her job as " the kit packer "..
-
Does she get time off with pay?
-
Ships boats
Gregory replied to Don Case's topic in Discussion for a Ship's Deck Furniture, Guns, boats and other Fittings
Try " longboat " You get a lot of Medway's Longboat but others also.. The Medway longboat should be a good example of framing for the next 100 years.. Also the Model Shipways 18th CenturyLongboat is a good example. P.S. " Pinnace " is a good search also.. -
Ships boats
Gregory replied to Don Case's topic in Discussion for a Ship's Deck Furniture, Guns, boats and other Fittings
The drawing that Allan referenced above should help.. https://collections.rmg.co.uk/collections/objects/86917.html There are many " longboat " logs and topics here, any number of which should help. Many of the basics probably didn't change very much for a period of over 100 years.. -
Ships boats
Gregory replied to Don Case's topic in Discussion for a Ship's Deck Furniture, Guns, boats and other Fittings
Abe Books has copies for even less.. -
Great to see another Cheerful on the blocks.. If you haven't seen it, there are a lot of good tips in the prototype build log.
-
Recommended Windjammer or Clipper ships kits?
Gregory replied to Robby The Brobot's topic in Wood ship model kits
There is a revue of the endurance kit. I don't see any build logs. -
Recommended Windjammer or Clipper ships kits?
Gregory replied to Robby The Brobot's topic in Wood ship model kits
The Mamoli/Dusek Flying Cloud might be another option. -
Recommended Windjammer or Clipper ships kits?
Gregory replied to Robby The Brobot's topic in Wood ship model kits
There is BlueJacket Redjacket.. -
I just noticed that ModelSpace payment plan is 30% more than one time payment.. That is really some ugly interest..
-
Unfortunately, that is a niche that is not being filled by kit makers.
-
The Vanguard kits are fairly new and fairly high-end as well..
-
Home, bench top laser cutters.
Gregory replied to Bill Hudson's topic in Modeling tools and Workshop Equipment
I was looking at your anchors for the WESPE, and that is an excellent example of using laser cut layers to make a 3D part.. Very nice work and a very good argument for using a small laser to make small parts.. -
Home, bench top laser cutters.
Gregory replied to Bill Hudson's topic in Modeling tools and Workshop Equipment
I would say 'yes' to both of those. Most, if not all, tabletop lasers use a USB interface. My experience on laser user forums tells me MAC users tend to have more interface problems due to driver issues. The software that usually comes with DIY lower cost lasers is notoriously not very useful. A sight I visit a lot Is the Support Forum for LightBurn software.. More info about the software here: LightBurn Visiting that forum will tell you a lot about what kind of issues people have. Using it for model ship building can be as useful as any number of other tools. Whether or not you can use LightBurn depends on the controller board of the laser. It is a very robust cutting/engraving program, that has limited creation tools. It works best with images that you have already prepared with other editing programs like Adobe or Corel. The usefulness of the laser itself depends on your goals and building technique. You can create virtually any part that you see in todays kits that include laser cut parts. You are essentially limited to 2D, but depending on your own creativity, you can create 3D parts by building it up in layers. You can even explore carving by using the laser to create rough templates, then finishing them by had. The table-top lasers tend to be relatively low power, and not able to cut through very thick material. They would be most useful for engraving. I used a low power one for a while, and found it useful for essentially 'etching' a pattern on plywood or whatever, then using a scroll saw to cut it out. The scroll saw would tend to follow the laser burn more so than a drawn patter. If you decide to get a laser, be prepared for a steep learning curve in order to use it effectively. Another thing to consider, is that the lower priced, put it together yourself, lasers are even more of a challenge before you even begin to burn anything.. P.S. As Jaager mentions above, you do not want to operate a laser inside a house/workspace without some kind of forced ventilation system to the outside world. -
Did you look in on AdamA's log? He shows a lot of stern detail starting here: P.S. Posting your email in public areas of the forum is not a good idea. Best to use private messages.

