HOLIDAY DONATION DRIVE - SUPPORT MSW - DO YOUR PART TO KEEP THIS GREAT FORUM GOING! (Only 13 donations so far - C'mon guys!)
×


Oldsalt1950
-
Posts
496 -
Joined
-
Last visited
Content Type
Profiles
Forums
Gallery
Events
Everything posted by Oldsalt1950
-
 Looking good B.E., those lanterns look right at home. I'd put on the additional brackets myself.
- 857 replies
-
- 3
-

-
- Sphinx
- Vanguard Models
- (and 1 more)
-
Dave, Have you seen all the Hornblower movies put out by A&E on the Ruku channel?
-
How was a ship's launch boat prepped to sail?
Oldsalt1950 replied to Peanut6's topic in Masting, rigging and sails
Kev, for the most part you have it correct. The mast and sails would have been lowered with the boat. Sailors are not fond of doing extra work, so once the boat with mast and sails is lowered, rather then haul the lines back in to lower the masts and sails, they would be used to help raise them and the associated tackle. Once stays and tackle were connected via the hooks to eyebolts and cleats they were ready to go. Most of these boats were used for ferrying supplies and shore parties to various functions , so the crew of the boat was usually a midshipman and deck hands. Marines would be ferried ashore as raiding parties in longboats by oar power. The jib boom or bowsprit fit into a coupling and was pinned in place. Nothing fancy there, a lanyard was used as a preventer so the pin wasn't lost or worked lose. -
Hope you are back to normal soon, Bob. I know the feeling having been there myself about a year and a half ago.
-
There is a bit of cordage up there but looks fixable. One loop at a time.
-
How was a ship's launch boat prepped to sail?
Oldsalt1950 replied to Peanut6's topic in Masting, rigging and sails
A boat with sails would have some of the rigging attached to the mast, and hooks on the other end to set the mast and trim properly. The jib boom or bowsprit would be fastened likewise. Take a look at the rigging on the 26' longboat for an example. Noone had to leave the confines of the boat to rig for sail. -
Very effective work around, and one would have to really look and know what the rigging is supposed to look like.
- 476 replies
-
- 3
-
-
- sphinx
- vanguard models
- (and 1 more)
-
What's a good kit for learning rigging?
Oldsalt1950 replied to Mark m's topic in Masting, rigging and sails
The MS Armed Virginia Sloop. It has it all, ratlines, cannon, mast, bowsprit. The scale is large enough that you have some room to maneuver and plenty of detail if you wish to add it. It isn't over complicated so you can increase your skills without getting too frustrated. -
I was hoping to have some pictures of the progress I made on the build, but after looking at the few gunports I assembled I decided to regroup and figure out a better way of doing things. I took some measurements and installed the upper Wale and the garboard strake. It was then that the light came on. There is no need to cut measure and fit so many pieces for the gunports and oar ports and try to get them to line up, which usually leads to one port in the line being a bit off. The lower sill or stile for the gunport is two strakes above the wale. The gunport opening is 3 strakes high the opening for the oar port is square and the size of a strake. Now i can just plank the area above the wale by indicating where the ports go and plank around the openings and add what timber is needed to frame the opening. Everything will be in line with the wale line easy as pie. Then I do the same thing with the interior planks when done. No more playing around trying to align everything.
-
How was a ship's launch boat prepped to sail?
Oldsalt1950 replied to Peanut6's topic in Masting, rigging and sails
Like anything nautical, it depends. Oars, boathook, anchor were always stowed on the boat. Other items were added dependent on what the mission was, how many people and how long they were expected to be gone. Any consumable provisions would be loaded once the boat was ready to launch. Two men would ride it down, the coxswain and the boathook. They would release the lines once the boat was in the water and then the rest of the boat crew and any additional gear and provisions would be loaded onboard. -
The plan sheets should show the waterline, take the measurement for its location from there. I'd indicate it in a few different places, say the stem , amid ship and on the rudder. This will make it easier to see if you have the water line level with the marks .
- 73 replies
-
- 2
-
-
- Sphinx
- Vanguard Models
- (and 1 more)
-
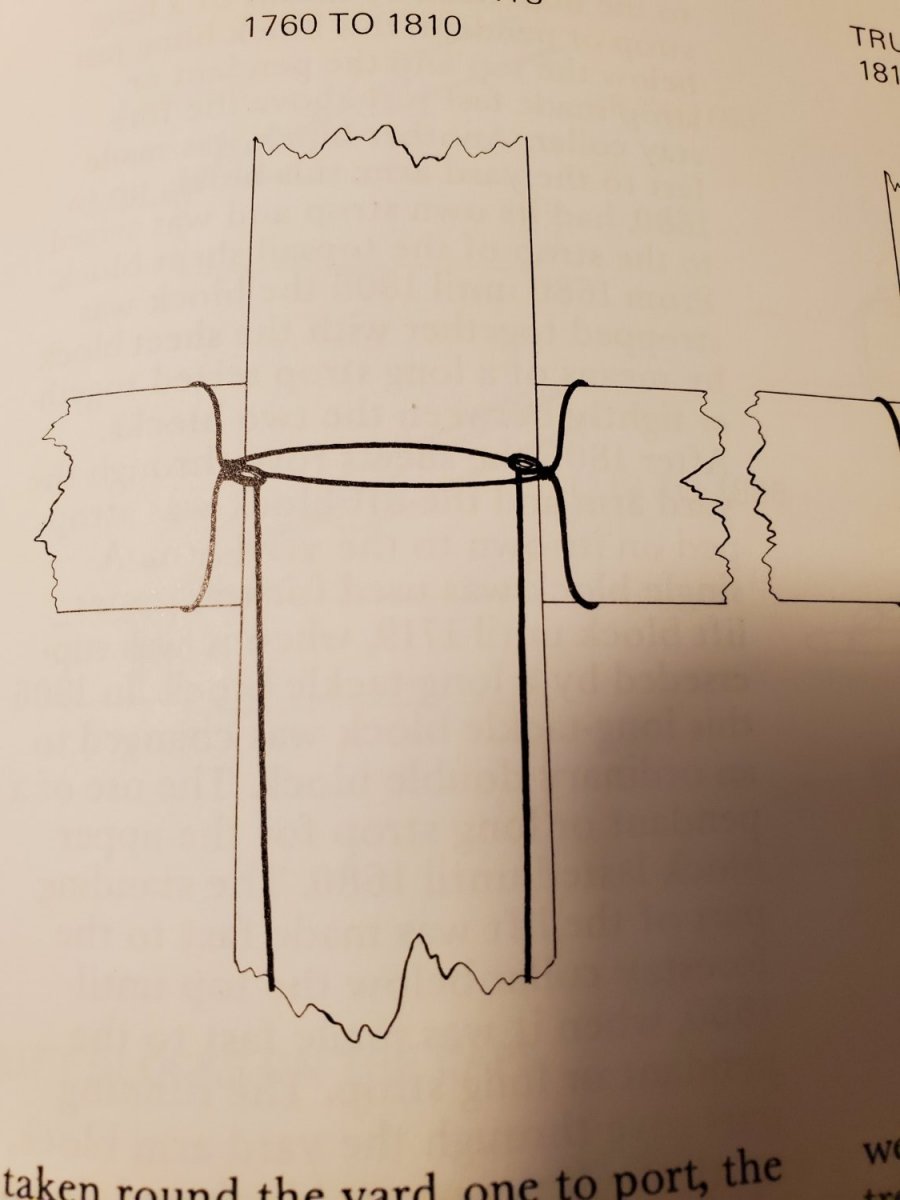
Glenn, was looking at your dilemma. Lee's book on Masting and Rigging page 67 has your answer. You will make two lines with eyelets /thimbles in the end, loop the line around the yard on each side of the mast them take the free end and pass it through the eyelet/thimble on the opposite side. These lines then run down to a block with a hook and attach to an eye fastened to the deck near the base of the mast.
- 476 replies
-
- 3
-

-
-
- sphinx
- vanguard models
- (and 1 more)
-
At the scale you are working in I would say no. It is however a personal preference.
- 63 replies
-
- 1
-
-
- Dapper Tom
- Model Shipways
- (and 1 more)
-
A little clarification. as the terms are not synonymous: The STERN is the aft most part of a ship or boat. The Transom is the aft most bulkhead that makes up the stern of the ship or boat. square tuck The after-part of a ship's bottom, when terminated in the same direction up and down as the wing-transom.
-
Very nicely done. Nice straight lines on the rows.
-
Schooner, you are off to a good albeit rocky start to your build. You had a few problems but worked them out in quick order. We all ran into problems on our first kit build, it is all part of the learning curve. You will find as you progress through the build that some items will need to be worked out of order, so read ahead in the instructions to see what fits your building style. Read through some of the other Baltimore clipper logs here for help and inspiration, there are a number of different names but all are based on the clipper hull design.
- 36 replies
-
- 1
-
-
- Harvey
- Artesania Latina
- (and 1 more)
-
Mark, you are making great progress. just remember to think through any parts that are giving you issues. We all have them. Sometimes it is better to walk away from the build and then come back to it to work out any problems.
- 15 replies
-
- 4
-
-
- Model Shipways
- Shipwright Series
- (and 2 more)
-
I use a tack cloth and the air brush (air only) to get all the sanding dust and accumulated dust and dirt off the ship. a light sanding between every few coats is usually indicated. You will be able to tell rather easily when sanding is needed. Be sure and look at the paint job from every angle to see where there may be too much or too little coverage.
-
Those were the days, Jud. I see you are wearing a working blues uniform, no piping on the cuffs.
-
Glomar, I assume you are going to be using an air brush. Do you have your equipment yet? If so what size needle, and is the air brush dual action? If you are using an air brush start at 30 psi which should give you plenty of control, you can then adjust paint flow for a specific distance from your model. The distance away will determine the amount of area covered. As stated earlier too much paint and to close will produce runs, sags and what is known as curtains. To far away produces orange peel as most of the paint is drying before hitting the surface to be painted. A clean paint gun is a happy paint gun and will give you no problems and last almost forever. Acrylics are easier to work with than solvent based paints, but may require more thinning. A mask like the paper ones worn during the Covid crisis is highly recommended as there will be fine particles in the air. If you need to hasten drying time a hir drier will do the trick. One thing you will also have to remember is to use overlapping spray patterns and very light coats. Better to apply to little paint than too much. You can always add additional layers, but removing excess paint is a real PITA. Don't just practice on flat surfaces find an old jar or tin can so you can practice on curved surfaces too. They are a bit trickier but once mastered you can spray paint anything. Keep the manufacturers literature on your equipment, as they have cleaning directions and usually an exploded view of the equipment if the need for disassembly occurs.
-
Make sure the surfaces are clean and dust free, use a tack cloth to clean. Just press the edge of the tape firmly against the surface of the hull no need to put anything under the tape edge. Use a good quality masking take. and don't leave it on the hull too long. Test your spray pattern and air pressure on a piece of scrap. It will also allow you to determine how far away from the surface you need to be. Start spraying before the area you want to paint, and let up on the paint after you have cleared the end of the area to be painted. Less paint per pass is better than too much. It will take a few tries before you get everything dialed in and can actually start laying paint on the hull. I was an aircraft finishing painter for Fairchild-Republic and that is what I learned .
-
Your build is coming along very nicely. Never worry about the pace of your build, this is not a race but something to enjoy and learn from.
- 84 replies
-
- 2
-
-
- Statenjacht
- Kolderstok
- (and 1 more)
-
Devin, looking good. I was however looking at the part 18a you duplicated. The grain runs across the part from top to bottom and if it were to stand alone on the stem when you went to fair it, it would be very prone to breaking. I see from the plans however that it is supported on both sides by other pieces. The grain is something you will need to take into account for making any future parts to avoid just such a mishap.