allanyed
-
Posts
8,149 -
Joined
-
Last visited
Content Type
Profiles
Forums
Gallery
Events
Everything posted by allanyed
-
Hi Jack, There were a couple recent posts on Model Ship World asking if you have any updates on the Cumberland kit. It looks so good, many are hoping to get an update from you.
Many thanks
Allan
-
-
 Su FWIW, the clamps you are using for the planking are meant to have the screw go into the frame or bulkhead, not into the plank. The tab is rotated to press against the plank itself. The design is so you do not have holes in the planks. Forgive the poor sketch below, but I think you can see what I mean about how these clamps are meant to work. As you add planks these will cover the holes made in the bulkhead previously. I realize with the painted hull it does not make a bit of difference if there are holes or not, but If your next project has a hull an unpainted finish for the planking, it will make a difference. For possible future consideration, if you spile or prebend and taper the planks you really don't need any clamps at all. Finger pressure on a properly formed plank is all you need for whatever glue you prefer. PVA will require just a minute to hold whereas some glues are more instant. Your choice as each has its advantages. Allan
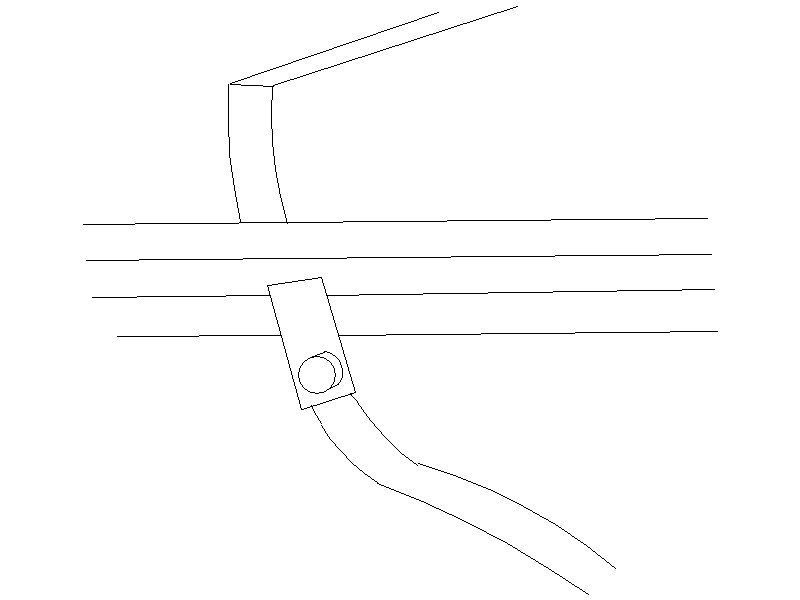
- 111 replies
-
- 3
-

-

-
- Swift
- Artesania Latina
- (and 3 more)
-
I second the request. This looks like it will be a top quality kit. Yours looks to be top quality, but I worry that it will be affordable as the details you are showing are incredible. I hope this works out!! One of the nicest things is that Cumberland had a number of sister ships so the kit builder could make some small changes based on contemporary drawings and have it represent Elizabeth (1769) , Resolution (1770), Powerful (1783) and others in the class. Allan
-
Trond, I cannot find any contemporary plan, model, painting or other that indicates there are tiny windows or ports of any kind in any coaming. Of course port holes are seen in deck houses, but I would be interested to see if anyone here at MSW has seen such an opening in a hatch coaming. It may be too late to fix unless you make new coamings and head ledges, but at least it something to watch out for in the future. It is always good to check out every detail from a kit against contemporary information the same as if it was a scratch build. Ha en flott dag! Allan
-
Well done. You commented in your first post about doing proper research and that is fantastic!!! As with any kit, it is a good idea to spend time looking at contemporary plans, photos of contemporary models and information to compare with what is provided in the kit itself. There may not be much information in some instances, especially if it is not a real ship, but usually there are scantlings, plans, models and sometimes contracts that will help. Takes a little time to do the research but worth it in the end, especially if you enjoy the research like you do. Allan
- 26 replies
-
- 1
-
-
- Constitution
- Model Shipways
- (and 1 more)
-
Glomer Are you talking about fairing frames, bulkheads or the planking after it is glued to the frames or bulkheads? Thanks Allan
-
Welcome Alex, It is so nice to see a new member that has done some homework and chosen the first kits wisely. The skills you have acquired, including doing adequate research, will carry through to the selection of more complex models from the other top kit makers such as Vanguard and Syren. No matter your thoughts for the next project, continue to do a good amount of research as not all kit brands are created equal. Allan
-
Planking glues
allanyed replied to ChiefCarr's topic in Building, Framing, Planking and plating a ships hull and deck
Druxey, Is there a reason you use white rather than yellow (AKA Carpenter's) glue? Obviously both work but I am curious as to how you made your choice. Thanks Allan -
Henry, you bring up a great point, LV had a variety of uses. The bearings for the propellor shaft where it went through the hull on all the ships I sailed in the 60's had LV sleave bearings. I am sure that has changed, but it served us well for many decades well into the 20th century, perhaps longer. Allan
-
Planking glues
allanyed replied to ChiefCarr's topic in Building, Framing, Planking and plating a ships hull and deck
Hi Carr, WELCOME to MSW!!!! For a first-time planking job, yours looks very nice. I am curious as to why you used rubber cement instead of a glue that is meant for wood to wood. Cheers Allan -
Kevin, The problem is not always how others that see our work, for many of us, we are our own harshest critics. When I say to myself something is good enough, I know it is time to walk away for a minute, hour, day, or week, then come back and rip it out and do it better. Does this cause a loss of motivation? For me, absolutely yes it can, and it has happened five or six times for periods of weeks or even months over the past 45 years. At those points in time I just forget the wood and go to working on research or drawing plans for a future project or go fishing. Constructive criticism from a master model builder is more welcome for me than tons of praise from those that don't know the rudder from an udder. (Great saying 😁) By constructive criticism, I mean don't just point out what I did wrong, give me the solution or better yet, show me where to find the solution on my own. Allan
- 129 replies
-
- 3
-
-
- Bounty Jolly Boat
- Artesania Latina
- (and 1 more)
-
A super warm welcome to MSW Nate. Maybe also post a little intro on the new member forum here at MSW. Are you saying you want to build a model similar to one of those in the photos or of a higher quality? The ones in the photos look to be mass produced very low quality decorator models out of China. It sounds like this is a new endeavor for you. If it is, go slow and easy. You have 42,000 helpers here at MSW! Fortunately there are a couple high quality kits makers to choose from. IF you are indeed a beginner, look at the David Antscherl series at Model Shipways as they will take you from beginner to experienced in a reasonable amount of time. There are also excellent kits from two other kit makers, Syren and Vanguard, that will suit your needs as you progress and gain experience. Allan
-
Hi Trond, I second Lyle's comment on the gratings. If you cannot make your own, Syren is the best choice for accurate high quality gratings. He offers 1:64 and 1:48 so the latter should be great for your scale of 1:50. He has them with camber and the battens run fore and aft and the ledges athwartships as would be on the actual ship. In your photo above, what are the brass rings on the coamings and head ledges? The coamings are no more than 6 inches high, maybe less depending on which deck, so I can't figure out what these would be. Thanks Allan
-
The mold cutters look really good for the shapes and sizes they cover. Are these carbon steel? How do you sharpen them when they start to dull? A lot of builders make their own using pieces of old hacksaw blades or stiff backed razors so there is unlimited range of shapes and sizes, but having the plates you show would save a lot of folks a lot of headaches that come from making their own. Allan
-
Peanut, For future reference, the following may be of interest to you and others. I have no doubt there were differences from boat yard to boat yard, and era to era, but a sample of the information at The Art of Making Masts, Yards, Gaffs, Booms, Blocks and Oars as Practised in the Royal Navy and According to the Most Approved Methods in the Merchant Service, 2nd edition, printed for Steel and Goddard, London, in 1816 follows: Ships' sweeps and oars are made of hand-masts, or rafters, as per table. They should be chosen straight-grained, free from large knots, shakes, or rind-galls. They are first sawed, or jammed in a snatch-block, and hewed nearly to their size; then raised on horses, and completed by the drawing-knife, spoke-shave, or plane. Open handles are nailed to the sides of the loom in the direction of the flat of the blade, made of oak, about one inch and three-quarters deep, and two inches and one-quarter thick, hollowed to admit the hand easy between that and the loom: the length of the handle is one-third the length of the loom. DIMENSIONS OF SHIPS' SWEEPS & OARS For a 36 Gun Frigate Lengths Loom Blade Handle Sweep Handle Loom Body Blade Square Broad Thick Diameter Inner Outer Inner Outer 44′ 1′10″ 16′ 8″ 11′ 0″ 14′6″ 5 ¾″ 5" 11″ 4 ¾″ 1 ½″ 1 ¾″ Barges and lighters', and ships' boats', oars are made of fir-rafters, similar to ships', without handles to the sides of the loom. DIMENSIONS OF SHIPS' BOATS’ OARS Lengths Loom Blade Handle Sweep Handle Loom Body Blade Square[1] Broad Thick Diameter Inner Outer Inner Outer 16 Foot Cutter (6 foot beam) 19′ 0′ 10″ 5′ 0" 7′2″ 6’ 0″ 3 7/8″ 3″ 6″ 2 ¾″ 7/8″ 1 ¾″ 25’ Cutter and 28’ Pinnace (7 foot beam) 20′ 0′ 10″ 6′ 0″ 6′ 10″ 6′ 4″ 4″ 3 1/8″ 6 1/8″ 2 7/8″ 7/8″ 1 ¾″ 30’ Barge (9 foot beam) 21′ 1′0″ 8′6″ 4′6″ 7′0″ 4″ 3 1/8″ 6 1/4″ 2 7/8″ 7/8″ 1 ¾″ [1] The looms of boats' oars were often made round.

- 129 replies
-
- 2
-
-

-
- Bounty Jolly Boat
- Artesania Latina
- (and 1 more)
-
Kevin, Your method is basically what I have done and it works well. The only difference is I glue a few temporary strakes on the outside and fair the inside first. Then when it is done I glue the clamps and a few strakes near the keel. Once these are set I remove the temporary strakes on the outside of the hull and fair the frames outboard. I wonder if it really matters which is done first, inboard or outboard. Allan
-
Suggested sites for purchasing wood model ship kits
allanyed replied to Capella's topic in Wood ship model kits
Some many choices, so little time😁 Many, if not most of us seem to have our favorite type/era for a ship model, but it is still a pleasure to go off our own beaten path at times. I enjoy building a Gloucester schooner as much as a 50 gun ship from the 17th century. You have a lot of choices of high quality kits/projects from which to choose with Vanguard and Syren. Allan -
Suggested sites for purchasing wood model ship kits
allanyed replied to Capella's topic in Wood ship model kits
Hi Alleycat Thanks for posting the website. I checked out a lot of the photos on the Model Shipyard. As you say, they CLAIM to be historically accurate, but 5 minutes study of the photos will show their work to be miles short of being accurate on both the Agamemnon and Admiralty style models that they show. Glenn gives very good advice regarding taking a hard look at Vanguard and Syren. I would add the Antscherl series of models at Model Shipways for beginner through intermediate. Allan -
Anthony Do you have a specific vessel in mind? Maybe tackle the Echo as Greg suggests to get a bit more experience, as they offer excellent information, then go for one that has not been done before. If you want plans to go completely on your own, there are hundreds of plans from which to choose on the RMG site, and a great selection of over 800 high resolution plans on the Wiki Commons site and at other archives. I am not sure this is what you are looking for, but one example is below. Others can be found at https://www.rmg.co.uk/collections/objects/search/Cross section plan. One example that has all the drawings you would need is for the Black Prince 1816 https://www.rmg.co.uk/collections/objects/search/Black Prince 1816. Cross section drawings like the one below are not common, but you can do just as well with a body plan, inboard profile, deck plans and appropriate scantlings if the cross section plans do not exist. These open you to hundreds of choices. Allan
-
If you want to go with brass, Greg's tutorial is excellent! In the past few years there have been great strides in at least one alternative. If you prepare or otherwise acquire STL format drawings of cannon barrels, they can be made in black resin in perfect replications to the drawings with trunnions and monogram included. I sent the drawings to one printer and received excellent quality barrels for about $0.6 each, including postage. If your model is older, (17th century) the trunnions are tapered so 3D printing takes care of this as part of the printing process the same as if they were cylindrical. Assuming these are for your Fly, these would probably be Armstrong cannon which were later replaced with Blomefiled pattern guns. Lots of ways these days to skin the proverbial cat. Allan
-
1:54 HMB Endeavour
allanyed replied to Tony_Brooks's topic in Building, Framing, Planking and plating a ships hull and deck
Mark, I totally agree and have used this method on both the hull and deck planking at times at small scales I just smear some watered down white or yellow glue over the holes (in small sections), and sand with fine sand paper. The saw dust will be a close match to the wood but a LITTLE darker so visible, yet subtle. Allan -
1:54 HMB Endeavour
allanyed replied to Tony_Brooks's topic in Building, Framing, Planking and plating a ships hull and deck
Perhaps treenailing should be left out altogether. At your scale, deck treenails would be about 0.015" diameter (#79 drill bit) and making treenails that small is difficult at best. A high quality draw plate and bamboo will work if you really want to show these. The treenails should also be very unobtrusive, not stark and dark. A good example of the subtlety can be seen in the photo below from a build log here at MSW. I saved this photo but do not recall which log, so am sorry for not giving credit to the model builder. Allan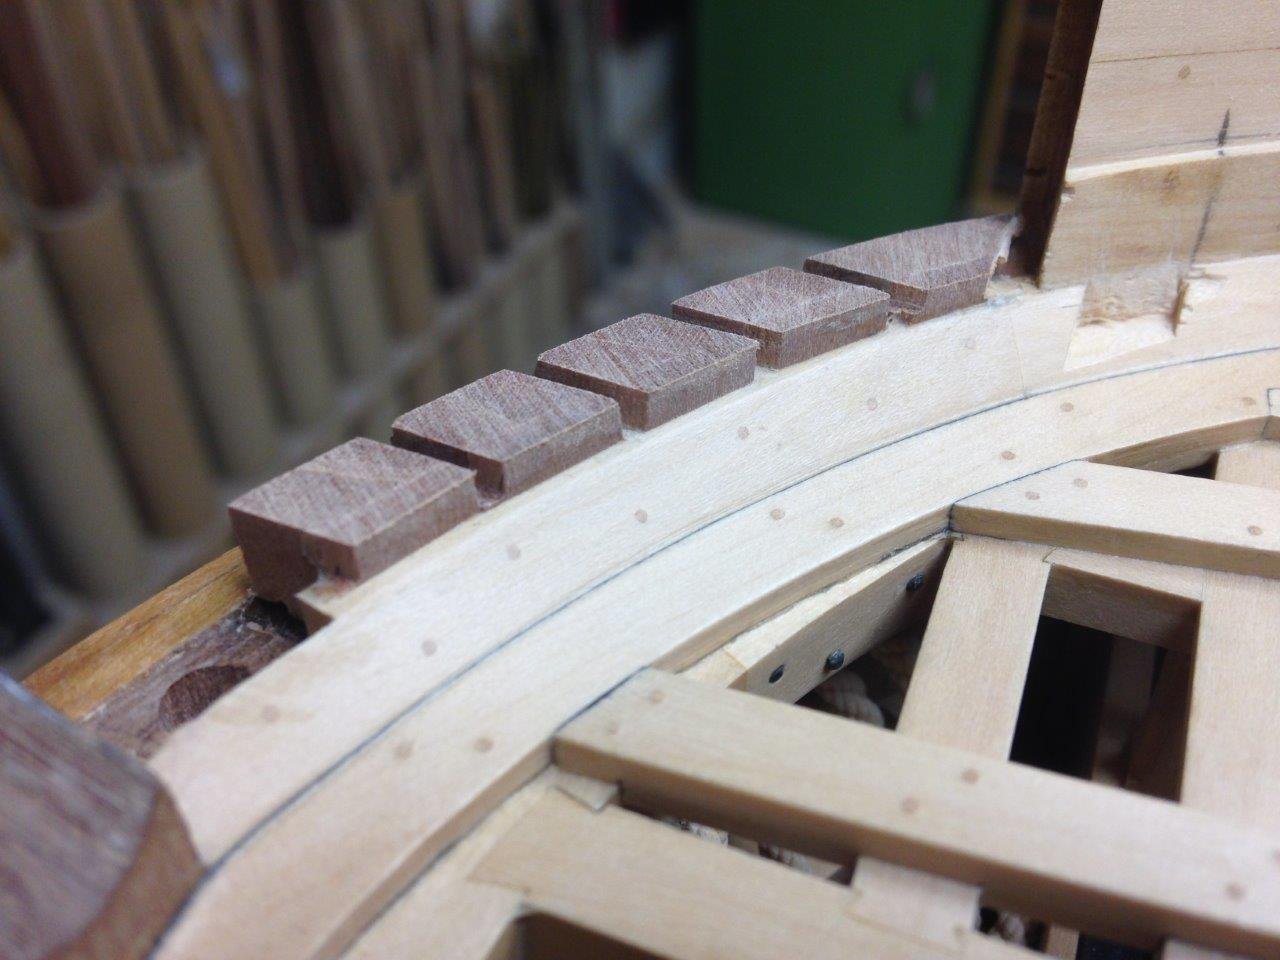
-
Your model continues to be a great project for us to follow, especially your rigging. Do you know why the kit has a different number of deadeyes than those on the contemporary drawing for multiple ships, including Bellerophon. https://www.rmg.co.uk/collections/objects/rmgc-object-80933 This seems like a pretty basic item for any good quality kit designer. Allan
- 366 replies
-
- 2
-
-
- bellerophon
- victory models
- (and 2 more)
-
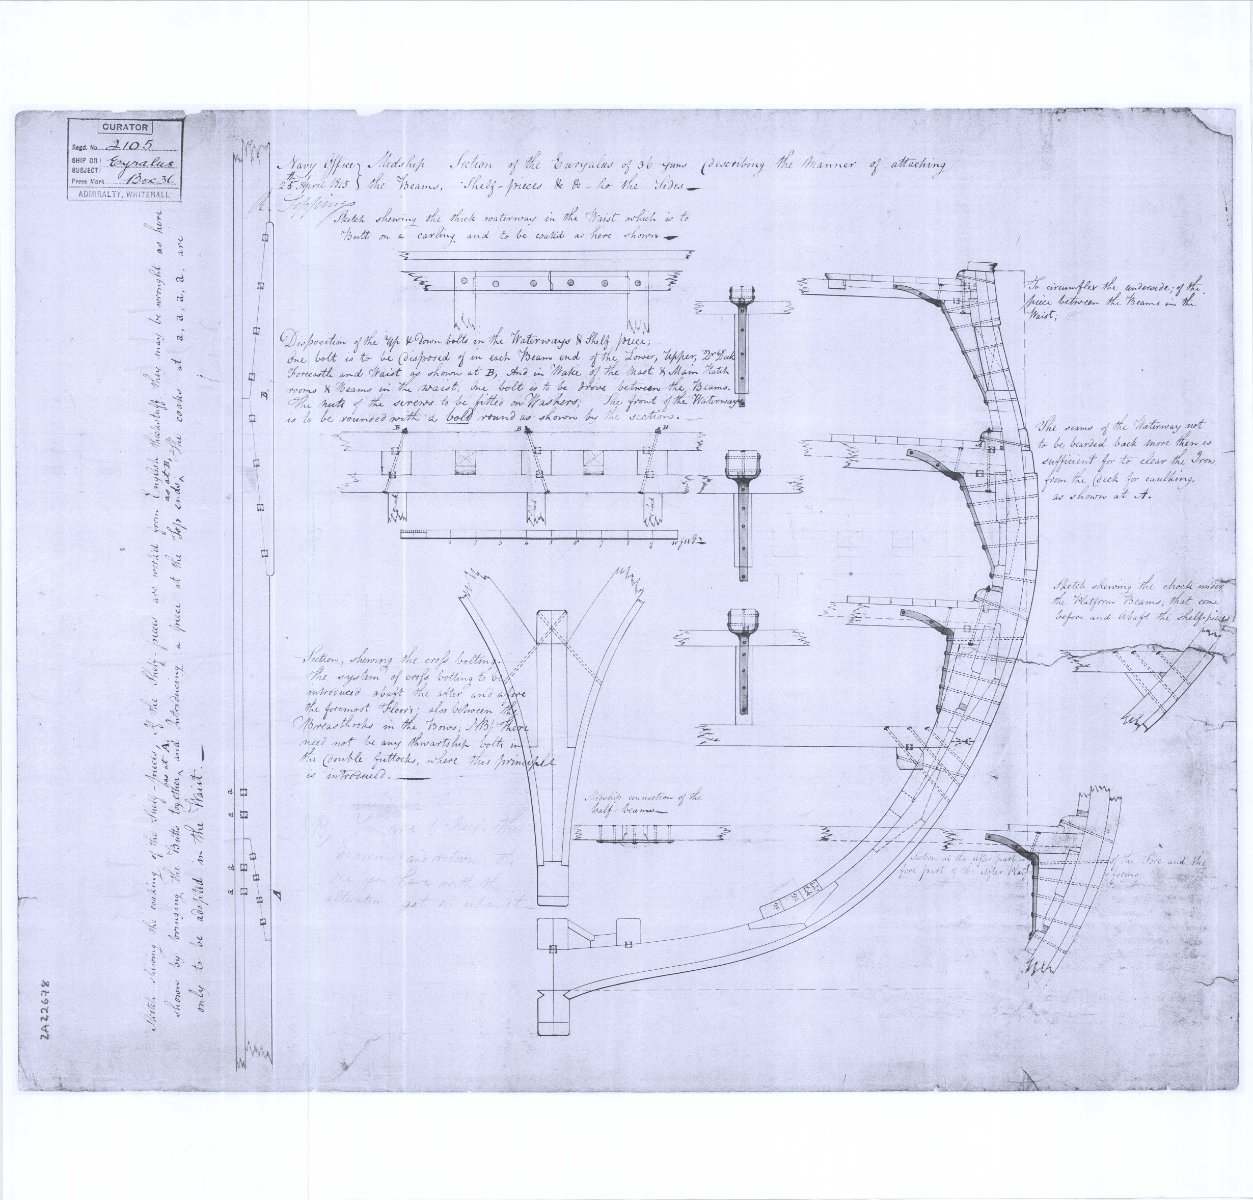
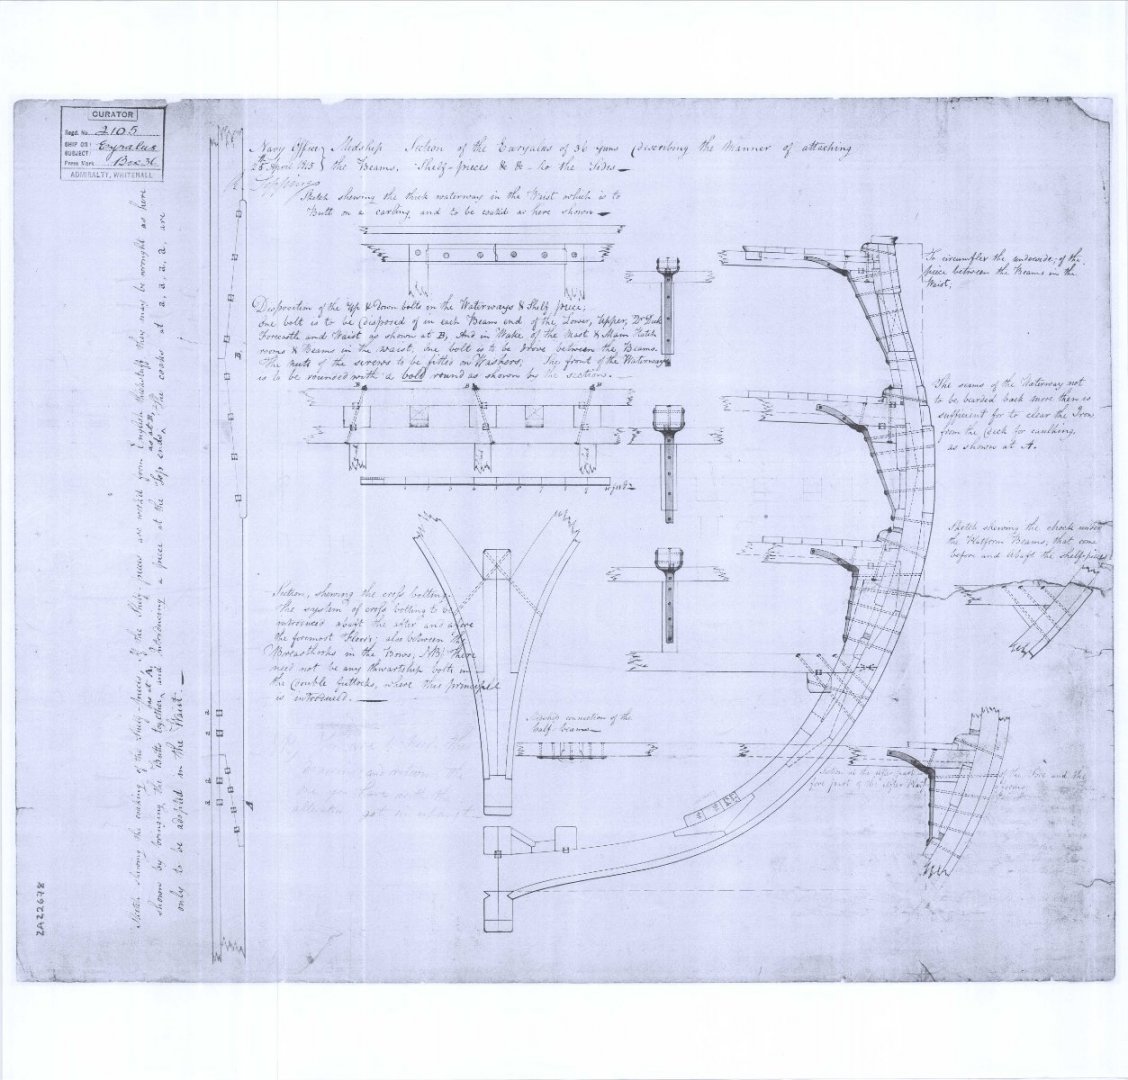
Seawatch is looking at an additional print run of Eurylaus Volume I. If you are only looking for information on the shot lockers and well, PM me your email address and I can send you some photos and drawings from the original manuscript before it was published. I believe there are some great photos on Matiz' Euryalus build log and Bitao's build log of the Naiad here at MSW. Cheers Allan
-
Wish we were a little closer to discuss face to face. We're over in Wailea this week, but checking in on MSW for the important stuff 😀 As to internally stropped blocks I need to look at my books when we get back home but I know they were common by the late 19th century so probably quite some time earlier. I am sure there are members here with some contemporary based information. I hope so, as I am curious about this as well!! Allan