allanyed
-
Posts
8,149 -
Joined
-
Last visited
Content Type
Profiles
Forums
Gallery
Events
Everything posted by allanyed
-
 Hi David, I am curious about the forward pin rail. Do you have any idea where the kit or David White found evidence of this item as it is not shown on any of the photos of the contemporary models in the AOTS book or the photos of the contemporary models or the 1794 drawings at RMG. I do see it in the drawings in the AOTS book on pages 102 and 104 , but these drawings do not match what is shown on the contemporary drawings, thus my curiosity. https://www.rmg.co.uk/collections/objects/rmgc-object-66303 https://www.rmg.co.uk/collections/objects/rmgc-object-66533 https://www.rmg.co.uk/collections/objects/rmgc-object-82154 Having them seems to make sense rather than using the timberheads as was done on other ships. Thanks Allan
- 310 replies
-
- 2
-

-
- Diana
- Caldercraft
- (and 1 more)
-
Stick with it Chimp. If not scratch, there is always kit bashing to make things to your liking. Enjoy the Granado build as well. Looking at the various kits here at MSW, looks like Vanguard has their act together more than some others so maybe something to consider in the future. No matter anything else, have fun!! Allan
-
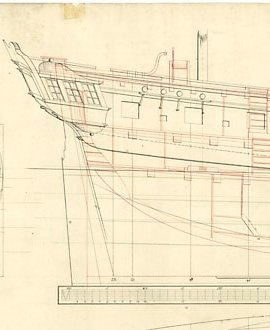
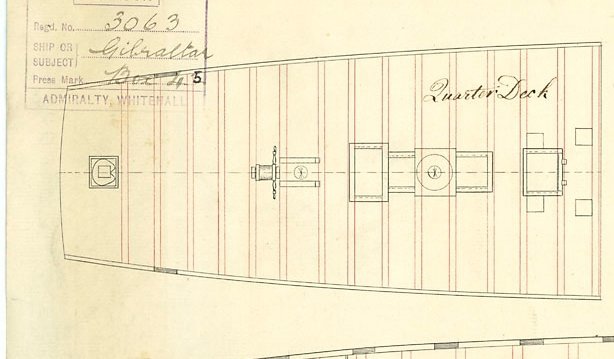
In browsing through a few drawings this morning on the RMG site, I found the below as-built drawing of Gibraltar 1754 (20) It is low resolution so hard to see when blown up, but the rudder and steering configuration looks rather odd to me. It extends into the lower counter as usual, then the lines are drawn in red from this point and extend up through the quarter deck. My quandry is that the tiller, if it is indeed the tiller, has a crook rising up as if for the helmsman to hold. If that is the case, why have a steering wheel? I question if this is in fact part of a tiller rather than the cap rail as there is a section missing for about 2 feet starting 5 feet 4 inches aft of the lower crook. The deck plans show the wheel and where the rudder head looks to be coming up through the QD. If these are both tiller and wheel, I can see them rigged similarly to the larger ships pre-Pollard style but with the blocks and lines on the QD rather than at a lower deck level although this would be a huge inconvenience. I have looked through Lavery and Goodwin but neither show examples like this set up. If anyone has any more details or examples of this that they can share, that would be great. Allan
-
Poly rope - Which adhesive product?
allanyed replied to LyleK1's topic in Masting, rigging and sails
Jaager, In all seriousness your sharing of your wealth of knowledge in many areas is greatly appreciated. On the lighter side,....... so if one has a bottle of Culinary Solvent or Everclear in the pantry, they are good to go for thinning shellac as well as having other more fun uses. Sounds good to me! Allan -
David, I have no idea if the number of pins is correct for Victory or not, but belaying lines is difficult under normal circumstances even with room to work. Would you consider getting rid of the cross pieces and pins and making your own and drilling holes for realistic sized pins. That way you will have the requisite number of pins, and room to work each line. As can be seen in many build logs, unfortunately there are a number of kit makers that do not appear to understand or care about scaled parts when it comes to things like the pins or rings. FYI, Model Shipways has several sizes brass belaying pins although it is not so difficult to make your own with a drill or drill press, and jewelers file. Allan
- 218 replies
-
- 1
-
-
- Victory
- Caldercraft
- (and 1 more)
-
Great photo Keith! The dixie cup head gear tells me probably US and post 1885 but I am curious to know which ship and year if you know. Thanks! Allan
- 362 replies
-
- 2
-
-

-
- Amati
- Lady Nelson
- (and 2 more)
-
Thanks for sharing the photos, your workmanship is really very neat and clean. I realize it is not your doing, but the kit itself does seem to have some interesting substitutes for reality. Allan
-
Rich Where are you located? Knowing might help members in pinpointing some help for you. McMaster Carr is one choice if you are in the USA. Allan
-
Robert, I for one am very happy to see that you added the LEDs as it makes your already excellent model even better. Allan
- 527 replies
-
- 1
-
-
- caldercraft
- victory
- (and 1 more)
-
David, I continue to enjoy following your build! I do have a question regarding the bitts and pins, I really hope you don't mind. According to the scantlings in Steel's Elements and Practice of Naval Architecture 1805, the main bitts had bitts that were 14" square and cross pieces that were 10.5" broad by 9" deep. The Shipbuilder's Repository of 1788 has very similar scantlings. Yours look to be right on. But, the pins are nearly touching with not enough room for the lines to go. Do the plans and kit parts call for this many pins and/or so large? The diameter of the pin handles were about 2 or 2.5 inches (about 0.3" at your scale) so they could easily be gripped by hand yet strong enough to belay a line and hold it under tension. At 1:72 it may not be possible to make pins this small out of wood that will be strong enough. Brass is a strong alternative and can be painted to look like wood. Coiling lines around pins is hard enough, so the more room between them that you have the easier it is to work. Allan
- 218 replies
-
- 1
-
-
- Victory
- Caldercraft
- (and 1 more)
-
Poly rope - Which adhesive product?
allanyed replied to LyleK1's topic in Masting, rigging and sails
Hi Lyle, Have you tried matte finish clear nail lacquer? Allan -
help with Corel Mystique running rigging
allanyed replied to edite's topic in Masting, rigging and sails
Welcome to MSW Ed It would be a polite thing if you would post an introduction on the new member forum with a little about yourself. Using your name as your subject here gives no clue as to what you need so maybe consider renaming it to something like Xebec rigging problems. Have you done any research outside the kit on xebec rigging plans? There are a number of excellent books on rigging but I don't know if any relate to a French xebec. Frolich's book for one may be of help to you. There was a post on xebec rigging problems here at MSW in 2015 and other build logs on xebecs here that may help. Rigging without sails should make things much easier for you. Because there is no woven cloth in existence or sewing methods that are to scale for smaller than about 1:24, unless using non-woven materials and no sewing, it is best to leave them off anyway as they ruin otherwise fine models if being to scale is considered important. Allan -
La Palme by Tobias - 1:36 - POF
allanyed replied to Tobias's topic in - Build logs for subjects built 1501 - 1750
Beautiful workmanship!! I never realized the joints of the keel on French and English ships were completely different with the French being horizontal and the English being vertical. I wonder why or if one was stronger than the other. Allan -
Looking forward to your next update Lyle. Have you posted anything about this problem in the General Ship Model Kit Discussions forum so others are made aware? Allan
-
Hi Lyle, Thanks for continuing your log. Your last photo brings up something I have often wondered about. Were the seizing on the blocks normally tarred as you show or not? I always thought they were not, but cannot find any information one way or the other. If they were tarred, what was the point of doing so? Hope one of your followers has info based on a contemporary source. Allan
-
What is the price? Thanks Allan
-
Glenn, This model is coming along beautifully. Your photos show the higher quality of the Vanguard kit very clearly especially considering the materials, scaled parts, and general attention to detail in replicating the ship and paraphernalia it is representing. Allan
- 476 replies
-
- 2
-
-
-
- sphinx
- vanguard models
- (and 1 more)
-
Some folks use the first layer of planking as a learning cycle to properly plank the second layer rather than following the kit instructions. Did you by chance study the planking tutorials here at MSW? It would be a great help for you in the future, including the second layer of planking on this model. Allan
-
How to thread ropes through blocks?
allanyed replied to Steve K.'s topic in Masting, rigging and sails
First, welcome to MSW Steve!! It would be nice if you would post a little introduction about yourself and your modeling areas of interest on the new member forum. If you do a little research with the search function here at MSW you will find your question discussed in detail. The plusses and minuses of each method described are given including the use of cyanoacrylate, polyvinyl acetate, acetone based nail polish, and mechanical assists. One of several threads is modelshipworld.com/topic/20088-2mm-block-threading/#comment-612707 Allan -
Don't give up Dave. Regarding the belaying pins, would you consider removing the kit pin racks and make new ones with the proper size holes? Looking at the photos there appears to be enough room to work. For running rigging, it really should go on after the standing rigging. A couple tweezers to handle the running lines are a must, that way you can work from either side of the model. I use both straight and bent forms, spring type and locking type as needed. SHARP scissors or a cutter of some kind is a must as well. Blunt end suture scissors work well as it is less likely you will snag and cut an already rigged line when reaching in to snip off and Irish pendants. Some like nail clippers but they can be difficult to maneuver into the rigging at times. I prefer barber scissors as they are so sharp and hold an edge, my favorites being Joewell 4 inch and 5 inch from Tokosha Company. Again, don't give up!! Allan
- 362 replies
-
- 4
-
-
-
- Amati
- Lady Nelson
- (and 2 more)
-
DD A warm welcome to MSW! Hope to see more photos of your models in the near future. Allan
-
Thanks Starlight, very much appreciated. I have tried this in the past with minimal success. 1mm is huge unless working at 1:24 scale as the muntins at 1:64 and 1:48 are 0.4mm and 0.53mm respectively. I bought the cutting device Pat suggested in his first pic (thanks Pat!) and it works OK. Next up is trying the pre-thicknessed piece rubber cemented to a sacrificial piece as Druxey suggested as I have slitting blades for my small table saw. Thanks to everyone for their thoughtful suggestions, they are all truly appreciated. Allan
-
Ulises Having the gunport stops (linings) set in before the second layer of planking looks like it assures the outboard edges are even and a great idea for double planked models. For the future, keep in mind there was no lining piece on the top of the port attached to the upper sill, only the side stops and the bottom one resting on the lower sill. I looked at a good number of photos of contemporary models and could not find any with stops on the upper sills. There is a very detailed explanation on these in volume II of David Antscherl's The Fully Framed Model. Allan
-
Artesania Latina, S.A. Micro Shapers A, B & C
allanyed replied to BubbleHead's topic in Modeling tools and Workshop Equipment
Chisels are an interesting idea, but I wonder how they will be to hold and draw down a strip of wood accurately compared to a straight backed razor or piece of hacksaw blade which are easy grind to the shape needed and to hold steady when using them. Hope you post how this goes with the chisel idea. Allan -
Artesania Latina, S.A. Micro Shapers A, B & C
allanyed replied to BubbleHead's topic in Modeling tools and Workshop Equipment
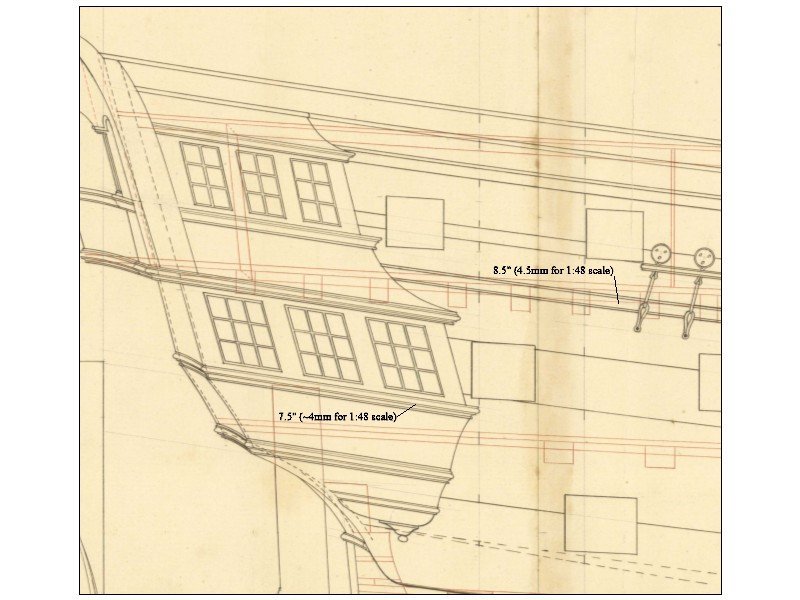
Tom, You ask if the AL unit is useful for 1/4 scale, but there is no way of knowing without knowing what ship and seeing the contemporary plans of which ship you are building. I am with Mark on making your own with stiff back razors or pieces of a hacksaw blade. This way they will be the proper shape and size. An example from a contemporary drawing of Resolution (74)1758 is below with the dimensions of a couple mouldings in mm at 1:48 scale. There is a high resolution copy of the full drawing on the Wiki Commons web site. For this ship at 1:48, the cutters you have look to be close for one moulding but the wrong size and/or the wrong shapes for the others. The shapes in the drawing below are pretty common and there are more on page 57 of Goodwin's Construction and Fitting of English Man of War where he also gives a few dimensions for various rates of vessels. Allan