
Supplies of the Ship Modeler's Handbook are running out. Get your copy NOW before they are gone! Click on photo to order.
×


allanyed
-
Posts
8,149 -
Joined
-
Last visited
Content Type
Profiles
Forums
Gallery
Events
Everything posted by allanyed
-
 Trond, PMing you now. Allan
 -
Your build is going great, and I hope you do not mind a question. Why do most of us (me included) rig cannon? Am I (are we) just gluttons for punishment? I have yet to find one contemporary model that has any cannon rigging other than breech ropes, and I am not sure they are original. For that matter, the vast majority of hull models and some of the fully rigged models at RMG don't show cannon at all. Just curious 🤪 Allan
-
The tutorial for spiling by David Antscherl is in the Articles data base under framing and planking as is the lining off article by Chuck Passaro. https://thenrg.org/resource/articles Note that in the first picture in Chuck's article he is very clear to avoid this unrealistic planking style. All the strakes need to end at the rabbet unless there is one or perhaps two drop strakes. If your model is double planked you have the first layer as a great learning practice before going to the second layer. Allan
-
MONTAÑES by Amalio
allanyed replied to Amalio's topic in - Build logs for subjects built 1751 - 1800
Your joinery never ceases to amaze us. Gorgeous workmanship! Allan -
Looking good! For future builds, keep in mind that all of the decks have round up, they do not lay flat. It may be the photos but the decks look to be flat. Check out the build log of the Endeavour by KJackson. modelshipworld.com/topic/31858-hm-bark-endeavour-by-kjackson-occre-154/#comment-902995 where this has been discussed in detail in the last day or so. It appears there are at least a couple kits that forgot to take into account round up/camber which would be found on virtually all ships. Your first layer of hull planking looks to be going well. Will you be tapering the strakes and spiling or hot edge bending? If you have not already studied them, there are excellent tutorials here at MSW teaching proper planking techniques. Allan
-
Looks good to me. The contemporary figures I gave and the NRG figures are very close. FWIW, the contemporary figures at 1:54 are as follows: 1719 Establishment Upper deck to round 6.75"/54= 0.125"=3.75 mm Forecastle to round 5.5"/54= 0.102" = 2.6mm Quarter deck to round 6.5"/54=0.120" = 3.06mm Scantlings from the Shipbuilder's Repository, 1788 gives the following for an 18 gun sloop of war (392 tons) Upper deck to round 6"/54=0.11 = 2.82mm Forecastle to round 6"/54=0.11 = 2.82mm Quarter Deck to round 6.5"/54=0.120" = 3.06mm
-
I have no idea if these figures apply to Endeavour but for a 24 gun ship, (374 tons) the 1719 Establishment gives the following: Upper deck to round 6.75" Forecastle to round 5.5" Quarter deck to round 6.5" Scantlings from the Shipbuilder's Repository, 1788 gives the following for an 18 gun sloop of war (392 tons) Upper deck to round 6" Forecastle to round 6" Quarter Deck to round 6.5" Allan
-
Qu Looks like gun port lids which I do not believe would be there. I am sure there are Victory experts here at MSW that can confirm or correct. As a fan of Victory and Nelson, I hope you sign up for the Trafalgar TV series http://trafalgar.tv as in my signature below. Allan
-
Glad to hear you are on the mend! I really think that if you get the first layer faired with filler or replacement pieces you will have a good chance to get the second layer done without issues if you follow the tutorials on tapering and spiling by David Antcherl and/or the tapering and edge bending process detailed by Chuck Passaro. Allan
-
Shipaholic The rounding (camber) is an extremely valid point, good that you pointed it out. Each deck usually had a different amount of rounding from orlop to the upper most decks, do you know if the other decks on the model have any camber at all or are they flat as well? Allan
-
HMS Bounty by AdamA - 1:48
allanyed replied to AdamA's topic in - Build logs for subjects built 1751 - 1800
It may have been from a different era but it sure looks good!! Allan -
Brig Le FAVORI 1806 by KORTES - 1:55
allanyed replied to KORTES's topic in - Build logs for subjects built 1801 - 1850
I am enjoying your many innovative techniques and thank you for sharing. I hope you and your family are safe. Allan -
Happy to be of at least a little help KJ. Allan
- 200 replies
-
- 3
-

-
- Whaling Bark
- Charles W Morgan
- (and 1 more)
-
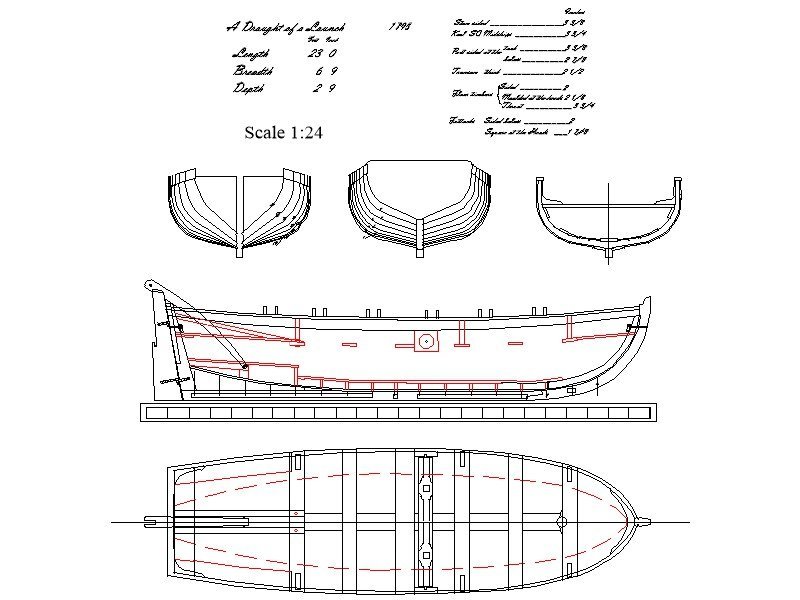
The following drawing is based on 23 foot launch plans at RMG and scantlings from W.E. Mays' book so maybe can help you. I am not sure of the resolution you will get here, but if you would like a high res version in whatever scale you want, feel free to PM me. A side note: the davit and davit side supports in the stern were most likely removed for Bligh's voyage. As to color, maybe some of the models at RMG will give you some ideas. One of many examples can be seen at https://www.rmg.co.uk/collections/objects/rmgc-object-66539 Allan

- 62 replies
-
- 1
-
-
- Bounty Jolly Boat
- Artesania Latina
- (and 1 more)
-
A warm welcome to the fray BZ. Your choice for the Shipwright series is very wise. You will learn good techniques that will carry on as you get into more detailed projects. A magnifying visor is great advice. The downside is you will see things that you thought were perfect may not be.😀 Allan
-
Sorry if I missed this in an earlier post, but I could not find anything.. For the beakhead bulkhead frieze work, did you do this as you did in earlier frieze work that you posted May 18, 2021, that is, did you paint directly on the bulkhead? Beautiful work!!!! Allan
-
For future, if you wish, I can PM you or anyone interested in the below plans for the 23 foot launch in high res PDF at whatever scale you want. It is based on RMG plans and info based on contemporary sources. Allan
-
K, If you have not already seen these, check out https://store.mysticseaport.org/ships-plans/morgan.html for a set of 8 pages of plans. Not cheap, but they look to be highly detailed. Allan
- 200 replies
-
- 3
-
-
- Whaling Bark
- Charles W Morgan
- (and 1 more)
-
Clare makes an important point about the top timbers. AIRCRAFT plywood is the best solution, albeit very expensive. The moulded dimension of the top timbers (extensions) is sometimes much too large on , but with aircraft play it really is no issue at all to have them to scale. Good birch veneer plywood works well and costs a lot less but as with most things, you get what you pay for. If the scale is in the 1:64 or 1:96 range I would bite the bullet and get the aircraft plywood. Do your plans have the bulkhead drawings? If not, you can use the station lines on the body plan for the Charles Morgan. As you probably know there are 8 drawings of the Charles Morgan, including body plans, inboard profiles, deck plans &c. available from Mystic. https://store.mysticseaport.org/ships-plans/morgan.html Allan
-
HMS Bounty by AdamA - 1:48
allanyed replied to AdamA's topic in - Build logs for subjects built 1751 - 1800
PMing you re: the boat drawings. Allan -
Welcome to MSW. So you served over the seas and under the seas, good for you!! Thank you very much for your service. Allan
-
Chief, I spoke with Mike on several things and one of these was doing another printing of volume I of Euryalus. It is one of the many things he has on his plate but he could not give me a timing on this happening. Allan
-
WA Look at the many models at the Royal Museums Greenwich website. Most do not show cannons at all, let alone the rigging. As one example do a search of 3rd rate models. I counted over 40 models and only 3 of them had cannons, the rest did not. Of the three with cannons, none had the cannons rigged. https://www.rmg.co.uk/collections/objects/rmgc-object-66415 is one example. For others go to https://www.rmg.co.uk/collections/search/3rd rate model I checked photos of models in the Rogers Collection and quite a few, not all, of the fully rigged models had cannon, several of which had the cannon rigged. No matter your choice, there is a precedence. Allan
-
I have noticed more and more uses of two different species or the same species but from different billets to give a contrast when next to its adjacent piece. One example of this is in the construction of the partners. This really shows of your very fine workmanship and I plan to use this on occasion in the future. Allan
-
I have no idea what the metal is for your castings but be careful as it may be a very low melt point alloy. Would hate to see you melt one. Maybe ask the kit maker what the metal is and the melt point as they should have or be able to get this information even if they are outsourcing. Allan
