allanyed
-
Posts
8,149 -
Joined
-
Last visited
Content Type
Profiles
Forums
Gallery
Events
Everything posted by allanyed
-
Welcome to MSW Carss! I for one look forward to your work in progress. Allan
-
Confirming the posts from Druxey and Keith, unfortunately the artisans that built these were probably not seamen nor students of maritime history so had little, if any, idea as to what a ship looked like or how it was constructed, thus the extremely poor representation in these models, including yours. BUT, while it is worthless monetarily to any serious collector it has untold worth if you like it. Allan
-
 Juhu The first photo below is from the US Library of Congress of the of the Effie M. Morrisey. The only thing that looks like barrel appears to have a line that is likely secured to the bulwarks, thus secure and out of the way. The second is from the internet where there are a few contemporary photos if you do a thorough search. I just Googled fishing schooner photos and scrolled through. The third is at the wharf and a few barrels are shown, but not likely on deck when underway. I suspect salt barrels would be below when underway to keep them from getting soaked and possibly leaking water into the salt. If you find contemporary information on the actual practice it will be an interesting find. You may also find the following an interesting read. Two minute search on the internet for "Where did old fishing schooners salt their catch of fish" turned this up. https://www.heritage.nf.ca/articles/economy/19th-century-cod.php Allan


-
I cannot think of more appropriate words than ingenious. Allan
-
Harold Hahn method
allanyed replied to Essayons's topic in Building, Framing, Planking and plating a ships hull and deck
Welcome to MSW Juddson!!! You are correct in referring to the "style" This thread has addressed several styles of framing, (not bulkhead construction) starting with the so called Hahn method which uses sistered frames that do not reflect how the actual ship was built, the Navy Board style which Druxey has shown in his photos and was commonly used on contemporary models, and fully framed which follows actual practice in the ship yards. Scantlings of each part of a frame are available by measuring contemporary drawings, contracts for the ship you are building if available, or in several books that give scantlings for various years, mostly from the 1719 Establishment through David Steel's folios for ships in the late 18th century into the early 19th century. Spacing on the actual ship was normally only an inch or two as the futtocks reduced in size as you go up from the floor to the top timbers. Below are the "Hahn" style, Most common Navy Board Style (photo from Anderson's Navy Board Models Page 11 and a contemporary drawing of the framing disposition of HMS Jason (30) 1794. Note in the drawing of Jason, there are dashed lines that represent the station lines as well as the edges of the frames. These coincide with a frame edge on this drawing, but that is not always the case. I realize the drawing on the right is not very clear, but there are high resolution images of contemporary drawings of framing dispositions that you can search for at https://commons.wikimedia.org/wiki/Category:Ship_plans_of_the_Royal_Museums_Greenwich including the Jason on the tenth page. Allan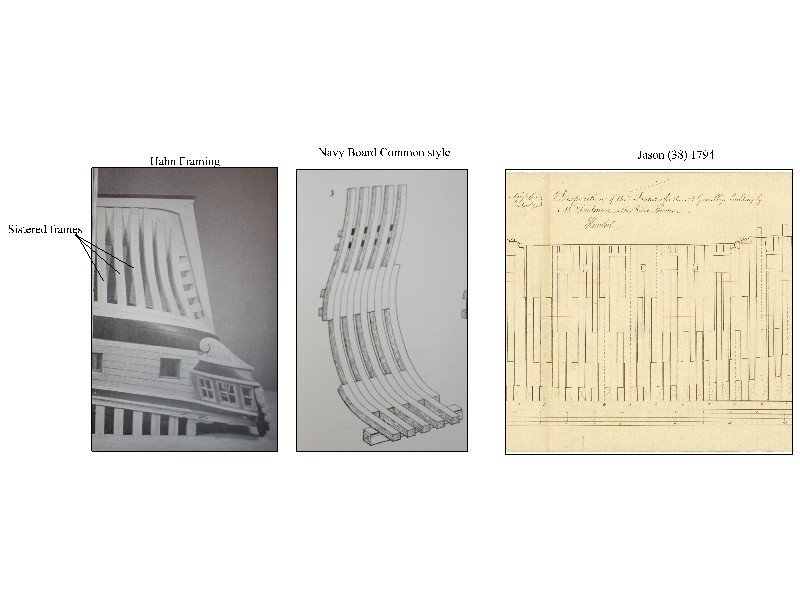
-
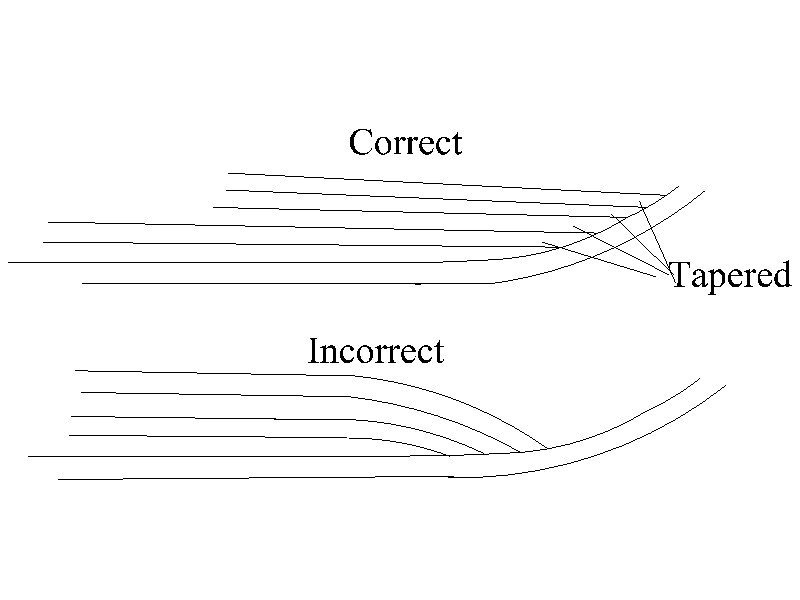
I really see no way to fix this without removing the planks and starting over, but other members here might have some better advice. The main problem is that your garboard curves in the wrong direction at the forward end. It needs to curve to match the run of the rabbet. My apologies for not having more precise information. Study the other planking tutorials and forget Dirk's. The methods given by Chuck Passaro and David Antscherl are diverse but both work. Allan
-
Looking for a good "starter" pin vise set
allanyed replied to Capella's topic in Modeling tools and Workshop Equipment
Turangi Your post has me smiling regarding your comments on both the tools and the watches. Amazon is a savior for those of us making bad choices, be it a tool or a watch. To paraphrase Jimmy Durante, Thank you Mr. Bezos wherever you are!!! Allan -
James (or do you prefer Jim or Captain😀), Welcome to MSW! Are you looking for the actual model in that photo from 1924? Do you know where the model was photographed? As it was a model put in the water, it may very well not have stood up to the past 98 years and no longer exists. If you can locate contemporary plans of her you could always build a model at whatever scale you wish and it would probably look more like the actual Peacock built in 1813 than the model in the photo. If you look at the photo (which I have enlarged below) and contemporary paintings of Peacock prior to being rebuilt in 1827/1828, you will see that other than having two masts the model in the photo looks nothing like the Peacock when she visited Hawaiii 1826. Perhaps this model is what she looked like after being broken up and then rebuilt in New York. A few examples just to start are that the gun ports are not placed properly, she would have three square sails on each mast, not five, and the bow appears to be far too sharp rather than somewhat bluff bowed for that era and the list goes on. Allan
.thumb.jpeg.708e009037a49232a04ef612413cc990.jpeg)
-
COMPLIMENTS on your planking and your gratings. It has been a while since I have seen a kit build log with such well done and properly laid planking and yours is exceptional. Am I correct that you made your own gratings or are they from the kit? Amati gratings have never looked remotely close to what a grating should be, so I was hoping they changed and got it right. Beautiful work Dusan!!! Allan
-
These are the greatest words I have heard this morning. Everyone should read these. Too many times the "it's good enough" attitude comes into play. Allan
-
Egil, First, welcome to MSW!! It would be very polite of you to post an introduction and a little background on the new member forum. I respectfully disagree with your assessment on RDL's expertise. Studying everything available before and during a build is something everyone should do. Some folks have a working knowledge of the terminology many years before building a model due to their profession such as naval architects, merchant mariners, pleasure sailors, etc. While the planking workmanship on RDL's model is quite good, there is no reason to doubt he was a first timer. For example his method of making the garboard strake is quite common, nothing expert about it. If you closely study and follow the planking tutorials by Chuck Passaro and David Antscherl here at MSW, anyone can achieve an excellent planking job, first timer or not. (I would avoid the tutorial by Dirk Debakker like the plague. Great guy, terrible methodology) Taking one's time to do things right, including do-overs, probably has more to do with a mind set than having experience. Kit bashing to replace some of the stuff kits provide is common as well. As to disappearing, keep in mind MANY of us at MSW are up in age. Lord knows what might have happened since he last posted in 2013 and visited MSW in 2017. Again, welcome aboard!! Allan
-
The plastic PVC pipe also works well for soaking planks before cross bending them if you choose that method rather than spiling each plank. Allan
-
Jackson, Sorry to beat a dead horse, but unless you remove the garboard and the five strakes above it and start again this will be even a bigger frustrating mess. The problem started when you put on the garboard strake upside down. Again, look at the contemporary planking expansion above and the sketch below to see what I mean. Dirk's tutorial on planking that you used was his own idea. He worked with me on a project and we discussed and emailed about this in March, 2009 and in the end he agreed it was a bad idea as it does not work. Notice he showed no photos as he never could get it to work. Why it is still on MSW is a mystery. If you study the tutorials by Chuck Passaro and David Antscherl you will have no problems. https://thenrg.org/resources/Documents/articles/LiningOffYourHullPlankingTutorialAndFan.pdf and https://thenrg.org/resources/Documents/articles/APrimerOnPlanking.pdf Allan
-
Kmainguide, I know I am really late to the party, but for a first build, your work is excellent. Hope you don't mind a thought on the sheathing. For future I would find another supplier for the copper sheathing. Assuming the BJ material is to scale (48"X15") or thereabouts, the nail punch marks look to be about 2" in diameter rather than the actual 1/2" diameter which should barely show up at your scale. At 1:96 they would be 0.005" diameter so maybe better left off. The overlap is fantastic. This is the first build log I have spotted where this was done correctly. My apologies to others that may have also done this correctly and I missed it. The real thing below. Allan
- 112 replies
-
- 3
-

-
- Bluejacket Shipcrafters
- Constitution
- (and 2 more)
-
Brian, Which ship? There are sources based on contemporary contracts and folios with scantlings for beams, carlings, ledges, and the flat (planking) on each deck of various size ships from the late 1600's to the early 1800's. If you bought the dory kit designed by David Antscherl, who is a member here, you will get the best help possible and it has a great reputation as a fantastic starter kit. Allan
-
Pieter Based on photos in the build logs, Vanguard seems to be very good quality, although I take exception with their gratings and copper sheathing. Allan
-
New Member Introduction and Need Some Advice
allanyed replied to Artisan's topic in New member Introductions
Hi Greg, Welcome aboard! Have you studied the forum here at MSW of Build Logs for Kits? There may be useful information for you there. Also you may find good information in the General Ship Model Discussion forum. Good luck and again, welcome to MSW! Allan -
PIeter, In addition to the David Antscherl designed kits I would look at Syren's Cheerful for a top quality kit before considering any others. Allan
-
Masking tape lifting
allanyed replied to Jeff5115's topic in Painting, finishing and weathering products and techniques
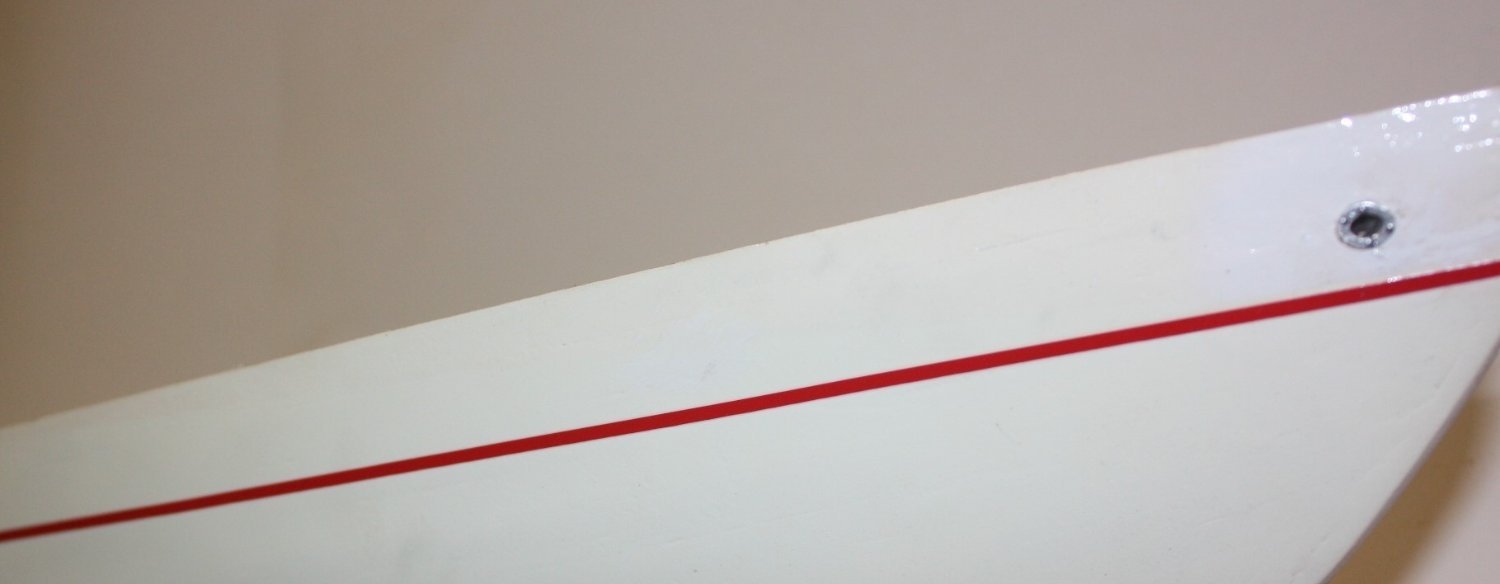
Jeff I use this method and it works beautifully. BUT, do the lighter color first, red then black, white then read should the top of the hull be white or similar light color. If your vessel has a stripe as seen on some schooners, pinstriping tape is easier to get a clean line than painting a stripe, at least in my experience. Allan
-
Suggested sites for purchasing wood model ship kits
allanyed replied to Capella's topic in Wood ship model kits
If you don't care about accuracy any kit will do, as most, not all, kit manufacturers don't seem to care either. 😀 Allan -
NEW MEMBER and new to model ship building
allanyed replied to Peter6172's topic in New member Introductions
Welcome aboard Peter!! You have thousands of potential teachers here which can be a curse as well as a blessing as experience (and opinions) vary. 😀 Allan -
Suggested sites for purchasing wood model ship kits
allanyed replied to Capella's topic in Wood ship model kits
Capella, Are you interested in any specific era or nationality? Are you interested in accuracy or are you OK with what the kits provide? With a few exceptions the manufacturers of the kits seem to have done little, if any, research so a lot of the materials are not at all realistic in appearance and scale. Study the many build logs here at MSW (both scratch and kit) rather than relying on advertisements from the kit makers and suppliers. Two you might want to consider based on build logs and comments here at MSW Model Shipways - models designed by David Antscherl Models from Syren Ship Model company You can always try kit bashing for any of the less realistic kits. If you have sufficient room to work, maybe consider investing in tools and a few books and give scratch building a chance. This opens you to thousands of vessels rather than being relegated to a few dozen. In the end, what makes you happy with your investment is the way to go. Allan -
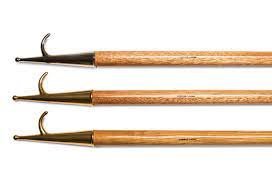
Do you mean one of these? Allan
-
Hi Mark Welcome to MSW!!! If you study the planking tutorials the planking is no more difficult for a rounded bow than a sharper bow. It does take more time to get the planks shaped but it is not difficult. Study the various build logs of kit models closely and you will learn a lot about the kits, both good and bad. The three stages of experience series of kits designed by David Antscherl may be exactly what you want as well as any model from Chuck Passaro/Syren. If you want to do the Bounty launch the Model Shipways version is supposed to be OK, but others, not so much. Again, welcome to MSW. Allan
-
If you have not already done so, you can download the high res drawing from the Wiki Commons site I gave above. Fascinating stuff can be found on the high res drawings at times, including hand written notes and such. Allan


.jpeg.603446a2947824b28bb547b8def8917d.jpeg)