allanyed
-
Posts
8,149 -
Joined
-
Last visited
Content Type
Profiles
Forums
Gallery
Events
Everything posted by allanyed
-
 Per Pages 228-229 of Lavery's Arming and Fitting give a good synopsis of the windlass. As written by Lavery,launches, which pretty much replaced longboats on ships of 20 guns or more by 1780, had windlasses. In addition to the windlass would often be found a davit. Prior to the davit there would have been a lignum vitae sheave over which line would run out. The davit and windlass combination was necessary when lifting the buoy rope in order to lift the crown of a 3 ton anchor that had become embedded in the bottom. No boat crew could do this without the aid of the windlass. The davit rested on a pivot pin as shown on the photo. Hope this helps. Allan
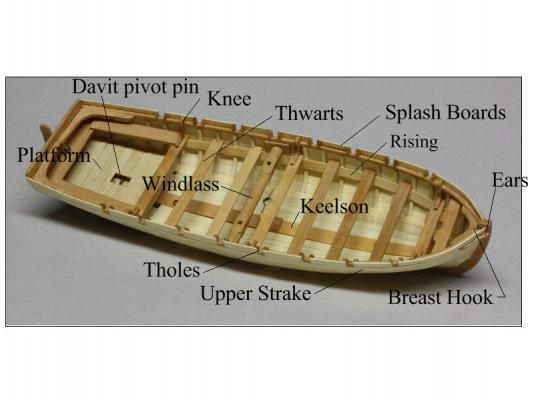
-
Another 2 cents, maybe only a penny. I start with an Xacto back saw cutting outside the line, then SHARP chisels and finally a file if needed. Now, if I ever get my wish for a good milling machine, I have seen how these can be used in scarph joints and more, but I suspect the set up time is longer than doing a steady slow finish with chisel and file. Allan
-
Gordon, I have to agree with Kester regarding the armament. The first carronades from the Carron Company had come into use about 10 years before Bounty so it is conceivable that Bounty could have carried them, but a quick search shows Bounty having four 4 pounders and swivel guns. No mention of a carronade on the ship or the launch is mentioned anywhere that I could find. The boat was packed with men and some supplies. Room for a carronade, powder and shot would have been a total waste of the little space they had. Besides, why would the mutineers arm the launch for the men they were putting off the ship? I understand that Artesania does not have a good reputation for accuracy, so take their ideas with a grain of salt. Allan
-
CONGRATS ED!!!!! Allan
-
Too what degree are shrouds and stays served
allanyed replied to markjay's topic in Masting, rigging and sails
Mark, Assuming you are referring the HMS Fly 1776, you can get the whole story on rigging this and other Swan Class vessels in Volume IV of the TFFM series by David Antscherl. I quote from Section 15.24 on page 50, Fore and main shrouds........... These shrouds are 10" cable laid and their laniards are 3 1/2" line. The foremost shrouds of both fore and main gangs are "singles" that are cut-spliced over the mast head. They are seved for their full length....... Allan -
Super job from start to finish. Your log will be viewed for years to come by many builders Danny. Congrats Allan
-
Probably one of the best sources would be Adrian Caruana's The History of English Sea Ordinance Volumes 1 and 2. Mary Rose era would be volume I. Allan
-
Not hard to find these terms on the internet and once a bit of time is spent, easier to remember :>), BUT --------------- Let in means the beams are cut down 1/32" where the thicker planks are to be laid so the tops of the planks are flush. Save yourself some trouble, IF YOU WANT TO, and use the same thickness planks , 1/16". Only you will know they are not let down into the beams. Standing proud means the thicker planks will be seen as higher than the thinner ones, and yes, would be a tripping hazard. Allan
-
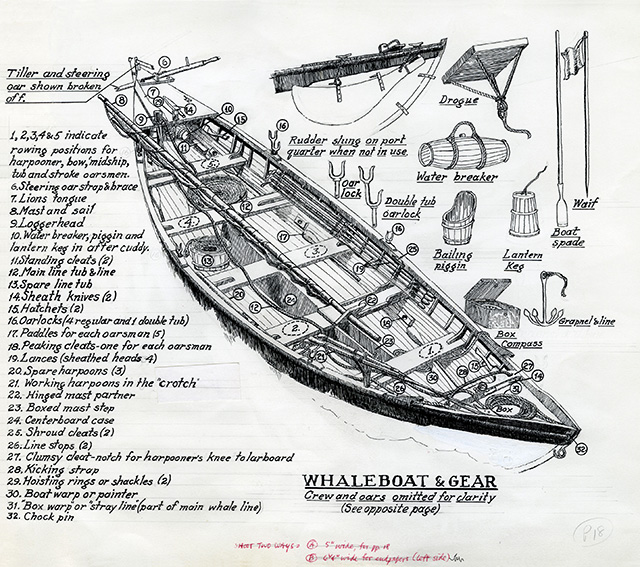
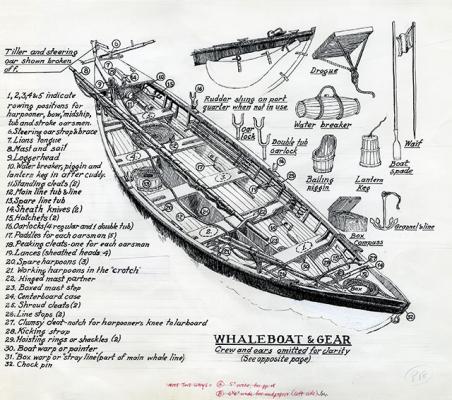
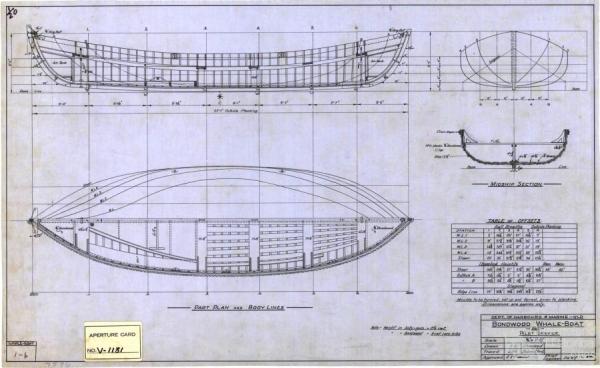
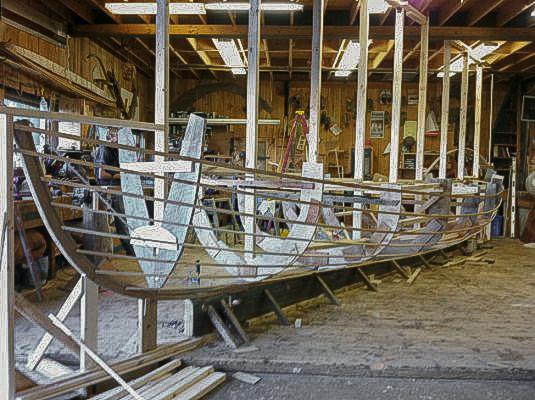
Whale boats..... If they are monomoys or similar, the tutorials will surely help. You may be able to get information from Mystic Seaport such as drawings and photos. The internet is chock full of plans and photos, a few of which are attached the last being a whale boat being built for the Morgan Allan
-
Caulking deadwood
allanyed replied to DocBlake's topic in Building, Framing, Planking and plating a ships hull and deck
I do believe if it is not directly exposed to water as were the hull or upper decks, there would be no caulking. The deadwood was covered with planking down low and inboard higher up thus not constantly exposed to water and thus not caulked. I bow to any more knowledgeable members if I have misspoken. Allan -
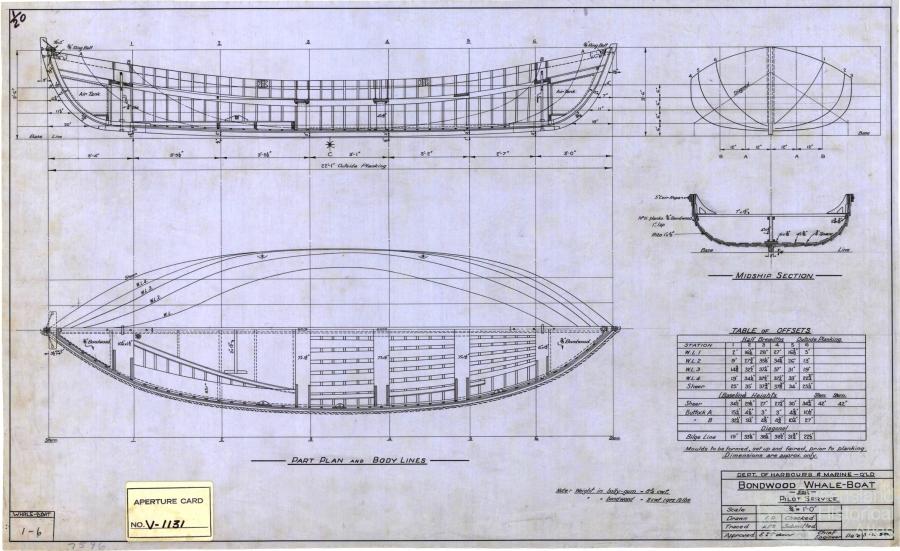
Anders, If the boat is hung from stern davits, the length can be figured out pretty closely as the rings to which the falls were attached in the boat would probably be spaced about the same as the davits. Drawings of boats showing the rings can be found in a number of books including Lavery's Arming and Fitting, W.E. May's book, on ship's boats. From there an approximation of the overall boat length can be determined. A cutter or small pinnace might be appropriate and plans can be found on line at the NMM collections site. I am not near my books, but W. E. Mays book may be a help for design as well as some scantlings appropriate to the mid 19th century. I just did a quick search at NMM collections and found a number of cutter drawings including a 23 foot from 1852. These are not high res when downloaded but most are 1/24 scale so should be clear enough to work with. Google National Maritime Collections, then in the search box near the top left type cutter or pinnace and a list of drawings and pictures will appear. Click on them one at a time and the drawing comes up and when you scroll down below the drawing, a write up including date of the drawing can be found. Hope this is a help. Allan
-
British 'Termagant', 1780, ship-rigged Sloop - Info?
allanyed replied to malachy's topic in Nautical/Naval History
Michael, I do not know the image size per se, but I can tell you once down loaded (and do it as soon as you receive it, there is a time limit of a few weeks I believe) and inserted into Turbocad or other drawing program, you can enlarge it to your heart's content and it as clear as can be. As an example you can enlarge it enough to measure the width of a pencil line. Faint notes, erasures and more, can often be found that you may not be able to make out on a paper copy. Well worth the price IMHO. Allan -
I suspect the model kit industry is like many others. No one single factory makes everything, but rather assemble parts made by others. Autos down to model kits. You can find Michelin tires on many brands of cars because the auto companies cannot afford to make tires themselves. It MAY be the same with kits. Someone has the dies and casting tools and know-how to make a lot of pieces so the kit assemblers go to them for parts. This may be totally off base reasoning, and is just one deduction from one person....... To avoid poorly made parts, it would be better to make them yourself or go to a quality supplier of parts, such as Syren. Allan
-
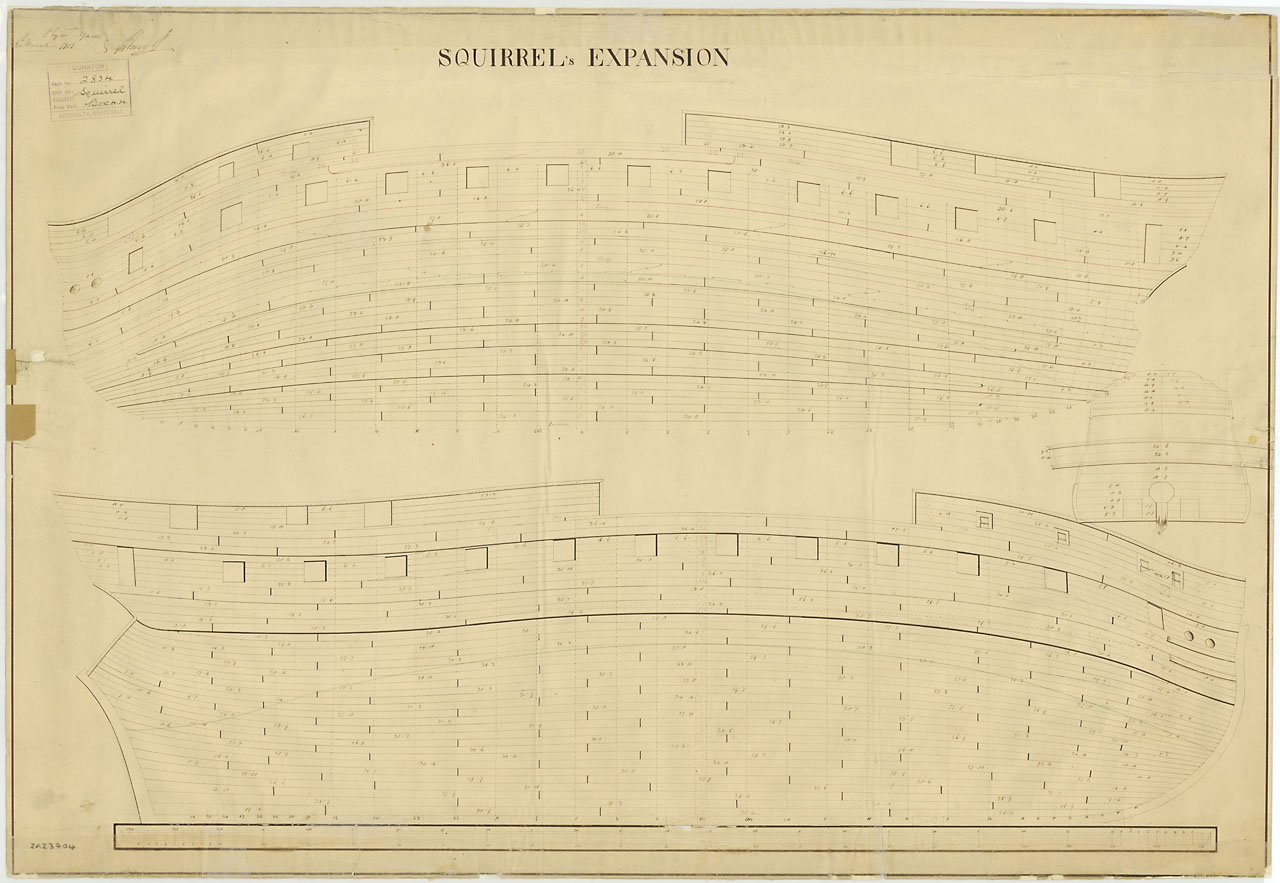
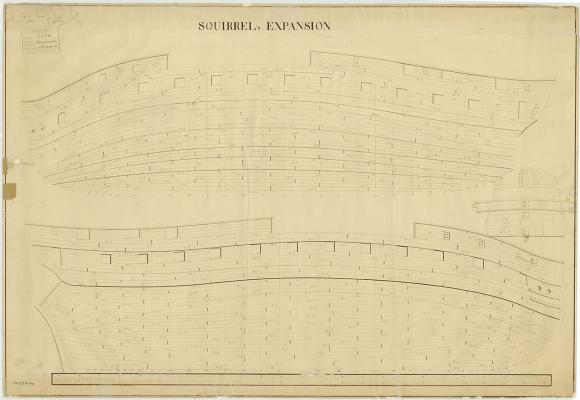
Richard The planks did bend to the extreme, but they were not just straight pieces of wood forced in place. Spiling each plank was necessary to give the right shape that could then bend properly. A planking expansion showing the shape of each plank before they are bent will give you a better idea of what I am writing. If the attached is not clear, this picture and several other expansion drawings can be found on the National Maritime Museum collections site. When the site comes up, in the search box type planking expansion. Allan
-
Brian, If the hawthorns there are like in the U.S. they bear little apple fruit like crab apple trees. As it is a fruitwood, it may be a good wood to use as many fruitwoods such as apple and pear make great carving and other model building materials. I hope someone has experience with this wood tpo share with you as you may have a nice store of wood available. Allan
-
How to make a flag? (edited by admin)
allanyed replied to michael101's topic in Masting, rigging and sails
Michael The ensign is secured to the halyard at top and bottom corners of the flag. The halyard usually has clips (modern) or eyes spaced to match the height of the ensign and the ensign has grommets or some such at the corners. The halyard reaves through a sheave at the top of the flag staff and keep in mind the halyard is a continuous loop. There is a cleat near the bottom of the staff for tying off the halyard. If the ensign in the kit is paper, you may be better off to replace it with a cloth flag so it can be rigged, not glued. Allan -
Cathead Thanks for the Don Troiani reference. I Googled his work and thoroughly enjoyed browsing his American Civil War works. Allan
-
Britannia, July 4, 1840- She took the age of sail and 6 week crossings down to a fortnight with her steam/paddlewheel propulsion system. Samuel Cunard and his daughter were on board along with 117 other passengers, 89 in the crew and 3 cats to keep the rats in check. Allan
-
HMS Leopard by gobi71 - 1/300 scale
allanyed replied to gobi71's topic in - Build logs for subjects built 1751 - 1800
Quite remarkable Gabriel. The more I think about trying to work on such a small scale, the more I procrastinate, and will probably not have the eyes needed by the time, if ever, I decide to go ahead. Thanks for the photos and sharing your work. Allan -
John Make friends with your barber/hair stylist or have your lady make nice with hers and try to get an old pair of their scissors. They may or may not need to be sharpened, but will then last you a lifetime of rigging. I got a free 5" Joewell K2 shear this way. Allan
-
Don Based on the photos with the cloth and thumb and the next photo, I am guessing the sample in your photo is less than 100 thread count material. Have you tried it with finer cloth such as 600 or higher TC or other materials such as Silkspan? Allan
-
You are probably OK to use Brogard's proportions of 1716 wherein the total length is 25 15/16 X the caliber. Yes, the lengths did vary in many cases for the same caliber, but for your project this should work. All proportions from Brogard are on pages 92 and 93 of Lavery's Arming and Fitting of English Ships of War It may also be somewhere on the internet but I could not find it. Allan
-
Question about stoves and how the rotisserie worked
allanyed replied to Modeler12's topic in Nautical/Naval History
For those that want to read the patent on the Brodie stove see the attached. Spelling is as it appeared on the patent..... Allan Brodie Patent.pdf -
If I had to choose one, I would go with TFFM IV. If I were to choose two, I would also recommend Lees Masting and Rigging. English Ships of War 1620 to 1860. Lees can take a little time to get used to as he covers such a wide range, but once you home in on the appropriate year, you can size everything with good accuracy. Allan