allanyed
-
Posts
8,149 -
Joined
-
Last visited
Content Type
Profiles
Forums
Gallery
Events
Everything posted by allanyed
-
Welcome to MSW Jim, Where are you in Florida? There is am extremely nice group in the Naples area that meet on Saturdays that I am sure would be happy to lend guidance as you need it. Allan
-
This thread has brought up an interesting point. There are servings on a variety of rope sizes on any given ship. I just spent a good amount of time researching but have come up with nothing on the circumference of serving lines. I found reference to the number of strands but nothing on diameter or circumference. Is there such a chart with ratios of serving line size to the rope size on which it is to be used? Until now, I have gone with what looks right, but I wonder if, like in many things on these ships of ours, there was an established list or at least a rule of thumb. Allan
-
 Hi Andy, Thank you for sharing this. This looks like a very nice kit overall. I noticed that this kit has more frames than many of the others that you mentioned, which is a big plus. I believe a 30 foot launch, which would have been carried on a 64 in 1781, would have had more frames that were sided 2.25" but what they provided is much closer to an actual launch than some others shown on build logs here. Looking forward to your next posts! Allan
 -
Warm welcome to MSW Todd. You won't find a more friendly or helpful collection of ship modelers! Allan
-
Width in the bend
allanyed replied to rudybob's topic in Building, Framing, Planking and plating a ships hull and deck
I agree. Would you consider reading the article on spiling by David Antscherl in the Articles database here at MSW? It very clearly explains lining off the hull and spiling the planks. Allan -
Tying stays and shrouds to foremast top
allanyed replied to Scotty W's topic in Masting, rigging and sails
I was going to ask you what that is supposed to be. I thought maybe a stay of some kind or a swifter, but then there would be two of them, one port, one starboard and a swifter would be just above the other shrouds. So far, I cannot find anything like this in any book on rigging so it might just be whoever did the drawing did not do enough research. Stuff happens. Allan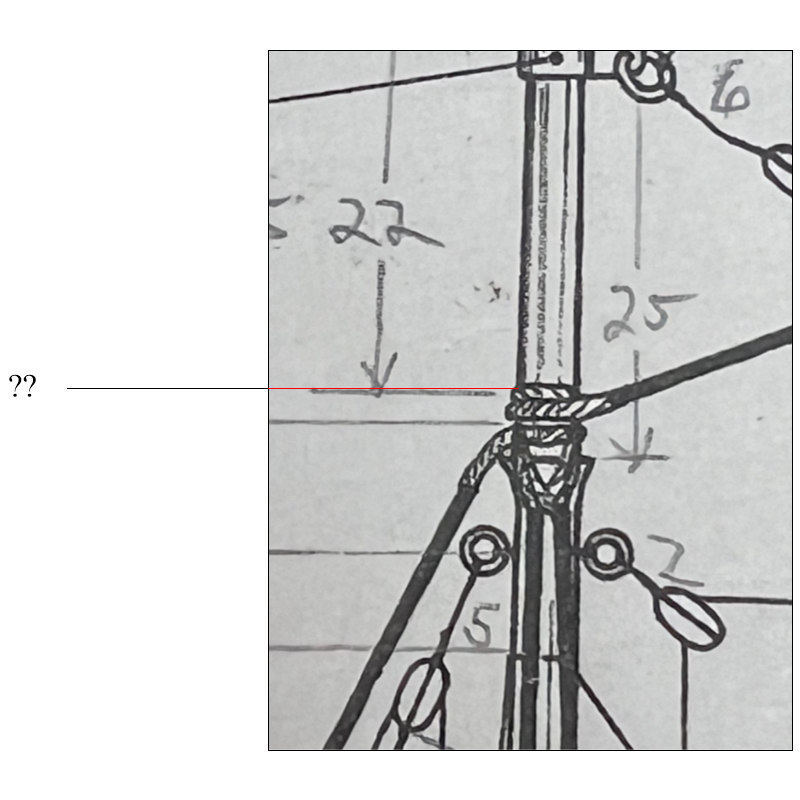
-
Ahhhh Capella, One of the nice things about a first layer is that you can practice proper planking techniques that will help with the second layer efforts. Sorry to say this but I would remove all the planking and start over after studying various planking articles in the MSW database and watching the four part video on planking by Chuck Passaro. You cannot get good results using edge set planks without pre-shaping them as shown in the video or spiling the planks from sheets of wood rather than using strip stock as shown in the article in the data base by David Antscherl. Go to https://modelshipworld.com/topic/22975-chuck-passaros-planking-videos-where-are-they/ and scroll down to the second post to find the videos or find them online. You will be amazed on how simple planking can be including no need for fillers. Allan
-
Tying stays and shrouds to foremast top
allanyed replied to Scotty W's topic in Masting, rigging and sails
Hi Scotty, They may be too small and break off when you tighten the rigging. You can make them larger and lower the location of the eyes as the kit plans may not be right. If you feel you want the eyes as in the plans and thus have to use small wedges consider cutting a slot through the mast and inserting a solid piece which is less likely to break. See sketch below. Note that the order of dressing on your plans of the topmast standing rigging looks wrong. As the U.S. followed British practice in most cases normally all the shrouds are set up first followed by the stay, then the back stay. Allan
-
Tying stays and shrouds to foremast top
allanyed replied to Scotty W's topic in Masting, rigging and sails
While this may not be exact, it should be somewhat close as it is based on drawings from Lees' Masting and Rigging for your time period for British vessels. Allan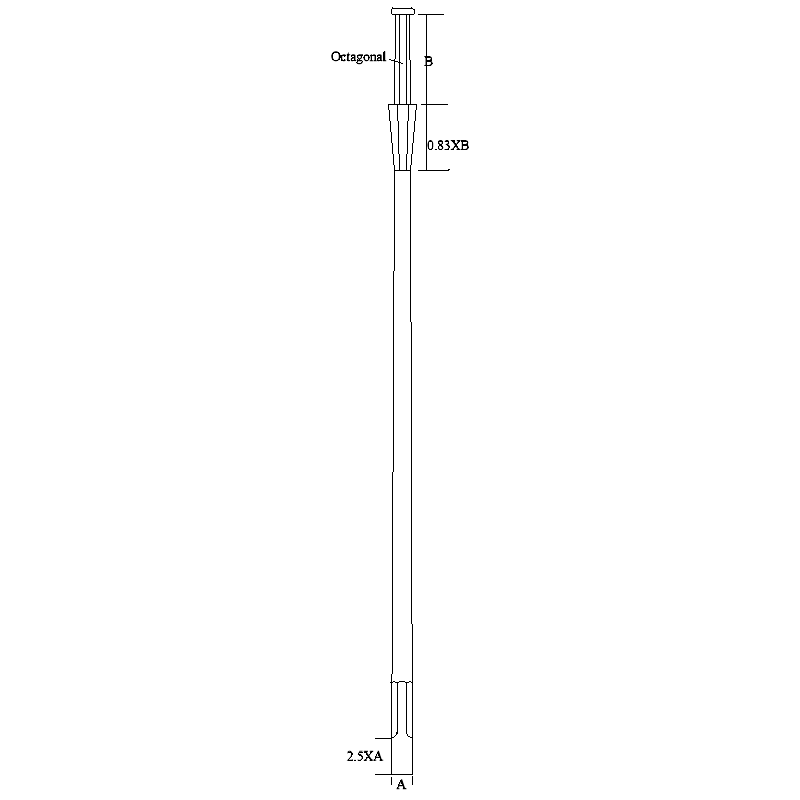
-
Great advice. He did his research so if he is giving block dimensions, I would not question them without contrary information from other contemporary sources. Allan
-
You are correct. Larger ships had more than one filling room, and each would have a light room with one or two lanterns. Lavery shows a lot of details on these areas in Part VII of The Arming and Fitting of English Ships of War Allan
-
Hi Gregory I agree with you that the block sizes for many/most ships, are based on the size of the rope. But, in the case of the Bluenose, the only thing I could find were block sizes in Chapelle's book on schooners as he does not give the line sizes. Different tack, but that is all I could find for these vessels. If he had listed line sizes instead, it should be the same for finding the block sizes as we are used to doing. Allan
-
There are block size charts for several similar schooners in Chapelle's American Fishing Schooners that will give you all the block sizes on pages 341-347 along with many other details you may find useful for the Bluenose. I would post these but there is far too much to copy here without possibly violating copyrights. Those vessels Chapelle lists regarding blocks include Dunton, Ed Bosley, Grampus, and Columbia. There is a used copy on line at Abe Books for $17. Allan
-
Yes it was meant for you. With more than two people active on scratch building this same project I get confused.😀
-
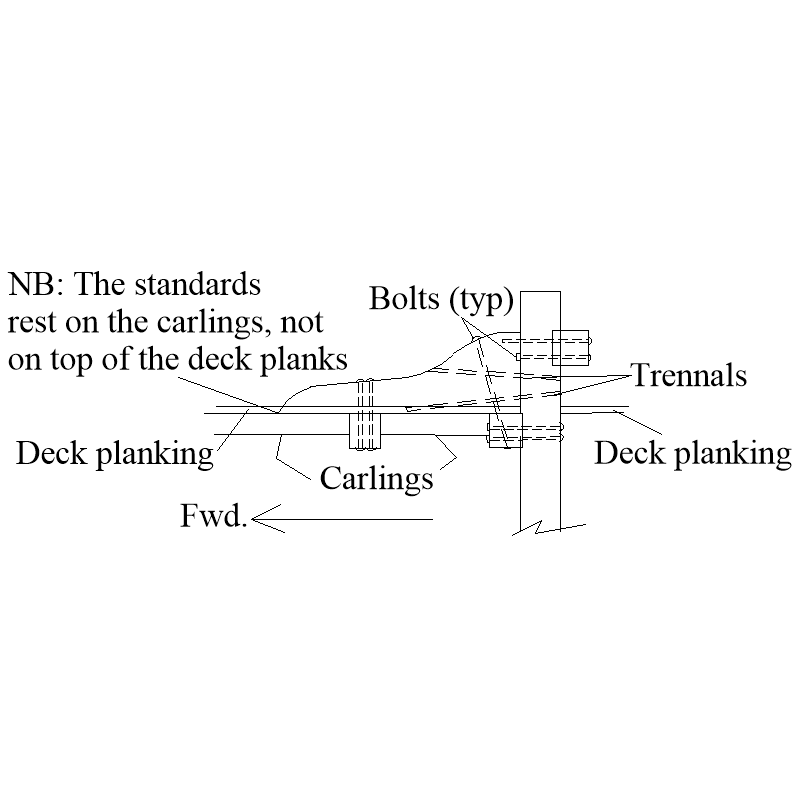
Alan As iron nuts and bolts came into use circa middle 1400s it is possible they would have been used on a carrack of 1492. Normally for the riding bitts that you show, the after face of the pins was scored to receive the cross beam and the standards were on the forward side. The crosspiece fasteners were commonly iron clench bolts, but 2 1/2" diameter trennals were sometimes on British ships. Hopefully the sketch below, based on drawings by Peter Goodwin, will help. Allan
-
Jiggling or Nibbling
allanyed replied to CLovehitch's topic in Building, Framing, Planking and plating a ships hull and deck
Clovehitch, GOOD ON YOU FOR ASKING FIRST. The key is remembering that the planks taper to about half their width from the dead flat to the bow and end at the rabbet with one or sometimes two exceptions. The best advice I can think of, assuming you will use planks from the kit is to watch the 4 part video by Chuck Passaro about planking on You Tube. Part one - https://www.youtube.com/watch?v=KCWooJ1o3cM They also usually get wider at the stern, but using kit supplied planks you can use stealers. Do a search here at MSW, there are a lot of posts on drop strakes, stealers, and planking in general as a ship was actually planked. Regarding boiling, that is not really needed. No harm, but not needed. Heat is the key more so than moisture. Watch the videos and you will be happy with the results you can achieve. You may want to invest in a $15 hot air gun versus a mini iron, but both work well. Hair dryers don't get hot enough most of the time and if it is hers, there in lies a problem. Allan -
The determination of the lengths varied with the era. What ship/nation/year are you interested in? Lees' information was developed from contemporary masting tables and from proportionate tables given in contemporary books and manuscripts. If you use Danny Vadas' spread sheets in the Articles Database here at MSW which are based on David Lee's formulas in The Masting and Rigging of English Ships of War (except do not use for ships built between 1670 and 1710 as the formula he made up is wrong) you should be close. There are contemporary drawings of the masts and yards available at the RMG Collections site and on the Wiki Commons website for specific ships but i have no idea if they are appropriate without knowing which vessel you have in mind. The era is very important as the lengths of the yards were sometime a proportion of the length of the mast, sometimes, the length of the keel, and others as a proportion of the length of the gundeck. If you are referring to the 1492 carrack (Santa Maria??) that you mentioned in previous posts, consider using Lees earliest era formula Length of main yard is 5/6 the length of the keel. 0.833X41=34.17 feet This is close to the double the beam length which would give you main yard of 36 feet long. The foreyard would be 0.80 the length of the main yard. The lengths of the upper yards are all a proportion of the lower yards. Allan
-
Hi Scotty FWIW, there is no reason to have to use push pins or clamps for the planking if you pre-shape them via the method shown in the four part You Tube planking video by Chuck Passaro. I realize the kit has precut strips so spiling is not an option if you use the wood they supply in the kit, otherwise that would also work well without pins or clamps. This is the same for your launch as used for full hull planking, a little finger pressure for a minute with PVA or a few seconds if you prefer CA. Just remember the planks need to taper so the end of every strake lands in the rabbet. Allan
- 129 replies
-
- 2
-

-
- Bounty Jolly Boat
- Artesania Latina
- (and 1 more)
-
Hi Eck, Thanks for sharing your build with us. This is often seen and I realize it is a kit thing but it is a pet peeve and I often wonder why there only a couple kit makers that show how to properly plank a hull. For future builds you might want to study the planking tutorial here at MSW in the articles databased by David Antscherl and the four part You Tube video by Chuck Passaro on how to duplicate realistic planking. The pic below shows the difference between what many kit instructions yield and realistic planking where the planks end at the rabbet. The only exception would be if a drop strake is needed. If the hull is to be painted or coppered of course that pretty much covers any differences. Note that the wales tapered to the same thickness as the surrounding planking as they approach the rabbet. Allan

-
VERY interesting. What a great find!! Allan
-
Jiggling or Nibbling
allanyed replied to CLovehitch's topic in Building, Framing, Planking and plating a ships hull and deck
Phil Are you asking about for the Revenge 1577, or later, 1652, 1654 or 1699? Not sure it matters, but I am also curious to see an answer based on contemporary sources. Allan -
Depends. For the magazines there were light rooms that sealed off the actual light source from the magazine. For the Fly 1776 you can see one on the internal profile drawing. https://www.rmg.co.uk/collections/objects/rmgc-object-84458 For the gundecks the tin lantern from the Victory may help. https://www.sothebys.com/en/buy/auction/2022/treasures-2/a-painted-tin-and-horn-lantern-from-the-gun-decks It looks a lot like the one in the photo you posted. Hope this helps Allan
-
Scratch built chainplate
allanyed replied to RossR's topic in Metal Work, Soldering and Metal Fittings
Thanks Toni, I looked in every logical book that I have except my own! Thanks again. Allan
-
Noticed the same thing Mark and the running line is tarred. I figured it was just a test set up. Good point though. Glenn, beautiful work and thanks for posting the photos. I wonder though about the second photo in post #1. I always thought there would be an eye, with or without a thimble, rather than the line being forced under the strop around the block. (Right side of the photo) Allan
-
Jiggling or Nibbling
allanyed replied to CLovehitch's topic in Building, Framing, Planking and plating a ships hull and deck
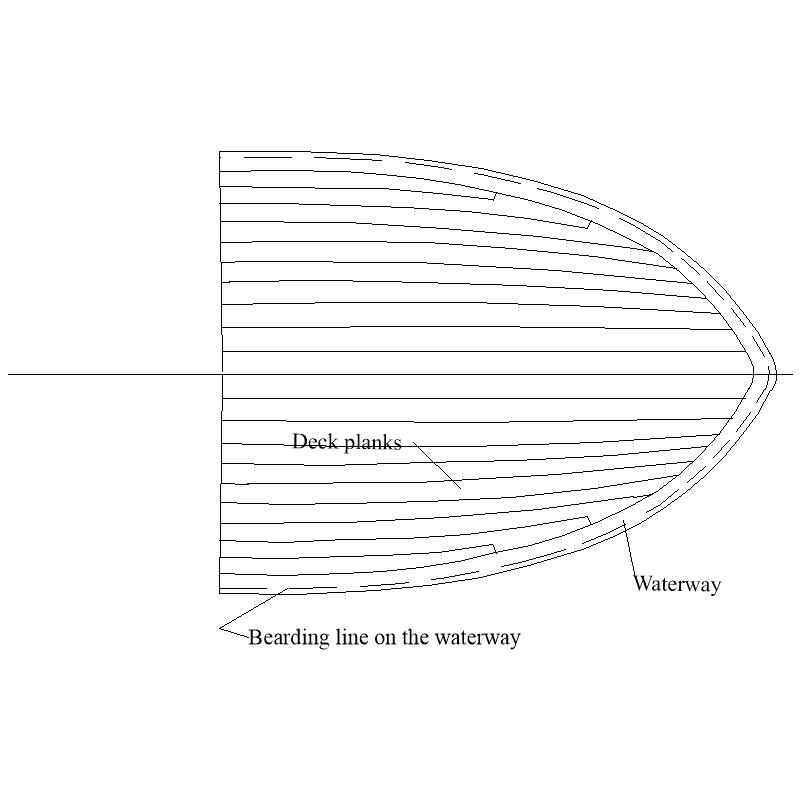
Are you speaking about the shape of the waterway? (outboard most piece) Depending which ship, era, nationality and deck, the planking may very well have been done as shown on the following rough sketch. Allan