allanyed
-
Posts
8,149 -
Joined
-
Last visited
Content Type
Profiles
Forums
Gallery
Events
Everything posted by allanyed
-
Hi Granta, I am confused by the order of dressing you give from Mastini. From Lees, The Masting and Rigging of English Ships of War page 158. The normal order of dressing for the lower masts is the "pendants of the tackles, shrouds, stay, preventer stay (on small ships it was sometimes the practice to carry the preventer stay under the stay.)" For the topmasts, the order is "Burton pendants, shrouds, backstays, preventer stay, and stay" Regarding the center line rigging which lines are you referencing on the center line if not the stays and preventer stays? Is it that merchant ships used the opposite order of dressing than warships?? Thanks Allan
-
 Greg, Couple weeks late but better late than never in reading up on the belaying pins. You made my day! I do wonder how small one can go (1:64??) before considering going to brass. Even then, starting with the thicker rod makes a ton of sense, thank you very much for that tip. Allan
 -
Welcome to MSW John. It may be too late but you might consider setting it aside for now and starting with one or more of the high quality three vessel starter series from Model Shipways designed by David Antscherl. These are very accurately designed and will teach you great techniques and habits rather than the opposite. It is a blessing and a curse, but you now have over 42,000 potential teachers and advisors here at MSW. Allan
-
Thanks Mark, At least you do not have to worry about ratlines on the pram😀 Seriously, study the build logs, there are a number of top rate builds in both the kit and scratch build forums. Also consider putting some money towards a book or two that will teach you neatly done rigging from masts and yards, to standing and running rigging, blocks, and more. When you go to choose your project that has shrouds and ratlines, to make life easier, consider a small vessel at a large scale (1:48) or larger if possible to start. I am sure there will be suggestions from members on books that will help without braking the bank. Allan
-
I was lucky to get them at a Cosmetic and Hair trade show in NYC when I was selling manufacturing equipment to that industry. Prices were discounted quite a bit, so I justified the expense in my own mind. 😁 To this day I have no regrets and so far it comes to about $1.50 per month and that drops each month they are still in the work shop. Allan
-
Mark, What ship are you working on? Rigging buntline, lift, and similar blocks on the yards is definitely a great way to go. Rigging shrouds and ratlines off the ship,,,,,, no advantages and a lot of disadvantages. There are good books on rigging as well as dozens of logs here that show good techniques. Look at Ed Tosti's build log on Young America as one of many examples. Allan
-
You have provided an extremely well done treatise on what can be done even starting with the limitations provided by a number of kit makers. Kudos!!! Allan
- 2,699 replies
-
- 5
-

-

-
- heller
- soleil royal
- (and 9 more)
-
I agree with regular scissors, but good quality barber shears do not have this problem at all. I have two pair of Joewell barber shears I picked up at a trade show in NYC over 10 years ago and they have never failed me, one for rigging and one for mustache and beard trimming. My favorite is the Joewell Classic 5.0. It cuts closer and cleaner than anything else I have tried, including nail clippers, regular scissors, and scalpels. I have even used it to trim any errant fuzz at the end of a line, so it has proved its worth. Allan
-
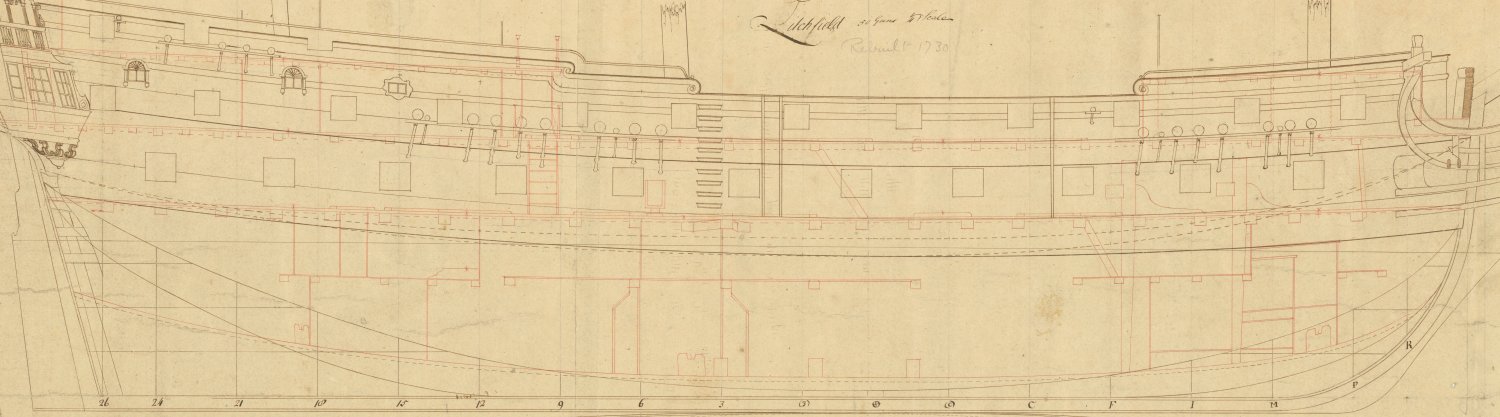
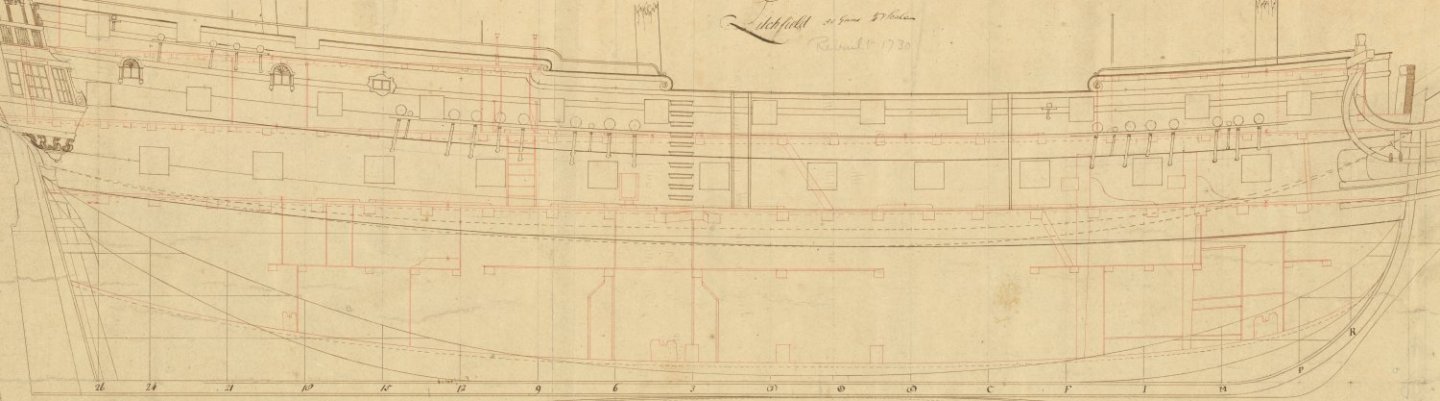
1695 is the J4030 drawing. Interestingly, the contemporary drawing J4031 for the 1730 rebuild is also called Litchfield with a "t" . The town was founded in the 12th century so somewhere in between 1100 and 1695 is my guess. RMG describes both plans as Lichfield and noting it was also spelled Litchfield. No matter for the model as the Admiralty disallowed names on the ships until 1780 and then after about 10 years stopped allowing them again in 1790. I have seen a couple exceptions on contemporary models, but that may have been for presentation purposes only. Allan
-
Biker Mart According to contemporary sources it was spelled both ways. One example is below from RMG, plan J4030 which is based on the original versus the 1730 rebuild. By the way, the pencil notation on the drawing for the 1695 version is incorrect and RMG has been told about it, which they acknowledged. The give away on which version the J4030 below is, is the doubled wales which are 17th and early 18th century designs. The later version of 1730 was built to the 1719 Establishment which had solid belts of wales. It states that the main wales and stuff between were equal thickness worked hook and butt for a total of 42" width. The channel wales has a total width of 26 1/2". Each of the lower wale strakes on the drawing below are each 12 1/2" and the width of the channel wale strakes are each 10 1/4" Allan

-
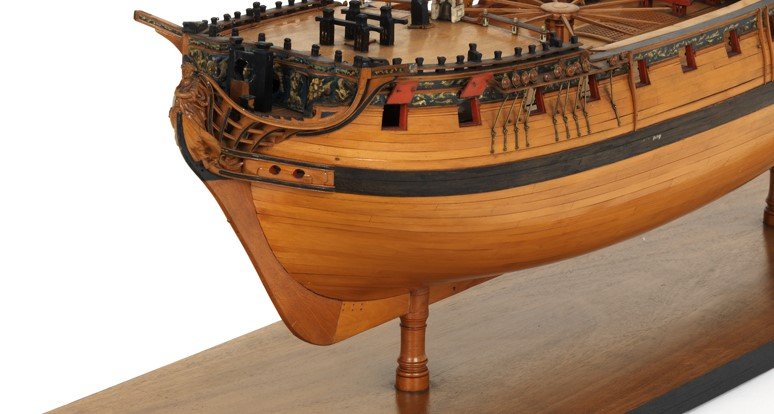
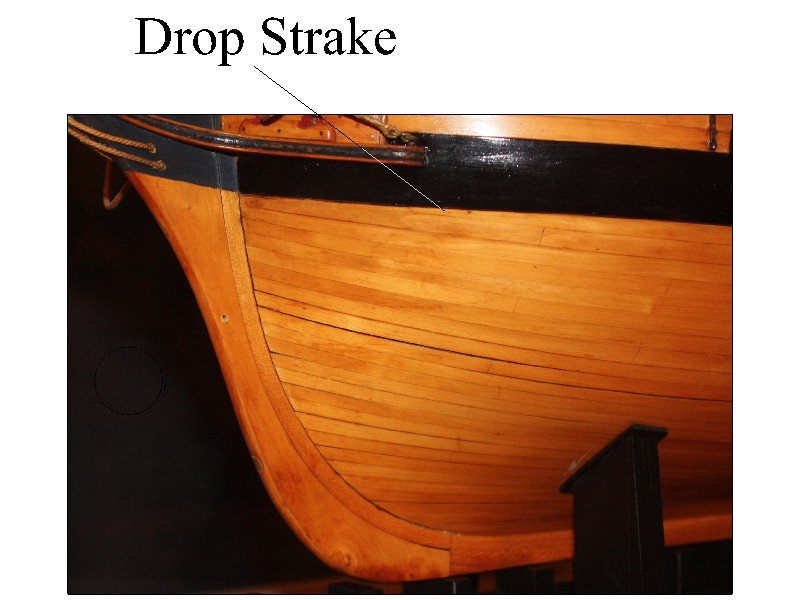
I would ignore his videos when it comes to the second layer of planking as they look nothing like any ship ever built. His videos over all are interesting, but his planking uses neither Chuck Passaro's edge bending nor spiling and as a result, it looks like many of the strakes fail to end at the rabbet on the stem as they should. The second layer pretty much looks like many other kit planking methods that were never used on any ship. He does not mark out the lay of the planks to get the appropriate widths along the strake with stick strips or any other method so it is near impossible to get the planking tapered correctly. Actually he does not appear to bother with any tapering, thus the inappropriate end result. Look at time marker 8:14 on video number 6 and then compare to the planking on contemporary models. One example to compare follows. Note that every strake below the wales tapers and other than one drop strake, ends at the rabbet at the stem.
-
Actually these are completely different roads to get to the same endpoint. Chuck uses edge bending while spiling is cutting the plank to shape. I have found success with both most of the time, but edge bending can be a problem with tight turns and hard woods, whereas spiling is fail safe. There is a very informative article on spiling here at MSW in the articles section written by the author of the The Fully Framed Model series David Antscherl. Allan
-
Bedford, I have an open question to any member with knowledge on this, hope you don't mind. Why does the kit have belaying pins? Belaying pins did not come into common use for British vessels until 1771. I realize many kit makers do little research, but this seems pretty basic. I may be completely wrong and she did not follow normal practices in regards to rigging and belaying points. None of the contemporary drawings for R Caroline (later R Charlotte) at RMG show belaying pins or pin racks that I could find. Thanks Allan
-
Welcome to MSW!! Love the race track at Dover and the fact that it is close to St. Michaels and the striped bass fishing can be fantastic 😀 Allan
-
Neatly done water line! Not so easy even when using tape and sealing with a clear to prevent bleed through before adding the white. For those with less steady hands an alternative is to consider using auto pinstriping rather than painting. I did one model on which the pinstriping has stayed on without any lifting for 14 years (so far) including shipping from the US to Europe and then spending the last 13 years at sea. Once the paint and tape were done, the final finish for the hull was five coats of clear spray. Allan
-
Not to steal your log Gary,...... Steven I see that this is your first post. WELCOME to MSW. Please do post an intro in the new member section to let us know a little about you. Thank you! Allan
-
Your first layer of planking looks to have the strakes tapered and spiled which is great. Will you be doing the same for second layer? It is so nice to see proper planking techniques with your kit. Was this part of the kit instructions or did you do this on your own? Either way, it is great to see! Allan
-
Welcome to MSW Farmer. At 25 years old you are still a kid to most of us 😀 I know freight is an issue more than ever, but if you go with the three vessel series you will likely be hooked on ship modeling forever and you will learn SOOO much that will carry forward as you get into more complex models. Look at the build logs again and note which brands are predominant. There are good reasons. At least, before you go there, ask which specific kits they have and post again to get some feedback on those specific kits before spending your money. Some may be great, others not good. Again, welcome to MSW! Allan
-
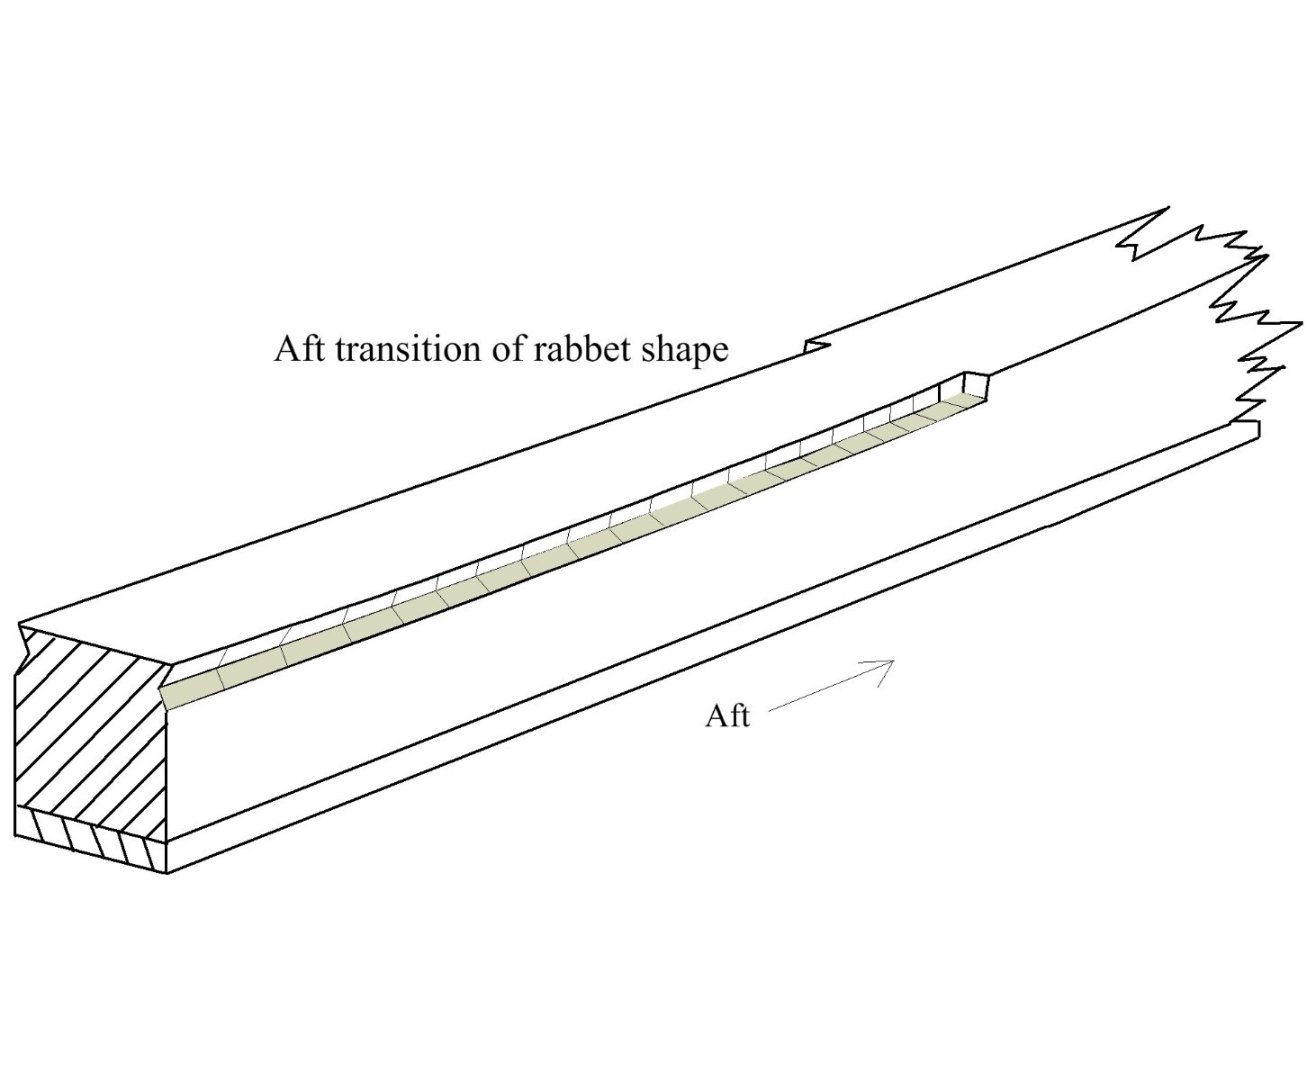
Allen, The groove is called a rabbet which I believe comes from the French word rabbat, meaning a recess and is a dynamic landing space for the edge of the garboard. The rabbet goes from the top of the stem, down to the keel, aft to the stern post, then up to the wing transom. Along the keel it is shaped in conjunction with the frames (or bulkheads) so the garboard strake fits neatly and securely. The sketch below shows where it is very dynamic aft to accept the garboard as it goes from near horizontal midships to near vertical. Practically speaking, you can install the garboard any way you like and it may look OK if done with care. Look at your models and compare to models with a rabbet. There are MANY photos of models at the RMG Collections site that you can study. Pic below may be of some help. The second pic is a contemporary model that happens to have drop strake. Note how, every strake tapers and other than the drop strake ends at the rabbet. Allan
-
A method for making panelled sails using paper
allanyed replied to Cathead's topic in Masting, rigging and sails
Hi Kevin If you do a search here at MSW on silkspan or silk span there is mention of a You Tube presentation in one or two of the discussions that may answer your questions. It is similar to the methods in Swan IV Supplement on making sails. Seawatch Books offers the booklet for about $8 if it is stock. Allan- 49 replies
-
- 2
-
-
- sails
- sail panels
- (and 1 more)
-
Based on your posts, you are succeeding quite well. Hopefully those kit makers such as this one with arguable quality levels will see what you have done and fix the myriad of mistakes you have come across. Allan
-
A method for making panelled sails using paper
allanyed replied to Cathead's topic in Masting, rigging and sails
I agree with Eberhard. MAYBE experiment using silk span and matte medium instead of paper and diluted glue. Sig makes three thicknesses, 00 being the thinnest, GM (medium) and SGM (heavy) https://sigmfg.com/products/sig-silkspan-tissue?variant=465592221705 There is a great booklet by David Antscherl at Seawatch books, You Tube videos, and a lot of discussions here at MSW on using this material, including painting (off white or any other color as needed), making reinforcing pieces, and more. Allan- 49 replies
-
- 2
-
-
- sails
- sail panels
- (and 1 more)
-
Sadly it seems to have become the motus operandi for them and a number of other kit makers. Luckily there are several high quality brands from which to choose for future projects. Allan
-
Doug, This may not apply to Bounty, but your adding the hanging knee is actually far more appropriate than the frame work provided by AL. Instead of a hanging knee they appear to have a hanging standard as part of the frame. Standards were often used on the orlop and platforms, but for the time of Bounty I don't think they would have them on the upper decks. There would normally be a clamp (thick strake) on which the deck beams rest and a hanging knee and lodging knee, nothing like the design they came up with. (I realize they are in business to make money and have to go cheap as much as possible) FYI the handing knee and lodging knee would be sided about 7" thick. for a ship her size. Pictures, 1000 words, &c. No doubt impossible to change on your build at this point, but adding the hanging knees as you are doing is a great idea. Allan

-
Hi Richard Good to see you back at it! To avoid the problems of the first layer of planking, will you be studying the tutorials in the Articles section here at MSW on how to plank the hull. The tutorial by David Antscherl as well as You Tube videos (4 parts) on the internet by member/moderator Chuck Passaro are invaluable pieces that will save you a lot of grief and yield a realistic hull versus the fairy tale hull planking seen on OcCre models. Allan