HOLIDAY DONATION DRIVE - SUPPORT MSW - DO YOUR PART TO KEEP THIS GREAT FORUM GOING! (Only 13 donations so far - C'mon guys!)
×


mobbsie
-
Posts
1,493 -
Joined
-
Last visited
Content Type
Profiles
Forums
Gallery
Events
Everything posted by mobbsie
-
 OK, Officially jealous now. That's a great job mate. You gotta go for the Deck Clamp Bolts. Be Good mobbsie
- 456 replies
-
- 3
-

-
- finished
- bomb ketch
- (and 2 more)
-
Belated Congratulations Matti, both the Vasa and the case compliment each other beautifully. Be proud mate. You don't appear to have started your next build, what's it gonna be mate. Be Good mobbsie
-
This is a complete lessen on how things should be done mate. I love it Be Good mobbsie
- 2,191 replies
-
- 3
-
-
- confederacy
- Model Shipways
- (and 1 more)
-
I take it the figure head of Jason is a self sculpture, nice pecks mate. Why is the stern always gives the most problems, and that's on all ships in my experience. You've conquered your problems nicely. Be Good mobbsie
-
I think we may be due an update mate, getting withdrawal symptoms here. You don't want me getting symptoms now do you. Be Good mobbsie
-
Nice to see you back and still in one piece Captn. Love those rudder shots and appreciate the work that's gone into it. Thanks. Rest up and do as your told, that's the quickest way back to full health. Be Good mobbsie
- 625 replies
-
- 3
-
-
- bounty launch
- model shipways
- (and 1 more)
-
Don't you just love those Parrel's, I like the way you done yours though. Looking real good Ray. Be Good mobbsie
- 536 replies
-
- 1
-
-
- diana
- caldercraft
- (and 1 more)
-
The result is it's own reward John, they look great. Be Good mobbsie
- 2,250 replies
-
- 2
-
-
- model shipways
- Charles W Morgan
- (and 1 more)
-
Me Again I have a couple of pics to hopefully explain a little better what I mean. The first is of the back end with the holes rimmed with a lead pencil, hopefully you can see the pencil hardness, it's the hardest I could get and so far to my experience it doesn't spread. The second is the same area but it's been given a coat of Poly, this has made it quite yellow and will I think have a large bearing on the filler choice, the holes appear to be completely black but when the filler is applied hopefully all that will be left will be a darker ring around the treenail. That's the theory anyway, we'll have to see. Holes drilled with pencil rim. Same area with a coat of Poly Hope that helps guys. mobbsie
- 255 replies
-
- 15
-
-
- granado
- bomb ketch
- (and 2 more)
-
Hi Lads, Bleeding, in this case it's not so much bleeding it's more like smudging, after putting the pencil around the rim of the treenail hole I gently sanded them down and applied a clear Poly. Hopefully when the hole is filled I will be able to work the mixture without the pencil lead and filler spreading onto and into the surrounding area, I haven't actually tried this before and it's a dangerous doing it without trials first. To my mind it should work without any problems but that's famous last words, I'm just keeping my fingers crossed. mobbsie
- 255 replies
-
- 3
-
-
- granado
- bomb ketch
- (and 2 more)
-
Hi Guys, Thanks for your very kind comments and for hitting the like button. To answer your questions regarding which colour I prefer for the treenails, I'm leaning towards No 5 but with a slight difference, the treenail will be ringed by a darker rim but no firm decision on the filler has been made just yet. Once I've done the rims I am going to poly the planks to stop any bleed that may occur, a final decision will be made when all the tests are in which means I am going to have to wait for the only member of the group who is still working, I find this so inconsiderate, "but no rush Grant". :D . Andy, To answer your question mate, I had to pay £72.00 VAT and a handling fee of £13.50, I had to pay up front before the wood was delivered which peeved me. Once the wood was delivered these costs paled into insignificance because Jeff's wood is absolutely 1st class and he's done me proud. Wayne, Sorry to disappoint mate but that would send me right over the top. Your more than welcome to have a go for me. :D Be Good mobbsie
- 255 replies
-
- 4
-
-
- granado
- bomb ketch
- (and 2 more)
-
Hi Mate, Very subtle differences but my preference is torn between 4 or 5. discernible yet unobtrusive. I'll try and slow down even more mate but we Brits aren't used to a snails pace. Be Good mobbsie
- 456 replies
-
- 2
-
-
- finished
- bomb ketch
- (and 2 more)
-
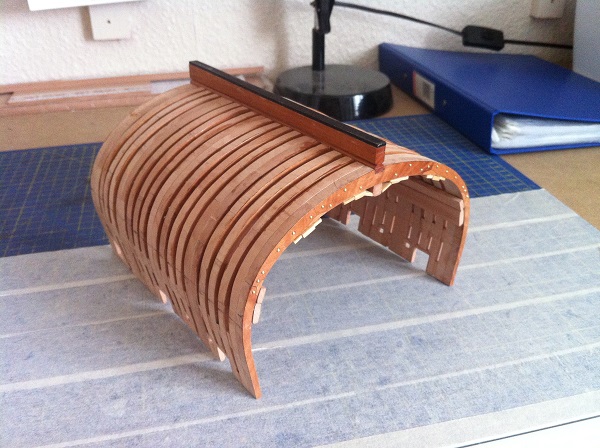
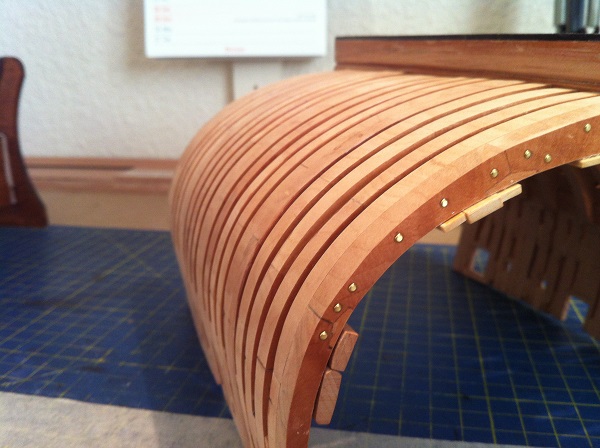
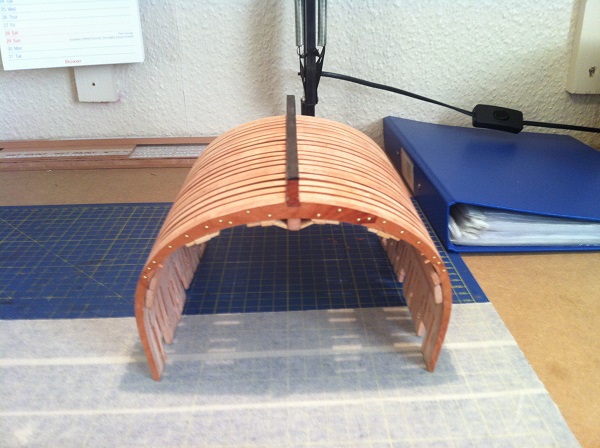
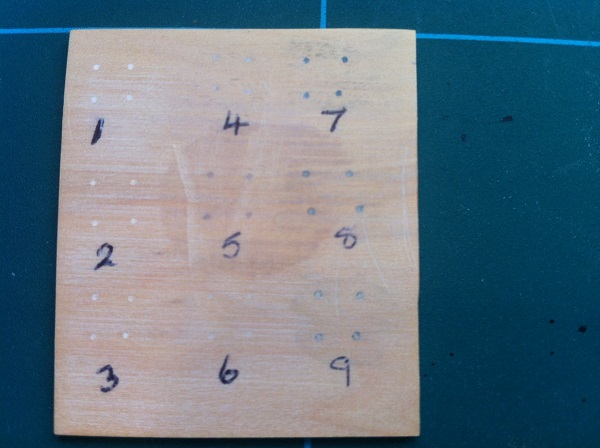
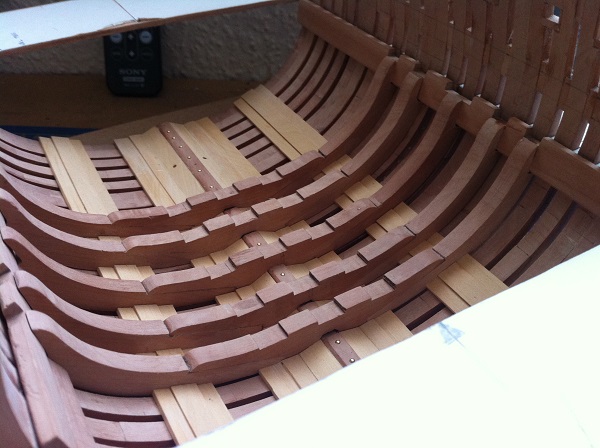
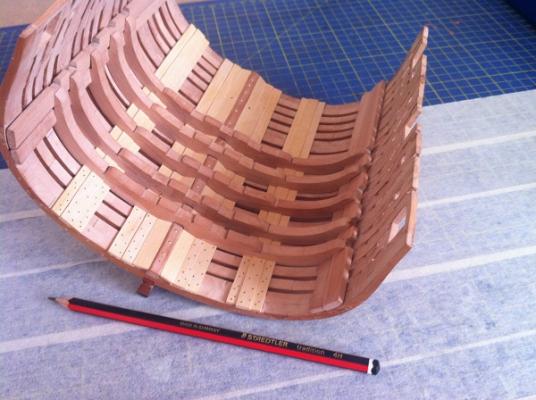
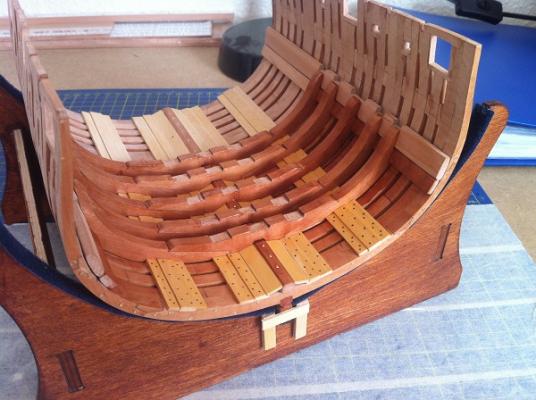
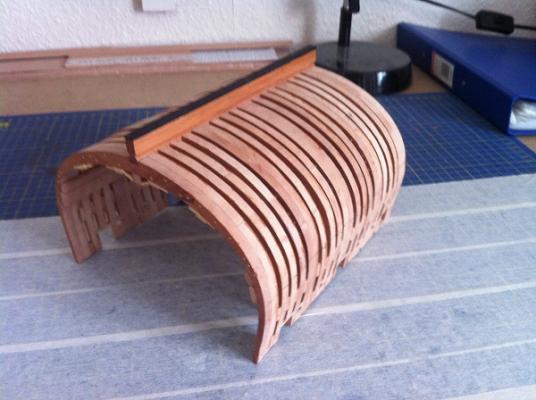
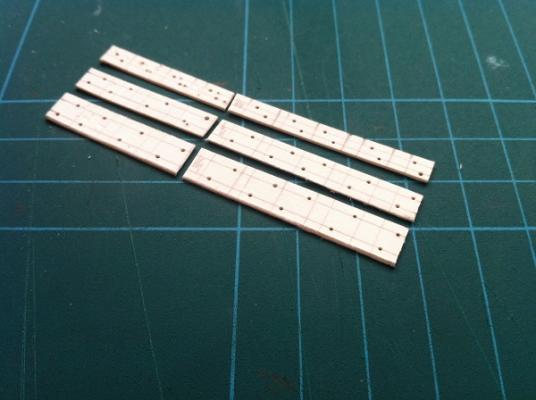
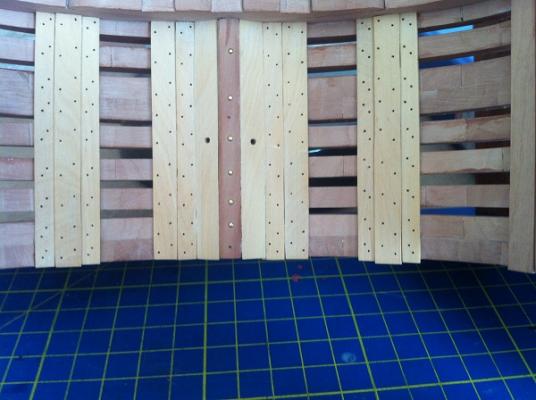
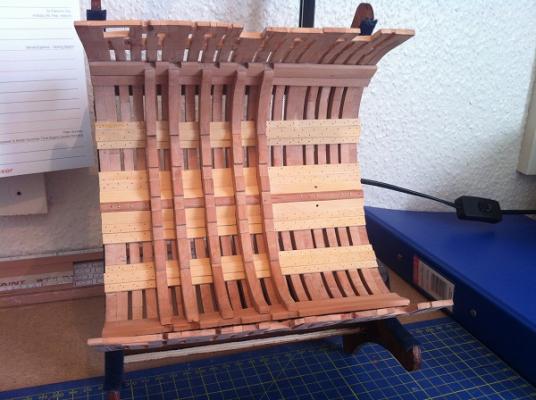
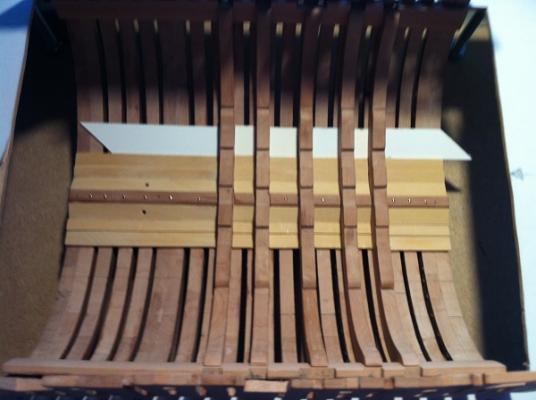
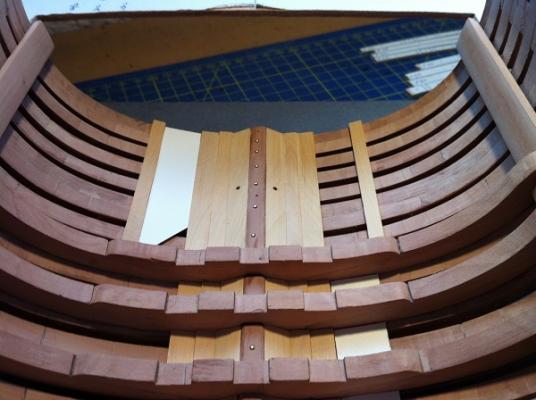
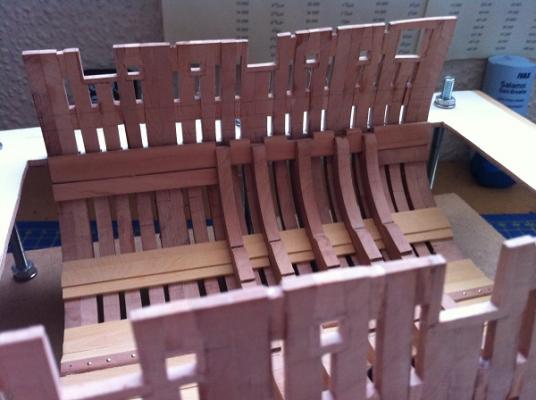
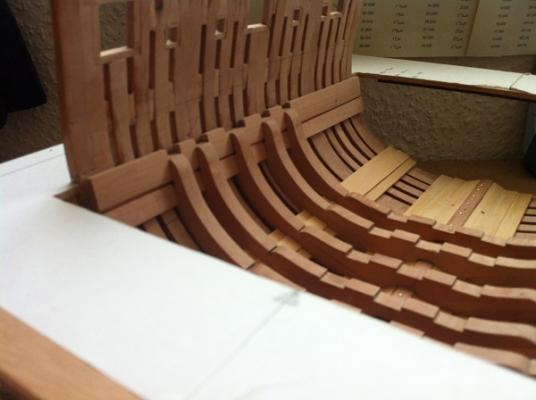
Hi Gents, Well she's out of the plastic bag and some progress has been made. First job was to remove the Jig, this was done with some trepidation as I wasn't sure what was going to happen, at first it was quite tight but when she came out she popped like a cork out a bottle, and in one piece. She is surprisingly robust even at this stage. Next up was to make a working stand, all I done was to cut my old Agamemnon stand down, I cut about 5 inches out of the length and the stand ends are in line with Frames "D1-D2 and Frame 12 so there is no need to place lateral planks. It will do the job nicely I think. After that the outside of the frames needed sanding / fairing, not my most favourite job but it needs to be done. This was done with no problems or disasters. There was some discussion about Treenailing the Footwails Strake's and Limber Board & Strake's, I wasn't going to do it but have now changed my mind, so I have now drilled 260 x 0.5mm holes in said Strakes and Boards, these will be filled with false treenails, a mixture of filler and sawdust. So that's where I am at the moment, some pics. Just out of the Jig prior to Fairing the Frames After Fairing the Frames Working Stand Template used for marking Treenails Some of the holes 0.5mm holes drilled Colour testing for false Treenails So there we are, up to date. Your comments, remarks and thoughts are more than welcome guys, good or bad. Be Good mobbsie


- 255 replies
-
- 18
-
-

-
- granado
- bomb ketch
- (and 2 more)
-
Hi Grant, Well done on those Spales mate, nice innovation and application and they can be used in so many ways in the future. It's a real bummer you had to redo the Pit Clamps but you made a good job on the replacements. :) You've made excellent progress mate so I shall now get my Cross Section out of the bag and continue, that is of course after the big clean-up. As far as tree nailing is concerned on the planking I'm not going to do that, I think in some cases "Less is more". I will however be doing the external planking. Great talking this morning mate, got a good bit sorted out. Be Good mobbsie
- 456 replies
-
- 5
-
-
- finished
- bomb ketch
- (and 2 more)
-
What they said Augie and more besides. Great stuff. Be Good mobbsie
- 2,191 replies
-
- 2
-
-
- confederacy
- Model Shipways
- (and 1 more)
-
Good rescue John, I like what your doing here a lot. Keep up this excellent work mate. Be Good mobbsie
- 2,250 replies
-
- 2
-
-
- model shipways
- Charles W Morgan
- (and 1 more)
-
Hi Mate, Those foot pads look really cool, it's a first I think and good that it was a local Ausie company. Looking at the LOA you have some real nice angles there, their gonna be fun. Good idea to lay some foundation work ready for the radio gear to go in. I you were to put a wiring loom in that would save a headache later and keep it tidy. Looking forward to further updates mate. Be Good mobbsie
- 339 replies
-
- 3
-
-
- dumas
- Chris-Craft
- (and 3 more)
-
There's a lot of work goes into those Floor and Futtock Riders mate, they look great. Glad you've got your fixing order sorted out, should work out fine. Be Good mobbsie
- 456 replies
-
- 1
-
-
- finished
- bomb ketch
- (and 2 more)
-
Can I have your old ones please Jack. Well done mate that's as close to perfection as you can get. BE Good mobbsie
- 60 replies
-
- 2
-
-
- granado
- bomb ketch
- (and 1 more)
-
Well done mate, nice job on those little bits. She's looking real good. Be Good mobbsie
- 1,616 replies
-
- 2
-
-
- caldercraft
- agamemnon
- (and 1 more)
-
Hi Ken Be as bold as you like mate, I'm not tellin It's not a ship related build at all, I built a Norman Catapult a little while ago and decided that I would like to continue with that line of weaponry. The Scorpione is a 16th Century Double Crossbow, it's a kit by Mantua and is 1:17 scale, I got it from Cornwall Model Boats. I have checked with Chuck and he's happy for me to start up a build log in Shore Leave so that will be up and running in the next few days, please feel free to pop in and have a look. Augie, thanks for the good word mate, appreciate it. Be Good mobbsie
- 255 replies
-
- 7
-
-
- granado
- bomb ketch
- (and 2 more)
-
Hi Capt'n, Not too sure at this moment in time mate, I'm afraid I've forged on ahead a little too far and now have to wait for my build buddies to catch up a little. We are building this as a group but I was forgetting that Grant is still working and has a limited build time, Jack has undergone surgery and is slowly getting back into it, and Lou is building on a different scale so has a whole different set of problems and challenges. At a rough guess I would say that I'm about 3 weeks to a month ahead. That sounds dreadful and I don't know if I can stay away that long. Still as an up side it will certainly give me more time to spend watching what your doing on the Launch, so many ideas coming out of your build that I think that it will change the way a lot of builders approach their own, and so it should. Be Good mobbsie
- 255 replies
-
- 2
-
-
- granado
- bomb ketch
- (and 2 more)
-
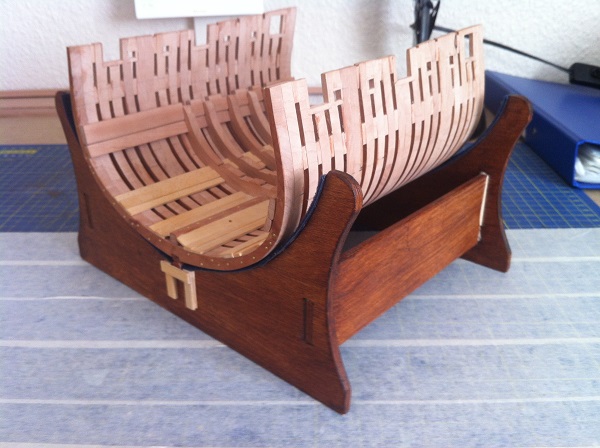
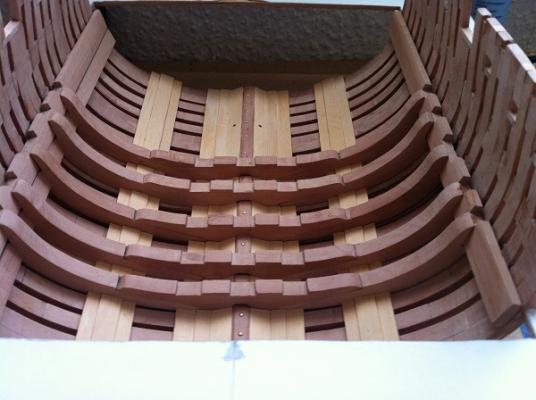
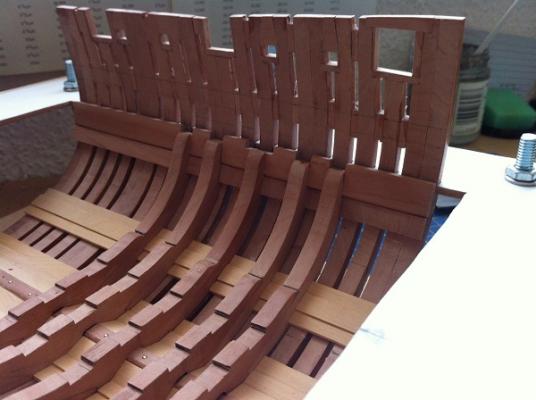
Hi Gents, Having said that I would be suspending the shipyard for a while well that wasn't strictly true. I put it down to toothache syndrome, you know, if you have a toothache you just cant help but keep putting your tongue on it, well so the cross section turned out to be the same. I do have an update on the build which for me seemed a good place to stop. All the Limber Boards and Strakes are completed as is the Footwailing Strakes, for the Footwailing I used a cardboard template to give me the distance between the Limber Boards and the Footwailing's. This is quite a simple section in that there is no shaping to be done, it's just a case of cutting them to size and fitting in place. Following that I decided to permanently fix the Mortar Deck Clamps and fit the Mortar Deck Clamp Upper Strake (thick stuff), the Mortar Deck Clamps were already cut out, shaped and were dry fitted, these took but seconds to fix. The Upper Strake needed to be cut and though not required I shaped the back edge, that done they just needed to be cut to size and fixed in, so that's where I am now. The next section to build will be the Shell Room, Mortar Pit Beams and Planking but they will be for later, NO HONEST I MEAN IT. I will however still be building but not on ship stuff, my secondary build has arrived and so I will still be busy. OK now for some pics Cardboard template to give correct spacing along the length of the Footwailing Parts of the Lower Strake have been fitted All the Footwailing Strakes have now been fitted Next up is the Mortar Deck Clamps and Upper Strakes So all up to date now, the build has now been placed in a carrier bag to keep dust off, the next time she comes out will be for a couple of coats of poly, then back into the bag until it's time to carry on. Thanks guys for all your remarks and comments and for hitting the like button. Be Good mobbsie


- 255 replies
-
- 20
-
-
- granado
- bomb ketch
- (and 2 more)
-
Hi John, No worries mate, glad they came through for you. You've certainly made good use of them, lovely rigging mate. Be Good mobbsie
- 2,250 replies
-
- 1
-
-
- model shipways
- Charles W Morgan
- (and 1 more)