HOLIDAY DONATION DRIVE - SUPPORT MSW - DO YOUR PART TO KEEP THIS GREAT FORUM GOING! (Only 13 donations so far - C'mon guys!)
×


mobbsie
-
Posts
1,493 -
Joined
-
Last visited
Content Type
Profiles
Forums
Gallery
Events
Everything posted by mobbsie
-
 You have some great work going on here Bob, beautiful rigging mate. With regard to your slack ropes, I'm sure the rope reacts to humidity, with the heating on the humidity grows and the resulting moisture is taken up by the ropes, when the air conditioning is on this sucks out the moisture and the humidity drops. That's my theory anyway. Keep up this fantastic work and I for one look forward to further updates. Be Good mobbsie
- 1,477 replies
-
- 1
-

-
- essex
- model shipways
- (and 1 more)
-
Hi Adriaan, Ouch, that damage looked as though it hurt, hope it's not too difficult to fix. Nice use of the lights mate, she's going to look special when she's finished. Be Good mobbsie
-
She's coming together really nicely Denis, my bet is you cant stop smiling when you look at her and that's as it should be. Be Good mobbsie
- 956 replies
-
- 3
-
-
- andrea gail
- trawler
- (and 1 more)
-
Hi Matrim, This is a lovely little boat and you've made a great start. Mind if I pull up a barrel and follow along. You have some great examples to help and guide you through. Be Good mobbsie
- 33 replies
-
- 3
-
-
- model shipways
- 18th century longboat
- (and 1 more)
-
Hi Gents, Thank you very much for your kind comments and remarks, I appreciate them greatly. Wes, I have a confession mate, the isopropyl was given an airing, I had to use it to remove the Floor Riders and Mortar Deck Clamp. The white Glue I'm using is Evo-Stick weatherproof wood adhesive, when it sets,it sets solid and would need chiselling off. With regard to the razor saw Grant put me onto it, it really is a wonderful little tool and I wouldn't be without it now. I got it from John Voltech at UMM ( Unique Master Models ), the web site is www.umm-usa.com . The postal address is :- 1042 Inverrary Ln, Deerfield, IL60015, Phone 847.537.0867 Catalogue No JLC 004 20 years Anniversary JLC Micro Pack, Cost $20.95. I also got a Mitre Block and spare blades to go with it. Catalogue No MN 034 Micro Mitre Box 45-90-60 degree cuts Cost $18.96 Catalogue No JLC 006 JLC Micro Spare Saw Blades Cost $14.50 John Voltech's email address is john@umm-usa.com He really is very helpful and gave me a good service. Hope the helps mate. Be Good mobbsie
- 255 replies
-
- 6
-
-
- granado
- bomb ketch
- (and 2 more)
-
She caught my eye again Denis so had another look through and it seems a shame that she has been relegated out of contention. Your lifting her out of the also ran's mate and making her into something special. Would it help to resurrect her if I flashed my big puppy dog eyes and rolled over onto my back. Be Good mobbsie
- 165 replies
-
- 1
-
-
- united states
- revell
- (and 1 more)
-
Hi John, I have not had the pleasure of dealing with Modelshipways as yet and if your experience is anything to go by I don't think I ever will. I deal mainly with Caldercraft and find them 1st class, they have never let me down yet as far as kit shortages are concerned, they are however quite expensive for spares or extra's, for these I generally go to Cornwall Model Boats, you can get most parts from them. Good luck mate and the offer stands. mobbsie
- 2,250 replies
-
- 3
-
-
- model shipways
- Charles W Morgan
- (and 1 more)
-
Hi John, She's looking real sweet mate, well done. If it's of any help mate could I send you some of my spare deadeyes, you don't say what size they are but I have the following spare 3.5, 5 and 7mm, if I can help just say the word and PM your postal address. Be Good mobbsie
- 2,250 replies
-
- 2
-
-
- model shipways
- Charles W Morgan
- (and 1 more)
-
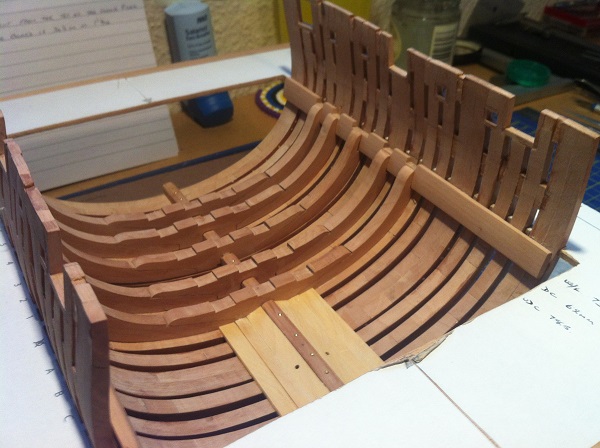
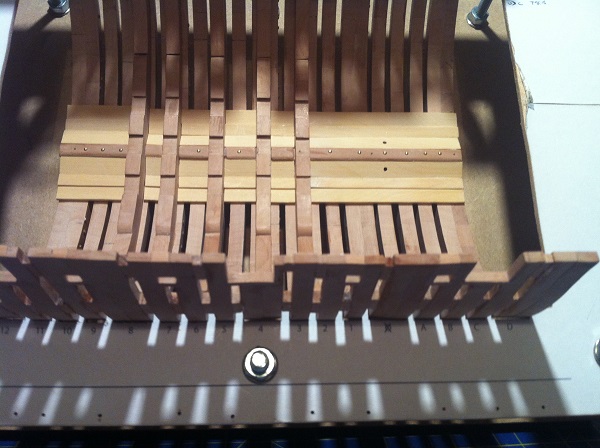
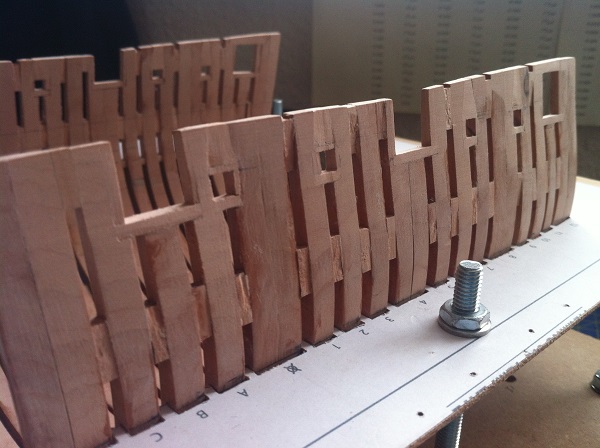
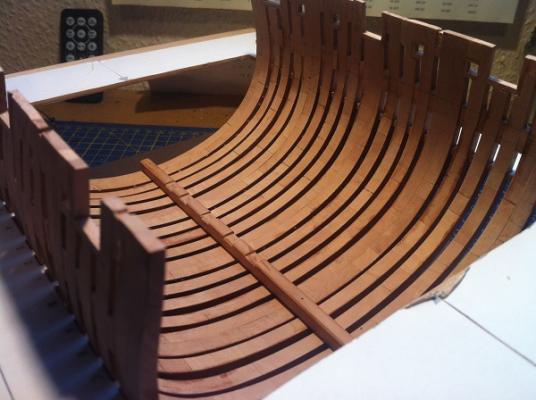
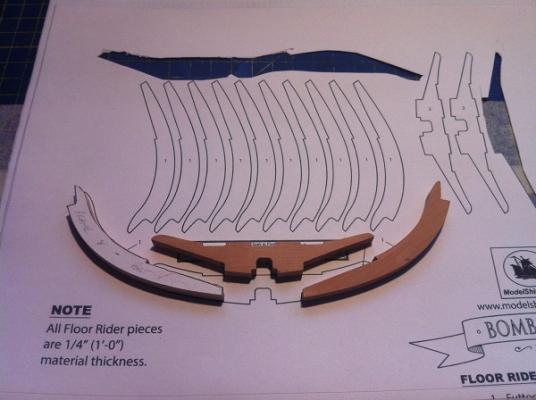
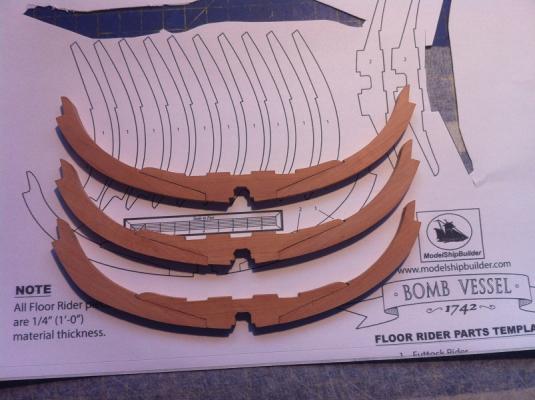
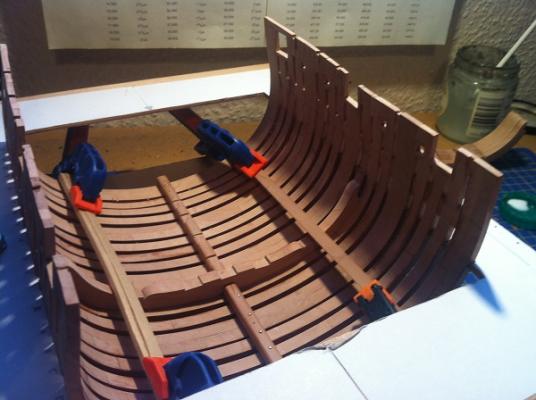
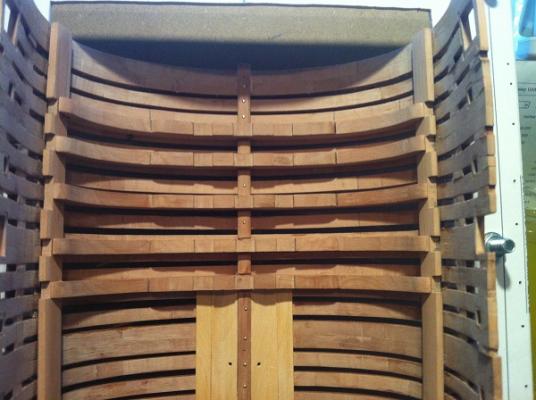
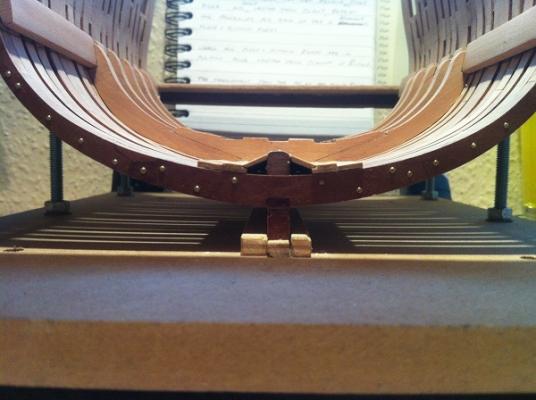
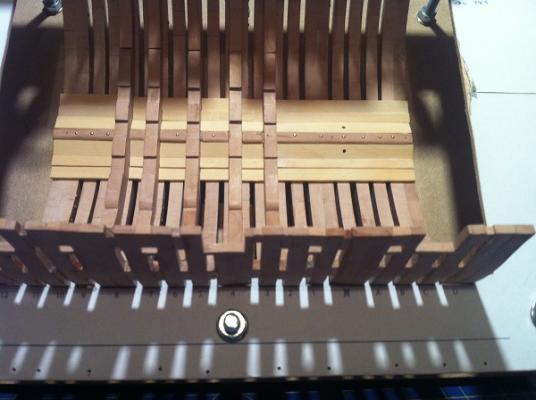
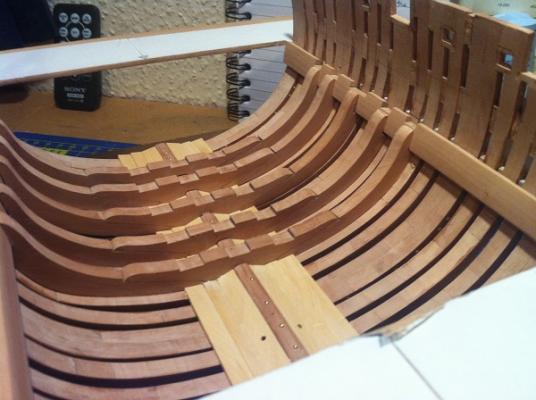
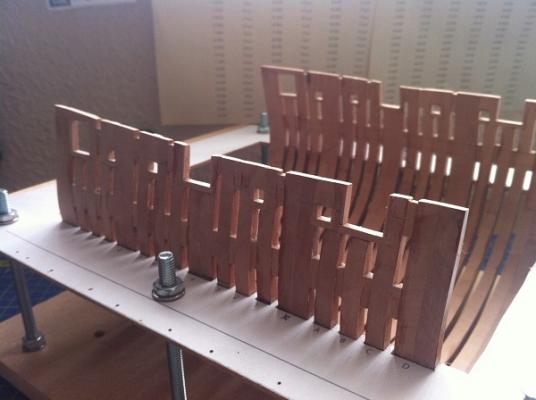
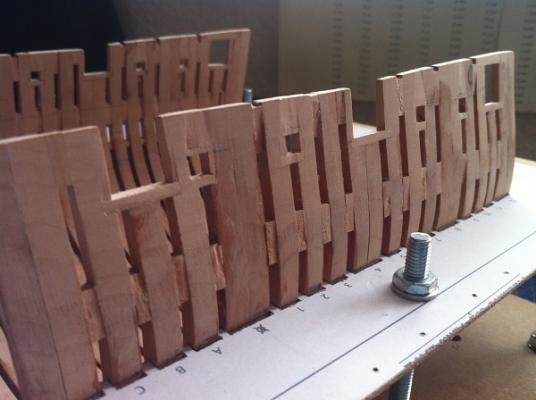
Update time again gents, before that I would like to thank you for the kind comments and for hitting the like button. I seem to be stumbling from one disaster to another with this build, it's about time I started thinking more latterly and stop making stupid mistakes. As stated in my previous update I was having an issue with the floor riders, I notched the Keelson and that fixed the problem, the top of the riders were on the mark, 34mm / 1" 5/16 above the jig base, got something right at last. All Floor riders were then glued into place and set aside to dry. I then went to fit the Mortar Deck Clamp and you got it, it was all to cock. Yet again the Floor riders have to come out and adjustments need to be made to the Mortar Deck Clamp cut outs on the Futtock Riders. The frames were marked up to the bottom of the Mortar Deck Clamp (62mm or 2"3/8), each Floor rider ( including Futtock Riders ) was measured and adjusted accordingly and then marked up Port and Starboard on the underside, then dry fitted. the Mortar Deck Clamp was dry fitted and a few more adjustments were made. Eventually all parts came together and so the Floor Riders were again glued in, the Mortar Deck Clamp is currently dry fitted. Next up came the Lumber Board and Strake, using my trusty Proxxon Router, Scroll Saw and Disc Sander all the parts were cut and made up, each of the Lumber Board and Strake pieces were left whole until I needed to cut them to fit between the Floor Riders, they are now fitted and will most definitely stay in place I think !!!!!!!!!!!!!!!! So that's where I am at the moment and that's where I will stay for a while, the shipyard is in a state of suspension in order to allow my build buddies to catch up a little,( please don't think that this is in any way the hurry up ), it's more for me to think more into the what it is I'm supposed to be doing and try to get it right first time. Grant, thanks mate for keeping me on the straight and narrow. Appreciate it. It will also allow me time to work on my secondary build, (none ship related). A 15th / 16th century Crossbow from Mantua. Some Pictures Notched Keelson in position Component parts of the Floor and Futtock Riders 3 of the 5 constructed Floor Riders The first Floor Rider in position and clamped down All Floor Riders are positioned with the Mortar Deck Clamp dry fitted All aspects of the build can be seen here, Frames, Floor Riders, Mortar Deck Clamps and Limber Board & Strake End Section of the Limber Board and Strake Finally two shots of the completed Limber Board & Strake So once again your right upto date guys, if you have any questions please ask away. Thanks for looking in Be Good mobbsie

- 255 replies
-
- 17
-
-
- granado
- bomb ketch
- (and 2 more)
-
I'll tell you now mate, those practice frames of yours would be keepers in this shipyard. To this old pair of eyes they look very good. The Ebony pegs/bolts are certainly different and will give that unique stamp on your build, but as Grant has said it is a lot of extra work. My shipyard has suspended operations for the time being, I'm getting way to far ahead, I still haven't learned how to slow up. Good luck with the remainder of your frames mate and rest assured those wedges don't get any easier, just when you think you've mastered them, they bite. Be Good mobbsie
-
The frames are coming along nicely Wes, nice to see some trimmed up. It would be interesting to know the overall dimensions of the completed build, she gonna be huge. Keep it up mate. Be Good mobbsie
-
Hi Denis, Your really steaming ahead with this mate, having trouble keeping up with you and I'm only an observer. Your turning out some great work here Denis, just wish I could keep up. Be good my friend mobbsie
- 956 replies
-
- 2
-
-
- andrea gail
- trawler
- (and 1 more)
-
Hi Grant, great bit of work there mate but I do have a question, well it's more an observation really. It may just be the camera angle. In your last post, the set of pictures, picture 3, it would appear that Gunport 3 on frame 11 the sill is slightly lower than the others, as I say it may be just the camera angle and I just know I'm going to end with egg on my face for asking. I do like what you've done though mate. Just a snippet, all my Floor Riders were removed successfully and a different approach is now being taken. Be Good mobbsie
-
You've done a great job on her Peter, she's a proper lady with a few teeth mate. She deserves a prominent display area. :im Not Worthy: Be Good mobbsie
- 431 replies
-
- 1
-
-
- pegasus
- victory models
- (and 1 more)
-
If the Admiral is going take the controls mate I think sheet steel would be better used than plastic Seriously that is a large area to cover and I'm not at all surprised there has been a few problems with it, your right to take the extra precautions mate. Continue to have fun mate. Be Good mobbsie
- 339 replies
-
- 2
-
-
- dumas
- Chris-Craft
- (and 3 more)
-
Good work mate, lovely deck planking. Be Good mobbsie
- 1,616 replies
-
- 2
-
-
- caldercraft
- agamemnon
- (and 1 more)
-
Just catching up on your log Ray and your doing some superb work mate. Love those yards, keep it up. Be Good mobbsie
- 536 replies
-
- 1
-
-
- diana
- caldercraft
- (and 1 more)
-
Great job Bob, the Crows Feet are awkward but when done correctly look fantastic. You've done yours correctly. Be Good mobbsie
-
She's looking really good John, nice bit of serving. Be Good mobbsie
- 2,250 replies
-
- 2
-
-
- model shipways
- Charles W Morgan
- (and 1 more)
-
What they said John, beautiful. Be Good mobbsie
-
Hi Frank, I spent some checking out your decking mate and I'm buggered if I can see a goof, it looks pretty damn good to my eye. Rail cap and your wale look great and the wale scarf joint went together really well, I've yet to do a joint like that but I have one coming soon, that's gonna be fun. Regarding your last email to me, I've decided I'm moving to your neck of the woods mate, can't let you have all that on your own, not good for your heart mate.
-
Wow that's quick mate, at this rate she'll be in the water before you know it. Real good progress mate but don't use any water based glue will you. Glad your having fun. Be Good mobbsie
- 339 replies
-
- 4
-
-
- dumas
- Chris-Craft
- (and 3 more)
-
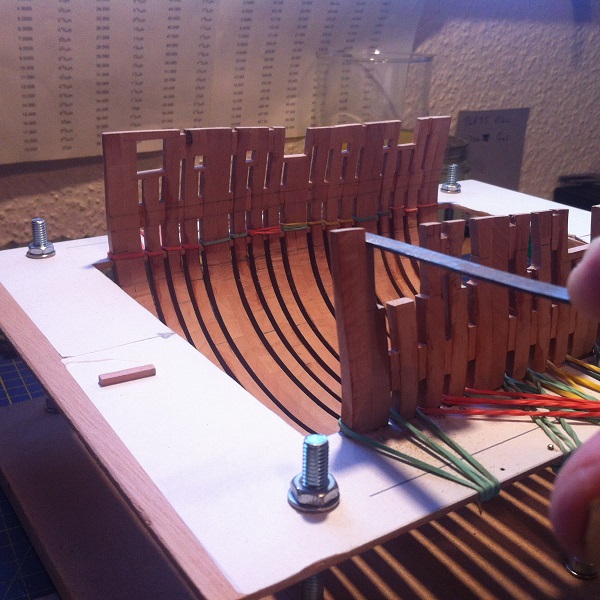
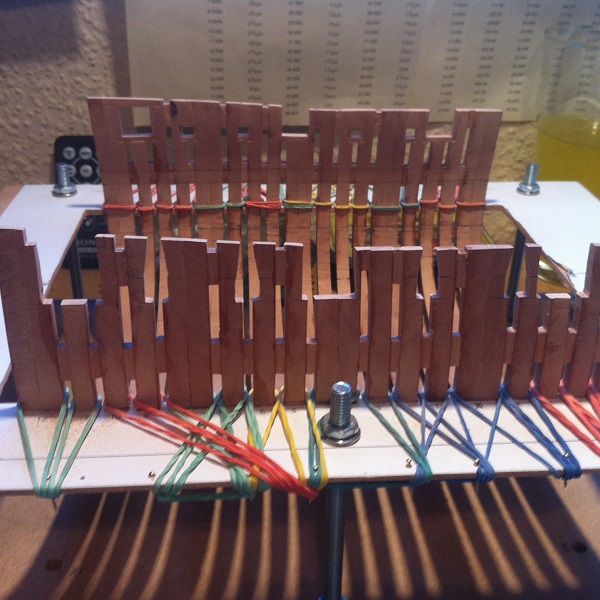
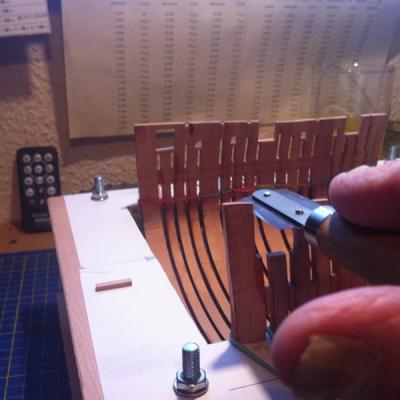
Hi Guys, Thanks very much for your very kind comments and for hitting the like button. Time for an update. The " fix " on the Gunports and sweep ports is complete with all ports relined, I did notice that my sweep ports appeared larger than they should be, so it was out with the dividers again and measurements were taken yet again, yep all sweep ports were larger by upto 3/64 and so further work was required. This work has been done so further progress can now be made. I have started working on the Floor Riders, Futtock Riders and Keelson, another problem !!!!!!!!!!. When fitting the Floor Riders over the Keelson the bottom of the Riders did not come into contact with the frames, Oh bugger what to do now ?????? There are so many things to consider when trying to come up with a solution, my main concern was the height of the Floor Riders and the Height of the Shell Room when fitting the Mortar Pit Beams, I'm now working 5 steps ahead and it's making my head hurt. I had several solutions to consider, 1, Recut the Floor Riders and leave a bigger foot on the rider, question, Would this make the rider to high and effect the height of the Shell Room ? 2, Make a deeper cut in the part of the Floor Rider that fits over the Keelson, for me that's fraught with the danger of making the cut too deep. 3, Notch out the Keelson, if the Keelson needs to be replaced it's a fairly simple job and so this is the way I decided to go. The feet now sit on the frames and they should be the right height for the Shell Room and Mortar Pit Beams. But for now the pictures are just concentrating on the on the frame fix. Notching for a Gunport Lintel, this is a smashing little saw. Finishing off with the file All the Sweep Ports and Gunports have been cut back and are ready for lining. Port side linings Starboard side linings Also the rubber bands have been removed, the spacing blocks, lintels and filling pieces have made the frames really strong. So there we are, hopefully I will be able to make a further update when the Floor Riders are in place. Be Good mobbsie


- 255 replies
-
- 16
-
-
- granado
- bomb ketch
- (and 2 more)
-
It's getting there mate, pity about the extra work but isn't that what this hobby is about, it either keeps you young or you get old bl--dy quickly. It never ceases to amaze me how a series of unnoticed, minor errors can build up. It's fun coming up with a solution though, I love it. Jack / Lou be warned. Be Good mobbsie
- 456 replies
-
- 5
-
-
- finished
- bomb ketch
- (and 2 more)
-
Nicely done Jack, looking really good. Be Good mobbsie