HOLIDAY DONATION DRIVE - SUPPORT MSW - DO YOUR PART TO KEEP THIS GREAT FORUM GOING! (Only 53 donations so far out of 49,000 members - C'mon guys!)
×


augie
-
Posts
4,669 -
Joined
-
Last visited
Content Type
Profiles
Forums
Gallery
Events
Everything posted by augie
-
 Looking good Frank. And Mark is absolutely right..... that cover slides back and you climb right down. I had a sailboat that had a 2 foot 'door' just like that.
 -
Like seeing an old friend again !
-
This area is a little tricky Jesse. Those planks that rise up to meet the counter both bend and twist at the same time. If you follow Chuck's method, you'll be laying the wales and several planks below the wales before you get there. Once you do, the shape of the wales will guide you somewhat. And you may need some stealers. The good news is that your fairing looks good. If you look closely at my log, you'll see a slight bump in the area where the planks pass the last bulkhead. I was able to correct it later with sanding but only because of the copper and black paint on the hull. Looks like you won't have that problem. Take your time here my friend.
- 1,306 replies
-
- 9
-

-
- syren
- model shipways
- (and 1 more)
-
Hope your recovery continues. As George said, running a plank through there should tell you if the fairing is ok.
- 1,306 replies
-
- 4
-
-
- syren
- model shipways
- (and 1 more)
-
gunport posts
augie replied to harlequin's topic in Building, Framing, Planking and plating a ships hull and deck
Joel covered it. -
Yes, that is truly well done, mate. Can't wait to see her scraped and ready to finish.
- 745 replies
-
- 3
-
-
- francis pritt
- mission ship
- (and 1 more)
-
Effort paid off. Darned, I LIKE that double thickness !!!
- 659 replies
-
- 2
-
-
- syren
- model shipways
- (and 1 more)
-
Wonderful job on those. But they are not fake, they are simulated !
- 335 replies
-
- 2
-
-
- 18th century longboat
- Finished
- (and 1 more)
-
Blue Coral, Jack.
-
Nice! Glad you're pinning your channels. You should consider that also for pin and fife rails as you don't want any surprises while your rigging.
- 659 replies
-
- 2
-
-
- syren
- model shipways
- (and 1 more)
-
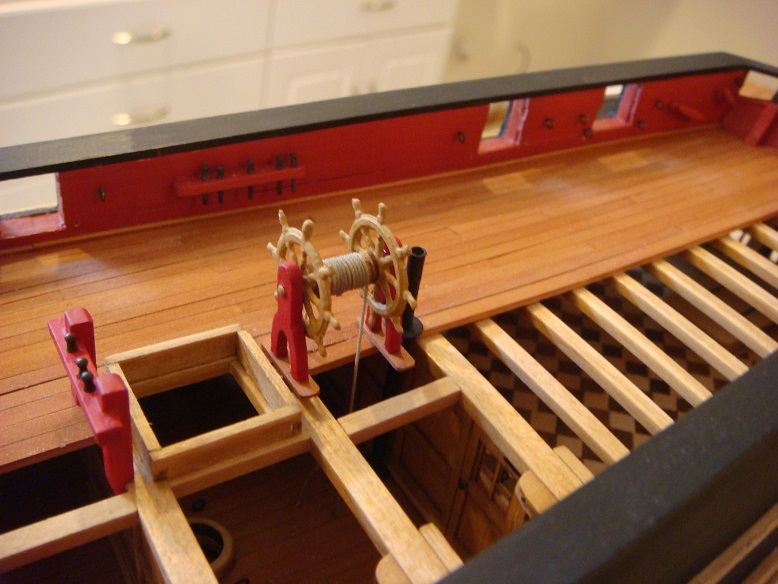
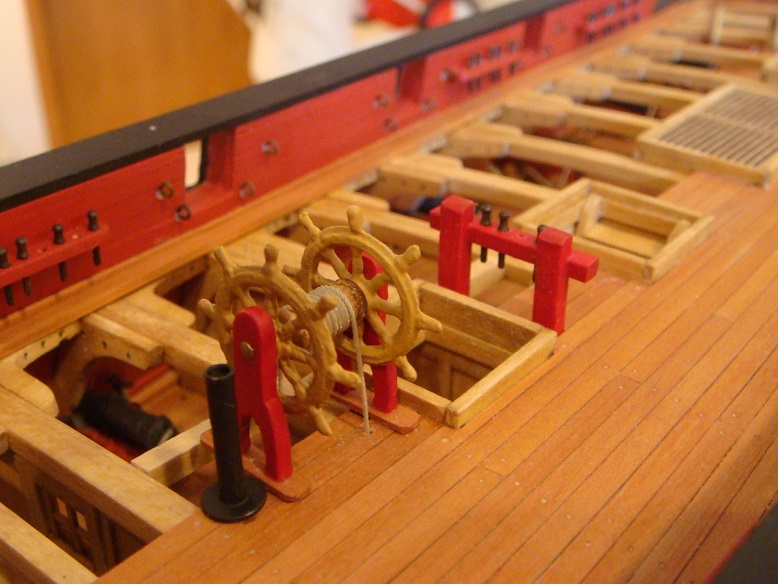
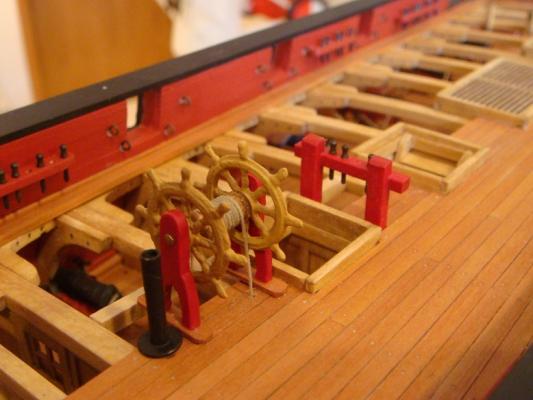
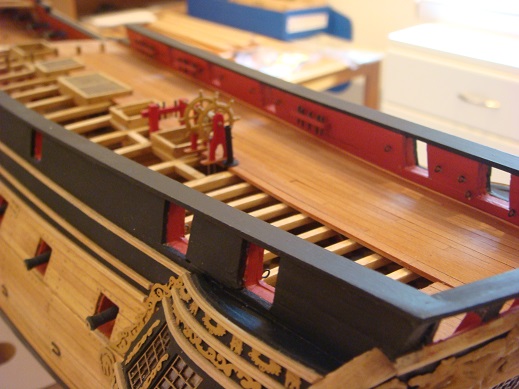
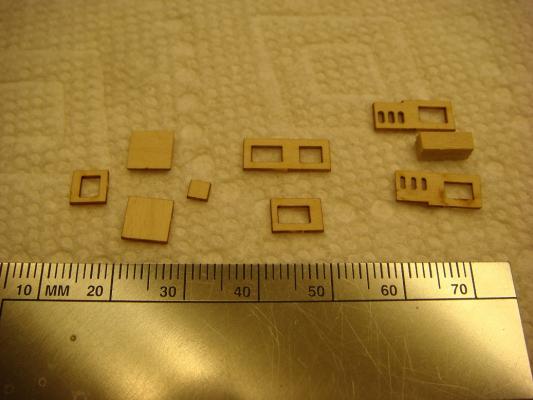
Happy Memorial Day to all. And a moment to remember all those who gave the ultimate sacrifice and cannot be with us to share it. Time for a small update. Have continued working on the quarter deck with the addition of numerous pinrails, cleats, belaying pins (blackened), eyebolts/rings for the cannon rigging and the ship's wheel: It's really good to get the steering cables, which pass down through the quarterdeck and gun deck, off of the deck where they have been in the way for months! The speaking tube also disappears below into the bowels of the ship. In more modern times I could just picture John Wayne bellowing 'Engine room -----more steam!!' The two wheels were really horrible castings but I did what I could to clean them up including fabricating 3 or 4 handles which were missing. At this scale I wasn't about to attempt scratching 2 wheels (make that any scale). There are still some stanchions and railings to be installed but I'll hold off on these until the 'heavy lifting' in the waist and bow are complete. Likewise the guns for the QD. So next up will be the twin binnacles. Here's a preview of the parts layout for one of them: Hope all is well with everyone!

- 2,191 replies
-
- 29
-
-
- confederacy
- Model Shipways
- (and 1 more)
-
Have a fun and safe time out there. I have the same problem with paint adhering to photoetch. I've tried several chemical pretreatments with little success. However, if I'm going with a dark color, I have had some success pre treating the PE with blacken it. Just enough to start the reaction. It gives the paint something to bite onto.
-
Well worth the effort. What did you use for the glazing??
-
No. It was too expensive --- even back in the 50's. Good old clear nitrate dope worked well enough. I love the smell of solvent in the morning
-
Thanks Sam. I just keep on learning new things here.
-
Congratulations on reaching the milestone of completing the rigging. It is simply beautifully pristine. I trust you'll be happy to get back to working at deck level. REALLY first rate, Bob.
-
Good heavens --- the old Cox fuel is about 30-40% nitromethane. That won't just dissove the plastic, it'll vaporize it !!
-
OK, so once you add the training tackle these will be in the running at sea position rather than run out for action? Therefore the gun ports shall be closed? Just trying to get a picture of this.
-
US Brig Syren by Gahm - Model Shipways
augie replied to Gahm's topic in - Kit build logs for subjects built from 1801 - 1850
Beautifully done ..... great color. -
Looking good. We leave a little DNA in every ship!
- 1,306 replies
-
- 7
-
-
- syren
- model shipways
- (and 1 more)
-
I don't mean to hijack Ken's log but I need to comment on the statement 'they say the Syren is not a good first time kit'. With Chuck Passaro's great instructions, even a first timer can do a very creditable job with Syren. She was my first POB and you can check it in the Gallery and there's a partial log under my signature. She will teach you a LOT if you provide the desire and patience. This is not meant to detract from Fair American in the least. Ken has shown how excellent she can be. She is also a slightly larger scale than Syren (1:48 vs. 1:64) which makes it easier for some to handle. Either vessel is a fine choice with plenty of help and examples here on MSW.
- 455 replies
-
- 1
-
-
- fair american
- model shipways
- (and 1 more)
-
Mark is correct with regard to the seat. I have an adjustable, padded stool that puts me at the right height for a variety of bench heights. You mentioned Home Depot. They carry a line of melamine coated wooden multi drawer units that are easily put together and quite sturdy. I use these for end supports with a sturdy top that I slide my stool under. They are a too low for a stand up bench but fine for sitting. They are 36" high x 24" wide by 18" deep
-
They look great. Yes, brass will last longer than copper if you can manage to cut it.
- 270 replies
-
- 1
-
-
- red dragon
- artesania latina
- (and 1 more)