


popeye the sailor
-
Posts
16,007 -
Joined
-
Last visited
Content Type
Profiles
Forums
Gallery
Events
Everything posted by popeye the sailor
-
 there ya go man!...........she's look'in real busy now! looks super!
- 122 replies
-
- 3
-

-
- tamiya
- King George V
- (and 2 more)
-
for the stack top, I mixed up some flat black and flat white, coming up with a color that looks a lot like soot. the chain is so-so........I've seen many do them in flat white, but I find it hard to see the logic in that, considering the function and use. I will usually go with flat black and wash it with rust in some cases........for this one, I would go with just the black. if you mixed up the soot color.......you can even use that made a lot of progress since I last saw her........looks great! the main structure second level deck isn't planked, so it would likely have been in the gray color. it looks really good though.......I like it makes the upper structures stand out 👍
-
javlin......you can get a lot of the same info from the Revell Cutty Sark . these two models are clones........with a little research, you can alter the model to look more like the Thermopylae. here is a site that will give you a good idea. http://www.powerhousemuseum.com/collection/database/?irn=211834&img=132358 if you want to compare the instructions, I've posted them here. http://cuttysarkdrydock.wordpress.com/ looks like the Sergal kit Bedford really nice looking model! I quite agree with you......the scale of this model needs to have been made larger, and definitely not a beginner's kit. very nice looking model though when complete.
- 105 replies
-
- 1
-
-
- thermopylae
- sergal
- (and 2 more)
-
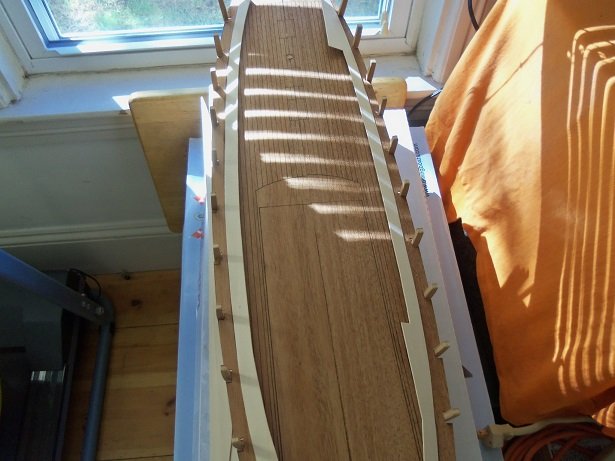
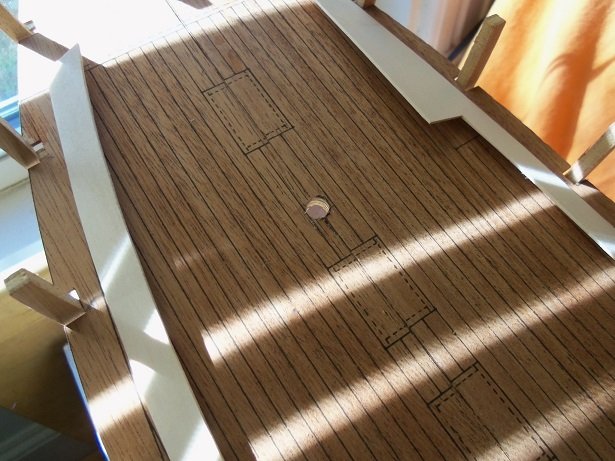
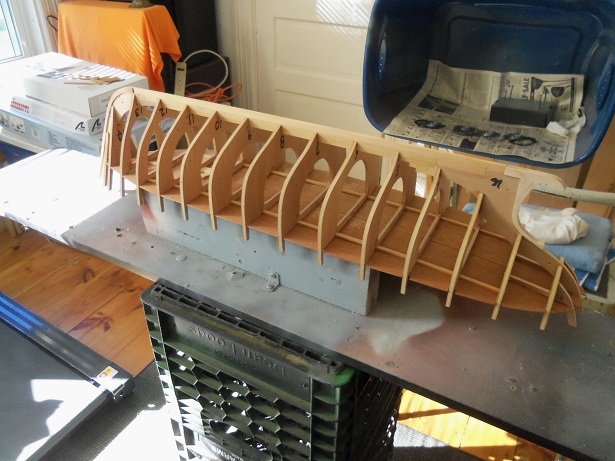
I got to fiddling with the Progress this morning.......I want to get the frame fared and ready for planking, before I do anything else. first off........the margins.......as mentioned, they are cut out. they came out well, but I still need to clean them up a bit, giving them smooth lines. I was going to widen them at the mid ship and get away from trimming the deck planking as much, but I think it will give the deck some character funny thing when I went to drill the hole for the mast. the plywood piece I used is made up of four plys. as I was drilling the hole, the glue holding the plys together broke away and half of the thickness fell off! darn! so I glued it back on and reclamped it. after it had set for a while, I went to redrill it with the clamps still in place. the center broke away from the outer ply and fell out!. fine then.........Ill take the other piece that matches it, and glue it on top as a stop.........stubborn piece of wood! I still need to go to a larger diameter hole, so before I glue on the other piece, I'll fit it to the dowel. faring the frame, I went to the garage and got my board.....just a narrow board with a pair of 2x4 blocks screwed on. it supports the frame better. I had to clean off the dead spiders and cobwebs since it's been a while since I used it last. oops........almost time to go.........I have to see the dentist today. I hate teeth problems!

-
hello Sam.thanks for the good word I do have a small update on her progress. I should have it up soon.........perhaps I can add more
-
I've watched many flights on you tube..........some are great.........but yea, when they crash, you want to cry along with the guy.
-
what?!?!?! you sold it to R2D2?!?!?! you picked a great person to sell it to........he has a built-in laser cutter! hope we'll see more of her
-
hello Mike........read through your log and found it quite enjoyable. couple of small diggers there, but you handled them well........the stern planking came out really nice nice job on the planking.......the second planking should be a breeze!
-
a Christmas present eh.........who ya giv'in it to? ba - da - bum
-
I haven't used the jig on this ship yet.......I will be though I may need to make a smaller one for the upper shrouds have a good trip........sounds like a lot of fun!
- 105 replies
-
- 1
-
-
- thermopylae
- sergal
- (and 2 more)
-
looking really good......those two areas on the aft deck look to be steel........likely something that Revell neglected to monopolize on. I'll look through some of the links I have to see if I can get something from the pictures. http://www.researcheratlarge.com/Ships/BB39/BOGP/ doesn't look like anything too significant..........bolted plate.......there is a life boat covering one of them. I have some PE that I'm going to add to mine.....model Monkey has some nice stuff for her, but looks like too much work for the fore upper structure. I do believe that your upper hull color, and the one I mixed.......is the same hue! we'll have to compare again....looks good!
-
I ran into the same problem with you lou....remember?!?! rigging looks awesome CDW!
- 467 replies
-
- 4
-
-
- mikasa
- wave models
- (and 1 more)
-
looks like you might need to trim the openings of the rear torpedo tubes.....they look as though the torpedoes will hit the hull as they come out. hull looks good so far Greg.
-
good thing you only have to do this to a few cannons {6?}........imagine doing an entire gun deck! very nice bit of detail!
-
when I was younger, I used to keep them under my bed........Mom used to complain that she couldn't sweep under there saved the sprues to make roll cages........cars that I got tired of fell under the knife
-
built quite a few cars in my day.........I build racing kits now a days.....funny cars and such. I also liked the 3 in 1 kits and the customize kits......the spare parts bin fills up rather quickly though nice looking model.
-
closest plane I built like this one, was the P38 Lightning awesome looking plane though......you did a great job on her
-
Yamaha MT-01 by Dan Vadas - CARD - FINISHED
popeye the sailor replied to Dan Vadas's topic in Non-ship/categorised builds
nice pair of 'jugs' Dan! -
I have quite a bit of info about the paint.......all i'm saying is, don't dwell on it like I did. I've mixed up some paint that I think will suffice...the color your using looks fine I'm planning to remove some of the casements and do railings. this model is misleading concerning the smaller guns as well, but I plan to put them in anyway. for example, the two forward most placements near turret #2, were never there.......they were to be anti aircraft guns. the two on the aft deck were not there either...they were to be the same. this kit is from 1959.....never changes from it's first production, although I recall the tops were assembled very different than what is shown in the model...I'm a bit baffled about that. I built this model before.......I am a devout Revell fan back then, I had never really looked a tamiya, Italeri or any of the overseas companies. what your doing looks very good......have you thought about PE? http://www.tomsmodelworks.com/catalog/index.php http://freetimehobbies.com/1-350-toms-modelworks-photo-etch-ship-rails-with-ladders-5-styles-of-rail/ https://www.model-monkey.com/ check these out........there's a lot of cool stuff here to enhance your build
-
something better would be to solder two pieces of wire together and fan them out at both ends, bending them to fit into the top holes. I took a picture of my little jig, but I'd drive myself crazy trying to find it as long as you arrive with all the dead eyes having the same amount of spacing, whatever method or jig you use will be fine. I have my Thermopylae on the table.......but I haven't done anything yet. I think it will be enough of an incentive to get the Nordzee finished and off the table........pretty sneaky, huh!
- 105 replies
-
- 1
-
-
- thermopylae
- sergal
- (and 2 more)