HOLIDAY DONATION DRIVE - SUPPORT MSW - DO YOUR PART TO KEEP THIS GREAT FORUM GOING! (89 donations so far out of 49,000 members - C'mon guys!)
×


popeye the sailor
-
Posts
16,007 -
Joined
-
Last visited
Content Type
Profiles
Forums
Gallery
Events
Everything posted by popeye the sailor
-
 very nice bevy of boats
 -
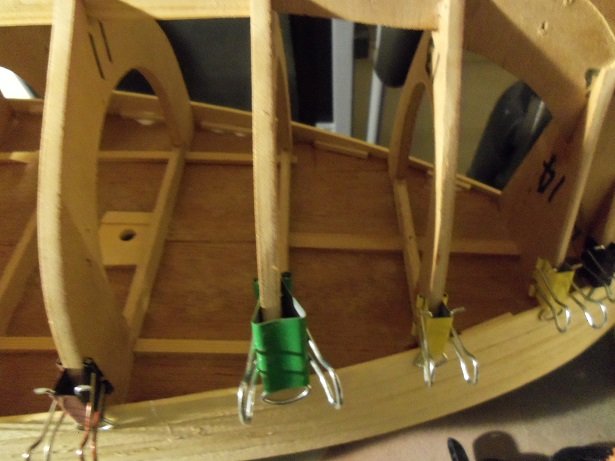
the ship's boats can be done either way. if you leave them like this, you could do the rigging for the davits and tie them off to cleats, affixed to either the bulwarks or the cap rails. to create the pulley assembly, rig two blocks with hooks on them and attach them to eye bolts on the cap rails. on some boats or ships, you might even see them in an X pattern. she's look'in really good
-
only thinking of you my friend after all........we don't want a tiny bit of rigging spoil such a superb looking model
- 258 replies
-
- 2
-

-
- harriet lane
- model shipways
- (and 1 more)
-
PVA........is that like white glue? I never had much luck using white glue......I either use clear cello or Testor's window maker. it sounds though like your expecting a clouded outcome......you will get the old age effect though your making good progress.
-
hello Zappto.......yes. fish were caught by net, transferred to fish boxes, where they were sorted and the catch was stored below. there will be holds on the deck. while I am waiting for the addition to the transom part to set, I made up the anchor boxes. I will then have to make the holes in the hull after they are cemented in place. I'm no expert with planking.......it might look scary at first. but considering my past outcomes, it should end up looking pretty good. having worked with an old kit before, I know what to expect........so far it hasn't let me down. I've had some breakage, but it's due to the age of the wood. I got into scratch building very early, so I'm all set there thanks for the good word !
-
hello Michael...and thanks for the good word the bench is actually the board I use to paint the hulls on. it has a pair of 2 x 4's that fit along the deck, making it pretty much hands free. not too good if I want to support the hull right side up though......but it gets the hull off the table, so I can do other things and not twiddle my thumbs. glad to see you look'in in...... thanks to you all who hit the like button this morning, I attempted to see how the planking would wrap around the transom and counter. without soaking the planking......it broke! so, I'm in the process of tracing and coming up with a template to make an addition to the transom part. I'm going to try and make the part from 1/8 th flat stock. I want the grain to run from port to starboard because of the curvature of the stern stem. this is not going to be easy........even after soaking the part I'm making under real hot water, it being very stubborn as far as the bending goes. I have it trapped inside a glass at the moment, sitting in the sun. I'll give it a while to see how this all works out. I hope I don't have to split the part. more on this soon
-
we must have posted at the same time I was asking if your boom repair went OK.........you answered my question! very nicely done......she looks great I do notice though that the horse isn't rigged.........instead of tying off at the cleat........rig the horse and then tie off at the cleat.
- 258 replies
-
- 1
-
-
- harriet lane
- model shipways
- (and 1 more)
-
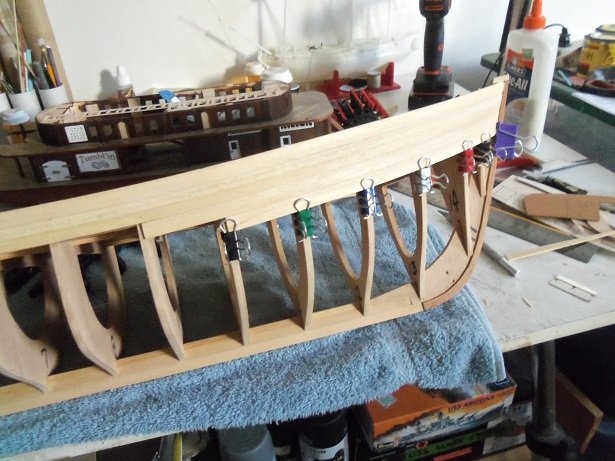
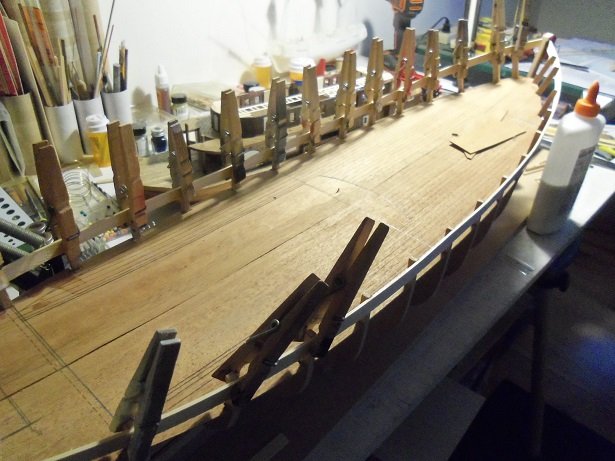
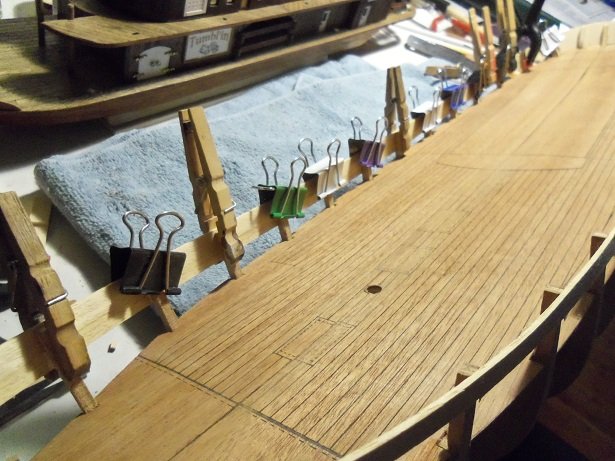
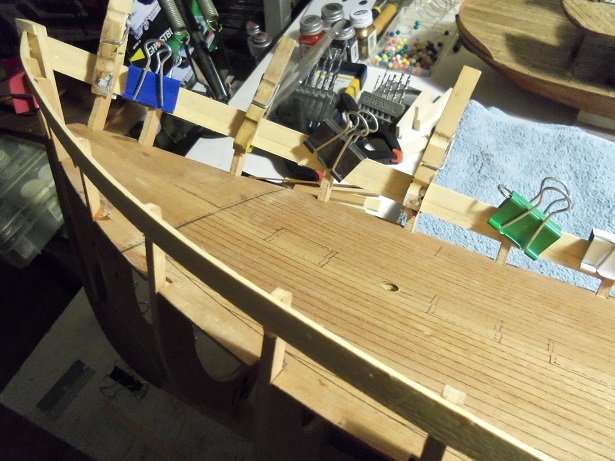
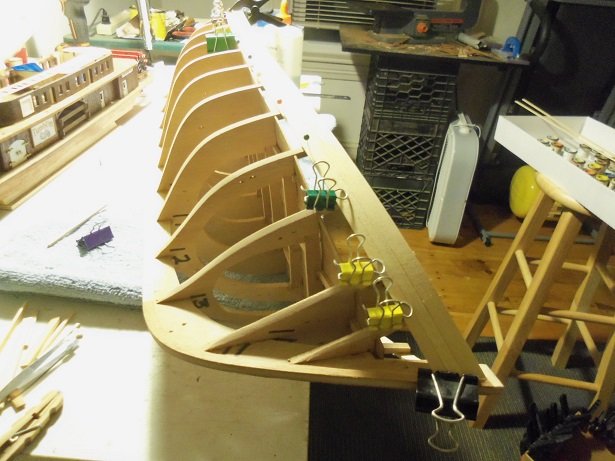
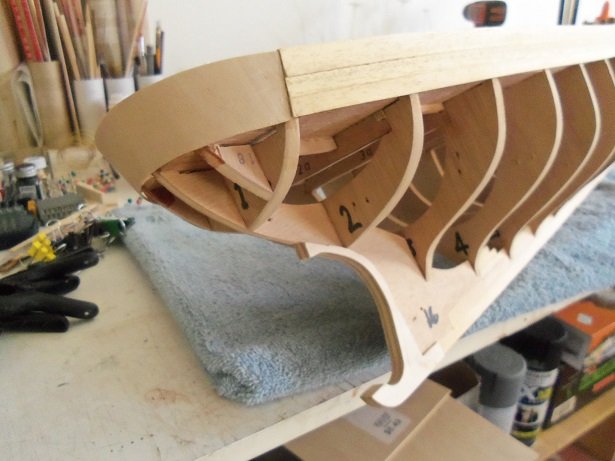
I did a bit more planking between other goings on 'round here today {and here on the site}. at one point during the bulwark planking, a triangular piece broke off one of the tabs on the deck platform. I think the margin would have covered it, but I glued it back in place. the hull is on the table, along with the Tumbl'in Dice...kinda crowded. as can be seen, rather than do stealers along the bulwarks, I will wait and do them lower at the bow. I know I will need to do at least one. I laid the two 7 mm strakes, then set it up with two 10 mm strakes. from these, I'll run 5 mm planking hoping that they will work better forming the transom and counter, as it meets the stern stem. I had a terrible time with the Nordkap........hope to do better here. the planking process is going to be time consuming and slow.........to keep myself occupied, I'm going to set up a small station to plank her on. with the table free, I can work on the Tumbl'in Dice while the planking dries. so I cleaned up some plastic milk crates and set up the station. I'm not too keen on the lighting........I may move the other crane light over to it.....got plenty of room. not that it might happen again......I'm finally going to add blocks to those tabs, so I don't break them again. I was able to do all the ones fore to the bow........aftward, I'll have eight more pairs to install. the bulwarks are now fully planked over.........there are no open areas around the deck. I also cut out some more parts........never take laser cutting for granted........I sure don't one never realizes just how many part there are in a kit, until it has to be done manually........Mahogany to boot! I hope to have an update tomorrow. nighty night!😫


-
....and I wish I had more...... welcome to the log Kevin. it's true.......I have way too many projects. even I lose track of where I am sometimes, but I enjoy it. this one was too good and too cool to sit on any longer. it's not every day that a person builds an old kit, then gets another older kit as a Christmas present. these two kits are interesting too because of the differences between them...in the wood part, as well as the fitting kit itself. same kit, same model. check out the Nordkap thread in the nautical discussion forum...I think I posted a link at the beginning of the log here. I've added to it as well. thanks for the good word, and I hope ya follow along. she kinda rough right now, but once she's fully planked and some paint get laid, she'll really start to take shape
-
now you know why they call it a boom.........snag just didn't have the right ring to it she's look'in good though........you've done some amazing progress since you got back to the table. gee........you should be almost done hope your fix goes according to plan.
- 258 replies
-
- 2
-
-
- harriet lane
- model shipways
- (and 1 more)
-
hmmmm....something to see.....Carl knock'in one back while hang'in around. gravity is affected by alcohol ........remember that
- 140 replies
-
- 7
-
-
- the sullivans
- trumpeter
- (and 2 more)
-
Cutty Sark by NenadM
popeye the sailor replied to NenadM's topic in - Build logs for subjects built 1851 - 1900
coming along nicely with the winch- 4,152 replies
-
- 2
-
-
- cutty sark
- tehnodidakta
- (and 1 more)
-
poking my head in here Rob and marveling over the progress you've made.........very nice indeed! mast and sails look superb.........just hate to be you when it comes time to terminate all those lines I know few folks that do it this way........I'd be too concerned I'd lose track. very well done!
- 1,208 replies
-
- 1
-
-
- great republic
- clipper
- (and 1 more)
-
it always a treat when I poke my head in the scratch build forum and I see an update from you and your fabulous ship your work is so amazing and always brings a smile to my face.......I even show the admiral your work. darned if she doesn't say........."so, what's the matter with you!" I could never emulate such beautiful work.........your pieces are so delicately made I am though.........hard pressed where you put the shield in post #380?!?!?! you said "bow decorations"...............where did you put it? I hope you are well and your problems are light {or on the mend......you had been ill a while ago}.
- 1,035 replies
-
- 7
-
-
- royal katherine
- ship of the line
- (and 1 more)
-
your progress so far is some really superb work........gonna be a smooth hull when your done awesome stuff!
-
thanks CDW.........appreciate ya say'in so she don't look like much right now......but once she has some paint, she'll start to look like something. I'm doing more planking today.....I hope it's not a super long process thanks for the good word! thanks for the likes all...........I'll be sure to report any weird stuff that comes along
-
the main problem would be access........with the spar deck cemented in place, it might be hard to accomplish. you could try fitting the cannons in like they do with ships in a bottle
-
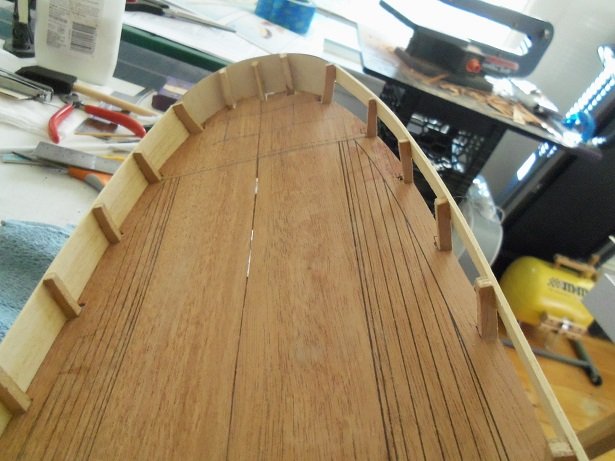
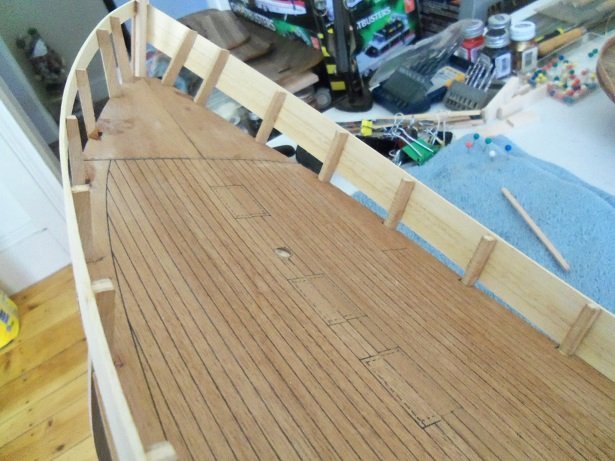
hi all..........thanks for the likes very kind of you folks to look in! yes........progress is still progressing on the Progress..........I started planking the bulwarks. I had this nagging feeling about the width of that wrap around part for the stern....it just didn't seem wide enough. I didn't have any problems with the Nordkap, when I planked that hull. if you've read the post I placed in the Nordkap thread, you see what I'm talking about. so, after looking at the two sets of instructions....which should have been identical {and finding that they are not}, I measured the width of the part in question, and found out that it wasn't 30 mm wide. this is what I get for thinking that both of these kits being the same. they should be.......but no. so a different direction must be taken here. I already have an idea. taking two strips of the 7 mm planking and comparing them to the deficit of the part, I saw that they would work instead.............so, I will fill in the bulwarks with one 10 mm and two 7 mm planks. first though, the top plank for the port side need to be laid. I found that I needed to break and reset the aft section on the starboard side because it was sitting too low.......not much, but it would have been a problem. when dry, the first of the 7mm planks was laid on the starboard side. I wasn't too worried about the excess glue along the inside at the bow........but from the bow cabin wall aftward, I made sure I cleaned them up. I don't need a bumpy inner bulwark . the second strake of 7 mm was laid after it was dry. if you read the other thread, you'll see what I did to cover the bulwarks at the bow. me at the time, being a total newbie, came up with the idea to follow the deck line with the second and third strake, and leave a gap, to be filled with stealers. I figured that it would straighten the planking and make it easier as I went along. in a way, I wished that the wrap around part {the transom} was a little thicker. it was printed on the same sheet of thin plywood, that the Nordkap's part was printed on, which is probably only 1 mm thick. I will have to look further in the Nordkap pictures to see what I did for this. but for the time being, it's nice to know that I solved the problem at hand. I could make another transom part from some 1/32 flat stock {1/64 would be better........I think they make it}, and thicken the transom up that way, I will make a tracing of it, just in case I decide to do it. with the two 7 mm strakes on the starboard side, it closes the bulwark totally........now to get the port side into the picture. but, the bow still has a way to go yet. I even have a thought about the planking as it continues. seeing that I have eight of those 10 mm plank strips left, I may use it to hasten the planking process. I have some 5 mm plank strips, my though is to jog two as I reach the stern, and it may make it easier to fill in the contour that shapes it. once the hull is sanded and painted, this will never be seen. looking at the fore deck, it makes me think..........the fitting kit came with hold covers. they are larger than the printed deck plan you see here. I may make the two aft of the mast larger, and make use of them. something to think of........
-
the Revell instruction diagrams may not be totally correct, but they are better than what Sergal shows. in some cases, rigging can become part of the ship's structure. standing rigging sometimes acts as a basis for the running rigging. say you have standing rigging that pulls a yard or mast in the downward direction. it may distort the way the yard or mast should look.......that is, until you add the lifts, which pull the yard back up to where it is supposed to be positioned. this is one reason why this scale is so terrible for a ship of this type.........you can lose so much detail, especially if one is not adept in working with such a small scale. even the manufacturer of the kit leaves out so much.......they can leave the builder with so many questions, like how things work, for instance. I'm sure that bracket assembly is a lot more intricate, than Sergal shows. some will insert a brass pin in the mast where the yard should go, and then rig the jeers and halyards, the lines that hoist the yard into position. the lifts mainly keep the yard horizontal, but are also used to position the yard as well. now, for this type of yard assembly and attachment, of course the rigging is different, having no halyard to rely on. some folks can make the fittings and add the detail that missing........some can't. to have an understanding of the part in question, it's function, and all that affects it, is an important learning curve........once you know that, you can better come up with a solution to any problem you encounter. the more you dabble in the medium, the more you will learn. it will make you a better modeler as for my Thermopylae.......she is on my main table, waiting for me to get busy on her. I've been messing with a couple other projects at the moment, but I've been ribbing myself to get the Nordzee finished and out of the way. I have the masts already assembled.......now to fit the brass on them and paint. I want to try those fittings I got.......I hope they will work out OK. if not, I might look at cornwall and see what they have. this model would be so much better if it was at a larger scale......UGH! it's pretty sad too, 'cuz it's not a bad little kit.......it's just that Sergal didn't stay within the scale of the kit. some of these parts are out of scale and don't work for the model.......anchors, railings, the lack of life boats, are just a few of the misgivings. for anyone who wants to try scratch building, this kit would be perfect. the itch to finish the Nordzee is becoming too much to bear........I hope I can find an opening to get her done very soon I had other ideas for the main table as well. sorry 'bout the picture.......I took it this morning after reading your post. I was going to replace the Nordzee with one of three other projects......seen up above. from left to right......#1 is the fishing boat from the Holiday Harbor project.......hoping it will turn out like another Andrea Gail. #2 is the Half Moon {Halve Maen}......I'm almost at the rigging end of the project. #3....and then there is the Trawler Syborn........so close to being finished, it's scary! I have been looking for the right life raft containers for the scale. I was going to have a couple of life boats, but there isn't too much of a stern deck....it may become too crowded. hopefully, I will find a quick end for that project.....it's only......what?.......four years in the making, I think. life goes on here at Wenzel's Wharf.......I've been seeing a dentist, taking care of a problem I should have dealt with earlier. yesterday I had two more teeth removed and was fitted for dentures. four more to go, and then I will have false teeth I feel pretty good since I started seeing this guy........due to some bad experiences, I haven't seen a dentist in quite a while. but it's time to take care of business. I think that as this happens, I'll feel more myself and will want to spend more time at the tables {I have two........I'm a confirmed glutton for punishment}.

-
Yamaha MT-01 by Dan Vadas - CARD - FINISHED
popeye the sailor replied to Dan Vadas's topic in Non-ship/categorised builds
superb progress since I last looked in Danny really looks great! -
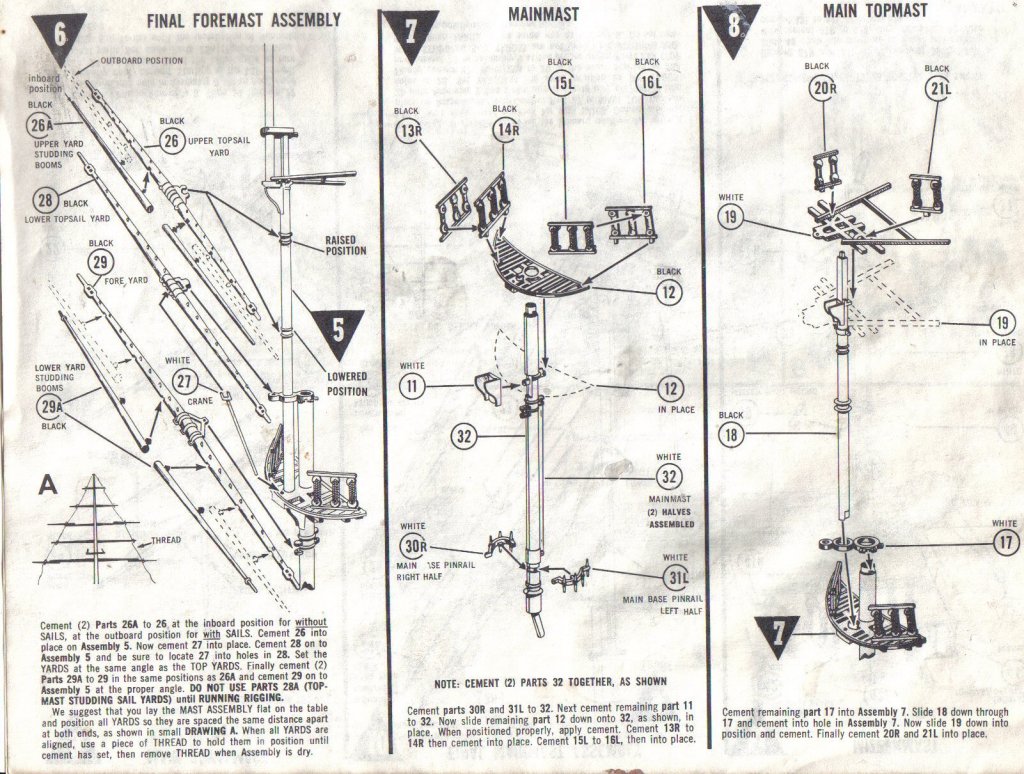
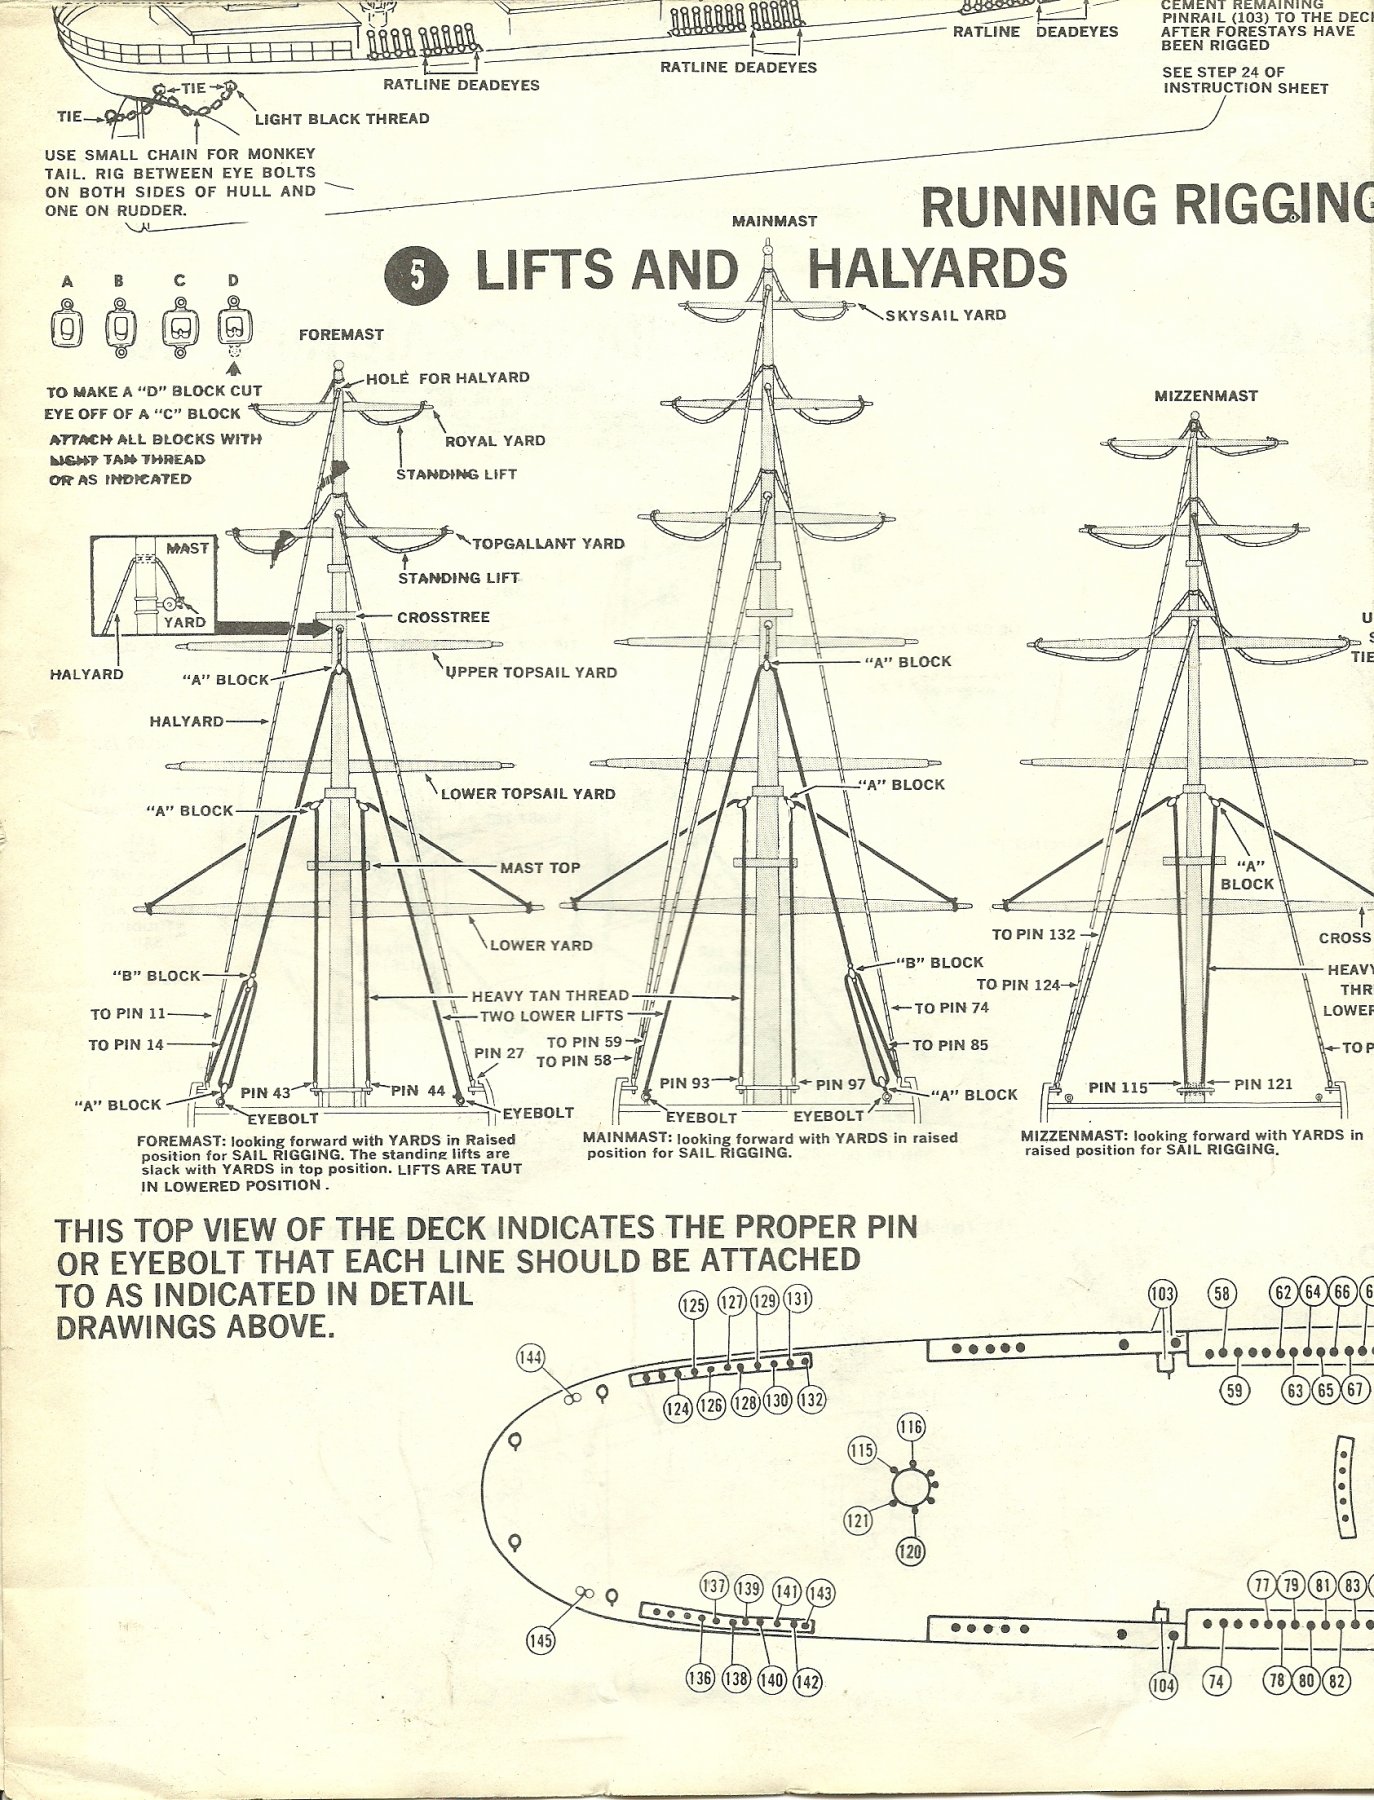
thanks Klas.....I mentioned that size....looks good you may want to cement the stock in place though....it seems to have fallen short of trying to bend the hook to capture the ring on the yard bracket, you could cement it in place. since the rigging is similar, here is the halyard and lift diagram for the Revell Cutty Sark these yards are in the raised position, so this is how the lifts will look when rigged. I'd have to look at the Sergal diagrams to see how they have it, but the lower topsail yard is a fixed yard. it does sit on a pivot point so it can be moved by the braces. it is held in place by a brace, called a crane. here is a picture of the assembly, as shown in the Cutty diagrams: this is a plastic kit.......but what this shows is important to note. looking at the upper top sail yard, you'll see that there are two locations for it.....one in the lowered and one in the raised position. it gives you this choice the rest of the way up the mast for the other yards. I just figured these might help you with the yard arrangement. those are the lifts that your working with........the halyards are for the upper top sail yard, the topgallant yard, and the royal yard. the main mast will be the same, but there is also a sky sail yard in addition to the others. but yea, you could attach it with a bendable hook, or create a U shaped brad {made from a piece of brass rod}, to fasten it to the mast. I did order the brackets for these yards, but I think they are too big......I'll have to try them and see. once I cut the yards, I should know more. I hope I gave you an idea