
HOLIDAY DONATION DRIVE - SUPPORT MSW - DO YOUR PART TO KEEP THIS GREAT FORUM GOING! (Only 75 donations so far out of 49,000 members - C'mon guys!)
×


popeye the sailor
-
Posts
16,007 -
Joined
-
Last visited
Content Type
Profiles
Forums
Gallery
Events
Everything posted by popeye the sailor
-
 look'in good OC.........looks even better on deck still more to go......so keep pile'in it on
 -
we also have a product called 'liquid steel'..........used it when I was working on cars. don't recall what color it was though.
- 292 replies
-
- 4
-

-
- g class destroyer
- trumpeter
- (and 4 more)
-
enlarging the image..........I recognize the brand {we have it over here}, but not the product. I'll definitely have to see how you use it. no card Carl.......it's just one of our U.S. crazy expressions being a card, means trying to be funny.......a joker
- 292 replies
-
- 4
-
-
- g class destroyer
- trumpeter
- (and 4 more)
-
I could see him runn'in 'round the house scoff'in up stuff........and the missus ask'in "whatcha do'in?"
- 83 replies
-
- 5
-
-
- marcle models
- card
- (and 1 more)
-
the printed decks threw me....not seeing them with my kit, I thought you had done them already older kits used to follow this practice.......instead of doing all that planking, folks could just stain the deck and be done with it. back when I was helping Tom out, I fielded a few questions and complaints about it. ignoring it, or if possible, flipping the part over and using the other side, was about the only option. folks didn't have to put up with it for long, because further down the road, it began to disappear. now, only a few manufacturers do it. the other kit that I have of the Nordkap has it.....I'll just paint and plank over it.......no biggie the strip along the inner bulwarks {been a while since I looked at the plans} isn't the way the plans tell you to do the pin rails, but it a good alternative to enable you to get at them at rigging time. not sure what your going to do to replace those belaying pins....I think the ones supplied in the kit are too big. I got some brass 5 mm belaying pins from Ages of sail...........click on the sub file for fittings and go from there. the number for them is AM4100/05. considering the hole you will need to drill to accept them, will be much better than the ones you'll need to drill for the kit supplied ones. while your at it, you might want to order some 4088/03 3 mm double blocks......there aren't enough of them either. if shipping costs are too much, perhaps a closer shop.......Cornwall, Amati would be an option {at least you'll have the size of what you'll need}. I'll bestow one small bit of wisdom I've come to know...........don't hesitate to go with a solution you've figured out for yourself. some of the coolest things I've seen here to remedy a situation, have been thought up by folks who are just starting out in the medium. keep up the good work!
-
kit review 1:65 HMS Terror - OcCre
popeye the sailor replied to James H's topic in REVIEWS: Model kits
great presentation and enjoyed the video very much! looks like a fine kit -
quite a feat, considering your working with plastic {ain't I a card}
- 292 replies
-
- 5
-
-
- g class destroyer
- trumpeter
- (and 4 more)
-
I think your cut out is very well illustrated.......nicely done.
- 83 replies
-
- 5
-
-
- marcle models
- card
- (and 1 more)
-
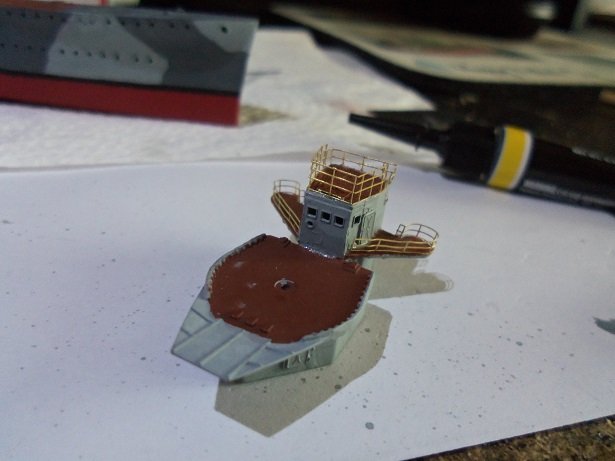
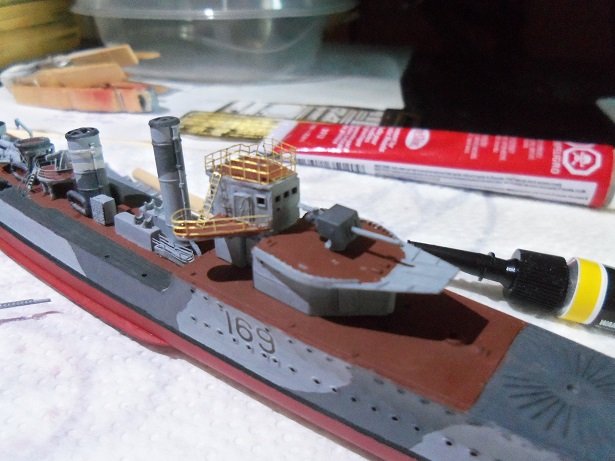
absolutely wonder progress........that funnel deserves the mark of excellence! I noticed that on the sides of your turrets, it looks like little bomb decals...........decorations for the number of hits perhaps? really superb workmanship........all together, she's gonna look awesome!
-
it's been very hot here........and the storms haven't helped much. humidity is very high too....work is still a discouraging word as well. by the looks of things.......you'll have that armada before you know it I think it's interesting how they are similar to the Vendetta.
- 292 replies
-
- 4
-
-
- g class destroyer
- trumpeter
- (and 4 more)
-
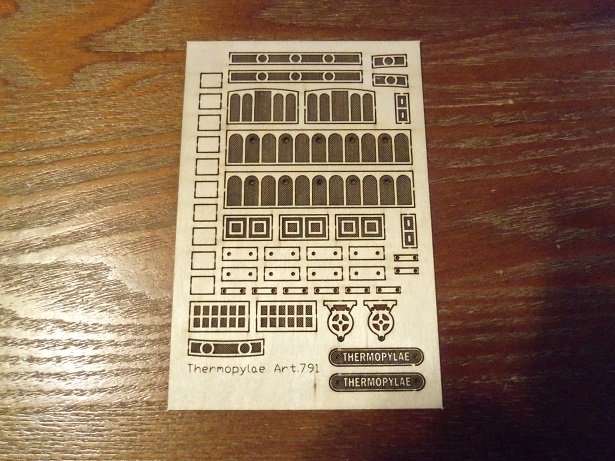
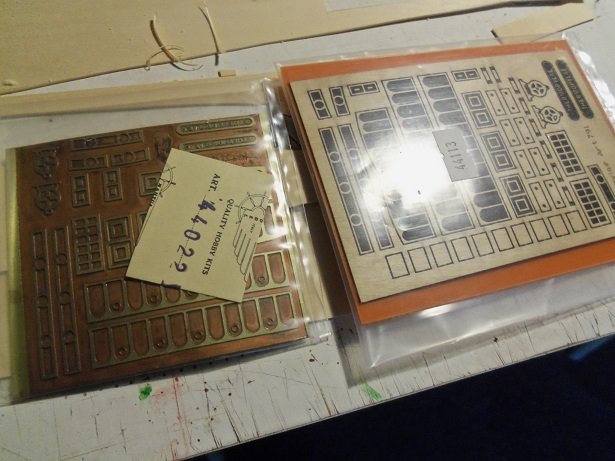
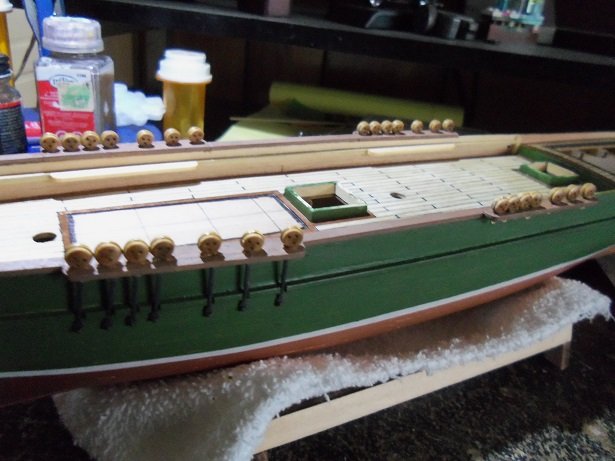
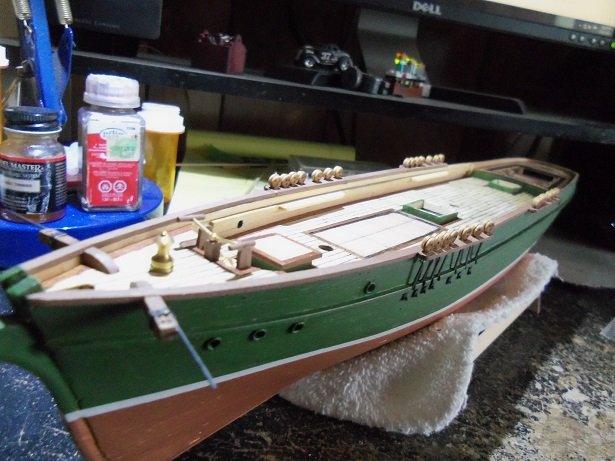
clipper ships are beautiful........definitely! I can agree that this particular kit is tough.......only because there is a lot more scratch building than meets the eye. your second planking came out nice...as with your deck. did you look up Cryil Humes' Thermopylae? http://www.powerhousemuseum.com/collection/database/?irn=211834&img=132358 click on the smaller pictures.......you should also be able to zoom in for close up viewing. your early pictures were misleading.........does your kit have printed decks? mine didn't.........I'm sure you got the smaller detail sheet for the deck fittings but, did you get one of these too? I had ordered these extra sheets from Cornwall Model Boats.......the one on the left is stamped sheet brass. it was a bit of a pain to work with, but I made good use of it. I was going to create a second hull and build the Cutty Sark........coming up with the decorations for the hull would be hard to do, so I thought better of it {dunno......I still might do it}. by all means........take your time. this hobby would be a bore, if one could churn one out in a week do you have a side picture of the inner bulwarks? ........interested to see what you did there. you asked about this......with all the bulwark posts removed {and after the deck planking}, I ran two rows of .5 x 2 mm along the bulwarks starting from the bottom. then I ran a strip of 1/16 x 1/16 from fore deck to aft deck. another strip of .5 x 2 mm finished the bulwark off. this will give you a firm anchor to locate the pin rails.......they will be high enough from the deck to add the belaying pins. you can also see how the chain plates {channels} were arranged. having an idea of the mast rake, they were arranged just after the mast holes. the rake is between 4 to 6 degrees.....this is good for most ships. I'm going to work towards getting mine back on the table. hope you don't mind if I posted these pictures......figured it would be the best way to show you. I can remove them if you wish.
- 105 replies
-
- 1
-
-
- thermopylae
- sergal
- (and 2 more)
-
nice job on the repair work.......the end result makes it all worth it good that you were able to recoup.
-
I'm sure they did.........likely to be very dark down there. they probably would be shielded though.......prevent any ignition of grain dust.........etc there were likely more lights as well..........but the single one would give enough insight, I think
- 83 replies
-
- 6
-
-
- marcle models
- card
- (and 1 more)
-
pretty ingenious to hide the wires inside the beams.......good use of the structure lighting looks good! very nice progress.
- 83 replies
-
- 4
-
-
- marcle models
- card
- (and 1 more)
-
I just grab a beer and get on my B cycle {been do'in that a lot lately}. the ship's look'in too good, to be the focus of anger nice work on the other hull too.....great job on both!
- 292 replies
-
- 5
-
-
- g class destroyer
- trumpeter
- (and 4 more)
-
really starting to take shape
-
I didn't know you had this project in the works! you gotten off to a very nice start so far glad to see your continuing the build.......very interested in following along BTW......my vote is for the Iowa.........I'm a sucker for a gorgeous battleship
- 467 replies
-
- 5
-
-
- mikasa
- wave models
- (and 1 more)
-
I really need to get one of my scratch builds going again, so I will visit the scratch build forum more often good to see you've brought the Cutter back to the table Michael........such a wonderful project {and eye catching vessel}. looking forward in seeing more progress on her
-
considering what happened to this hull, I think it came out great I agree that most of the nuances you speak of aren't really visible in the photos. the pin striping didn't come out too bad.......perhaps a different method might have produced something more to your liking. perhaps a different type of tape? they also sell pin striping by the roll......different widths and thicknesses. then there are decals and programs out there to make them....I have one....done a lot of neat things with it so far personally, I think you've done well for a first try........no one says you can't do another. don't be too hard on yourself
- 22 replies
-
- 1
-
-
- notre dame
- hydroplane
- (and 1 more)
-
hello Klas.......glad to see you started a build log the hull frame has a really nice shape to her.......faring the frame is really important, so to give the hull a smooth contour. as mentioned, I chose not to use the supplied planking. I'm not a huge fan of double planking, so I used 1.5 mm planking. it insured that there was plenty of skin for sanding. the stern came out very good....deck planking came out equally as well looking forward to see your next batch of pictures
-
thanks Carl after I posted, I began play'in with her.........there will be a bit more progress after all
- 1,090 replies
-
- 4
-
-
- showcase models
- vendetta
- (and 2 more)
-
those masts are going to be the crown on the Seydlitz creation Greg, should you pull the trigger on them. I wouldn't be a bit surprised if you haven't already! seeing your latest post on Carl's log......compels me to post the few pictures I have on Vendetta's progress. it isn't much. I did do most of the touch ups that I've needed to do.......need to do a bit more. I've added the squarish bit of PE to the four of the paravane's fins..........the other two flew off into never never land. I've painted the top of them......but still need to flip them over and do the other side. I only need the four anyway........the two at the stern, and the other two near the funnel. the aft mast is painted now........if I've neglected to mention it, it has been partially assembled as well. most of the progress went towards the fore structure, adding railings to the deck wings, on each side of the main structure section. ladders were added too.....also the gun for this deck as well. the structure is only dry fitted for the moment..........I want to add the railings and ladders on the fore deck. there are some touch ups to be done too. that's where she is at the moment folks..........hopefully I can get back to her.....but it's Friday. errands and a birthday party for one of my grand kids will eat up most of the afternoon. the week end kicks off my work week.......very slim chance I'll get to the table with that 'noise' going on. thanks for look'in in.........I'll post anything I get done today

- 1,090 replies
-
- 9
-
-
- showcase models
- vendetta
- (and 2 more)
-
I appreciate that Greg........but you needn't wait for me. while I've done a little on Vendetta, there is little to write home about. it's been very hot here, and I've had so many 'distractions'.......I just feel like I'd be holding you folks back. these group builds are a very good idea.......I would encourage anyone who has the time to participate. the Seydlitz build is going to be a spectacular project....sad, but I will likely be watching from the side lines. I have other projects that I really need to focus on...bad enough that I have a 'what if' in my head that is goading me to pull the trigger. the pull is so great.....worse I feel than when I did the Andrea Gail.....and we all know what happened when I finally gave in. you and Carl have unique projects going on ........I'll look forward for the next group build
- 292 replies
-
- 4
-
-
- g class destroyer
- trumpeter
- (and 4 more)
-
I use Testor's decal set when I have a tough time getting the decal to lay down correctly.