
MORE HANDBOOKS ARE ON THEIR WAY! We will let you know when they get here.
×


popeye the sailor
-
Posts
16,007 -
Joined
-
Last visited
Content Type
Profiles
Forums
Gallery
Events
Everything posted by popeye the sailor
-

Cutty Sark by NenadM
popeye the sailor replied to NenadM's topic in - Build logs for subjects built 1851 - 1900
super looking ship's boat Nenad- 4,152 replies
-
- 7
-

-
- cutty sark
- tehnodidakta
- (and 1 more)
-
yea.......kinda like Newton with the apple.......who would have thought
- 608 replies
-
- 1
-
-
- la couronne
- corel
- (and 1 more)
-
shrouds look great! really like the way you have them terminated and spaced. good luck with the ratlines.....I agree about the sag.......after all, the shrouds are adjustable and they need the extra room to move {in real application, of course}.
- 652 replies
-
- 3
-
-
- royal william
- euromodel
- (and 1 more)
-
it's called the whisker.......part of the cat head. one remedy I've heard of is with wire. thin wire with eyes soldered on, and then cemented via holes drilled into the end of the cat head, or banded along side of it. you could also get in touch with someone who has a stock pile of these parts.......but that's a long shot {only one person I know of, who would be n that position}. anyway......it's a thought....hope you can get it sorted out
-
super looking hatch Grant......do the inner guides fold away from the wiring?
- 339 replies
-
- 3
-
-
- dumas
- Chris-Craft
- (and 3 more)
-
great job Frank! she looks super with her sails looking forward in seeing the N.L. build!
-
super nice job on the long boat! the inner detail you've put into it so far really set it off nicely
- 1,306 replies
-
- 7
-
-
- syren
- model shipways
- (and 1 more)
-
sorry Steve for causing you to redo the rat lines......especially when I saw you ended up cutting them. they do look much better now though. super job with the fore and main mast...the standing rigging looks superb
- 291 replies
-
- 3
-
-
- bounty
- billing boats
- (and 1 more)
-
pretty interesting about the bobstays....you would think that with the length of the spirit and boom and the given stress of the rigging, there would at least be a pair or two terminated at the stem. thanks for the info
- 608 replies
-
- 1
-
-
- la couronne
- corel
- (and 1 more)
-
glad to see your recovering nicely........quite a surgery you had. even with all that went on.......and still produce some stellar updates. she's looking really top notch!
-
wonderful job on her Jerry........congratz to a job well done!
-
nice work with that part of the super structure.....came out very good. the PE parts will enhance the model for sure! the reels look great
- 295 replies
-
- 5
-
-
- amatsukaze
- halinski
- (and 2 more)
-
wonderful job on the rigging EJ.......really looks sharp do the rigging plans show any bobstays?
- 608 replies
-
- 2
-
-
- la couronne
- corel
- (and 1 more)
-
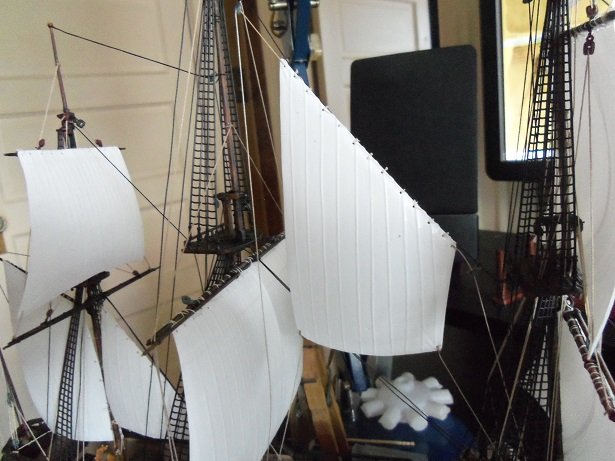
I started off on the wrong foot this morning.........I sewed the main top sail........but I had it set up upside down. .....had to take it all apart and redo it. then disaster struck.......the admirals comes in and shows me this bent piece of plastic.........it is the top gallant sail yard! it was right here on the table.........I saw it! I must have knocked it on the floor, and the carpet monster got it! she found it just under the bed.........the dreaded cave of doom........sssssssssssssssssssssssssssssssssssssssssssssssssssssssst! luckily, it's just bent......with very little distortion, and two of the single blocks are missing. I'll sew two more on and get it sewed before anything else happens to it
- 140 replies
-
- 8
-
-
- jolly roger
- lindberg
- (and 1 more)
-
very nice method.........this could also be applied to stanchion railings too. one to file away well done!
-
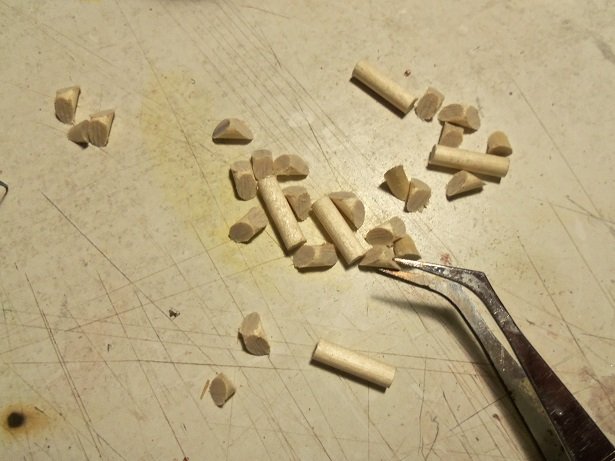
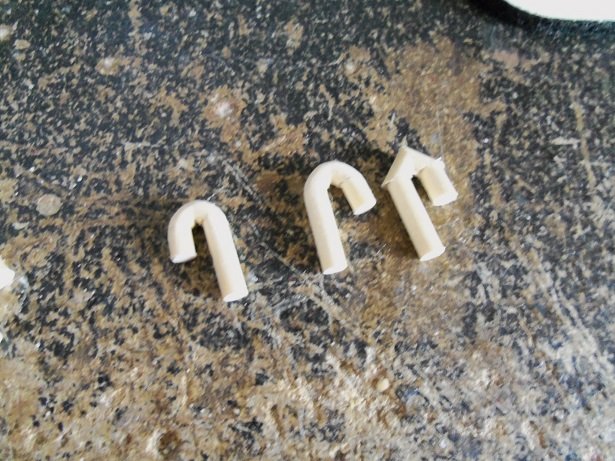
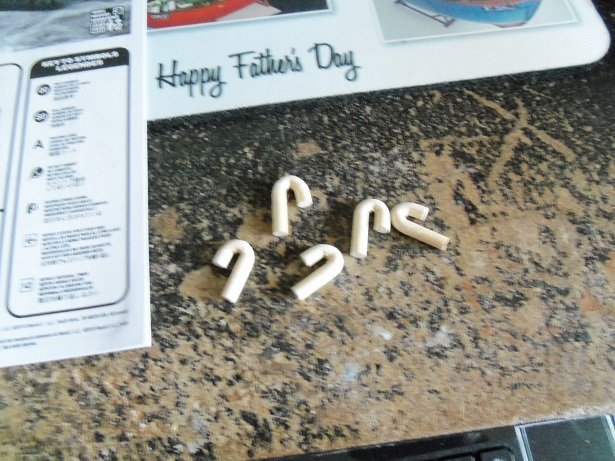
a few updates ago, I had chopped up some small dowel...diagonally cut bits and pieces. these have been hanging around on my table. I had done this to create the vents for the Andrea Gail. the week before last, I was working on the sails for the Jolly Rogers, and to break up the tedium, I pieces some of them together. later I glued the pieces together. this week.......now that I know they are quite dry, I began to sand them...shaping them into the vents. I still need to do the underside {the inner curve} and refine them a little bit more........but they are all sanded to the shape I need. once they are completely sanded {I may do some hollowing out at the spout}, they will be painted, and then added to the model. I've also come up with a couple ideas, for how to proceed with the stern section. I hope to have more soon....it's high time I got back to completing this model

- 747 replies
-
- 10
-
-
hello Lawrence! thanks for the kind comment on the 'ole trawler yea, she's close to being finished, but it's just slow getting back to her. I hope to soon. sails.......yea.....I did that not sure if it's detrimental on printers, but the material I ran through there worked well. I would say that it would be best to run the material through before they are cut out......you'd have a much easier time centering the image. I have a few different grades of sail cloth.....without looking at the blog I did on embossing, I likely used the cloth I got in the Gothenborg kit. that stuff felt like canvas....not sure if it could be ordered through Billing's. I haven't had the chance to try a second experiment on this, but I would also think that other types of sail cloth would need to be stiffened, prior to embossing. this can be done with atomized white glue sprayed on the cloth, light coat of lacquer, or a light coat of decal bonder....I've used this product too and had some good luck with it. it is a process......feeding it in square and trying not to allow it to pull the material, are the two biggest things to watch out for. let the image dry for a few hours before spraying it with another light coat of decal bonder {lacquer will work too}....but don't use anything water based, or the image will run. light coats is the rule here.....a second coat can be done later if you desire {they can even be shaped at this time}. I will post the blog for anyone to view. there are other blogs here as well that may be of interest. https://wenzelswharftips.wordpress.com/2014/04/29/embossing-sails-part-1/ thanks for looking in Lawrence.........I wish I had info on using the pre cut sails for you. it's nice to have an admiral that is willing to devote her time
-
I did do a little to this model yesterday. it's so humid here............been this way for a couple of days now. the lines on the model are drooping a little........I was kind of afraid to do any rigging. If I did, it might cause all the other lines to stay that way.......not good. I did find one mistake.......the up haul line for the main stay sail is wrong......I have it routed through a opening in the top, and it will be in the way in cementing the main top sail in place. white glue has it's good points. I was able to untie the line and reroute it to the railing at the base of the main mast. I tied the line on for the course sail and top sail lifts.......I still have the top sail and top gallant sail to sew yet. I likely get them done today and then I can continue. in the meantime, the clew lines will hang in limbo.
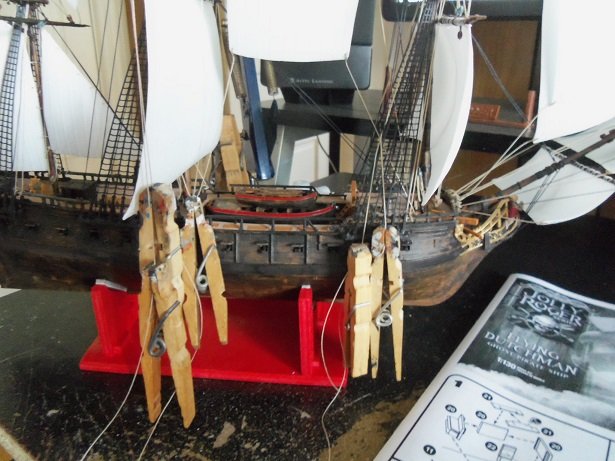
- 140 replies
-
- 13
-
-
- jolly roger
- lindberg
- (and 1 more)
-
I did a similar boo boo with my first build, the Nordkap. I ended up making a new part to replace what I was working with. most of the time, the broken part can be set back in place, but the repair you made will be just as effective. you may want to add a narrow piece at the end to even off the port side panel........when you add the part they call the bow stem, there may be a gap there where it attaches to the stiffeners. filler...sand, and your good yea, I need to get back to her.......I've been sidetracked with other projects
- 24 replies
-
- 2
-
-
- finished
- Chesapeake Bay Flattie
- (and 2 more)
-
it's actually not a bad practice to leave a little extra on the part......something to work with in fitting the part. in some cases, it can save you from creating a gap here and there. I think the extra knight head posed the bigger problem good you were able to make the adjustments without any issues
-
thanks Don.....plastic used to be my medium. I feel I've lost a little of the touch, since moving on into wood, but I still enjoy it. planes and cars seem more plausible to me though....the admiral might be rubbing off on me.......they just don't have the look, unless they are of wood thanks for the very kind comment. thanks to all who hit the like button I haven't made any more progress on her........and I'm running the gambit with the work week at the moment. I was {still am till they are done} at the table with the sails, sewing them using the helping hands. there's only two more left...once they are done, cemented on the model and rigged....the all that is left, are the braces, the tack lines, and the anchors.........oh.....and the yo ho ho pirate flag too while I was sewing the main course sail.........I did something that will be added on another project {not a new one........one in progress } that will be coming soon. I appreciate you all look'in in........the best thing I'm finding with this hobby, is sharing it with friends!
- 140 replies
-
- 7
-
-
- jolly roger
- lindberg
- (and 1 more)