HOLIDAY DONATION DRIVE - SUPPORT MSW - DO YOUR PART TO KEEP THIS GREAT FORUM GOING! (Only 51 donations so far out of 49,000 members - C'mon guys!)
×


popeye the sailor
-
Posts
16,007 -
Joined
-
Last visited
Content Type
Profiles
Forums
Gallery
Events
Everything posted by popeye the sailor
-
 thanks Frank.....yea, I think it will be worth it thanks for the good word.
- 165 replies
-
- 2
-

-
- united states
- revell
- (and 1 more)
-
you folks are awesome!......d' you know that! I'll be sure to keep you all well informed!
-
very well done Danny!
-
thanks to everyone and those that pushed the like button. today was no different......I had helped my son out in buying his first car.....used, but I saw great potential in it. we took off this morning and got it registered, so he could bring it home. once it got here, I began going through it, already found and fixed an electrical problem. had to do some junk yard hopping to find the part....it would have been expensive at the dealer. I've got more to check out before he tried to get it inspected......I really don't think it's going to need much else, besides a couple of tires someone mentioned this to me Evan....where I've made up wood deck platforms, I don't think they would be a good fit for them. the specs I used would make them a bit off. I've seen the work you did with your decks. after seeing them, I almost changed my mind.....but hey, I went this far.....so I may as well get totally wet! thanks for the thought and the good word.
- 165 replies
-
- 1
-
-
- united states
- revell
- (and 1 more)
-
so many holes.....so little time your gett'in quite a few feathers in that cap of yours.....at this rate, you'll have an Indian headdress
- 1,616 replies
-
- 1
-
-
- caldercraft
- agamemnon
- (and 1 more)
-
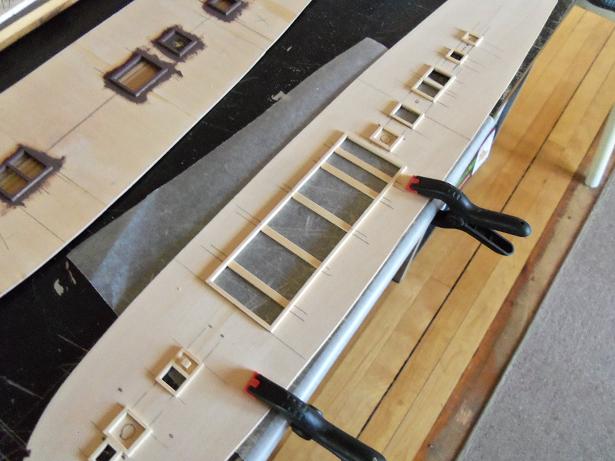
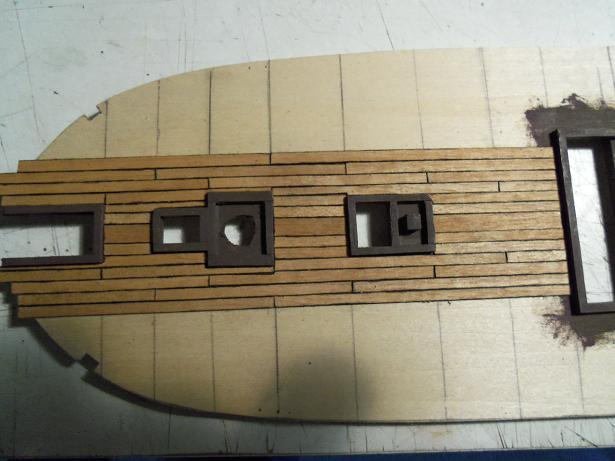
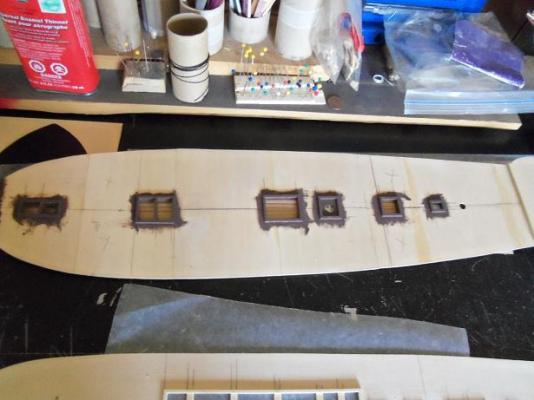
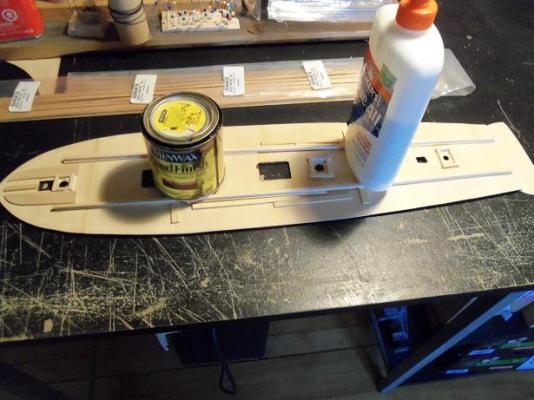
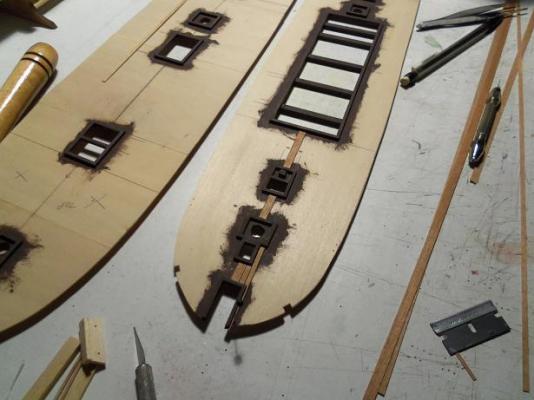
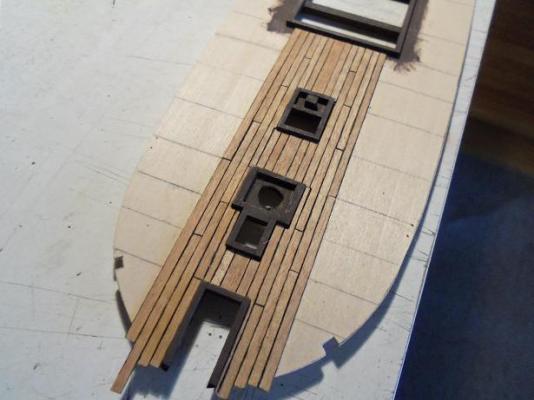
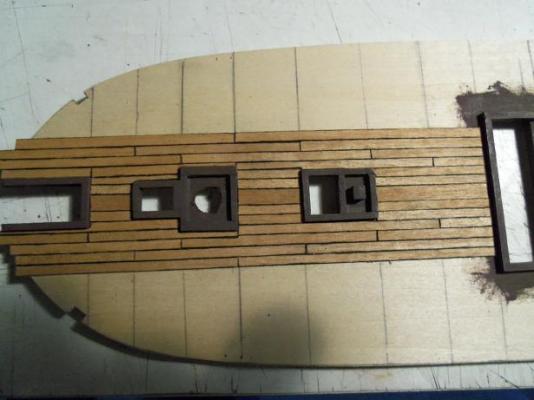
this lull is killing me! the last couple of weeks have been busy......I haven't had the time to spend at the table the time that I did find though, I put to good use. the main objective here is to get the decks planked. some prep work was needed before this can happen. first, the wood aspects on the decks needed to be painted. the gun deck got a coat of French Chestnut brown. for the spar deck, the opening needed to have the beams installed. to get the sense that the beams ran under the deck, the thickness was divided in two halves, and cemented together. the beginnings of the mast pots were done under the gun deck. when the masts are inserted into the decks, they will be able to sit in these boxes, without all that extra dowel running all the way to the keel. then the spar deck was painted like the gun deck the planking is going to be a slow process. I'm beginning to think that I should have gone with a 2 mm wide planking......the .5 mm here and there in relation to the deck moldings, requires me to trim the planking to fit. I was looking at the plank detail on the plastic parts, and I see that the planking is in many different lengths, as well as staggered every three rows. there is a wider king plank in the center, so I went with a 5 mm plank to do it. here is what I have so far. I gotta say........you folks out there with the wood deck upgrades for your battleships...are very lucky people I know of a fellow that planked his the same way I am, and he swore that he would never do it again! I also ran into a problem with the archive pen that I'm using for the calking.....it was running out of ink. I had bought a bottle of India Ink to stain some thread. I pulled the cap off the end of the pen and added four drops.......it's like a brand new pen I hope to have an update soon. thanks for looking in


- 165 replies
-
- 10
-
-
- united states
- revell
- (and 1 more)
-
I believe they still do......there are a few discrepancies with it though. the number of galley / stern windows and the aft stairs are the two most prevalent ones. I was looking at the log last night.....I'm missing more pictures that I originally thought......I need to go through the whole log it is a nice kit though, and to bash it is very easy to do.
-
thanks Matti.....yea, I know I should get back to her. I started to, but I got off on the wrong foot...so I undid what I did. now to start over. I've got many pictures of her and bookmarked a slew of sites. too bad that there aren't too many builds of her going on. I was looking at the corel version of the ship....I like the billing's version better. you've brought her very close to the original....kudos!
-
lordy lord! have mercy Piet.......... Sjors can only shoot cotton balls :D
- 1,616 replies
-
- 2
-
-
- caldercraft
- agamemnon
- (and 1 more)
-
thanks Tom......yea.....still too soon yet. to be honest, I haven't looked into it to much degree, but the hull configuration is there.......blowtorch....a little mod....but I think it will work! I'll be sure to let you know what happens
-
you do make this look easy.......but I know it's not your giving me such an itch to try this stuff out simply wonderful work!
-
she looks good Bob.....the deck looks very clean
-
your first attempt isn't bad at all......don't feel like that. if you do replace them though....the top of the door frame should overlap the sides. simply all you'd really need to do is put molding around the frame and leave the door the way it is. not too much to do...to make it look nicer.....I love that door...it looks rustic. I agree with Matti as well.....darker wood with the light wood really set it up nicely. try diagonal cuts when doing the door molding.....like a picture frame while it would be nice to have the doors functional, just doing them the way you have done is pleasing enough. keep that idea in mind for the next one......Ideas never die.....unless you want them to
-
looking good Sjors I can relate to what Augie says.......whenever I see something about a build that I don't like, I simply see it as an opportunity to bash wonderful progress you've done there!
-
thanks Kevin......I haven't done much with them as of late. waiting till the weather get a bit warmer, so I can bring them out to the garage for a complete sanding job. they are going to be singular builds, but under the same subject / theme. one of my ideas though might not be as good as I once thought. I at least want them to be practical, so I threw the skating rink idea out. I do have an idea for the third hull, but it doesn't pertain to the subject. if that happens, this project will become a duo, and I'll save the other hull for that purpose. however this turns out, it will still be fun to do. thanks for looking in
-
Cutty Sark by NenadM
popeye the sailor replied to NenadM's topic in - Build logs for subjects built 1851 - 1900
decking looks nice Nenad........very well done -
there is supposed to be a bit of curvature to the deck platform. I would sand the top of the frame work to this curvature.......if there are a couple at this point that shows more that what you should have, thin flat stock shims should take care of it. the bulwark posts seem to be rather thick with this kit.....I would fare the hull frame and either install the bulwark panels {if the kit has them}, or plank the bulwarks down to the deck line. then they can be thinned down, and the excess at the deck line can be hidden by the waterways or deck planking. the bottom line....just as the hull frame need to be fared for the planking to sit flush, the same is the case for the deck platform. I haven't built one yet that I didn't have to do this to....and yes, I have had to shim here and there.
-
Cutty Sark by NenadM
popeye the sailor replied to NenadM's topic in - Build logs for subjects built 1851 - 1900
good to see you bench cleaned off .....happy birthday my friend! working on her majesty is a wonderful way to spend a special day!- 4,152 replies
-
- 1
-
-
- cutty sark
- tehnodidakta
- (and 1 more)
-
looking very nice Nils
-
nice bit of progress......glad to see your on the move again! really great