HOLIDAY DONATION DRIVE - SUPPORT MSW - DO YOUR PART TO KEEP THIS GREAT FORUM GOING! (Only 51 donations so far out of 49,000 members - C'mon guys!)
×


popeye the sailor
-
Posts
16,007 -
Joined
-
Last visited
Content Type
Profiles
Forums
Gallery
Events
Everything posted by popeye the sailor
-
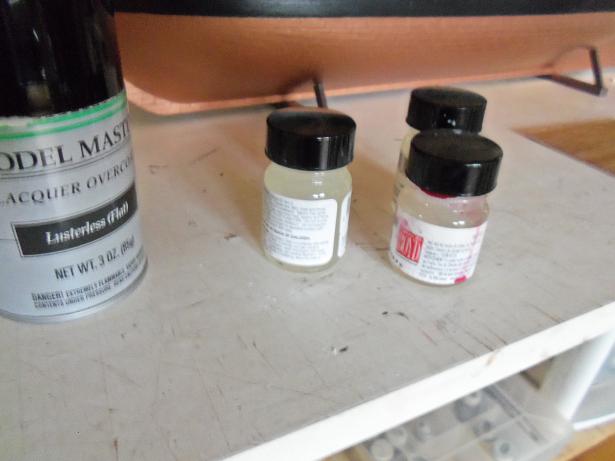
 thanks for the kind words gentlemen.......I solved the mystery! I should have thought of this before! today I decanted the rest of the first can, and half of the second can. all I had to do, was pick up the decanting bottle.......it was very cold to the touch. the propellant in the mix is the culprit. with airbrush and rattle can, the paint is sprayed through a tiny orifice. airbrushes work with 15 - to 25 PSI......rattle can, in my guestimate, sprays at a much higher pressure. the higher pressure going through the orifice, drops the temperature, and causes moisture {condensation} to develop. it didn't occur with the poop deck simply because there wasn't much deck surface...short blasts. I will let these three bottles breathe a bit before I seal them up, to let the rest of the propellant leach out. thanks Dave, Augie and Mark........there will be no more problems now. the spar deck has four coats, and the poop deck has three. with the fourth coat, there is still a bit of white still present....I may just leave it, and touch up the brown paint work. although.....I have thought about laying down a coat of semi gloss, to give the decks a little shine.........this flat lacquer has absolutely no shine at all......it's pretty dead. thanks for the good word thanks Mobbsie.........you have lost track I have eight in the cue.......the Boulogne is among them. now that the warmer weather is here, I can do some sanding in the garage.......the Boulogne Etaples and two of the Holiday Harbor boats need to have the hulls done. once I set up a jig to hold them, I can begin. I'm making another jig at the moment........I'll let you know how it goes. I have a build log for each one......the Boulogne is probably buried again.........perhaps a bit later thanks for the good word! actually, I still just poking around with this build.......I see so many that are doing the Connie..........I can't wait to try out some of the many cool ideas that are going on. thanks Patrick.....I'm a lot happier, now that I know what the problem is......I never had this problem with air brushing. it's another reason why I hate rattle cans. thanks for the good word! gee.......thanks Frank! for that......maybe I can quit my day job all I'd really need to do is work up some deck templates. the plus side is that I'd be doing something I love to do I could go even further.......how about a TV show "Pimp my Deck" I'm just kidding.......that's a really cool thought.....I really appreciate it thank you Frank not to worry Dave.........I can't leave my day job just yet.......I need what bennies I get
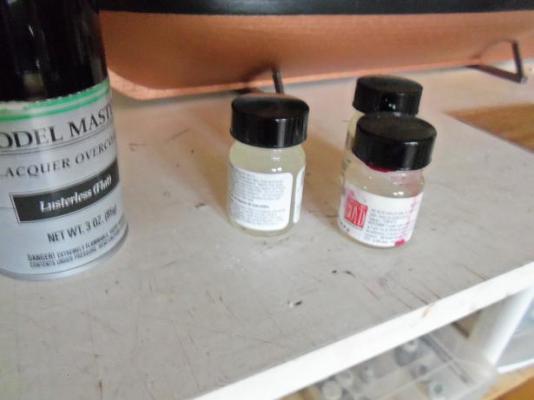
- 165 replies
-
- 9
-

-
- united states
- revell
- (and 1 more)
-
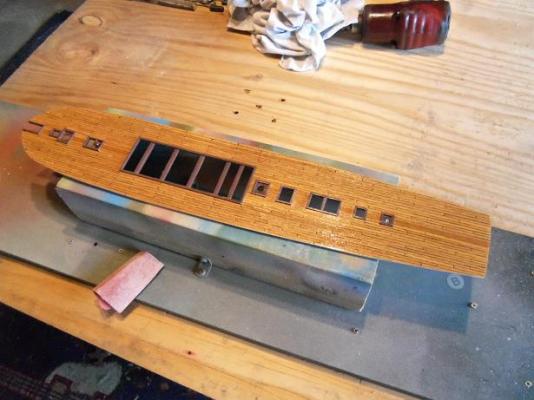
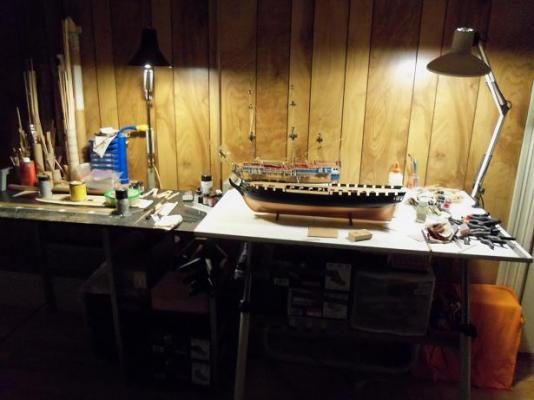
thank you Adam and Marcus...you two are like.......way too kind you and others have done well, in making it sound like a positive, and I thank you all for doing so. even if I end up doing the decks over again, I will know that I'm on the right track. I am very pleased how the spar and pop decks came out. I came home today and gave it another coat, after sanding it again. this is the only window I'd have for the next few days....it's supposed to rain. I'm beginning to think that it's the paint.........I'm glad I didn't do anything to the Half Moon. I know I have quite a few builds in the cue....I was hoping that I could lay some ground work for this build, and get it to the point where I could bounce to it a lot more frequently than I have been. but I feel that I have to wait once again. I did manage to take some pictures of the deck this time, while it was still wet. it will give you a god idea of what it should look like, if I didn't encounter all these problems. I let it dry for a bit, then I brought it back indoors. I even gave the poop deck another coat......it didn't turn white. I'm feeling that I must be using the wrong lacquer.......the other lacquer I use, I spray with my airbrush. perhaps I should decant it and thin it down.......I will see if I can get a retarder for it, but I will also try and see what the effects are with a reducer. there's no reason why I can't experiment a little. I got my other light working again, since I'm going to try and work on both tables again. for those who wonder what my set up looks like........here it is you'll notice the boot boxes under the tables........they are the part boxes for the Trawler, the Half Moon, the United States, and the holiday harbor boats. the rest of the parts for the Gothenborg are on the table. there's an odd box off to the side.......that's for the Boulogne. Marcus.......that is a very scary tale.......I'm glad that it had a happy ending {weird}. but yes, that's a example of how fire needs to have a maintained flash point to survive......either that, it ran out of fuel. I am humbled that you like my work......I thank you very much. once this build can really take off, I think it will be more enjoyable for both of us hopefully another update will come soon!

- 165 replies
-
- 9
-
-
- united states
- revell
- (and 1 more)
-
never mind the tight lines..........rather see them poles bend'in over
-
thanks Dave and John........it's getting better, but I still need to do more on it. I just hope I can save it!
-
yes Keith.......sanding is about the best way to eliminate the problem. if I was able to repaint it sooner than I did, it wouldn't have had time to cure.........the white would have simply disappeared. to catch it before the paint has cured, it would have caused the paint to become solvent again, and caused the white to 'melt' back into it's liquid form. I had another good window today.......but I had to work. it being mother's day......I was in charge of making supper. oh....well ......... my first day off.......Tuesday.......is going to be wet. but I hear that it will improve after that.....so I'll just keep my fingers crossed. I just hope I don't have to make another deck...........bad enough, I'm thinking that I should make another gun deck.......now it's beginning to ripple. I'm not catching a break here...........this is not good. love that article you sent along........I had forgotten about that car! for those who aren't aware.......the electric car was built around this time as well.......Renault had done a prototype....as well as a car that could go well over any car MPG that is made today. the technology was out there........the question asked here........is who dropped the ball, or hid these facts from the public. the non serviceable battery was invented around this time as well........they swept that one under the rug too! I was listening to Pink Floyd as I wrote that post.......I love the fact that I can do this with my computer. I also use the computer to practice songs as well......I made quite a few practice CD's. I wish I could play in a band again. I thank you.........I enjoyed everything you wrote! that car would make a fine 'Popeye-mobile'! I's don't has the pitcher 'o me can...........AK-k-k-k-k-k-k-k-k-k-k--!

- 165 replies
-
- 1
-
-
- united states
- revell
- (and 1 more)
-
well.......we were standing there when it did it.......we couldn't believe it either...but it did. I'm thinking that there were chemicals in it that interacted with each other , to cause such a reaction. to understand fire.......it's a huge part of the whole. fire needs three things.....air, fuel, and it's flash point. think of it as a grease fire.......fuel is there........air is there......but if the temp is not above the flash point, the fire will not survive. wood has a low flash point........so it need to have the fuel to survive and grow. here is an even better example......body filler. alone, the filler is harmless..........alone, the hardener is harmless as well. mixed together, chemicals in both parts interact with each other, and allows it to create it's own heat source....this is required to promote curing. the more hardener you add, the more heat that's created......thus a faster cure time. I'm not too worried though........those chemicals probably aren't available to the public. as much as I work with it, I'm sure that nothing like that would happen.
- 165 replies
-
- 1
-
-
- united states
- revell
- (and 1 more)
-
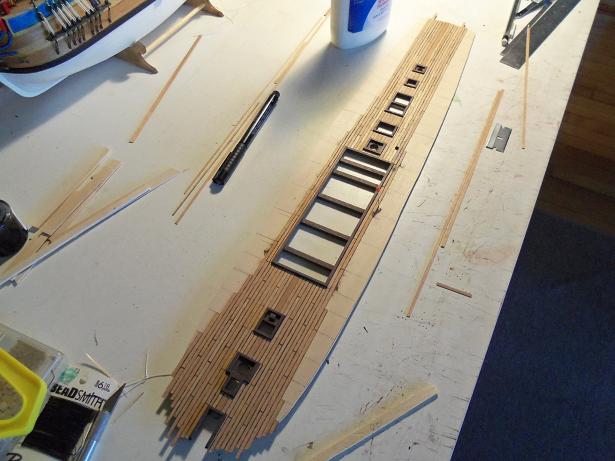
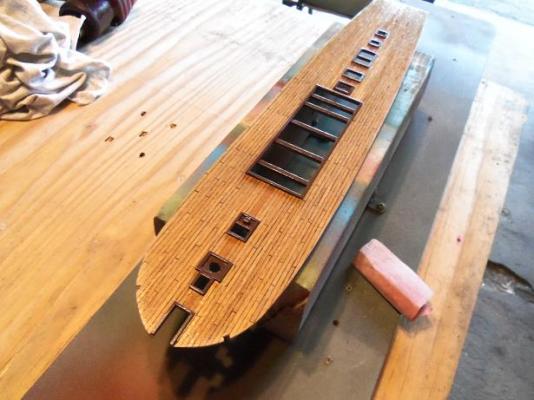
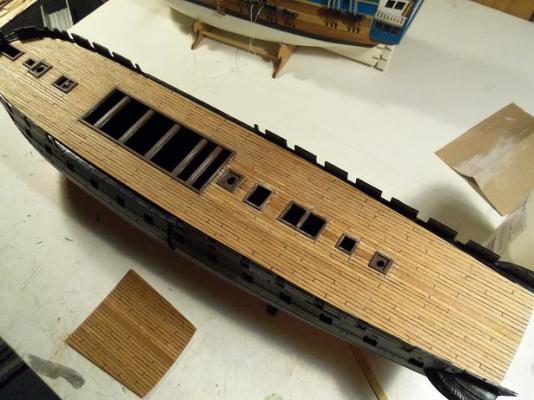
I did some sanding to the spar deck.........today, I came home.......got settled back in with home life, and grabbed the deck. I went out to the garage with it. it was rainy in the morning, but it cleared and it was quite warm. the clouds were making another run at me when I sprayed it. I let it set for a bit, then brought it back into the house. it had some time to dry, before rain moved in again.......but it still managed to turn yet again.......not as bad as before though. it may be because the lacquer is too concentrated.......perhaps I will decant a can, thin it and try again later. the semi gloss lacquer doesn't do this.........it's not in a rattle can and I do thin it to some degree........I will have to experiment a bit I have a block of wood under the poop deck......you can see the difference. back to the drawing board Sherman OK Mr. Peabody!
- 165 replies
-
- 11
-
-
- united states
- revell
- (and 1 more)
-
thanks to you all.........and to those that hit the like button. I did some sanding today.......but got side tracked with my son's car. I'm really starting to regret helping him get this car. then I find that our government has their head's up............never mind I don't know about that Patrick.........I think I'd rather have seen it look like the poop deck. I did sand it down a bit, but the longer I wait, the more permanent it will become. it was wet today.......so it may turn into a bigger job than I thought. thanks for the good thoughts though......I appreciate it thanks Frank........if both parts came out the same......it would be you still brought a smile to my face.....thank you there is another, more dangerous side to this type of paint.......it has the ability to generate it's own heat. you mentioned retarders Piet, and it reminded me of this fact. I was a lead man at Keller cabinets in Florida....we were trying out a different mix of lacquer at the spray booth. the booth caught fire......crazy and hectic time.....we got the fire out just as the fire department came rushing in. the plant manager and I were discussing what went wrong. at first we thought it might be because the booth was heated.......too high a temp for the paint. we did a test by spraying some of the lacquer on a filter, and setting it out in the aisle, outside the paint room. within less than five mins, it burst into flames. this was with no heat source as a conductor. I forget whether it was thinned with a reducer or a retarder, but the drum was sealed and removed from the paint room .......pronto! for the finish it can't be beat.....it dries with a harder finish than urethane.....and pretty resistant to scratches and dings yea.......unless I figure out a way to cut some of the wider strips down {I have quite a bit of it.......figures}, I will be ordering some more. if I can't straighten out the spar deck, I'll end up making another one. thanks for the good word Piet
- 165 replies
-
- 2
-
-
- united states
- revell
- (and 1 more)
-
the Wharf comes to life early in the morning. they awoke to find that during the night, there was a slight dusting of snow! morning mess had to be quick.......they knew they had to clear the decks, before they could continue their work. the tracks in the snow began to multiply, as the carpenters made their way to the dry docks........... lacquer is the hardest paint to work with.......everything need to be right, in order to get good results. in my experience with it, there are two things that are required.......the ambient temperature must be above the point that it can harbor moisture, and of course, moisture in itself. when I did the first coat, it was fine. I had done the poop deck earlier in the day. I did it at my table, seeing that it was such a small piece. I got such a raving review form the smell, that I moved the operation to the hallway. I would have brought it out to the garage, but by this time, it was getting dark, and the temp was falling. what this told me is that the hallway isn't as airtight as I thought it was........I did the second coat........it rained sometime after that........temp had fallen and the moisture content went up. all is not lost though......I can give it a light sanding and redo it........it should be fine. I'll see if I can fix it today

- 165 replies
-
- 7
-
-
- united states
- revell
- (and 1 more)
-
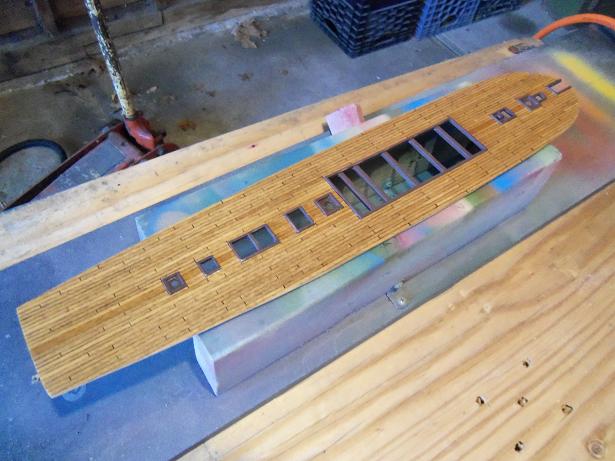
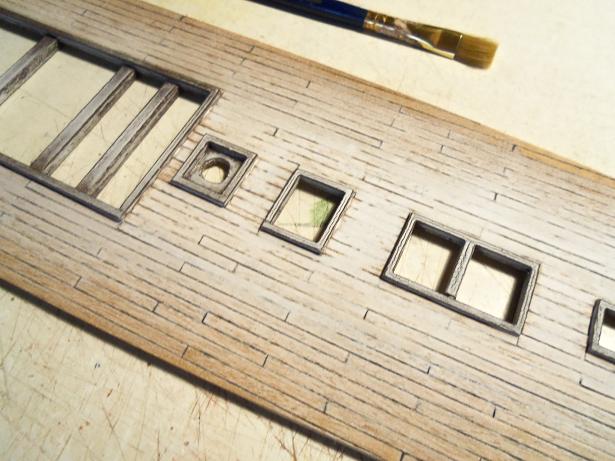
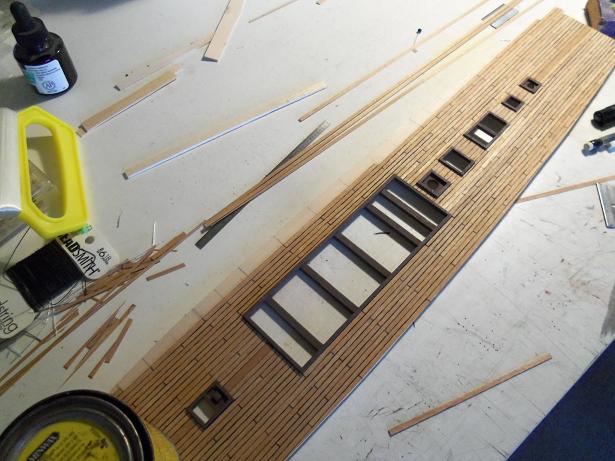
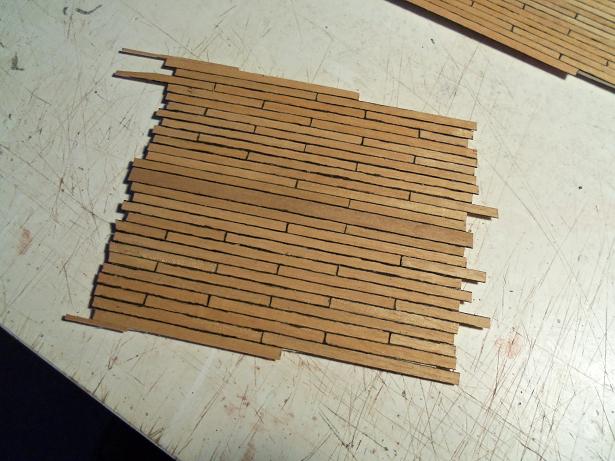
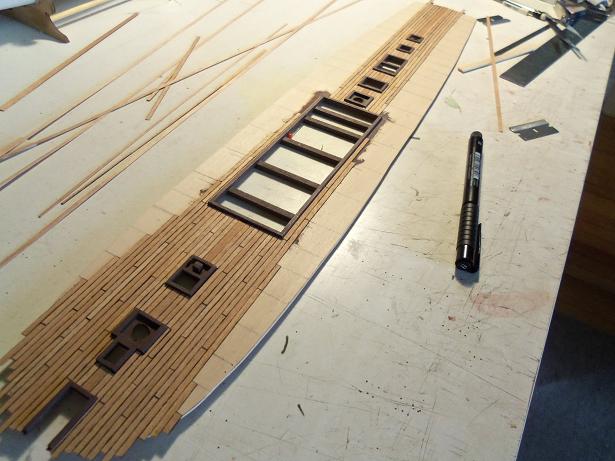
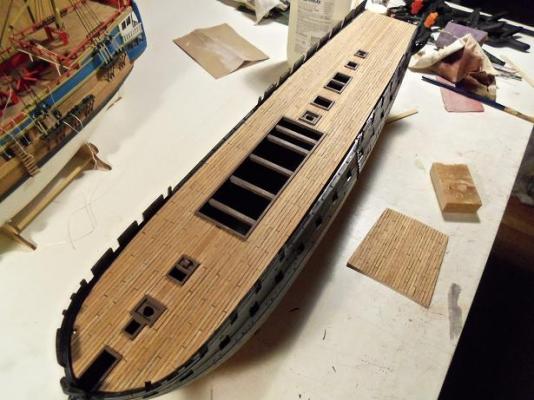
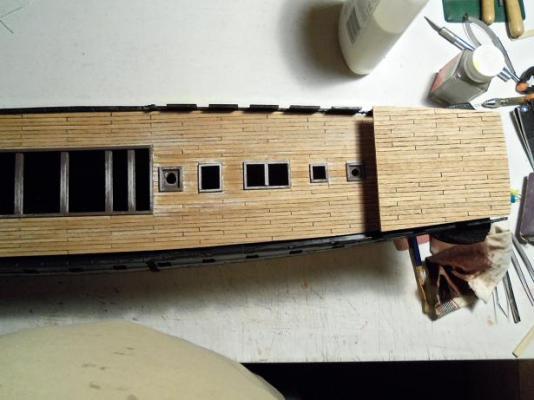
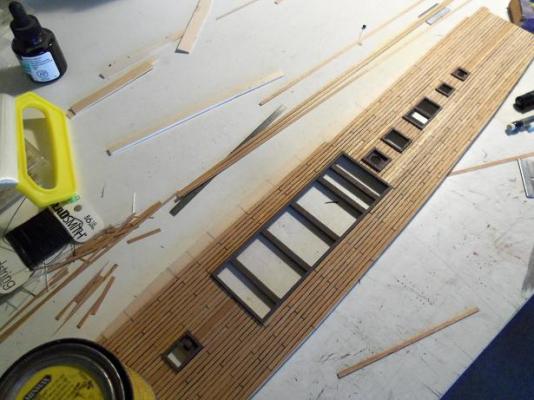
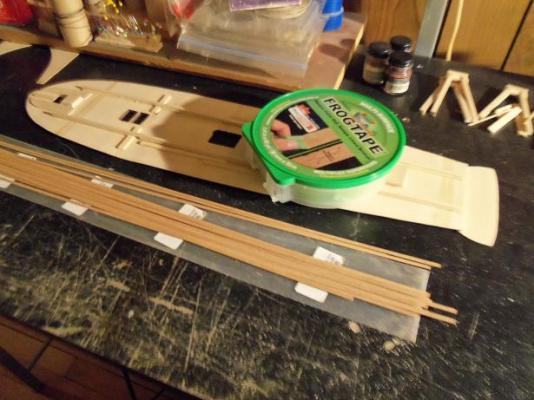
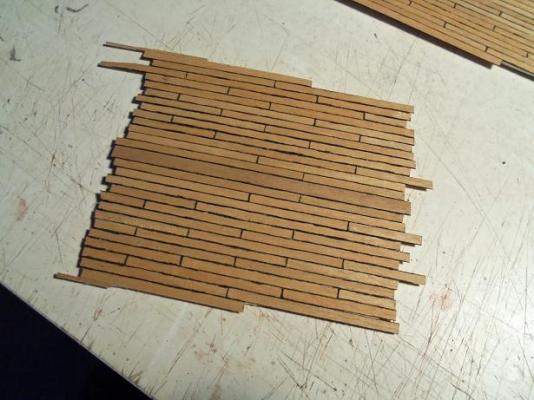
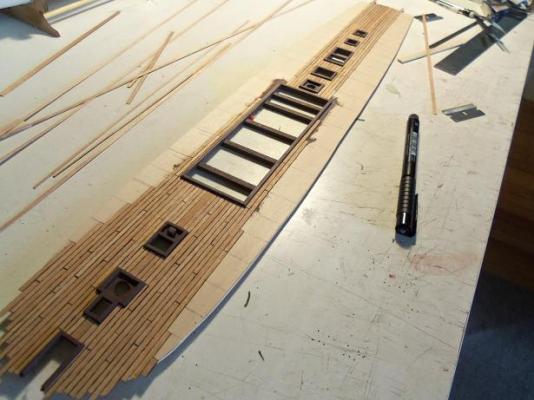
thanks Mark and Patrick for your comments.......a bright ray of light on a dismal looking day. it's cloudy here.......further confirming my suspicions of what happened last night. I'll get into this later. Mark: the thin planking that I use is called Annegre, sold by Billing Boats. it is a lighter variation of mahogany {so I'm told}, the darker reddish wood found in most kits. some folks plank their hulls with mahogany......it is a wonder, due to it's brittle nature. I've used Annegre in many ways....I use it as a decorative wood, but it is better suited for hull and deck planking. it's a bit more flexible and not as brittle as mahogany. when done up with the simulated calking...it looks great, and when sanded, the blackened grit gets into the grain and emphasizes the texture when seal coated. it is only 0.7 mm thick, and can be purchased in a variety of widths. best results are instances where there is a deck platform laid first........I remember the first deck I ever planked....I used the 1.8 mm strips....very tough to get it to lay down properly. this thin stock conforms to the slightest variation in the deck line...from the camber, to the man made goof it's very easy to work with. thanks for the good word. Patrick: I will appease you......then I'm going to make you jump up and say.......WT.......? I do thank you for your comment......not to worry friend.......I'm still smiling! Anyway.............on with the update! if anyone has the song 'San Tropez' by Pink Floyd.....put 'er on the fang tooth cobra....and give'er a spin......love that song! it's on the 'Meddle' album, for those fumbling to find it.......then.....follow it up with 'one of these days'.....with the volume turned up past eleven! it make me think of the old Dr. Who....when I was a lot younger all that was left of the planking, was the port side. it took a bit of time, but I got it done you can see that I try to weight the decks down, to limit the amount of curl they tend to get from sitting around. I do this while I'm planking as well.......the drying glue tend to put the pull on it too. while the gun deck is in wait for it's planking, I see I need to do this....even still with all the crap I've done to it before. what you see is all that I have left......that's around 25 strips......well below what I will need to complete the entire deck. the spar deck was trimmed and sanded after it was wiped down and the paint work was touched up, from the nicks it received from the sanding, it was time for it's first coat of flat lacquer. now it's a waiting game...allow to dry, so the second coat can be applied.


- 165 replies
-
- 12
-
-
- united states
- revell
- (and 1 more)
-
supper looking build Matti.......masts look really nice. not too many pictures of the deck lately......refreshing to see it I noticed the position of the capstan......the location seems more logical. most ships have them located just after the mid ship....guess they need more elbow room super build......coming along splendidly!
-
thanks john........it's a slow process. besides not having enough strip stock to do the gun deck completely, I think I killed the archive pen. I forgot to snap the cap on tight..........it barely had enough omph to finish the spar deck. I may wait on the gun deck. thanks for the good word thanks to you, Andy and Mark as well for the likes
- 165 replies
-
- 1
-
-
- united states
- revell
- (and 1 more)
-
Cutty Sark by NenadM
popeye the sailor replied to NenadM's topic in - Build logs for subjects built 1851 - 1900
bet you go through a lot of blinds though couldn't agree more.......- 4,152 replies
-
- 2
-
-
- cutty sark
- tehnodidakta
- (and 1 more)
-
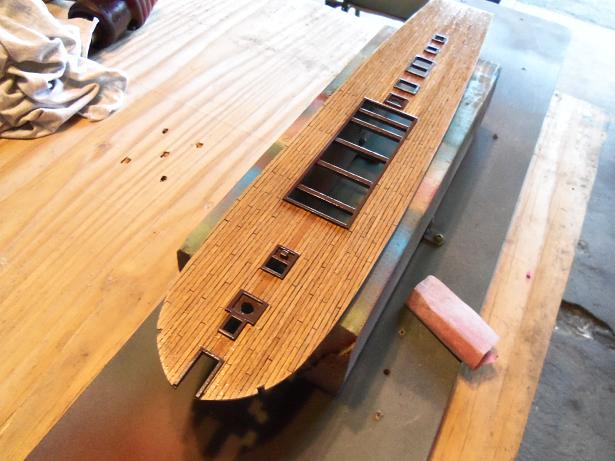
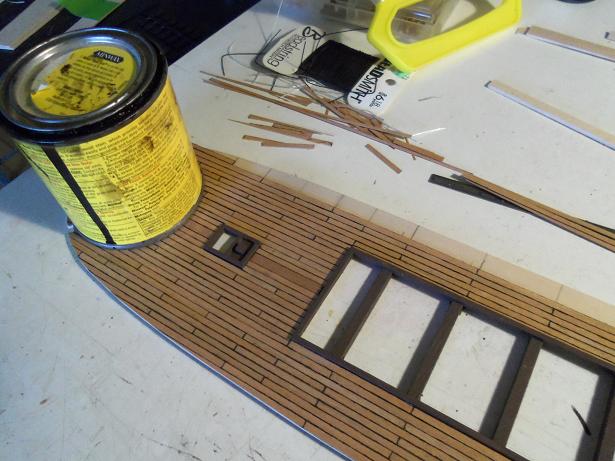
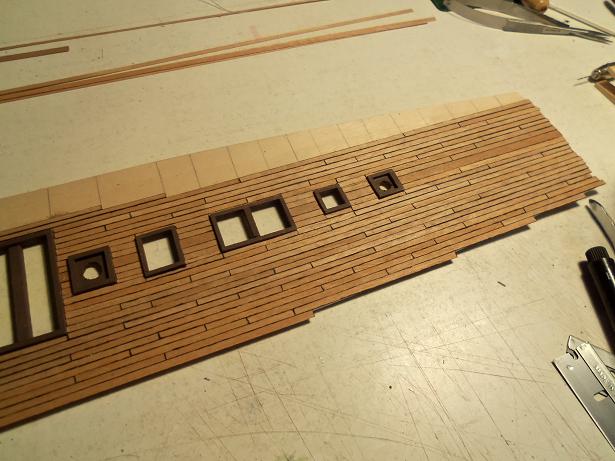
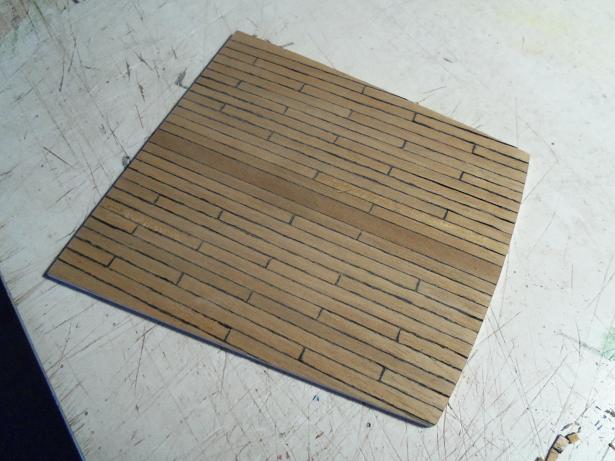
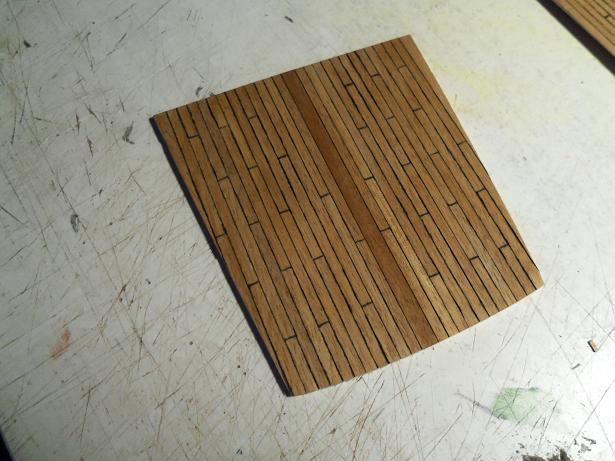
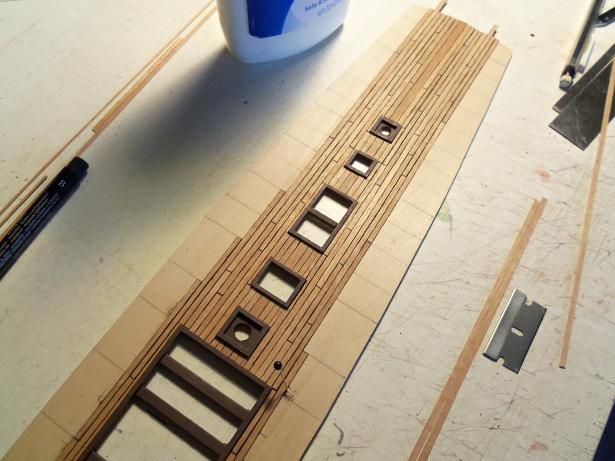
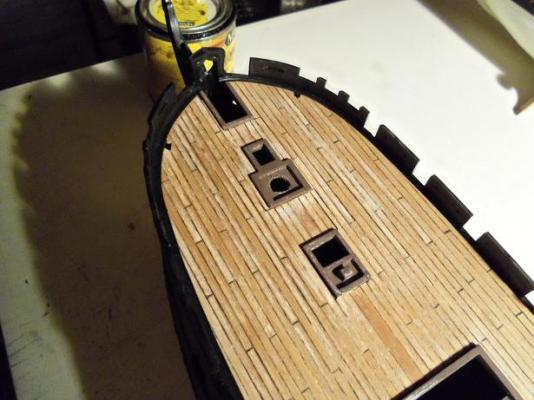
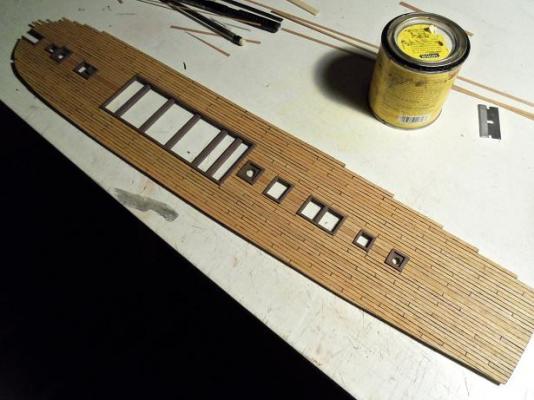
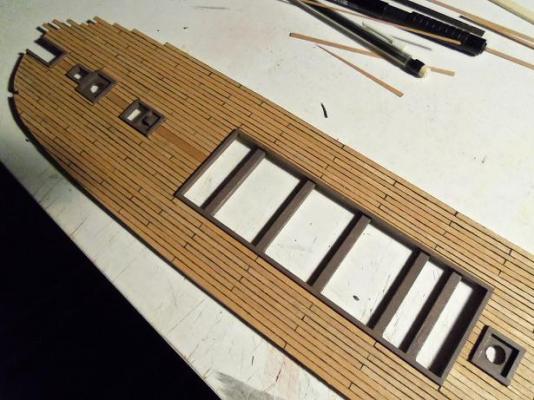
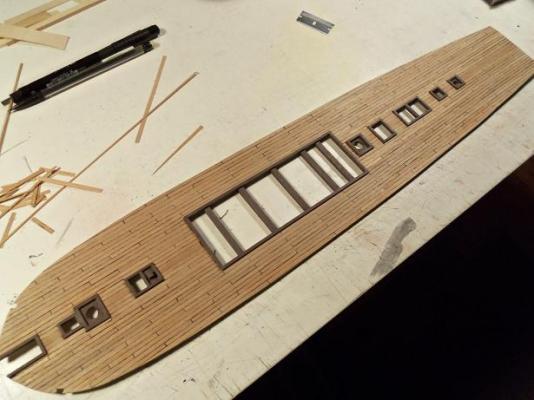
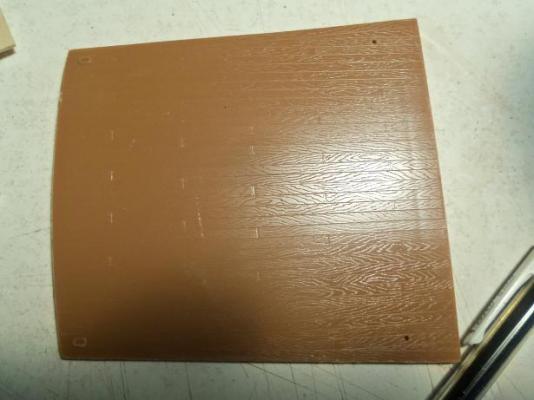
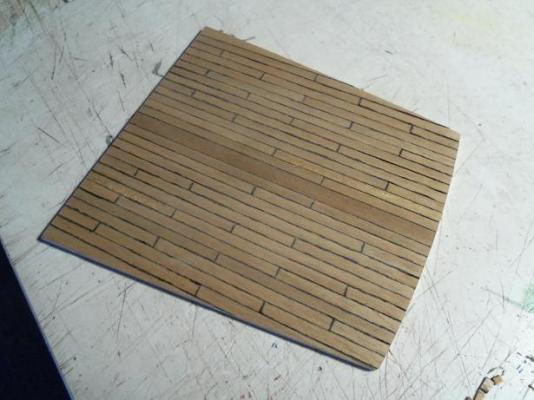
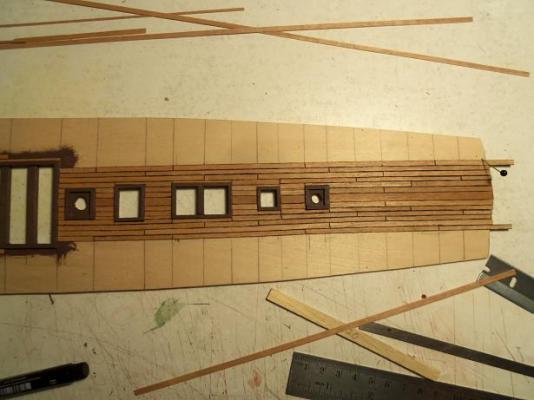
I was told at one time, that decks such as this were done with full length planks. since this deck has butt joints.......so will mine. I measured and marked off the line staggers. I also gave it a center plank as well. I think it will enhance the overall looks of the decks when they are all together, on the hull. the planking has progressed much further now.......the starboard side is fully planked. the poop deck is fully planked by this time then the edges were trimmed and the surface was sanded I gave it a coat of that flat lacquer I bought..........it's about as flat as you can get! I later gave it a second coat, but it simply soaked into the wood.........the first coat hadn't fully cured yet. I will wait on the third coat.......I want a slight sheen to it. I will wait till all three decks are complete, and they all have the same treatments. from here, I can go with a coat of dullcoat, or semi gloss lacquer........when fully cured, both will give me the same results. we shall see


- 165 replies
-
- 9
-
-
- united states
- revell
- (and 1 more)
-
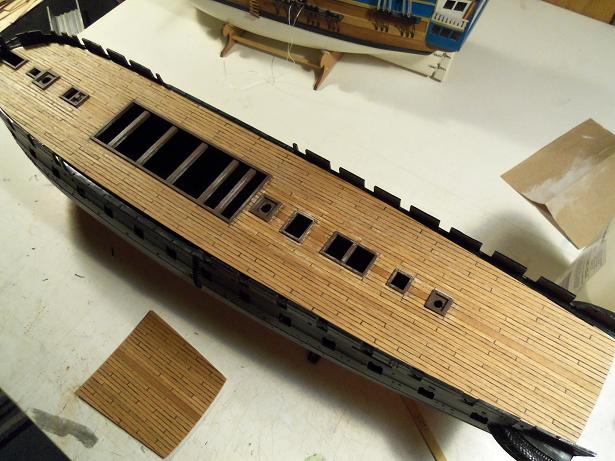
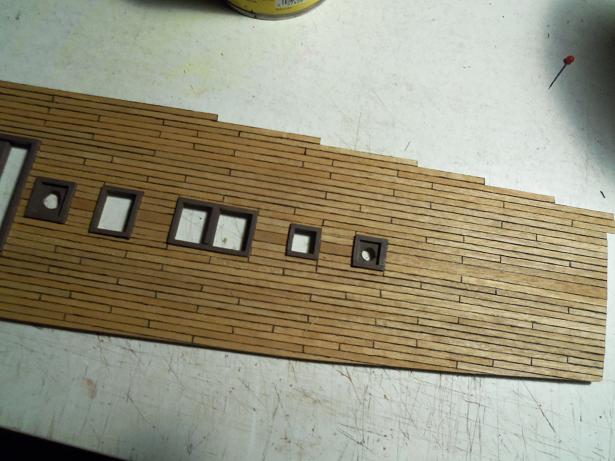
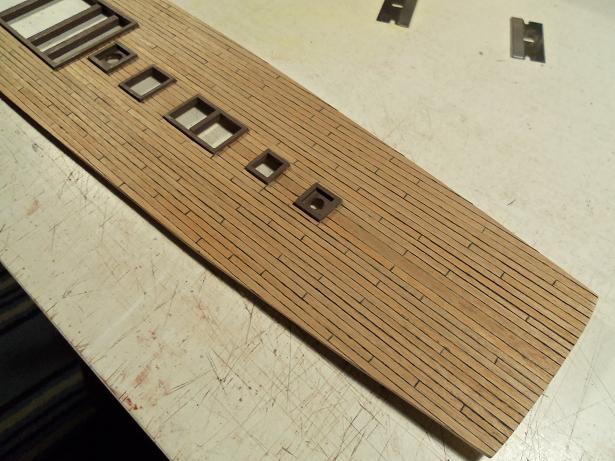
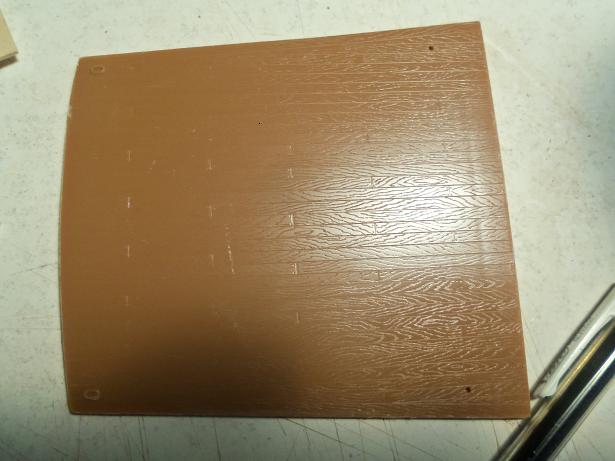
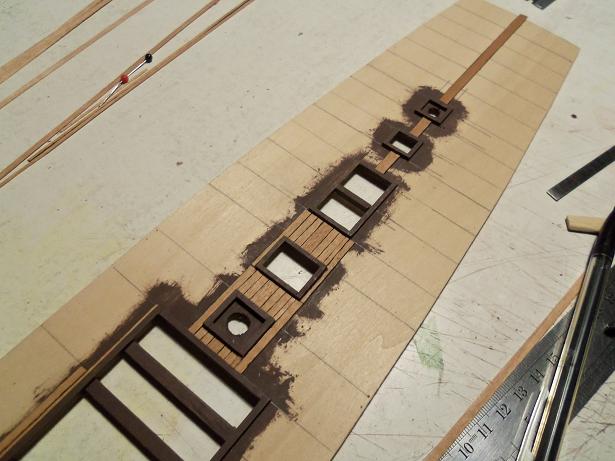
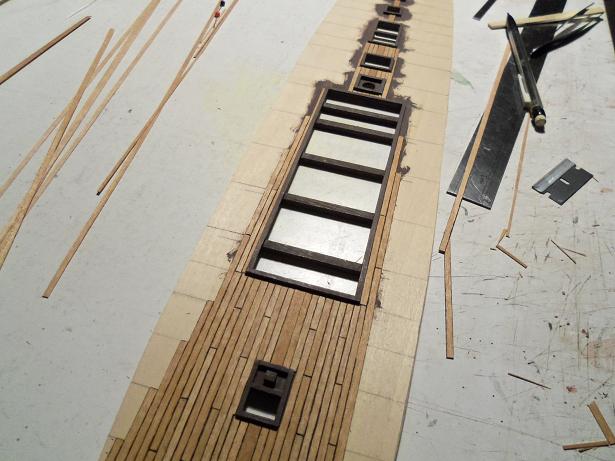
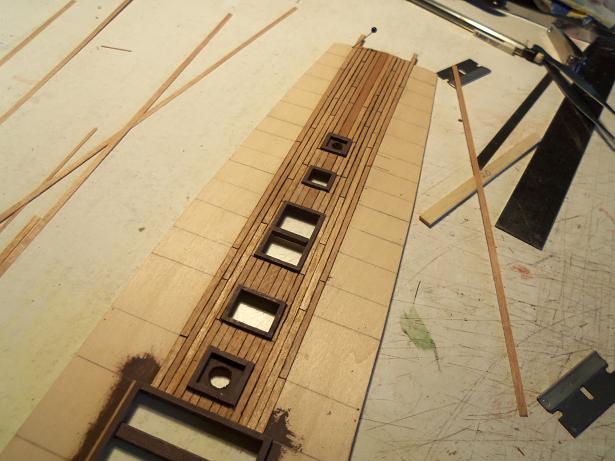
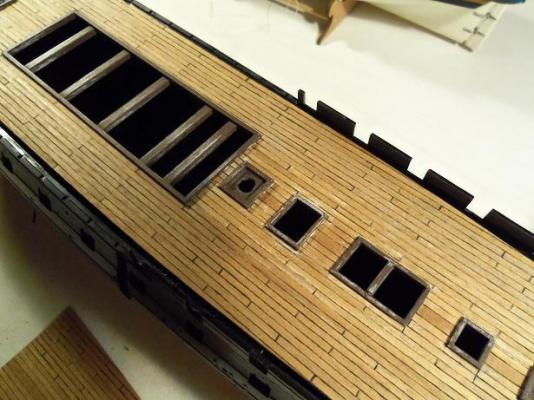
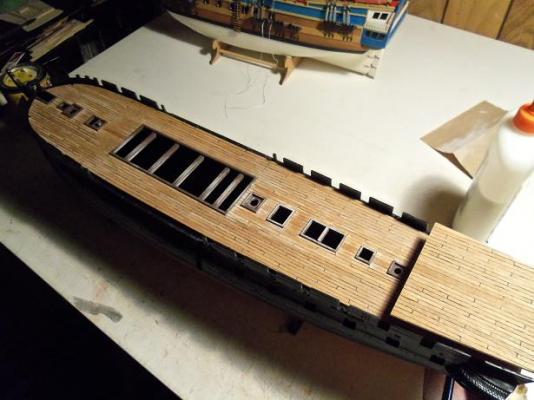
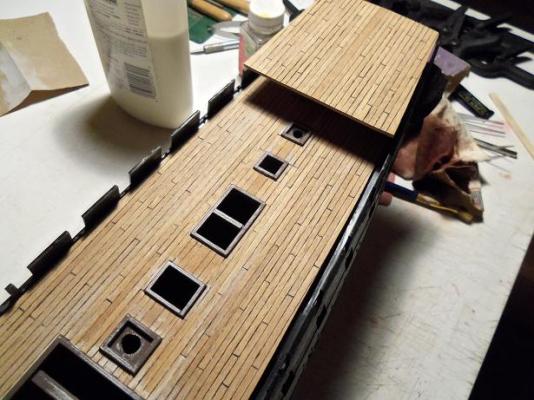
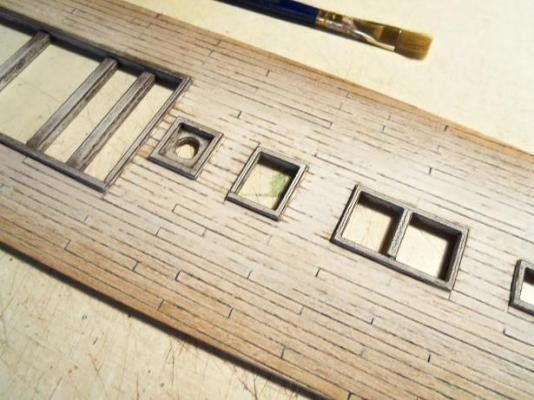
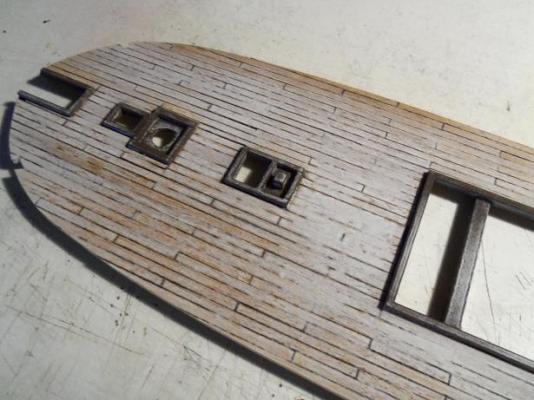
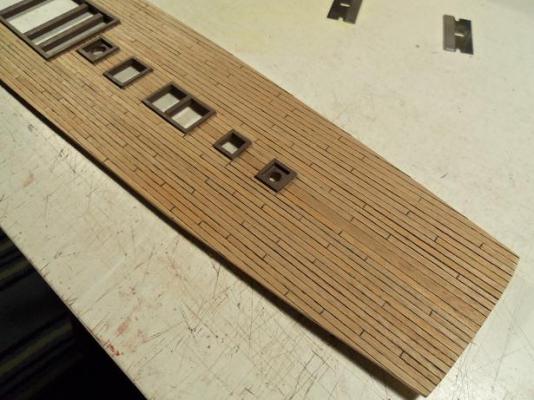
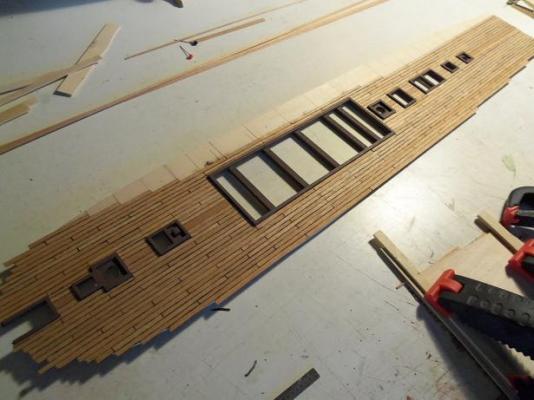
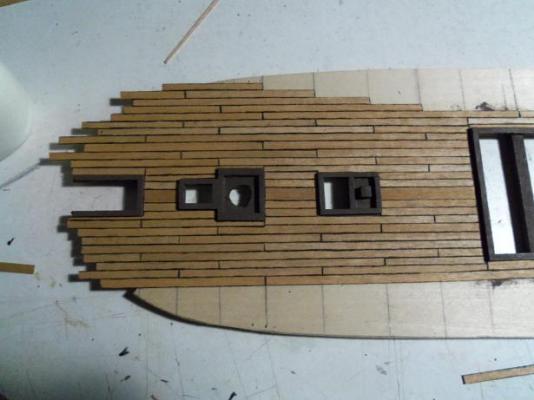
trying to follow the plastic deck was pretty fruitless.......just as much as trying to factor in the hatches and raised areas. I tried to stay with the three plank shift, but I messed up in a few spots. it really isn't coming out too bad though..... once the planking spread out this far, it needs to go further down, so the rows can continue. I began to fill in, between the hatches. there was still time to finish the aft section, as it began to creep onto the mid ship areas. I was almost there with the aft section I couldn't shake the feeling that I was missing something...........the poop deck! this deck also quite visible........it's going to be an added strain on my 3 mm supply. in thinking about it, I could also have subbed in the area that this deck covers, with the 5 mm.........it's too late for that now, not that it matters much. I even tried to think of a way to cut the wider thin stock down.......but with my limited tools, it would be trial and error at best. in the meantime, while thinking of this, I cut two pieces of 1/16 flat stock, and glued them together. further on down the deck......to the stern


- 165 replies
-
- 7
-
-
- united states
- revell
- (and 1 more)
-
yea.....those posts are pretty vulnerable at this stage.........you might do well to lay the first plank along the top edge. that's what I did with a few of my builds. on one especially......I went all the way to the deck line. not a lot of faring that high.........it's concentrated at the turn
-
nice bit of progress J........a few more fittings, and it's mast time! whooooohoooo!
-
looking great Den...........your nearly done spinning the web! very well organized
- 555 replies
-
- 1
-
-
- sovereign of the seas
- mantua
- (and 1 more)
-
very good repair of the bulkheads Patrick.........planking will really tell the story. by the looks of it, your going to have a happy ending oh........your probably not the first to sport an otterman in your pictures.......you surly won't be the last. let me guess......the admiral wasn't home at the time.......right?!?!
-
Hank........this is detail you won't find in any kit..........it's amazing! I'm still in awe of your method........it all looks so seamless really great job!
-
SHUT UP!!!!! AWESOME!!! ...........and in the back of your mind, you probably thought you couldn't do it that assembly is going to look so cool........already so much so! boy!!!........what you sub-boys can do! .........and we thought you folks don't get out much! sub - mersably speaking, of course............really Piet, it looks really good!
-
all the vitamins and minerals that a growing sailor would need! might even have a bit of protein too! {protozoa}
-
Cutty Sark by NenadM
popeye the sailor replied to NenadM's topic in - Build logs for subjects built 1851 - 1900
looking at that last picture Nenad........you have nothing to worry about! she looks great! I love that deck........you did a really sweet job on it..........and the bulwarks really set 'er up. move ahead.........no more lament you have your hothead........I have my version as well. just helped him get his first car......used. he's driving me crazy......cares more about that stereo than anything else! I'm ready to hang him by his big toes on the yardarms!- 4,152 replies
-
- 1
-
-
- cutty sark
- tehnodidakta
- (and 1 more)
-
I'll most likely go with vista or win 7.........I hear win 8 is a dog! I have a couple of other computers I can play with........love to get my Dell GX 150 going again.........ran very nice and smooth. I'd probably run into too many upgrades to get her going though. I'm running a Sony Vaio at the moment. I forget how many gigs I have in her........but I'll probably have to upgrade her when I change over. oh what fun!
-
the stove looks sweet! the drinking water cask really adds to the overall look and function........very nicely done!