glbarlow
-
Posts
4,134 -
Joined
-
Last visited
Content Type
Profiles
Forums
Gallery
Events
Everything posted by glbarlow
-
 Why cover nice planking with ugly copper. In my admittedly limited knowledge admiralty models were never coppered, so to stay consistent with your admiralty approach….
- 648 replies
-
- 3
-

-

-
- Indefatigable
- Vanguard Models
- (and 1 more)
-
Well done Matt, this really great work! It all looks ver crisp.
-
Congratulations on reaching a great and significant milestone. So well done! It feels so good to be done with this major step I’m sure.
-
I’d stick with the medium CA, the thin stuff makes a bigger mess and gives zero time to adjust. The CA applicators with the super thin nozzle and spatula I use makes it much easier to control. I’d never be able to plank any other way, Frank is doing a great job with PVA and I did ok with medium CA, obviously both work. Don’t be reluctant to remove and replace, it’s worth the extra time an effort in the long run
-
I’ll wait to be surprised by Surprise 😊 I used to check the Jotika website frequently to check for progress on their Surprise until it became clear it had been abandoned, both the website and the model in progress.
-
Put that away! Pre-drill the holes and any number of tools, small ones can push them in. I’ve never found the need for a pin pusher, I have several and none work very well. To check the bulkhead fairing you need a batten, a long, narrow very very thin plank you lay along the bulkheads to see if runs smooth touching each one. Check out some of the more advanced models like my Cheerful and Winchelsea to see how it’s done. The Nelson is small, but learning these techniques will pay off later. As to are you doing it right, maybe, maybe not. Who cares, what you do wrong you can fix, how someone else does it serves as a guide to develop your own way. Credit people when you can, but adapt and modify to make it fit and work for you. Before you know it people will be crediting you,
- 8 replies
-
- 4
-
-

-
- Lady Nelson
- Amati
- (and 2 more)
-
Focus Stacking
glbarlow replied to Dennis P Finegan's topic in Photographing your work. How to do this.
Nikon’s Focus Shift Shooting (with mirrorless electronic shutters) and LightRoom /Photoshop functions have improved and are now quicker and easier to do since this thread started. Still a bit of work to get a single image, but short of complex lab equipment it’s the best way to get that one image. That one being one, I can’t image taking the time to create a gallery of them. -
Don’t use oil based or enamel based paints, go with acrylic. Only need water and not all that other stuff. Don’t need India Ink, buy black rope. Syren Ship Models is the best source Here Look through (at the photos) the build logs you mentioned for tools, your wood working tools won’t be much help. Most of those videos are dated and not especially helpful. The build logs will be better guides. The Nelson instructions are sparse, I would have recommended one of Chris’ Vanguard Models Here (a sponsor and active member of this site) with its much much more detailed instructions including photos. Still Lady Nelson is basic and a good starter model. Don’t get frustrated, the best thing about wood is not much you can’t fix, and solving problems is half the fun. You’ll do fine. Be sure to like and comment on other logs, that’s how you build your community. I’ll be following along.
- 8 replies
-
- 4
-
-
- Lady Nelson
- Amati
- (and 2 more)
-
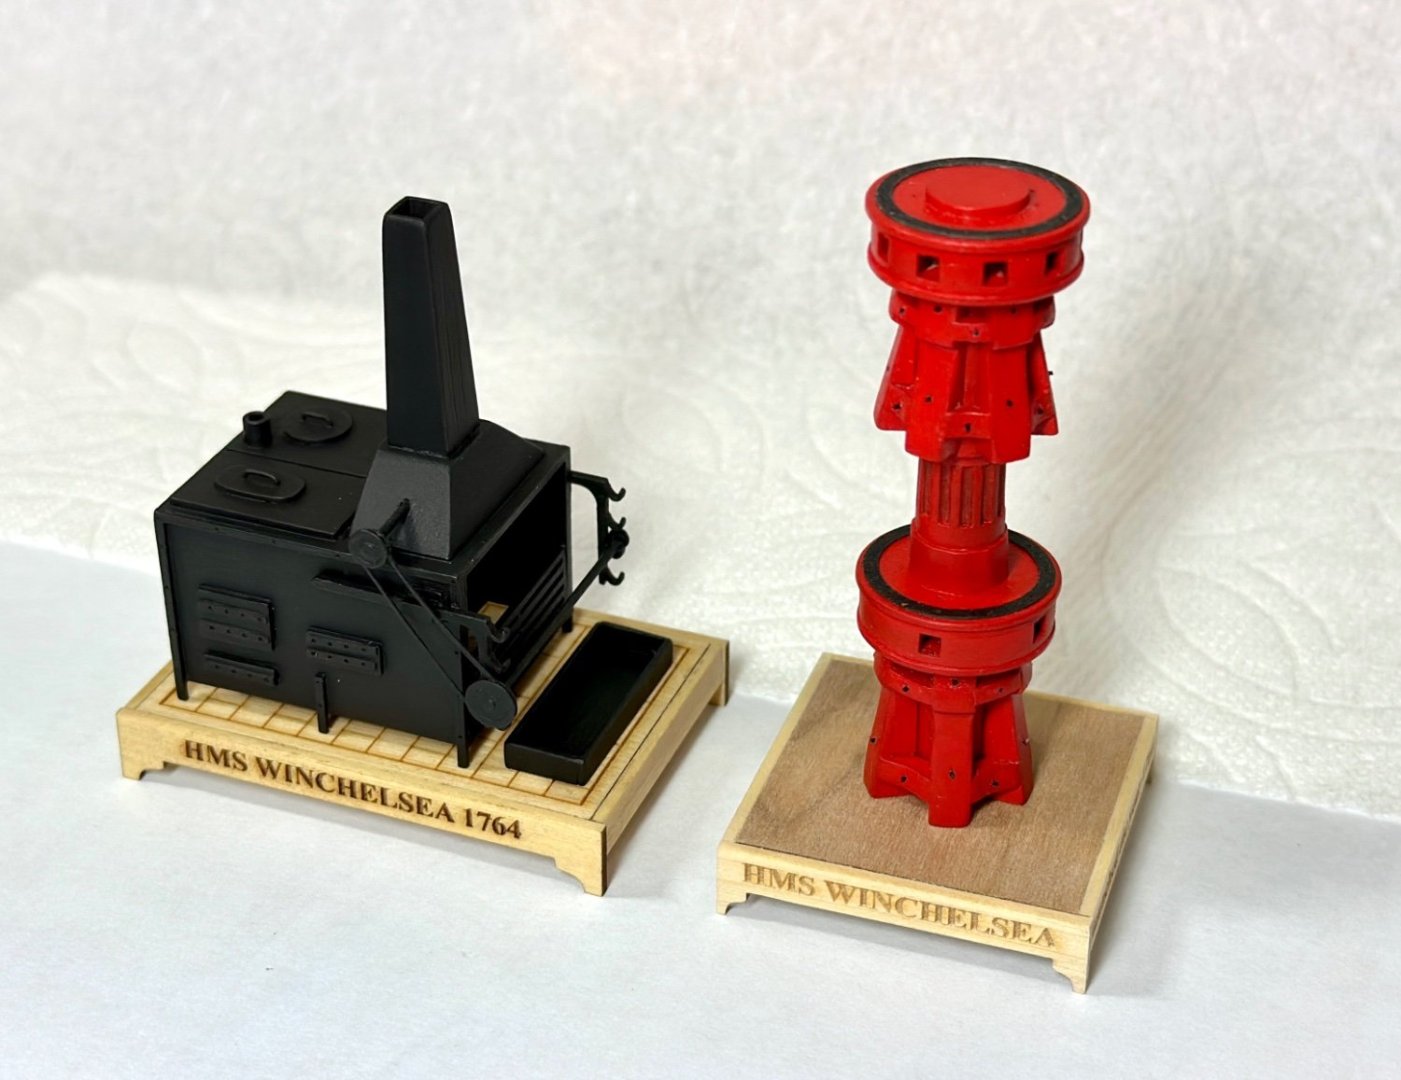
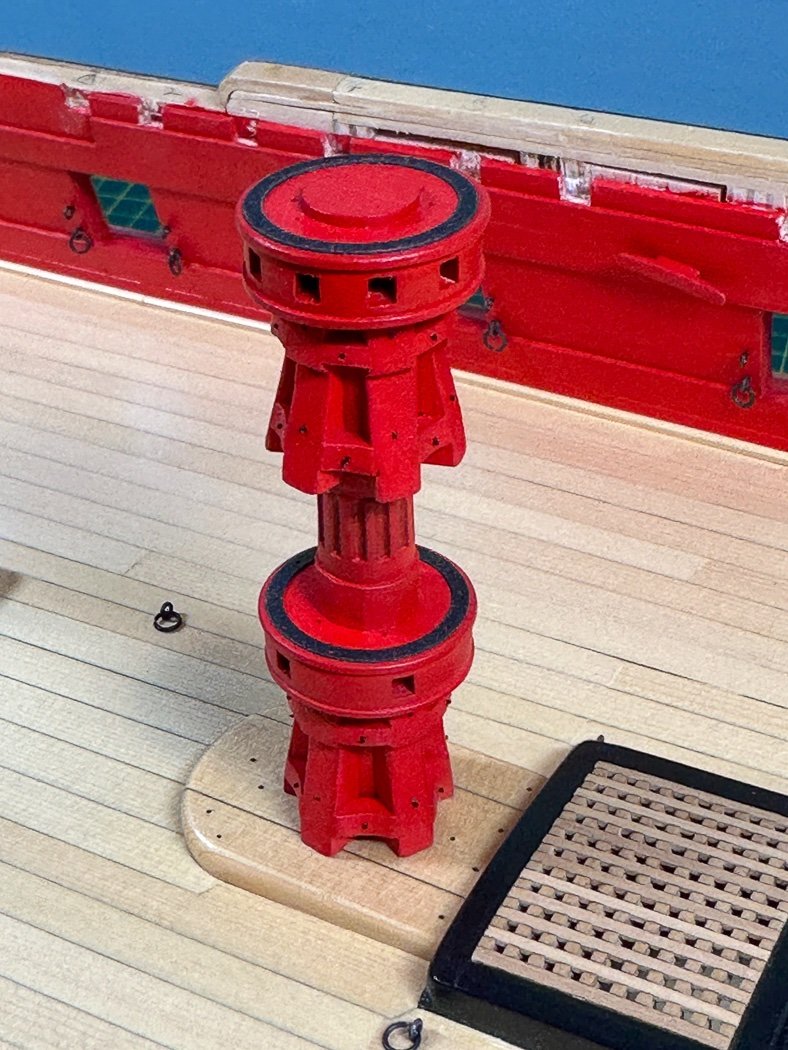
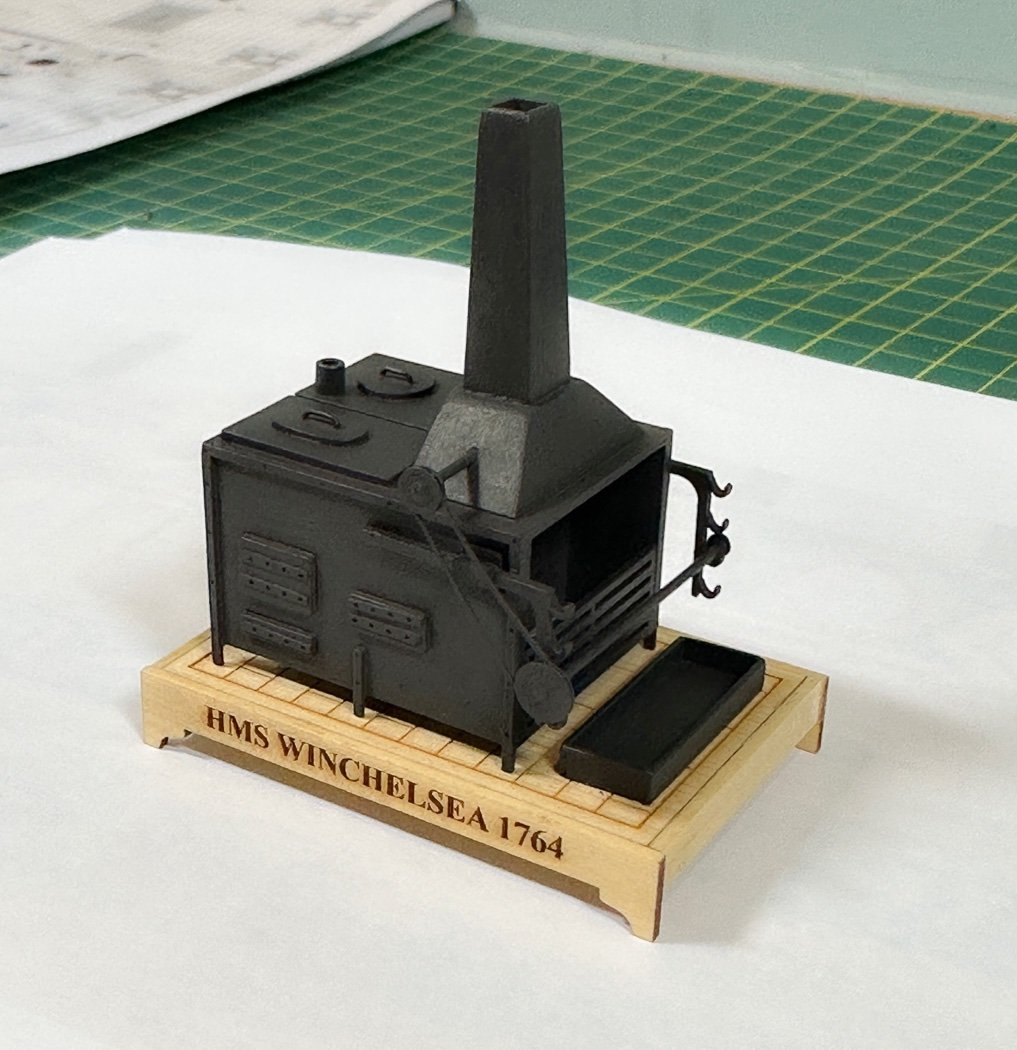
Still here. Not much workshop time, I have completed the stove and now the capstan. The instructions are clear and the mini-kit is, as always with Chuck, well designed and detailed. I did add Dullcoat to the stove. I like the look but rattle cans scare me, uncontrolled volume, I had to practice a little, first time I’ve used it. So I have nothing to add other than it was a wonderful opportunity for practicing char removal on many small parts. Good stuff. Now on to chapter 7. Hope everyone is enjoying your summer.

- 840 replies
-
- 19
-
-

-
- winchelsea
- Syren Ship Model Company
- (and 1 more)
-
Very ambitious and very well done. This will look great on a completed Winchelsea. Impressive!
-
Exquisite work!
-
Great work on the rigging detail!
-
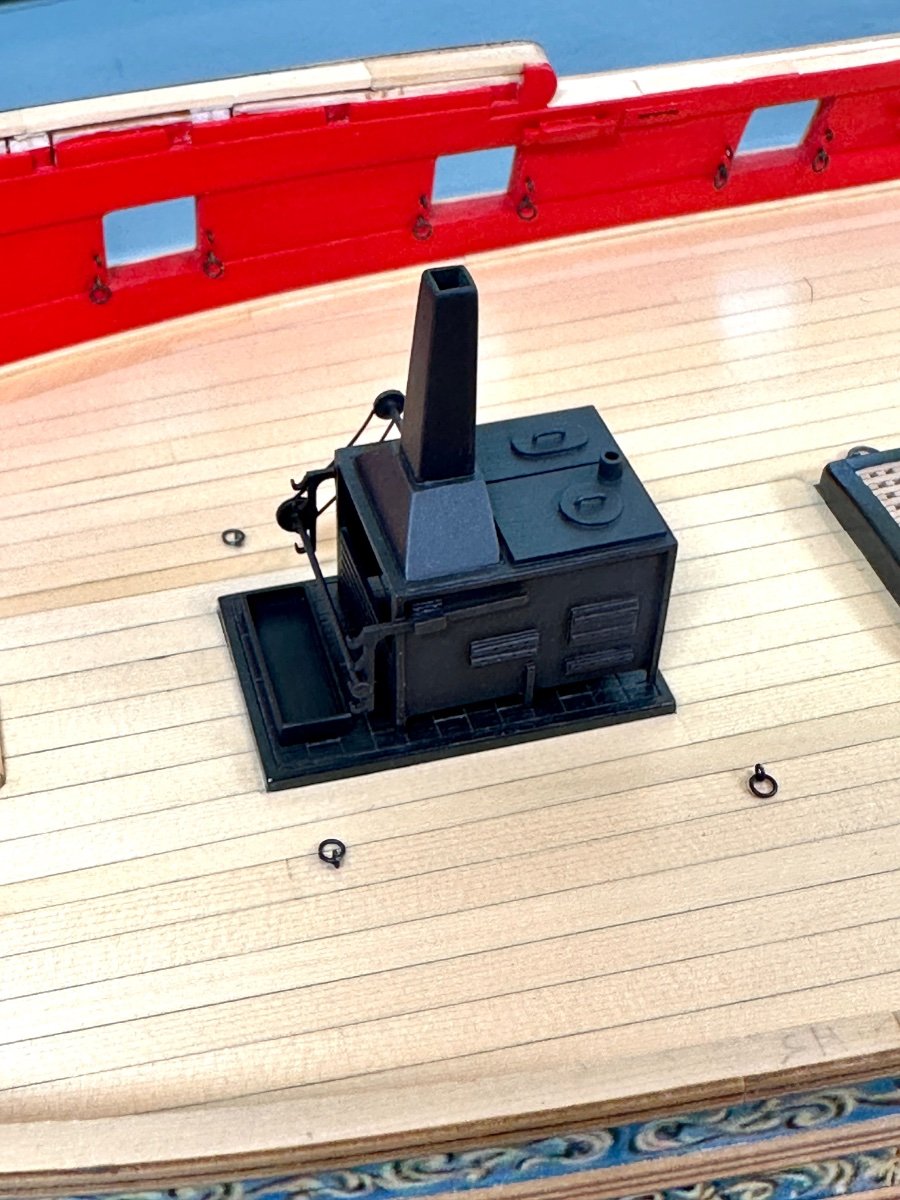
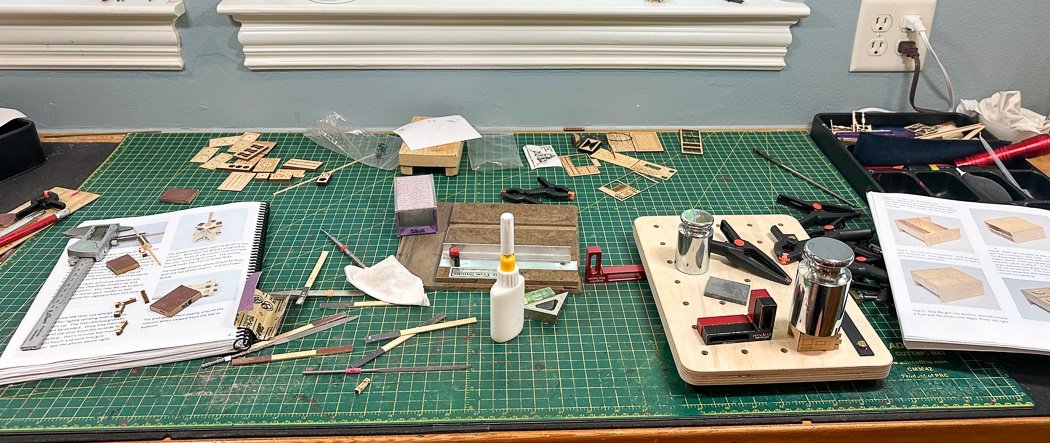
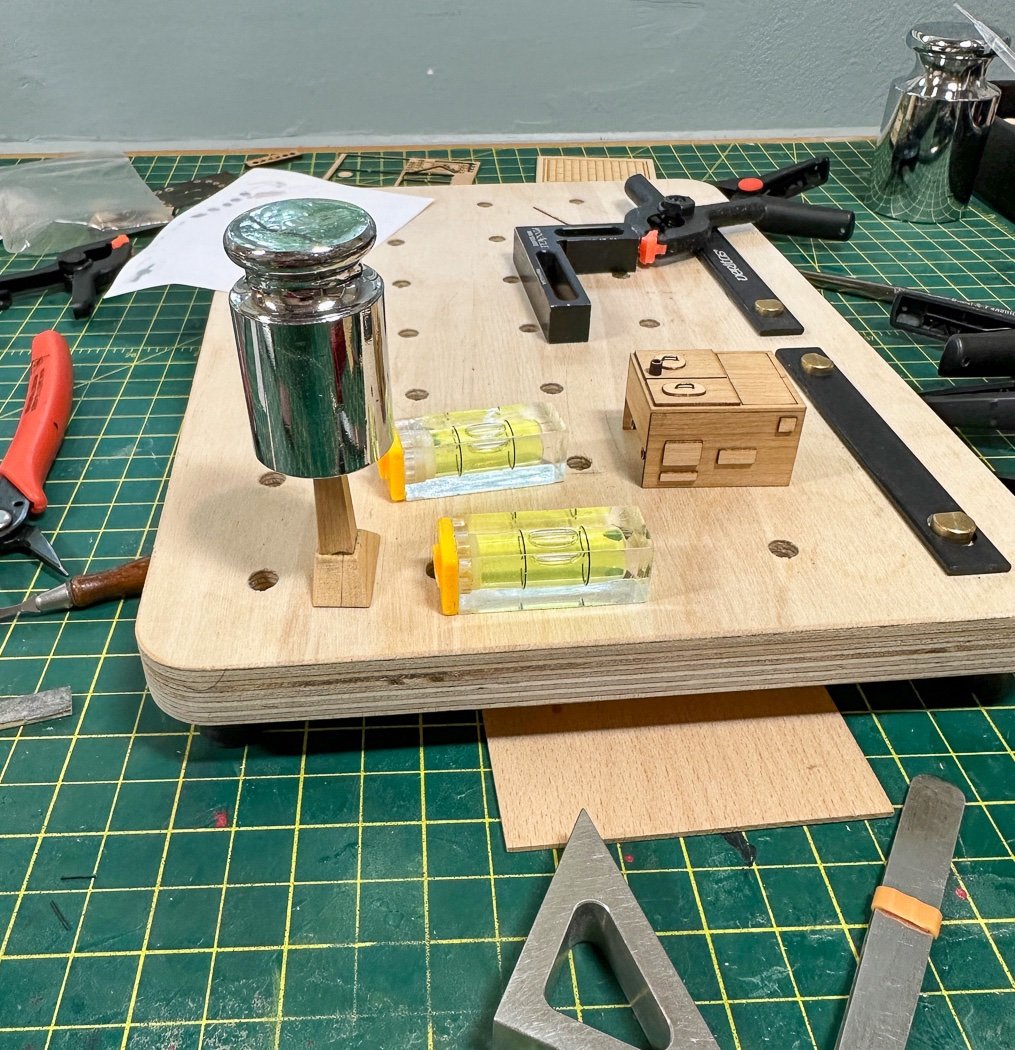
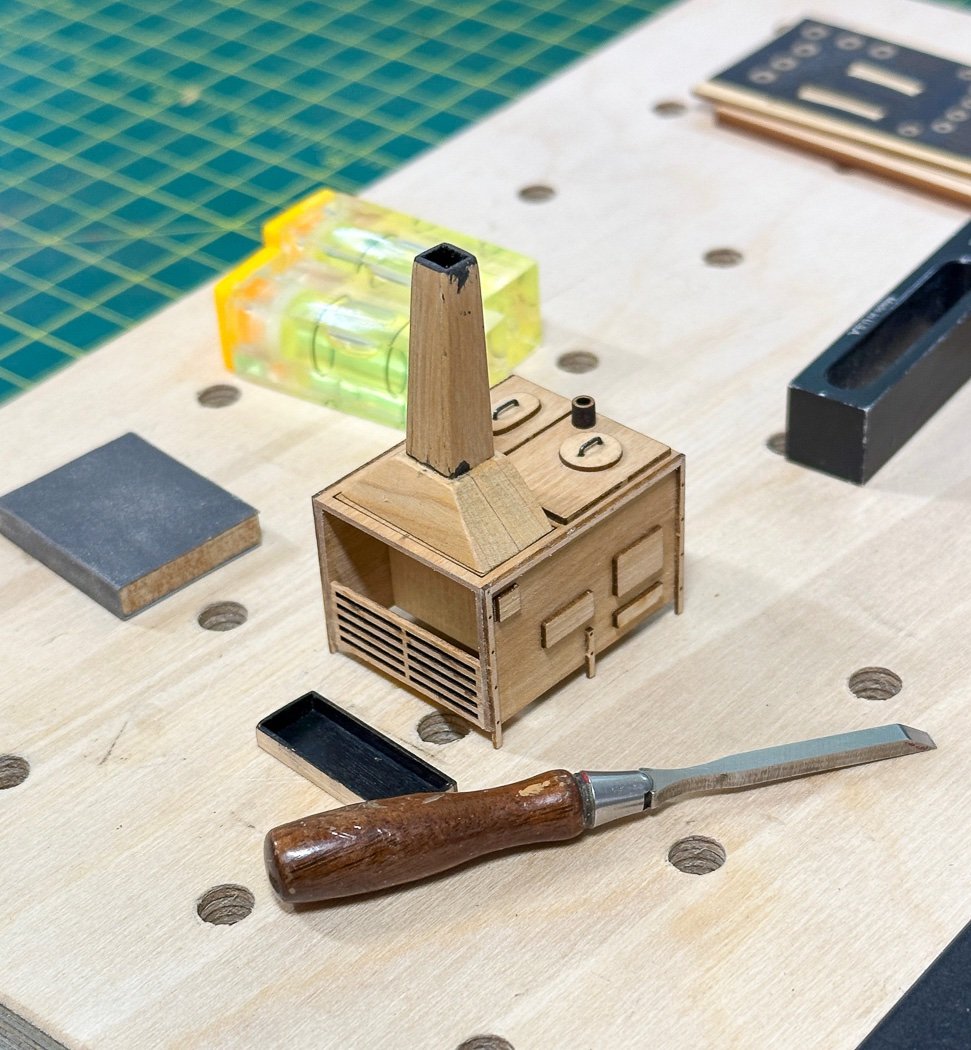
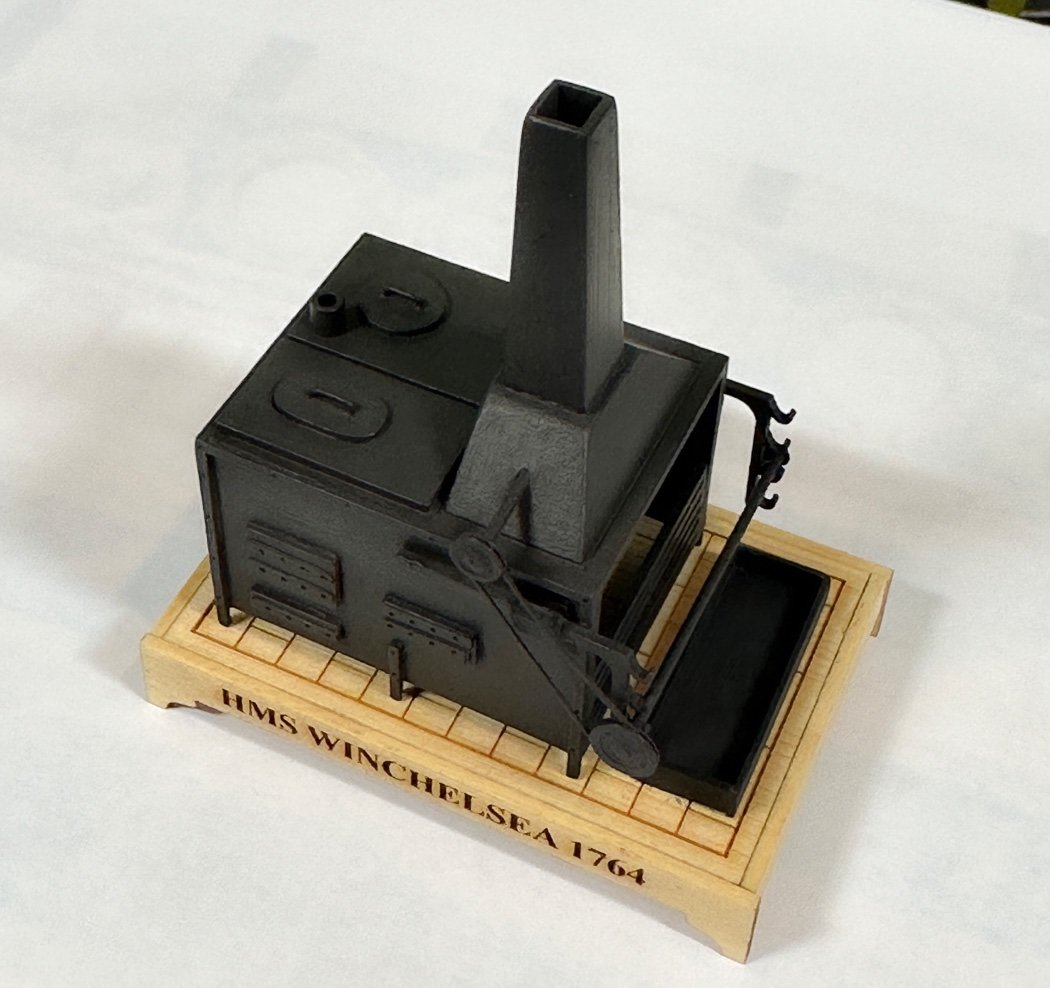
The Stove It is nice to finally move on from my cannon production line and work on something there is only one of. So instead of that I started on two things there are only one of, the stove and the capstan, thereby creating a complete mess on my work bench - fun. I cut some correctly sized blocks from scrap MDF to help keep things square. There are other ways, but this one was easy, in fact one of them is still inside the stove. Not as silly as it looks, there is an indention on the bottom of the weight that perfectly fit the chimney top. Nice tight glue seal, and yes it is a bit silly. I was constantly checking levels, there aren’t a lot of main parts to the stove but the ones there are need to be kept both square and level. I sent this photo to my two sons explaining it was the ship's stove - one questioned the wisdom of cooking with a wooden stove. The instructions are clear, not hard to assemble, attention to detail is important though, and this little jewel has a lot of detail to pay attention to. Those little racks on the front are very very fragile. Getting the pulley installed correctly required a little planning and dexterity, but really fun stuff. One addition I did make was to plane a small rectangle of wood matching the height of the six tiny little legs and glued it to the bottom center. It can’t be seen and I’m a lot more comfortable with it there than completely relying on my not breaking a leg and something more substantial to ultimately to be glued to the deck. While following the instructions for this beautifully designed mini-kit I became so absorbed with the work I failed to take any more photos until it was done, so here it is. The pulley system is so realistic I might think its actually metal fly wheels and a fan belt rather than laser cut assembly of 5 separate tiny little pieces. I'm not really clear how it would work though, what caused the meat to be turned on that spit and why does the upper pulley go into the vent.... I first painted it with my Admiralty Ironworks Black, finally using this paint on actual ironworks. Then as Chuck suggests I heavily coated it with Grimy Black weathering powder from the O’Brien set. I almost left it at that but went back with a light application of Rusty Red. I opted to brush and buff it in to an even appearance and will likely use the buff brush further. It’s a bit of a shame very little of this will be visible one the forecastle deck is installed, but I know its there. And now for the capstan. Thanks for stopping by, your likes and comments are always appreciated.

- 840 replies
-
- 15
-
-
- winchelsea
- Syren Ship Model Company
- (and 1 more)
-
After coppering Pickle, I was fine with it. After spending forever coppering HMS Vanguard and quitting modeling for three years after finishing it I vowed to never ever copper another ship ever never again. Aside from the mind blowing tediousness of it I really don’t like the look. Bit what do I know 😁
- 648 replies
-
- 2
-
-
- Indefatigable
- Vanguard Models
- (and 1 more)
-
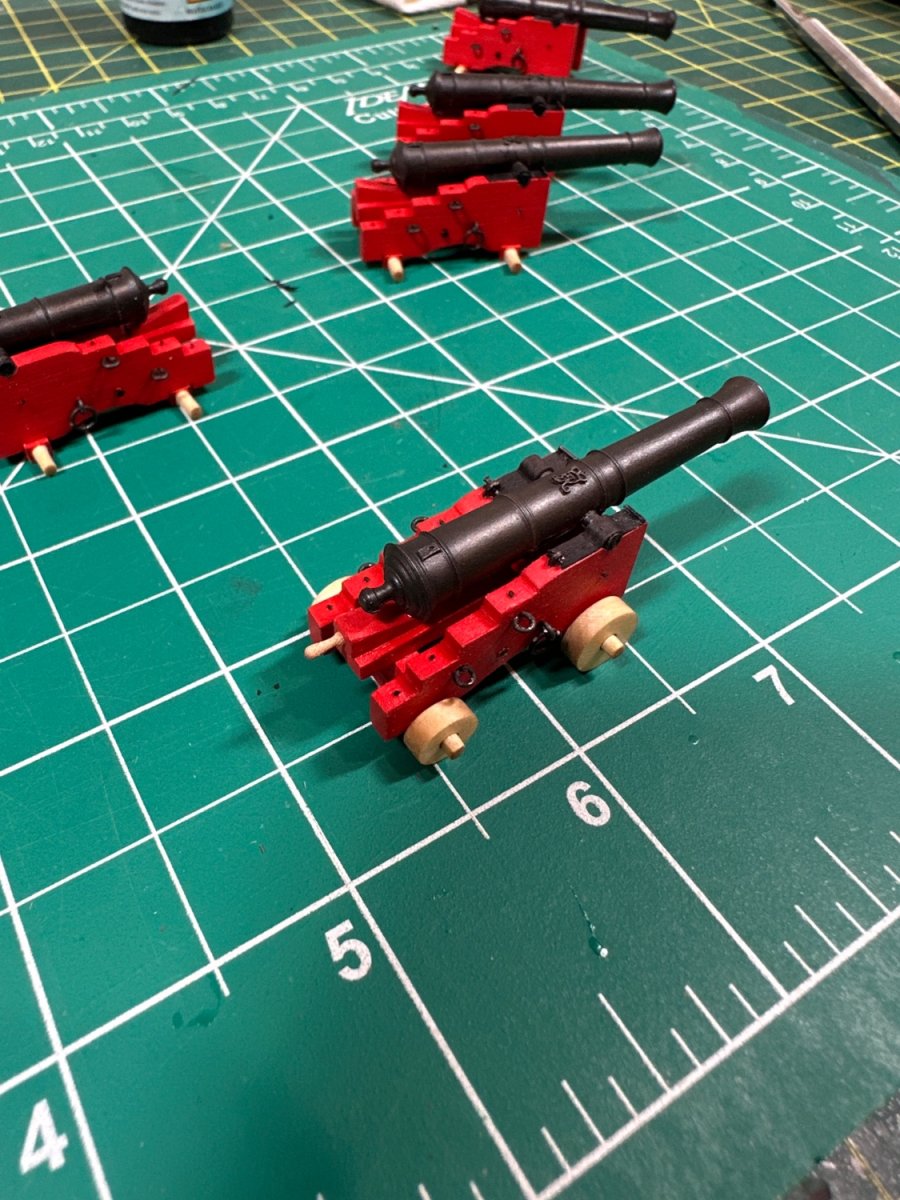
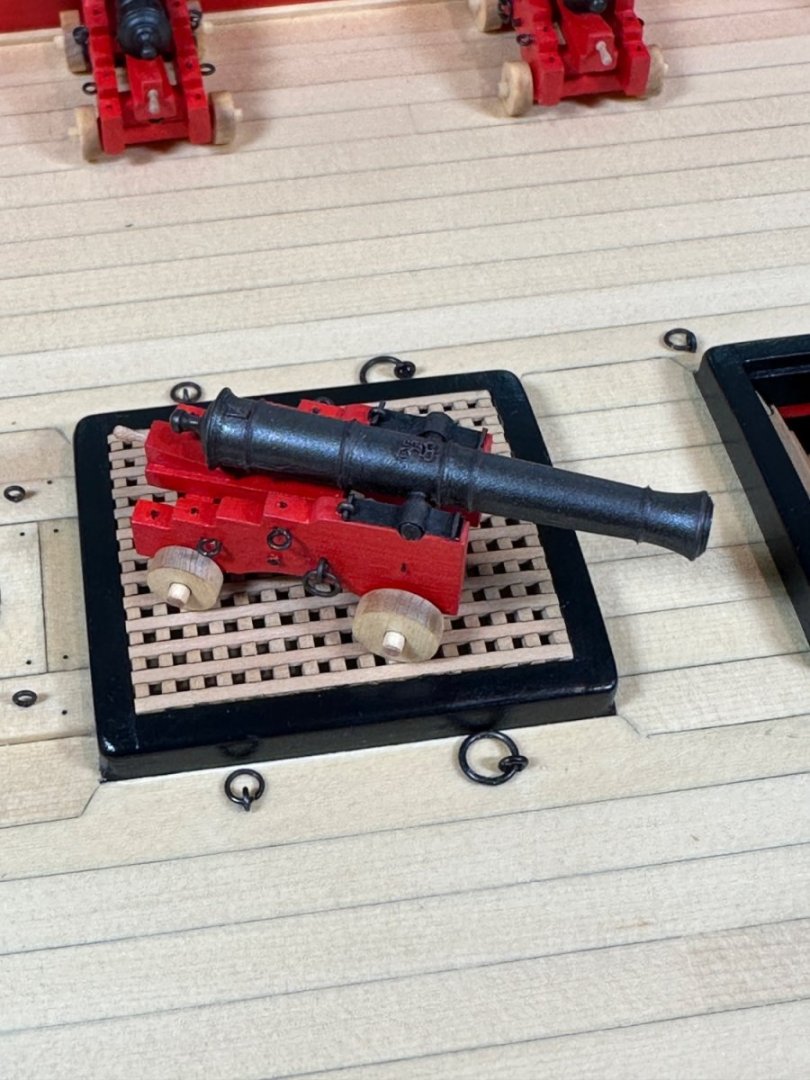
Cannon Weathering Just one more thought on the cannons. I mentioned this before but worth emphasizing for future owners of Syren’s resin cannons. The combination of these with Ironworks Black paint, or any Matt Black I’d imagine, and Doc O’Briens Rusty Red weathering powder (why the Rusty Red works best I don’t know), and a set of soft, single purpose brushes creates such a nice gun metal gray barrel. Well worth the time and effort to do it and highly recommended.

- 840 replies
-
- 11
-
-
-
- winchelsea
- Syren Ship Model Company
- (and 1 more)
-
Thanks for sharing that. I also spin them on my lathe, though pairing two is a great suggestion. I can get all the char that way but was feeling like the resulting wheel would wind up too small. Plus the impact of the grain from the board they’re cut on creates an inconsistent char pattern on the wheels as I sanded it off. I almost wish I’d just sanded them very lightly and left most of the char on. im sure I’m being ridiculously picky, I like the detail and how they turned out otherwise.
- 840 replies
-
- 2
-
-
- winchelsea
- Syren Ship Model Company
- (and 1 more)
-
Thank you! The wheels aren’t as free of char as I’d like, my comment was I didn’t feel I could get them that way without over sanding, meaning too much reduction in diameter/size. I’m sure I’m just being over-picky. I made the order to Crafty Sailor for the quoin handles (actually belaying pins) does that count.🤣
- 840 replies
-
- 4
-
-
-
- winchelsea
- Syren Ship Model Company
- (and 1 more)
-
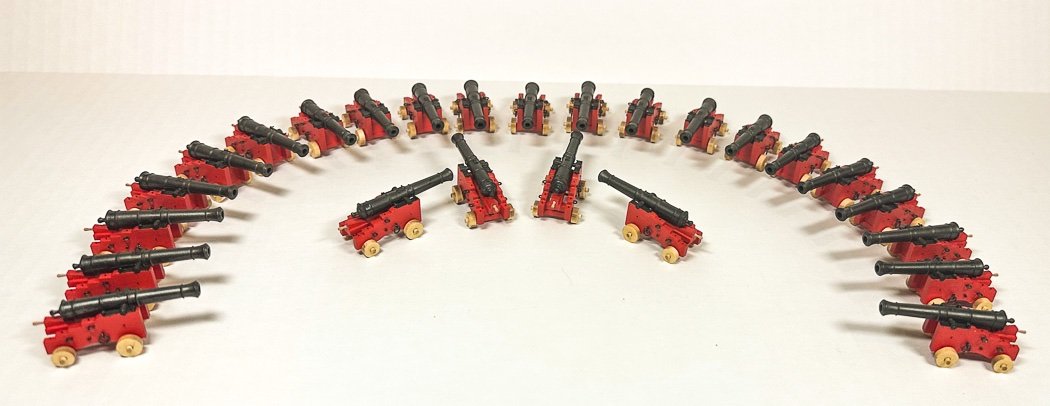
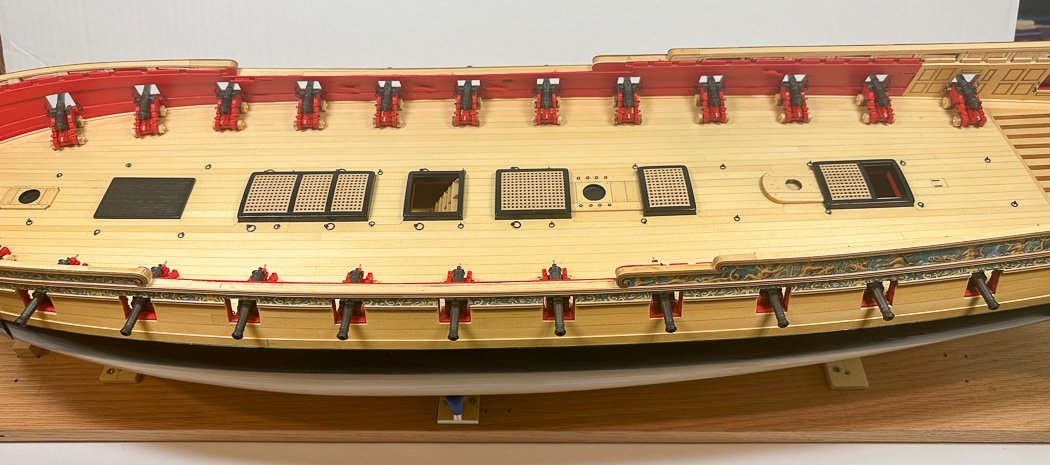
All of them. This ship won’t have masts, the cannon have no rigging, even the ships wheel rope is left off. Basically no rope anywhere. It’s a good look on this model, not to mention not rigging 32 cannons. 😁
- 840 replies
-
- 3
-
-
- winchelsea
- Syren Ship Model Company
- (and 1 more)
-
Welcome back. Very well done! So cool to see one near finished.
- 99 replies
-
- 2
-
-
- winchelsea
- Syren Ship Model Company
- (and 1 more)
-
Thanks Chuck, I did well I think on everything except the wheels. Just can’t sort how to clean them without over sanding. At least they’re consistent. Thank you, even though it’s been at a glacial pace lately. Thanks Rusty. The thought occurred to me after making so many. I like the little buggers but there sure are a lot of them.
- 840 replies
-
- 2
-
-
- winchelsea
- Syren Ship Model Company
- (and 1 more)
-
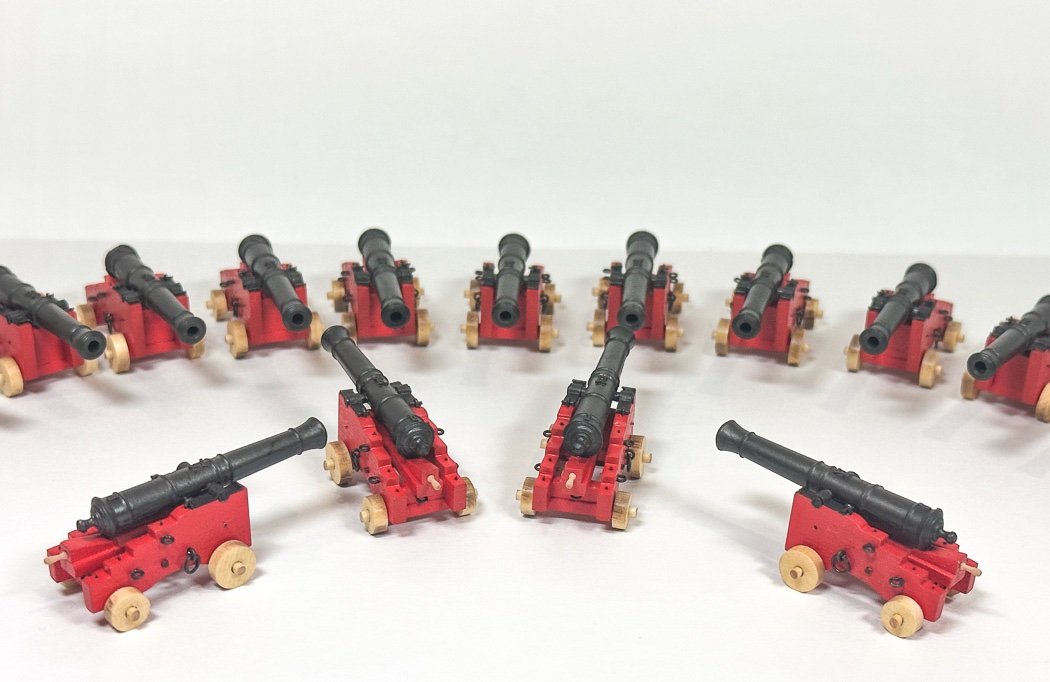
Main Deck Arsenal Complete I’ve finally completed the 24 (plus a spare) main deck cannon (with just 8 more in my future for the quarterdeck). I’m glad to have them done. Just sitting there for now. There will NOT be rigging involved as I’m embracing the admiralty model concept - no ropes anywhere including these guns. I wish I had cleaner wheels, but it was not to be, at least for me, without sanding more than I wanted to sand. Oh well. I’m going to build the ship stove and capstan before starting chapter 7. They should be fun and will allow me to put off painting deck beams a while longer. Good stuff Thanks for stopping by to see a few more cannon.
- 840 replies
-
- 19
-
-
-
- winchelsea
- Syren Ship Model Company
- (and 1 more)
-
I’m in a never ending search for quality drill bits at the size we need them. They are worth the search. Nicely done!
-
Where’s the fun if we don’t break stuff and have to fix it. Great looking work Matt, well done!
-
The first can be a rough go, stick with it, learn, follow other logs. It’ll be fun.
- 55 replies
-
- 1
-
-
- lady nelson
- victory models
- (and 2 more)