


glbarlow
-
Posts
3,851 -
Joined
-
Last visited
Content Type
Profiles
Forums
Gallery
Events
Posts posted by glbarlow
-
-
I cut every plank on Winchelsea with my Chopper I. I also have a Chopper II but don’t use it much. I cut them a little long then turn to my Byrnes sander and sand it square, or beveled, or at an angle, or both at once to the measured line as needed. Fast and easy. I also have the cross cut sled for my Byrnes saw which I use for more intricate work.
-
The Beginning of a Transom
Normally I dread building out the transom on a model, it seems to me commercial manufactures just throw whatever on the back of the ship and move on. Not the case with Winchelsea just as it wasn’t with Cheerful. This is much more complex, much more fun, and will look great if I can pull it off. It much more complex, oh wait I said that already.
The first step, adding the transom itself, was a bit anti-climatic, so much so I forgot to take any photos. I had this part when I was building out the stern frames, I also had the windows - I spent a long time back then making sure I had the right fit and alignment of the frames to properly fit the windows. I marked the transom accordingly and put it away until now. Of course I rechecked all those measurements before I glued it on.
I pre-painted the transom Cerulean Blue (I later painted the area between the windows, just didn't have a photo) knowing I’d be touching it up a lot - I didn’t want paint on the inside of the window frames, it was easier for me to make that happen now. I also widened the two ports to match the fillers and painted it the same Crimson red the deck area will be and the cannon ports are now. I like this RED color.

With that done I added the three 7/32 planks for the upper counter. I felt a little guilty not including pencil marks between planks, but this soon will be covered by the ships name frieze. Looking at it and the lower counter really demonstrates the difference a little #2 pencil can make. I did have to make adjustments to get the fit I wanted, once again proving I was far from perfect building out the frame no matter how careful I was at the time. Good news, it’s wood. The adjustments weren’t difficult to make, just took some time. I left room for additional sanding once I get to that point of adding the frieze and molding.
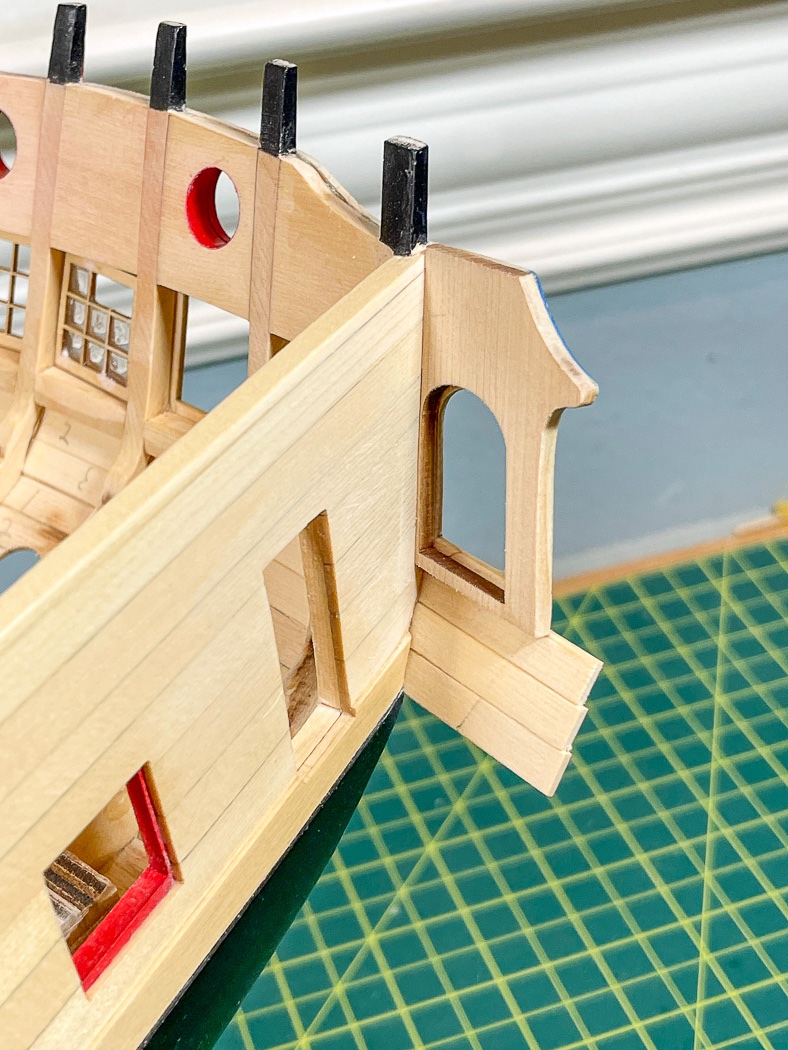
I guess I should have faired more of the stern frames way back when, I had very little room to fit in the quarter gallery stern window piece. All I needed was enough to fit the frame properly, so with lots and lots of sand, test, sand, test I got the fit. I faired the frames at the time to match a cut-out from the plans, still the variance here is only about 1-2mm, so I guess I should have faired the upper frames a little more. In my defense my focus at the time was not under-sizing the lower counter to match the plan template, which it does so…
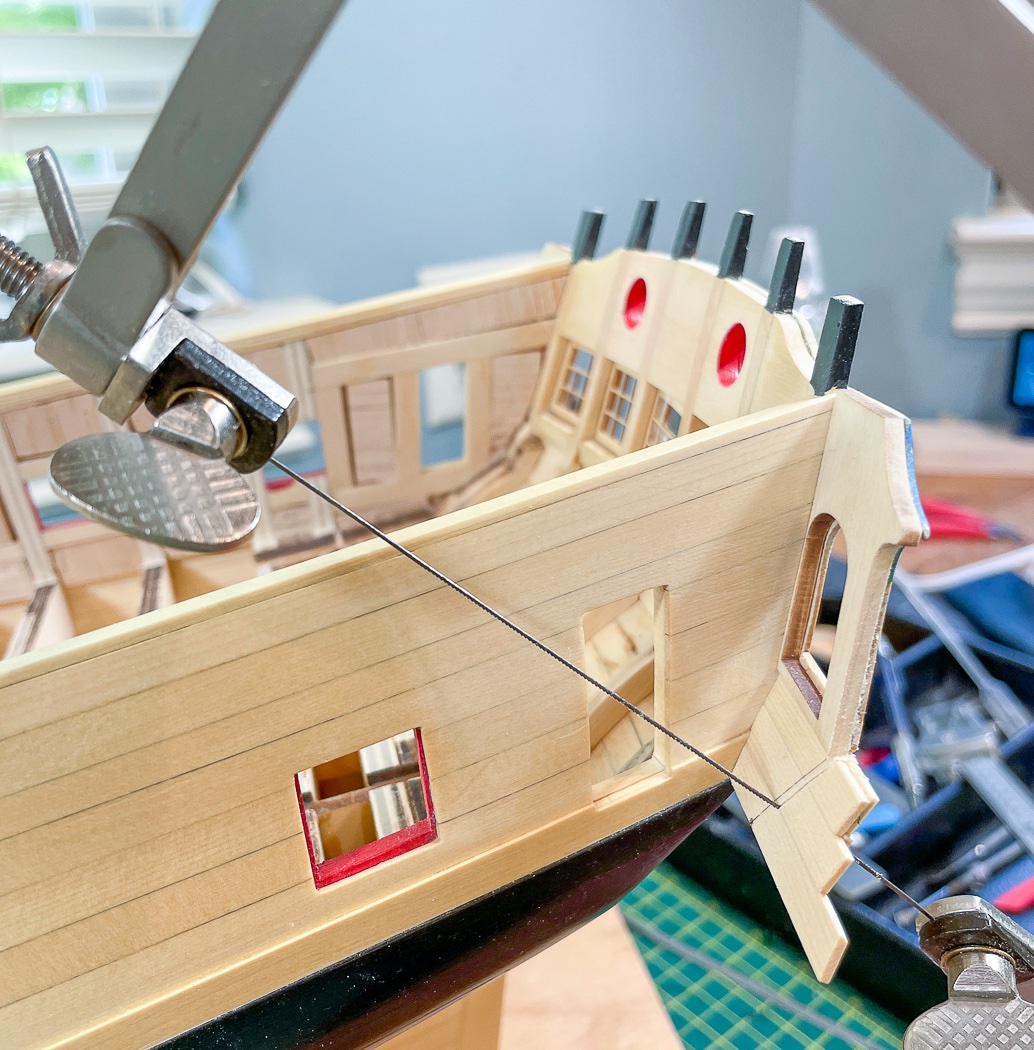
This was fun. I elected to use my jeweler’s saw to cut the upper counter excess to fit. I had made the counter extra long knowing it would be easier to cut with this saw. I just stayed well outside the line and sanded it to the line after cutting.
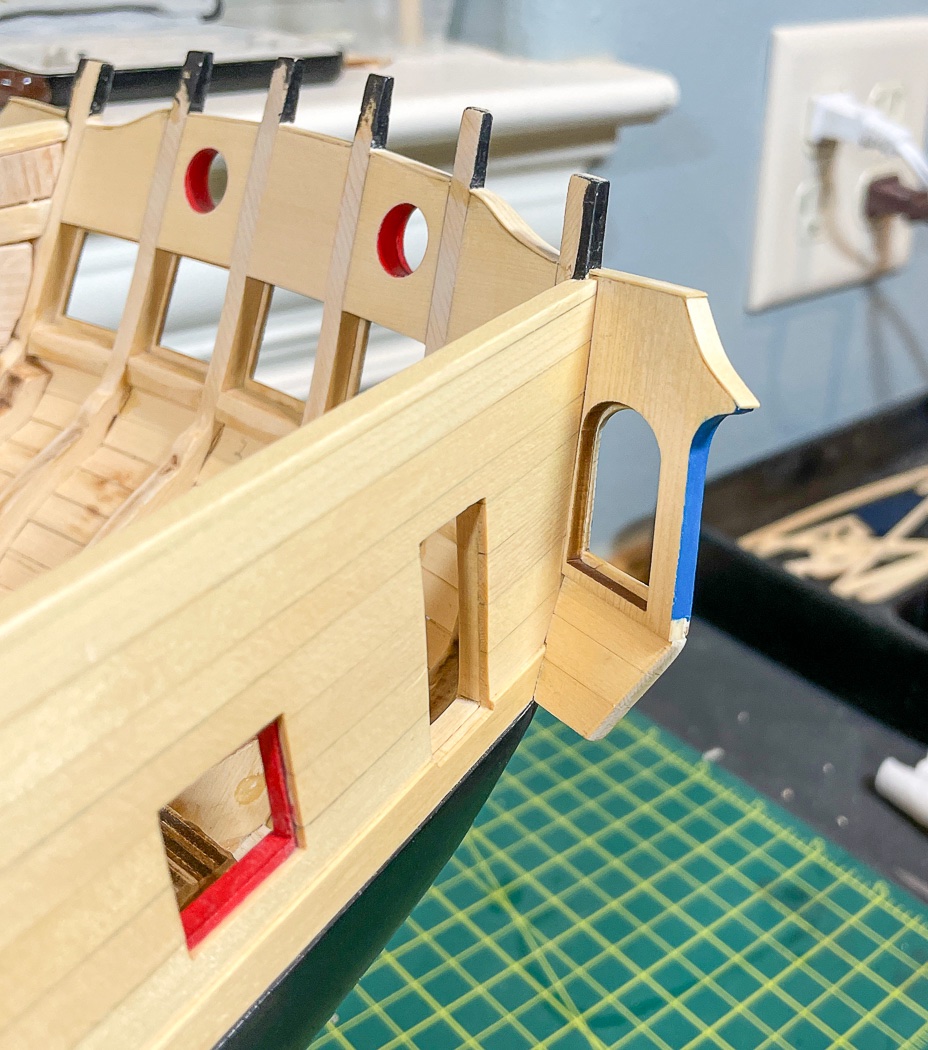
I’ll have to admit to being a bit skeptical about the bending properties of a 1/64th strip of wood - sure Chuck can do it, but could I. It turned out deceptively easy to bend, though it took me more than the required nine pieces (I’m not saying how many) to get a fit I liked. Once complete it looks exceptionally nice, a perfect design to finish off the top of the transom.
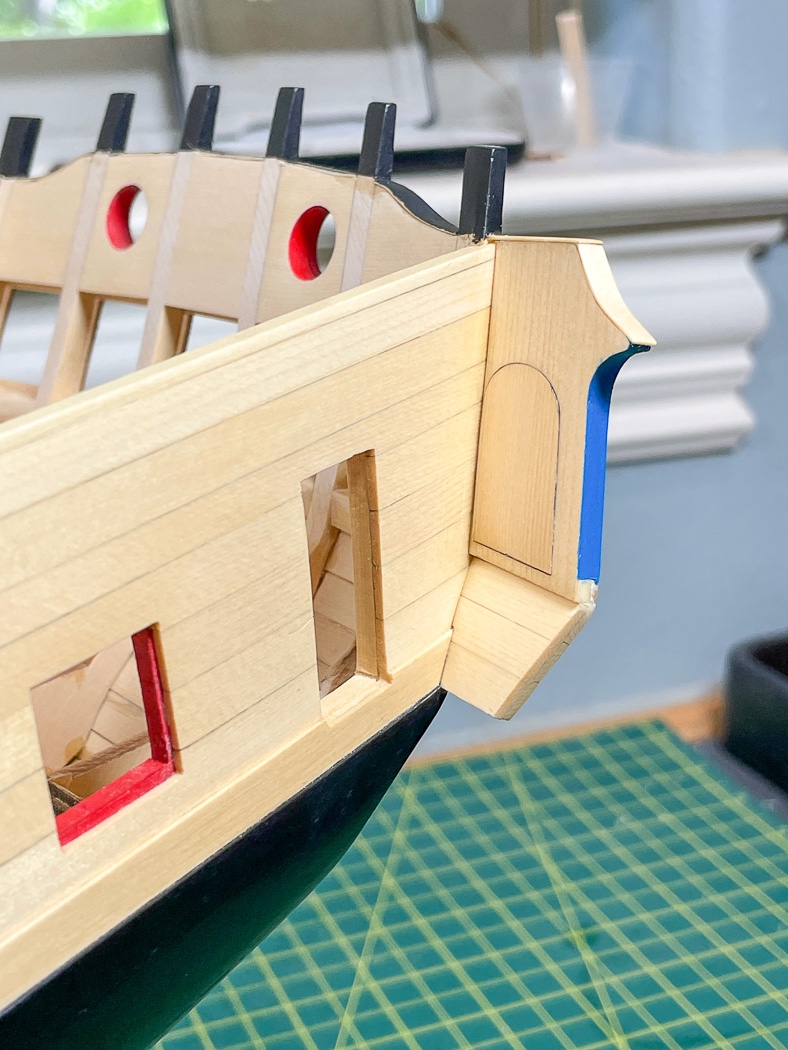
Per the monograph I painted the top of the rail and stern frames black where it eventually will meet up with the side railings and left outside of that bright. I added the frames, windows and back fillers, sanded it flush and added a coat of WOP.
I elected to fill the seam on the outside edge and paint it blue. Though it is covered by a carving and won’t show much I didn’t like the seam and I thought the blue would highlight the carving. Time will tell.
I could have mixed a little white into my flat black paint for the stern view of the galley windows, but where is the fun in that, instead I brushed on a little white weathering powder from my Doc O’Brien set. The frames are centered, just a trick of shadows and lighting making it appear a bit off. I also checked with the other windows in place to make sure it had a consistent look. I did not sand the window frames, at all, way to fragile for me. I did though lightly brush on a coat of WOP. Frankly I think the light laser char gives them more depth and character.
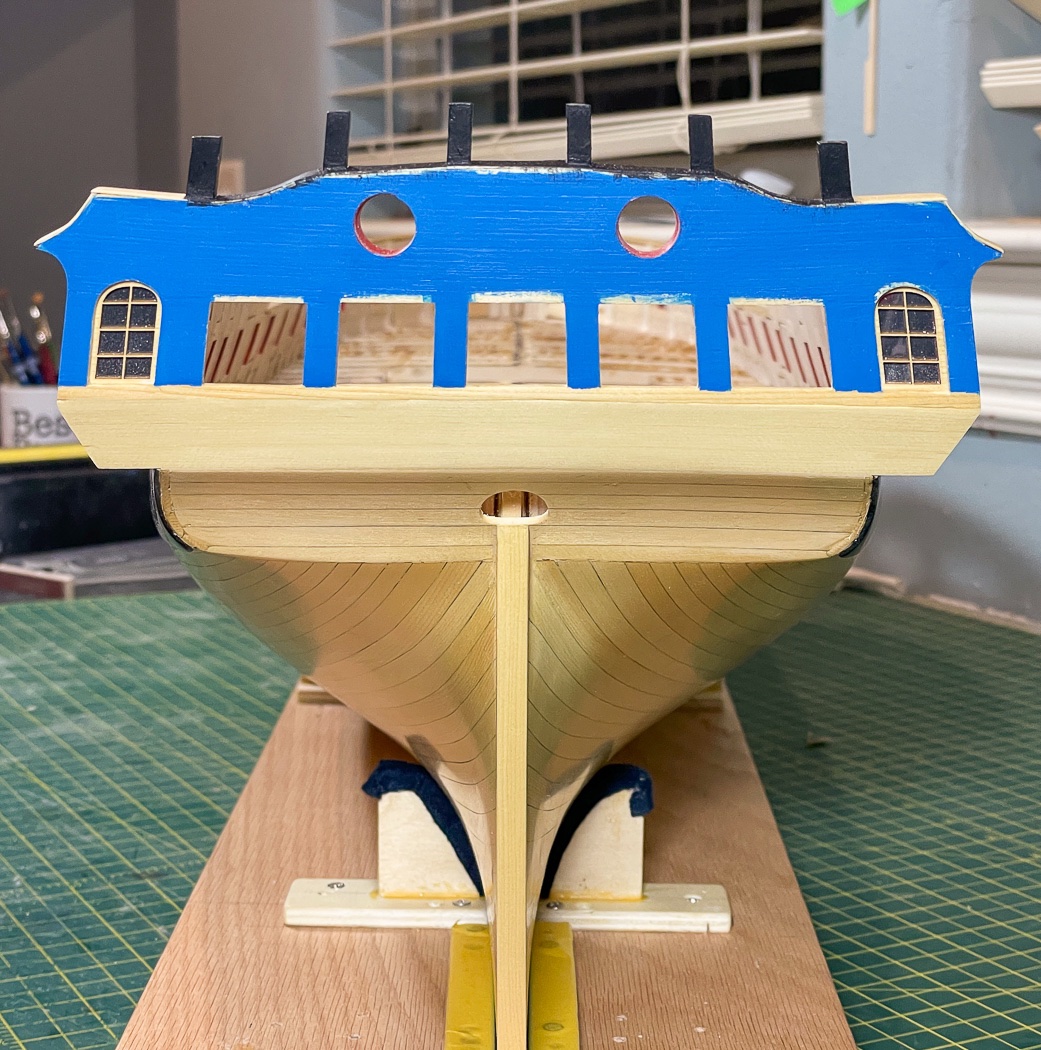
The transom looks a little beat-up at this point, there is a lot of molding and carving to add in addition to the upper and lower counter friezes. It’s prepped for when that time comes. Until then I turn my attention to the fascinating challenge of building the two galleries, did I mention its all very complex.
Thanks as always for your likes and comments and for stopping by to take a look.
-
That’s some nice planking, we’ll done. Congratulations, I know great it feels when that last plank goes on.
- westwood and FrankWouts
-
 2
2
-
Much ado about nothing. MSW is an extremely well run site, fast, both in response time and uploading large files, and is an amazing community of people. Facebook is a widely accepted social media platform and all that’s needed for any offline messages. Those that don’t want to follow MSW on Facebook, like those that do, need only patience to wait for the site to return during extremely rare times the site is down. I also received notice from NRG, another good reason to become a member there.
I’m sure there won’t be another 2013, and even if there is I, like others, create my build logs offline and post them, ensuring they won’t be lost like my long detailed Pegasus log. I can count on one hand the number of times the site has been down. The impressive availability of the site doesn’t require or benefit from any changes to the IT structure, nor the expense that would go with it.
MSW is not free to run. I’d encourage everyone to click on the donations tab on the upper right of the home page a periodically make a contribution to keep the site we all love up and running with the latest technology.
Thank you admins!
-
Well done Joe, you’re on your way now. JJ’s suggestion is a good one, the next challenge is to get a good fit for the lower counter with the fairing on those outer frames. Also a good flow for the transition from counter to stern post with fairing the stern fillers.
-
Really well done! All your extra touches, especially the friezes, headworks, and your deft touch on the scroll work really make this version of Sphinx stand out above all others. Consistent with your usual outstanding work your result and the well defined and detailed log you've provided will be the preeminent guide all others can follow. Very impressive!
-
That’s one great looking transom! Nice work on the cannon carriages, you must have hours in on removing char so well, do you have a secret method😊?
-
I first learned, then quickly purchased, about Quad hands from @Delf. Another nice thing for those interested is there are several models and sizes, all are available on Amazon. It is indeed a great tool.
Another option for weathering powders is Doc O’Briens Weathering Powders, I got mine from MicroMart. I Have a dedicated brush set for application.
I agree with Ron, both are excellent additions, whichever option, to the workshop. Appreciate his sharing their versatility with his excellent build.
- Ryland Craze and mtaylor
-
2
-
Well done, your spars, masts, rigging and seizings are all very tight and crisp. Excellent photography as well!
- hollowneck and Dave_E
-
2
-
-
A squared up frame is a great start, ready set plank😊
- Keith Black, mtaylor and Mr Whippy
-
3
-
You’re close to the finish line, it looks great!
So you’re allowed to work in such a nice part of your house😂
- FrankWouts, Dave_E and hollowneck
-
3
-
I found Chucks recommended approach of measuring and cutting the sills based on the measurement between bulkheads up next to the former, not at the outside where they go, critical to keeping the ship square. I agree with Chuck, you can find and make adjustments to recover from a 3mm variance. It’s a really big model, there are and will be more such opportunities.
I also cut out the side profile of the quarter port framing and frequently held it as a guide to positioning and length. It seems some of yours may not be beveled to fit the angle.
Hang in there, you can make the need adjustments and keep moving forward.
- FrankWouts and Saburo
-
2
-
1 hour ago, gulfmedic1 said:
Chucks syren company is there a link
https://syrenshipmodelcompany.com/
-
On 7/9/2022 at 7:15 PM, Gregory said:
split the plank up into two pieces
Or three and follow a shift pattern just for fun.
Not sure I’m seeing the photo correctly, I’d recommend you end one plank and start the next as squared ends (bevel the bottom of both for tighter fit) on a bulkhead. Also vary the bulkhead where the next rows meet by two bulkheads. I do this by marking a shift pattern on the bulkheads with a red pencil. Doesn’t have to be elaborate, just a repeated pattern.
You’re off to a great start, enjoy!
-
Those look really nice, can you mail me a few dozen😜
- dvm27, tlevine, Keith Black and 2 others
-
5
-
19 minutes ago, Thistle17 said:
One word describes your work
I could think of a few others, but thank you very much.
- FrankWouts and Dave_E
-
1
-
 1
1
-
3 hours ago, FrankWouts said:
Simply beautiful
Thanks Frank, I appreciate your saying so.
- FrankWouts and Dave_E
-
2
-
5 hours ago, DelF said:
Vancouver tomorrow for the start of our Alaska cruise
Ha. We’re going on an Alaskan cruise starting from Vancouver in September, let me know how it goes. I hope you both have a great trip!
Don’t forget the hard shell golf bag carrier to fill with the Alaskan Yellow Cedar 😂
-
It your expansive build board is an indication you’re off to a great build. Welcome to the project.
-
Precision here pays big dividends when you plank the counter and later and the transom piece. Test fitting Chapter 3 parts where you can really helps as does cut out copies of the friezes.
it’s all looking great, nice work.
- cdrusn89 and FrankWouts
-
2
-
14 hours ago, garyshipwright said:
planking job is outstanding
Thank you. It’s such an important part of the model.
6 hours ago, westwood said:handled the planking nicely
Thanks. Just trying to do well with all that wonderful AYC.
- FrankWouts and Dave_E
-
2
-
3 hours ago, LCdr Dave said:
it takes time isn’t just because I don’t know what I’m doing…
Thanks for the comment. I think it takes time because we know what we’re doing😊
- FrankWouts and Dave_E
-
2
-
An Upright Hull at Last
Thought I’d share a few photos of my Winchelsea hull upright.
I thought about what would be easier to do now than later in the build, following the always good practice of reading ahead.
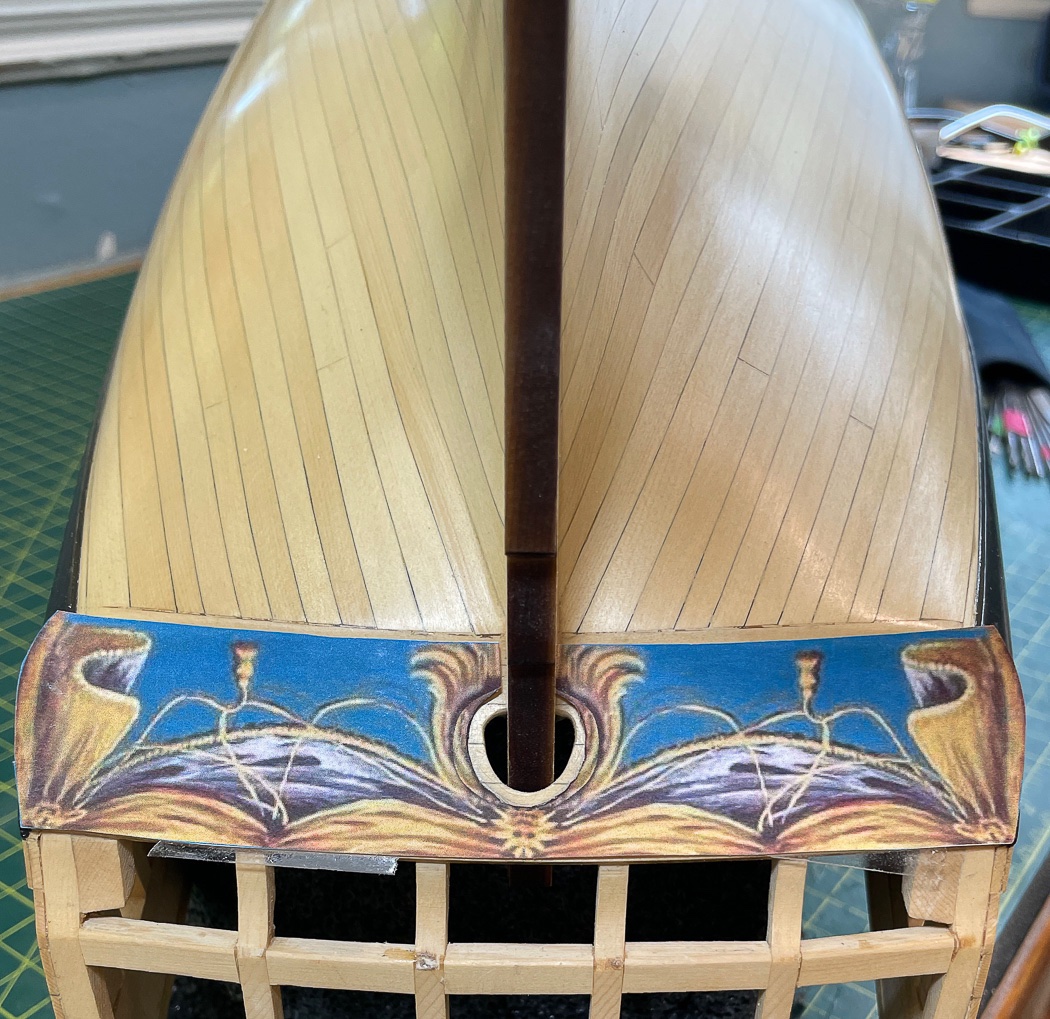
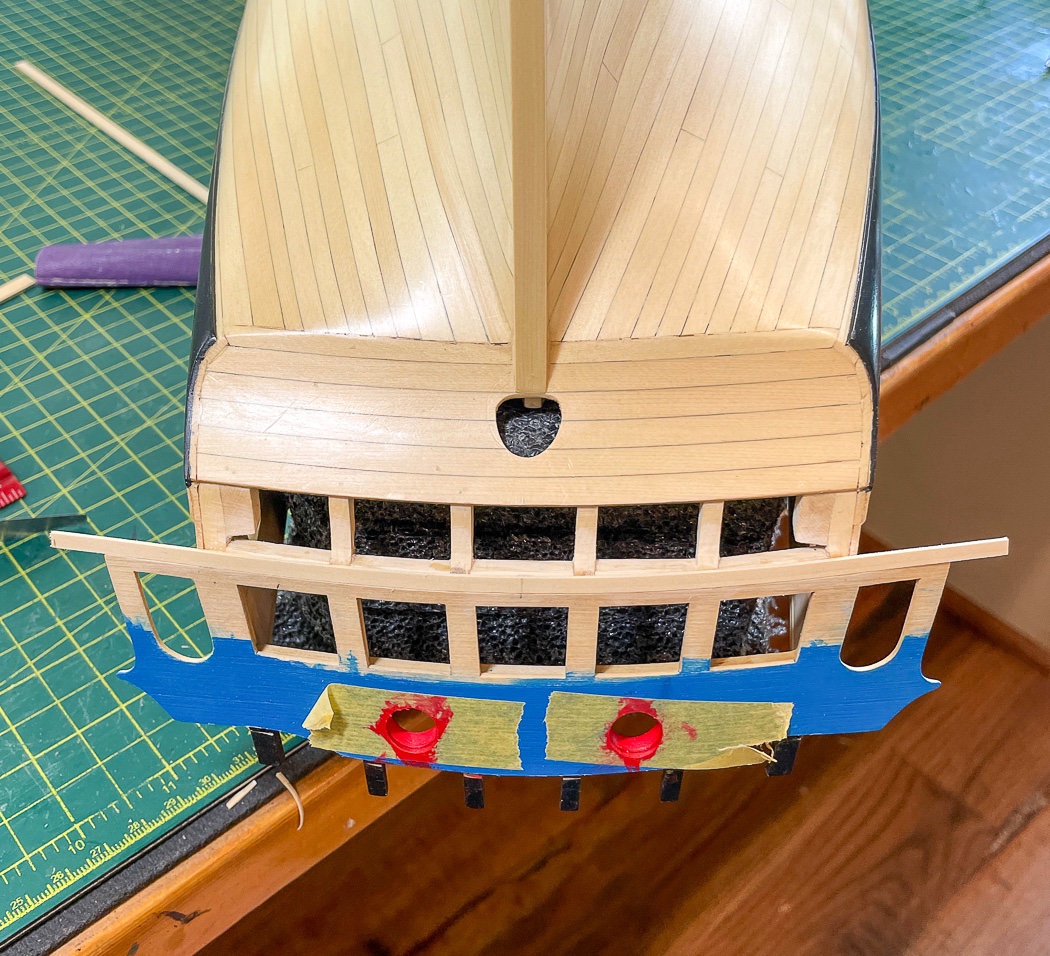
I drilled out the rudder port. To line it up I cut out a copy of the counter frieze and loosely taped it to the counter (I’ll get a better fit, only concerned about the rudder port) after cutting out the black area representing the port, drew a pencil line, drilled a hole, and worked my way out with a #11 blade and sanding sticks. I pulled out the rudder pieces from Chapter 5 and held the two parts together that pass through the port (the dark line shown in the photo is the rudder) to confirm the hole was big enough. I stopped well short of the black line, I’ll adjust later as needed. The still unassembled rudder went back in the bag.
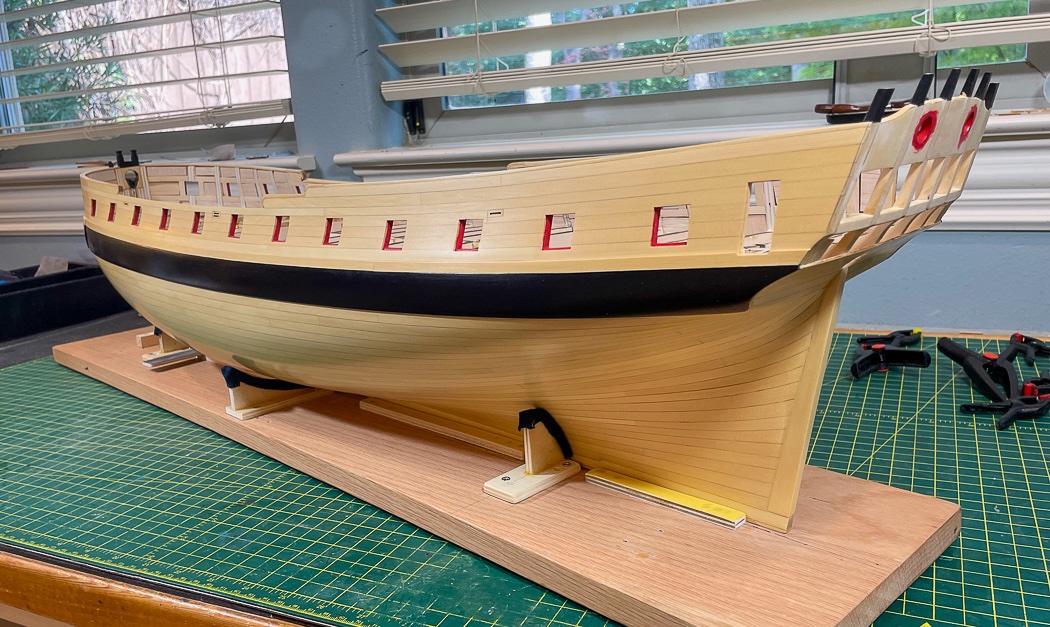
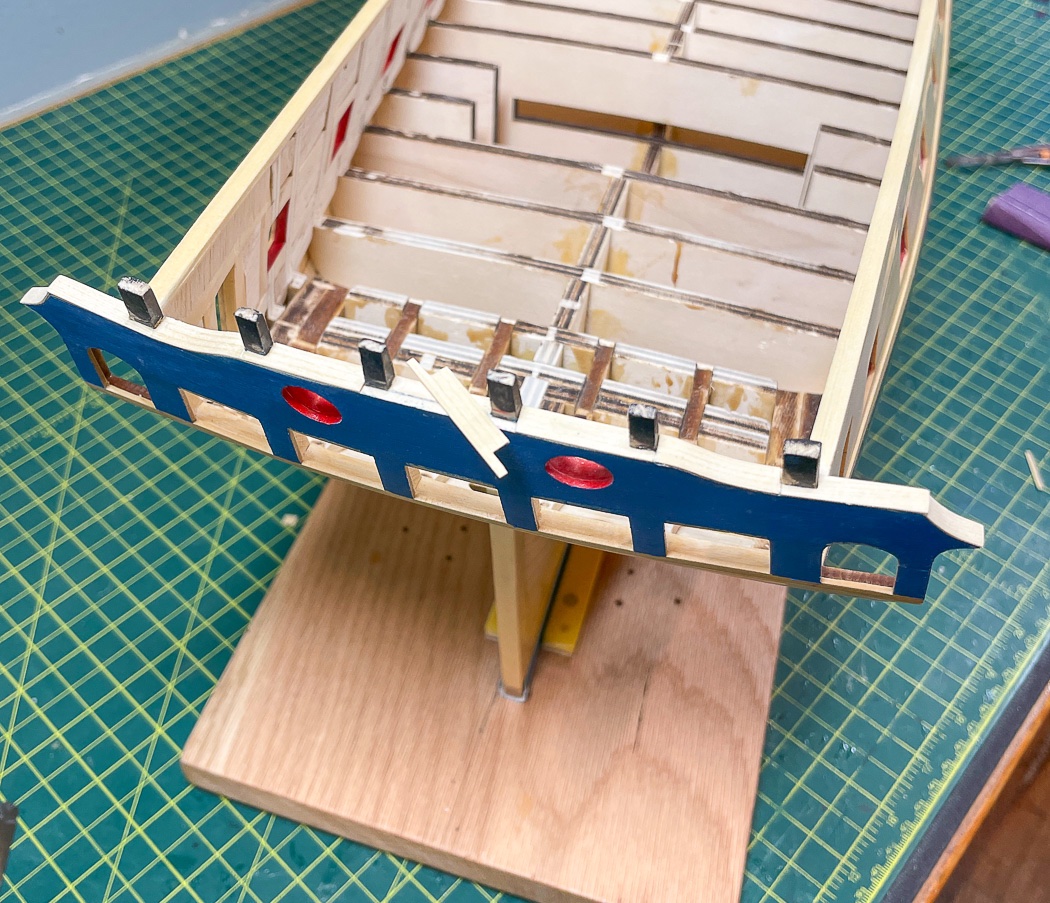
I used the jig from Chapter 10 to determine the height of the stern frames and cut them down about 1/8th higher than the jig to allow for future adjustments. Why not paint them black, as they eventually must be, while I’m at it. I will admit I broke one during the hull planking, fortunately it was a clean break and easily glued back together. I waited until the planking was complete, it has bothered me looking at it all that time. Now it’s fixed.
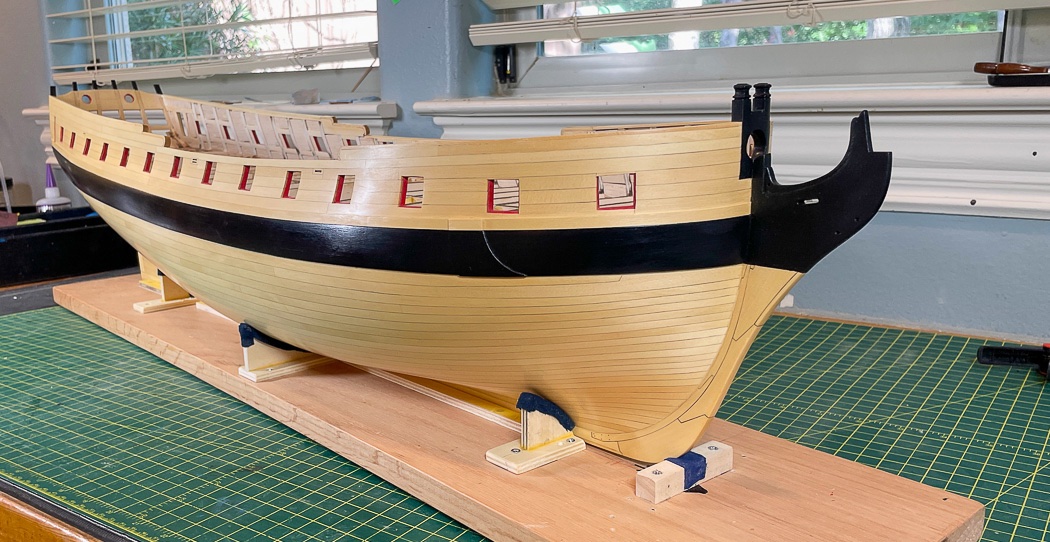
Finally I painted the stem. It was always going to be black, I’d rather deal with occasional touch up and get it done now while it’s relatively easy to do.
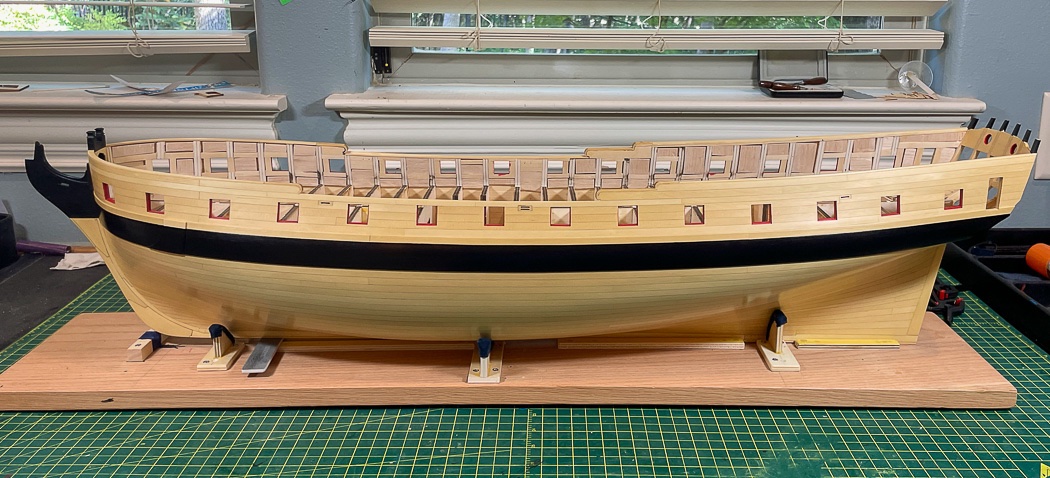
With that the hull is prepped and ready for the next steps, the transom, upper counter, and quarter galleries - can’t wait. Once again, excuse the rushed iPhone photos with their work light glare.
As always thank you for stopping by with your likes and your comments. I really appreciate it.

HMS Winchelsea 1764 by glbarlow - 1:48
in Member Build logs for the HMS Winchelsea
Posted · Edited by glbarlow
Thanks Chuck, I’ll do that. It’s Winsor Newton from the tube thinned with water. I’ll add a little white to the paint jar.