


No Idea
-
Posts
902 -
Joined
-
Last visited
Content Type
Profiles
Forums
Gallery
Events
Posts posted by No Idea
-
-
10 minutes ago, Beef Wellington said:
Mark - your work is outstanding and inspirational, such clean woodworking. One question if I may, how do you shape the underside of your beams? The concave profiles must me challenging than the convex upper side.
Hi ya Jason - I use a spindle sander to make the concave profiles with the biggest cylinder for such a gentle curve.
Its my most least liked machine if I'm honest - it vibrates - its loud - its just not a great machine to use.
I've been asking Jim Bynes for ages to make a decent spindle sander for ship builders for ages (I never miss an opportunity to say it again) and I hope that he does one day 🤣
Its not challenging to do just not one of those jobs you look forward too - Oh but I should have said its a very easy profile to achieve 👍
- mtaylor, dvm27, Keith Black and 2 others
-
 5
5
-
2 hours ago, druxey said:
Exemplary work!
Wow - thanks druxey!
1 hour ago, VTHokiEE said:As always I'm very impressed with your work and precision. You're creating a very beautiful ship!
Thanks mate 👍
This is a bit of a nothing post below but sometimes I just love the simple things that are just so accurate. Two pins - a length of red cotton - dead centre the length of the hull. If only everything was this easy
- VTHokiEE, ChrisLBren, westwood and 12 others
-
15
-
On 4/16/2023 at 1:09 AM, bdgiantman2 said:
Awesome job making those notches on the deck beams, this whole thing is turning out terrific!! I am gong to have to copy your process when I get to that step of making notches.
Brian
")
Thanks Brian 👍
On 4/16/2023 at 7:21 AM, Vladimir_Wairoa said:beautiful work. Thank you for showing the process.
V.
Cheers Vladimir
On 4/17/2023 at 12:43 PM, Hubac's Historian said:This is all exquisitely well-done, Mark!
Thanks HH its starting to come together now!
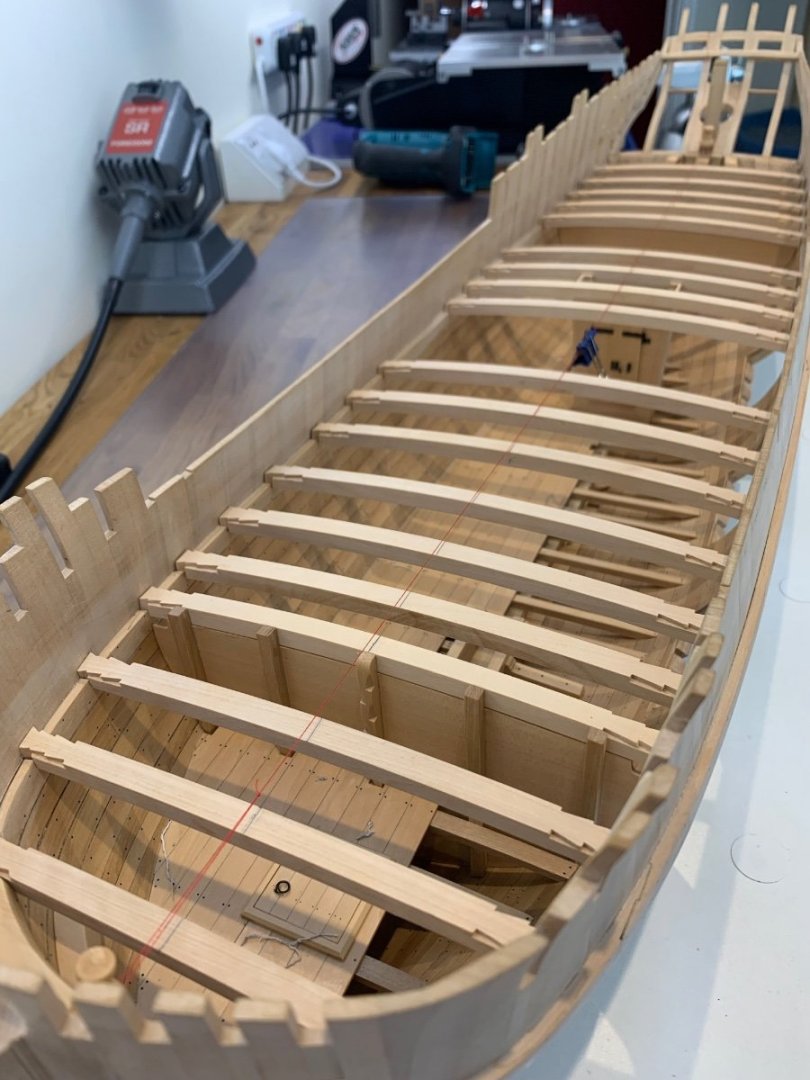
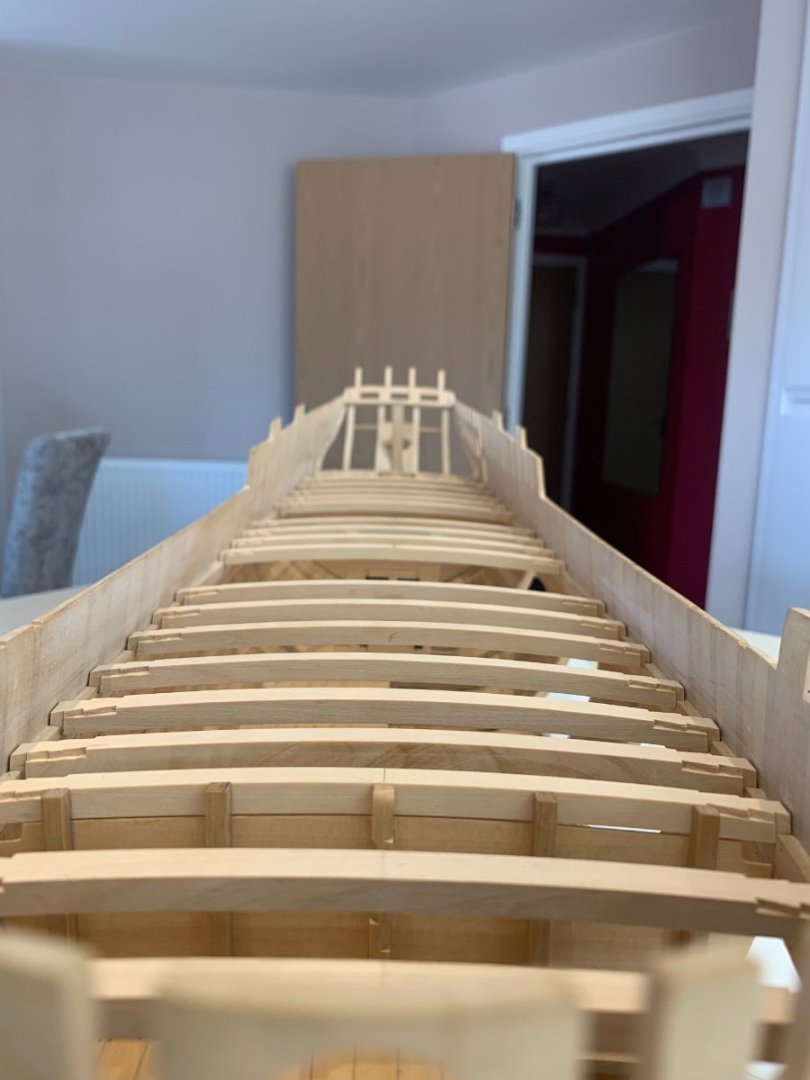
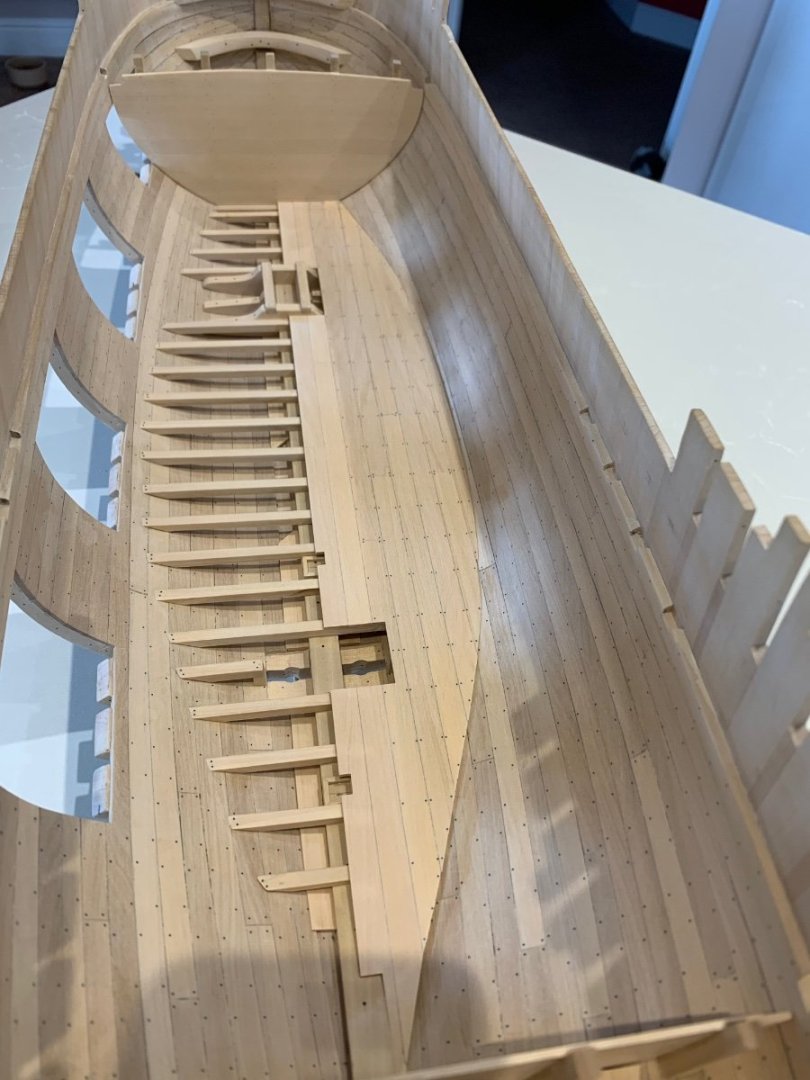
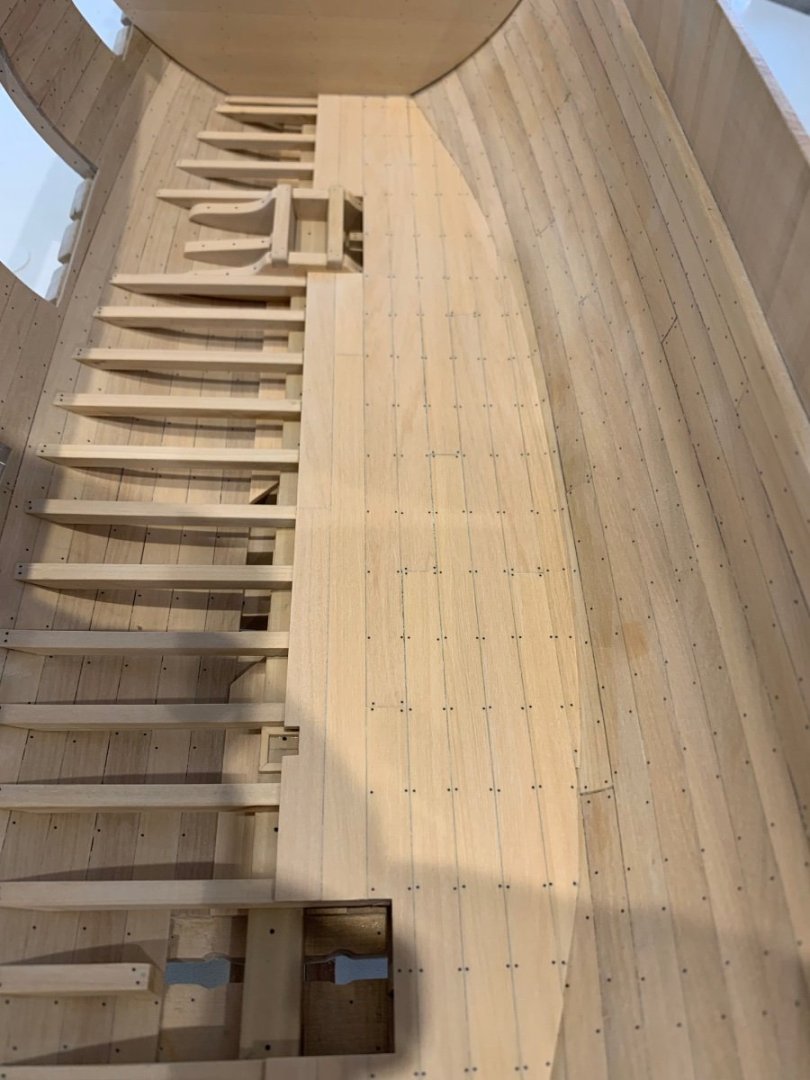
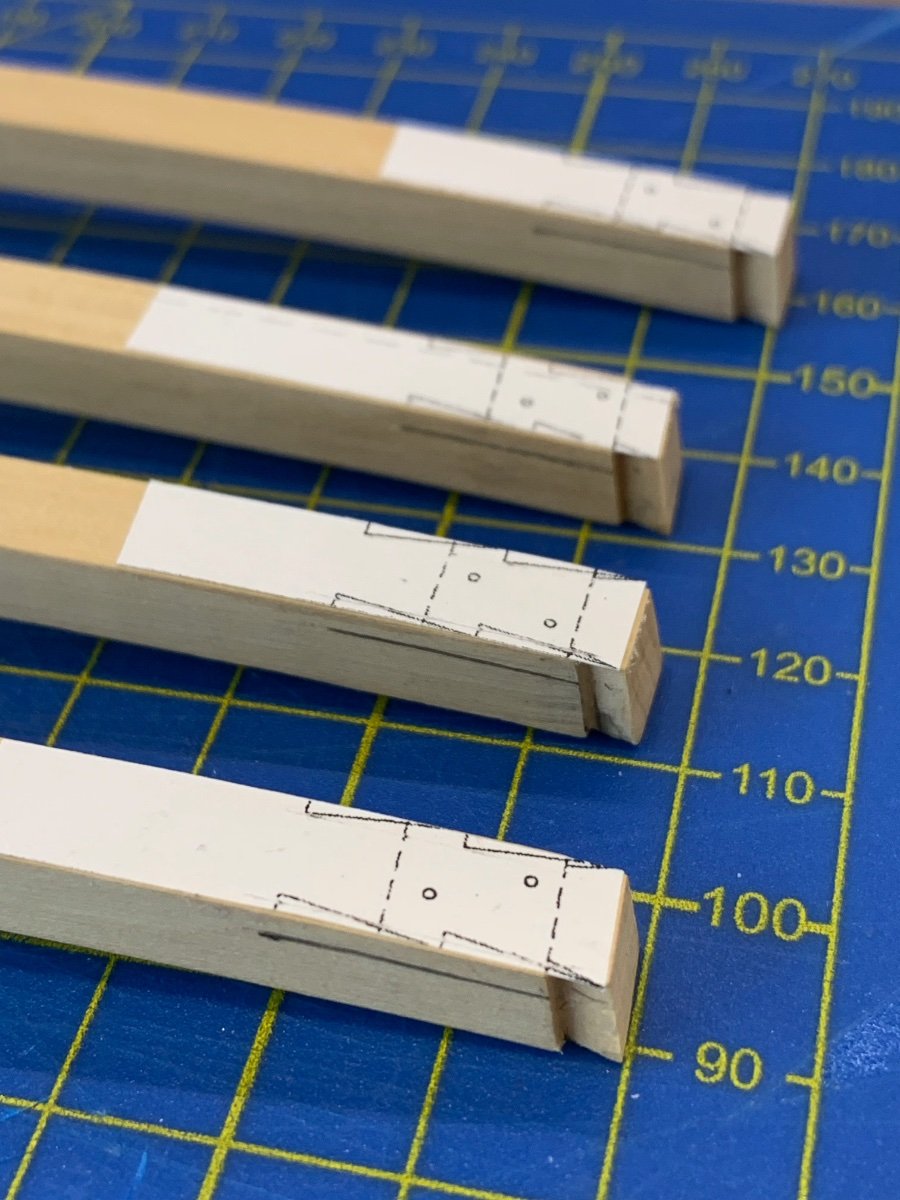
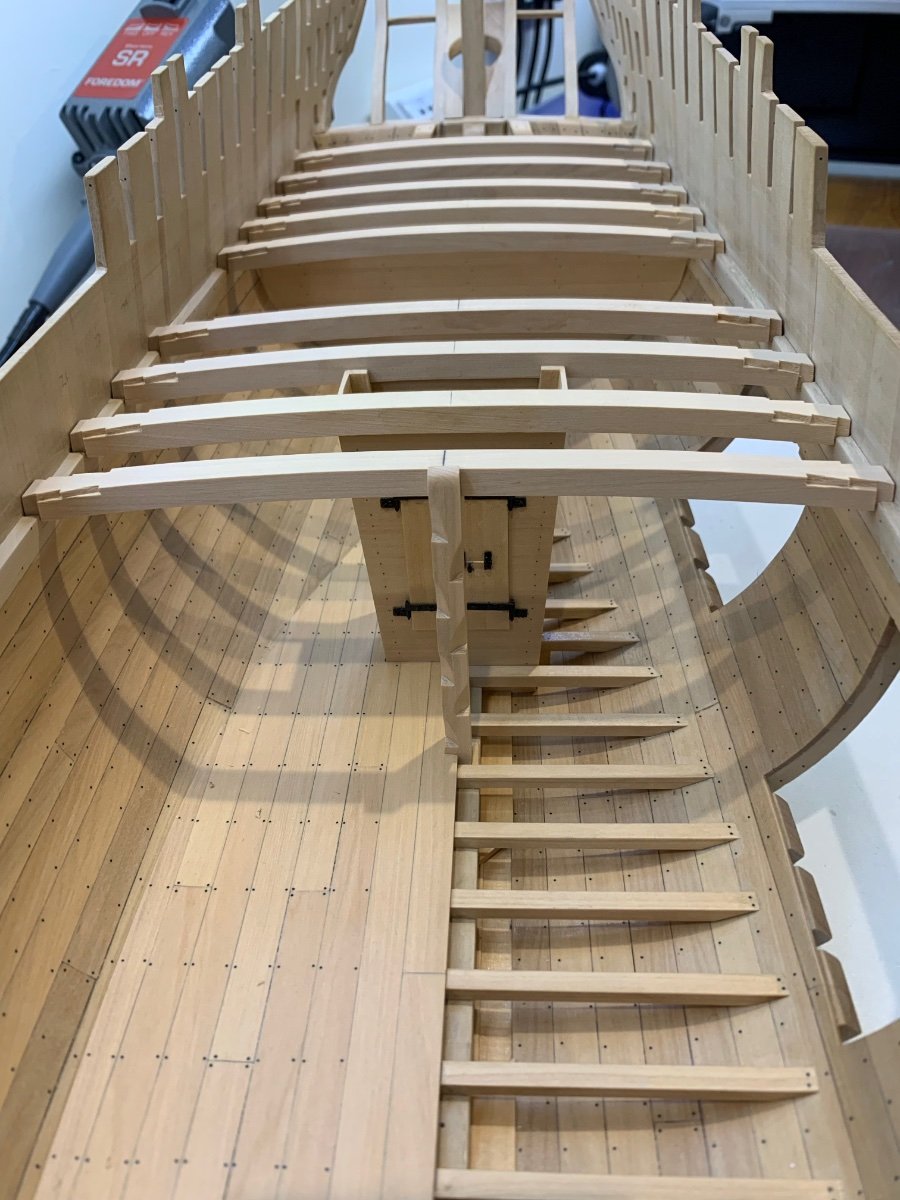
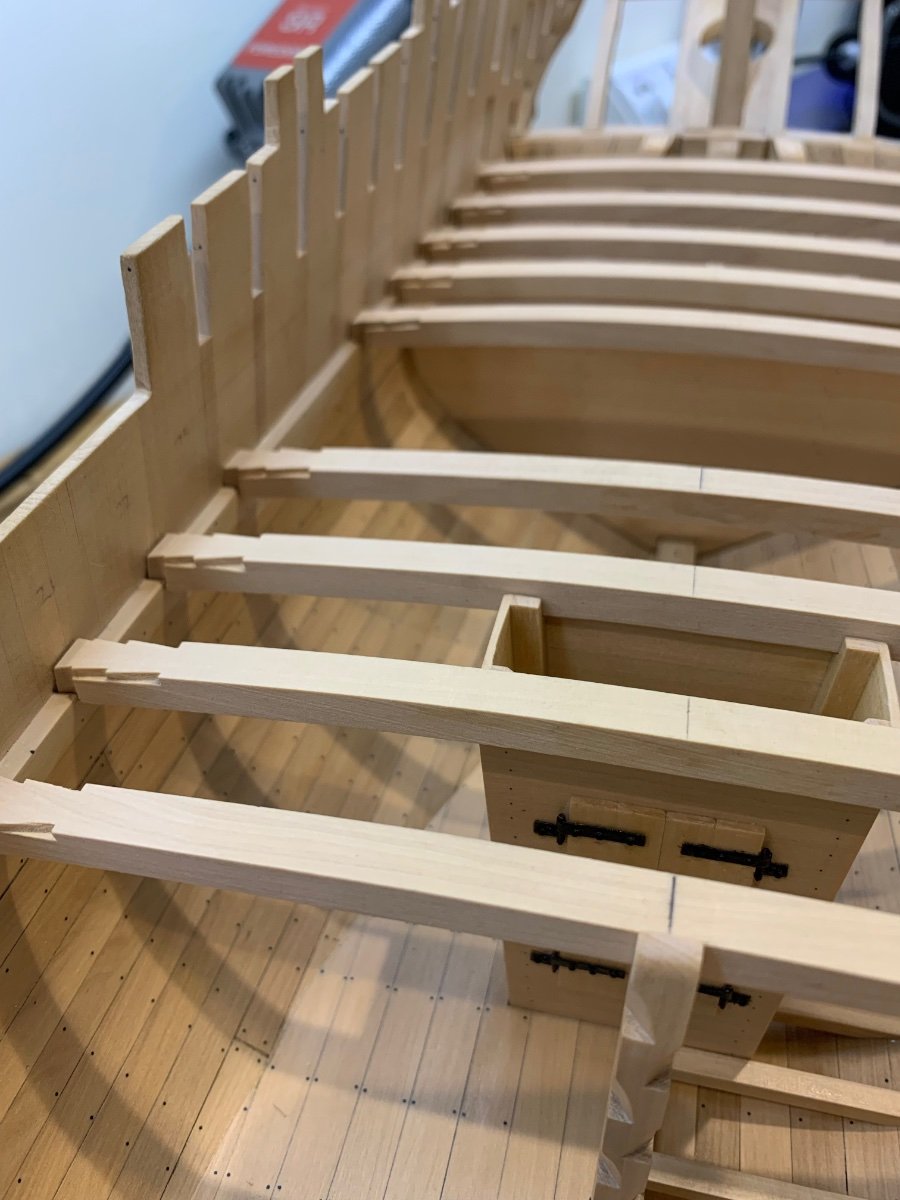
I've now done some more work on the forward beams. It's exactly the same principle as before. Here are the beams cut to length and carved.

And cut into the deck clamp making sure that they are sitting at the correct height.

Just like the stern; at the stem the beams must line up with the breast hook which was fitted over a year ago!

A couple more pictures
So my next job is to mark the centre line of the beams and then mark out and cut all of the notches for the carlings and hatches.
Cheers Mark
-
If you want the best it really is a matter of opinion and the users experience of how the saws they have used in the past perform. In my opinion I now use a jewellers saw as it does everything that I need. It can hold so many different types of blades (which break often) that its use for me is pretty much limitless. The blades can be installed as push or pull and turned to suit the cut as well. This is the one that I use but it ain't cheap and before this I used many saws which were adequate but never as good as this one. However as has been said a really good knife is essential and can actually quite often do the job of a saw. Your choice is huge and dependant on your budget. I originally started with the cheapest blades and saws that money can buy and they have got me to where I am today.
https://www.knewconcepts.com/MK4-saws.php
- Canute, GrandpaPhil and mtaylor
-
3
-
-
Welcome to MSW from the Black Country
-
2 hours ago, Mic_Nao said:
Good job, the wood has nice color.
Thanks Mic_Nao the wood is Castello and its very nice to work with
2 hours ago, albert said:Great beautiful work.
Thanks Albert 👍
1 hour ago, Paul Le Wol said:Mark, beautiful hand crafting of the beams. Thank you for showing how you did that.
Hi Paul - No problem mate I think it's really important to show how we try to make these parts. It took me a few weeks to decide how I was going to tackle this joint and in the end it was quite easy once started.
32 minutes ago, B-Ram said:Beautiful work Mark.
Thanks B-Ram 👍
-
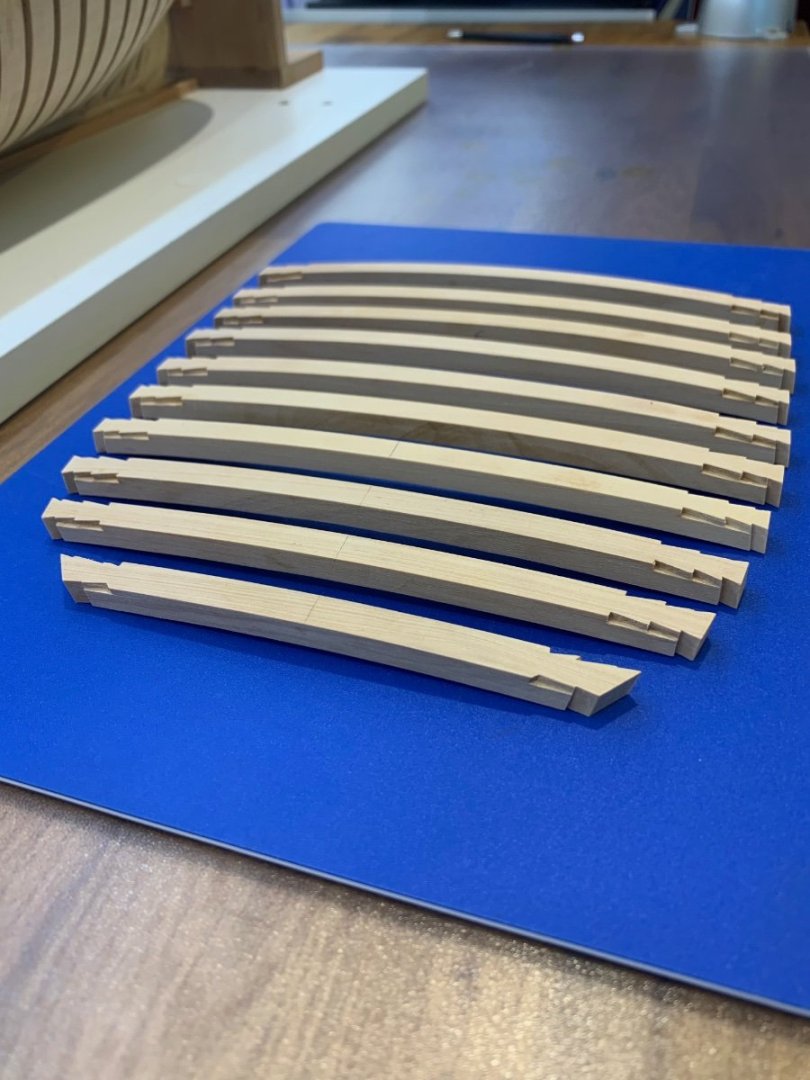
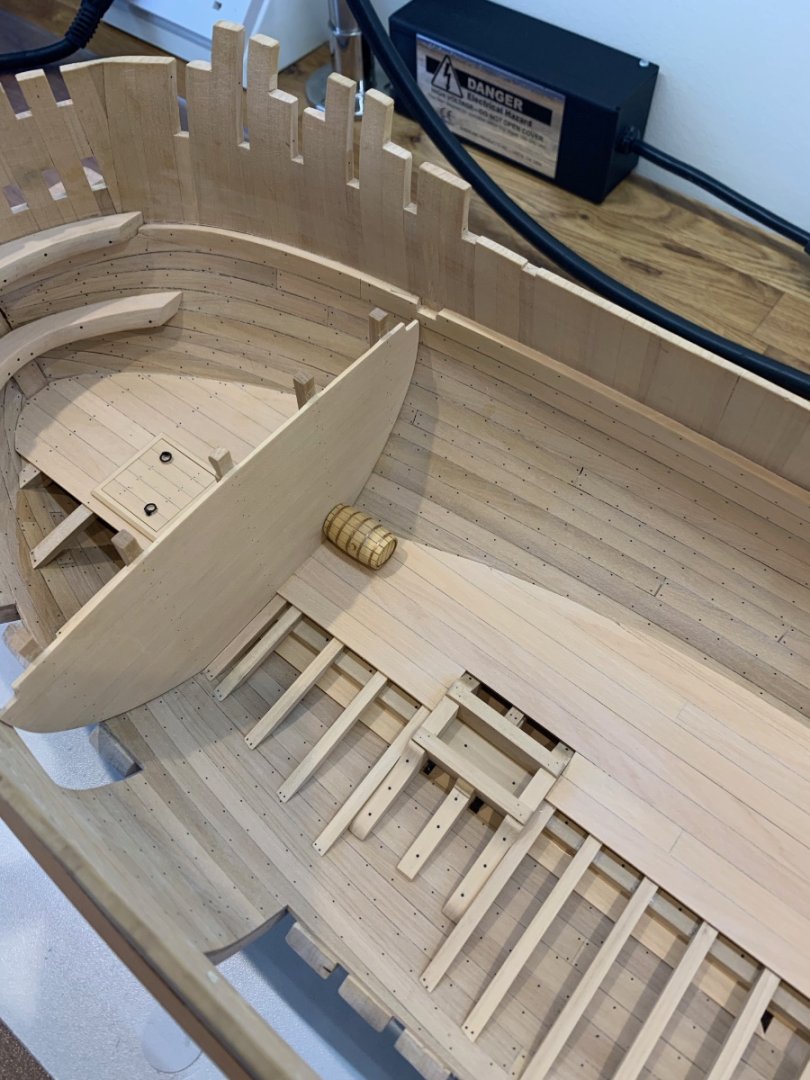
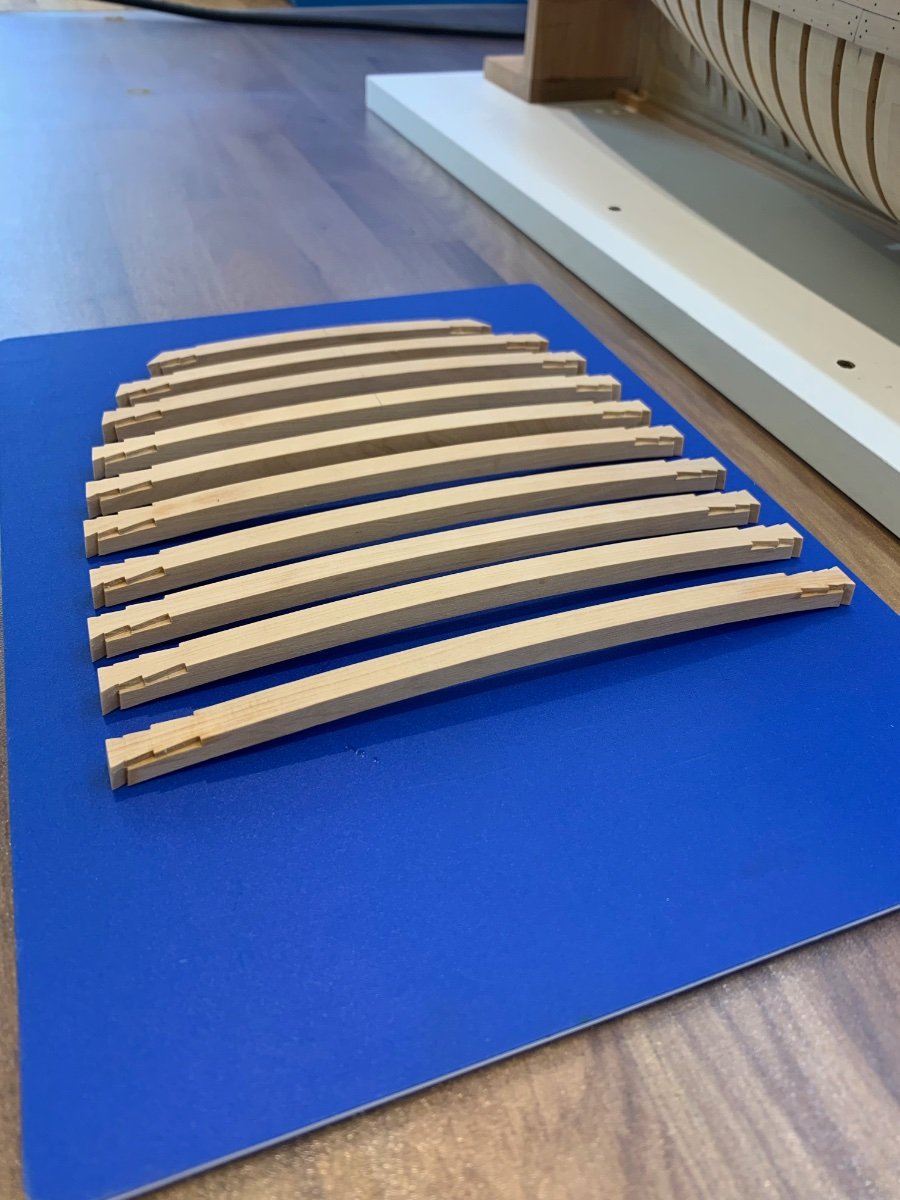
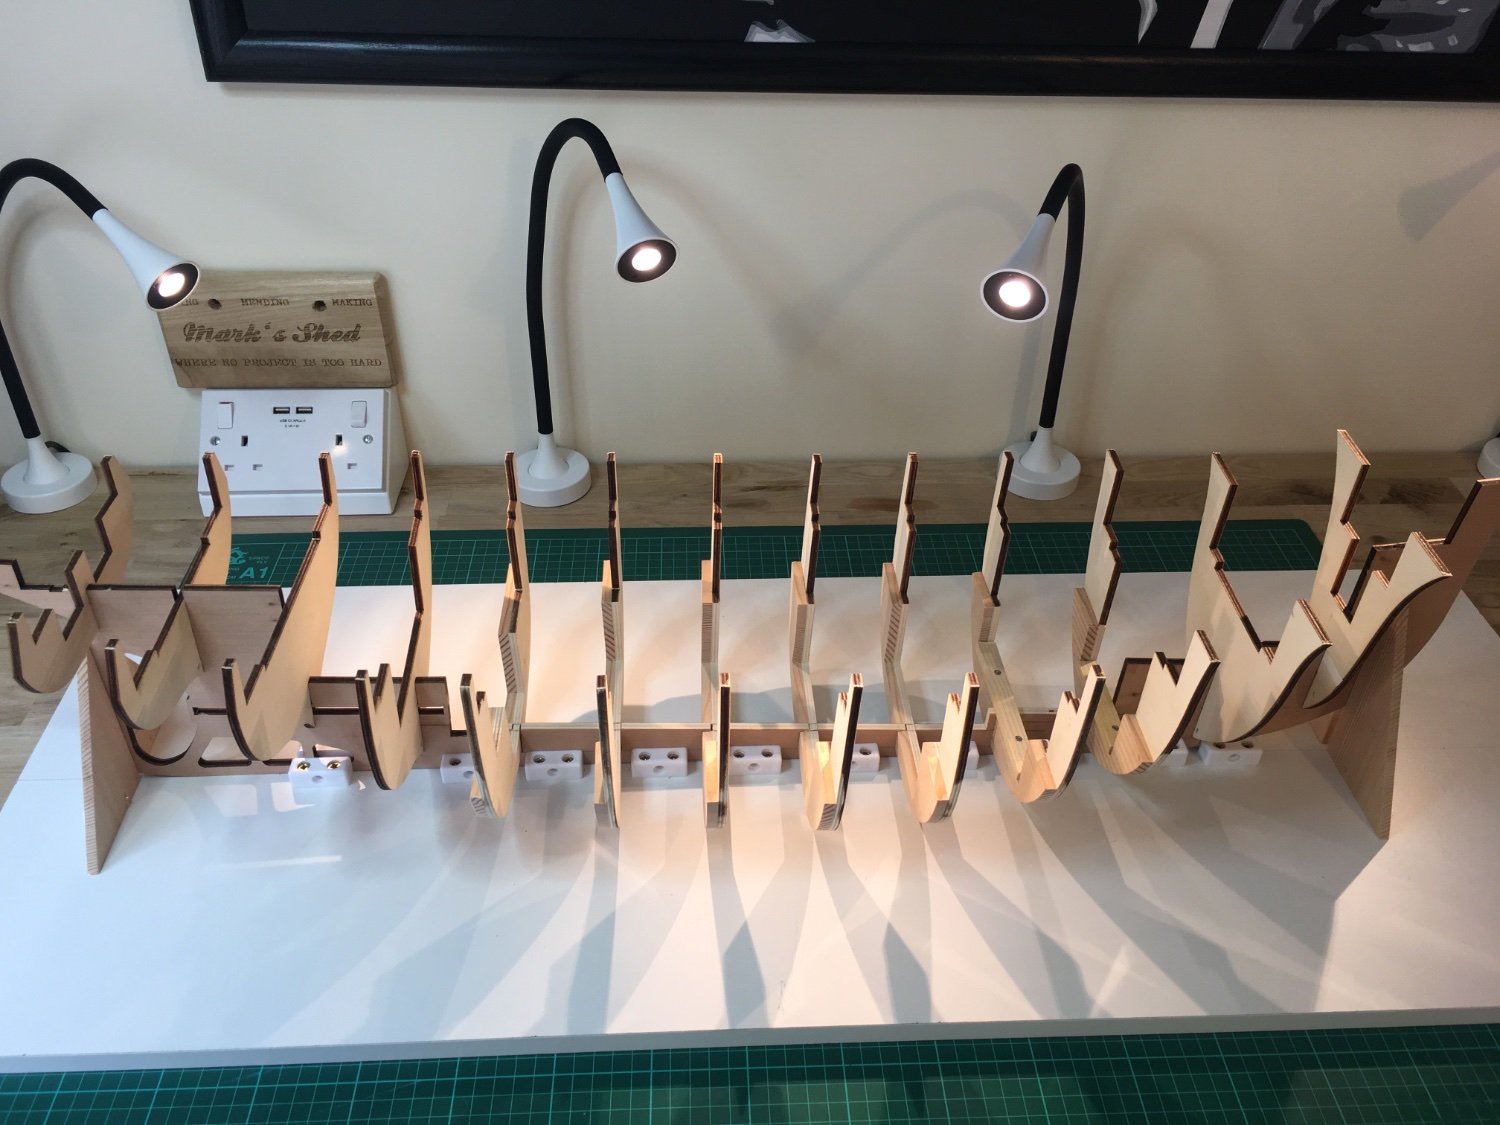
Well at last I've finally had some time to do a little on my ship. So I've started making the rest of the main beams and this is another very wood hungry job. In fact I was really surprised just how much wood these parts use. Firstly I cut them out and sanded them all to their curved shape.

I have decided to do the stern beams first and this is where I found a bit of a discrepancy in my build. The wing transom also acts as the last beam and I found that it sits 1mm too high. I'm not surprised to be honest as this was one of the first jobs I did when starting this build. I didn't realise at the time how much photocopies of plans can be out and also looking back I didn't check my measurements often enough........so I'll take the 1mm as a bit of a win. What it did mean though was I had to gently increase the hight of the beams towards the stern. Not a problem to do so thats what I did.
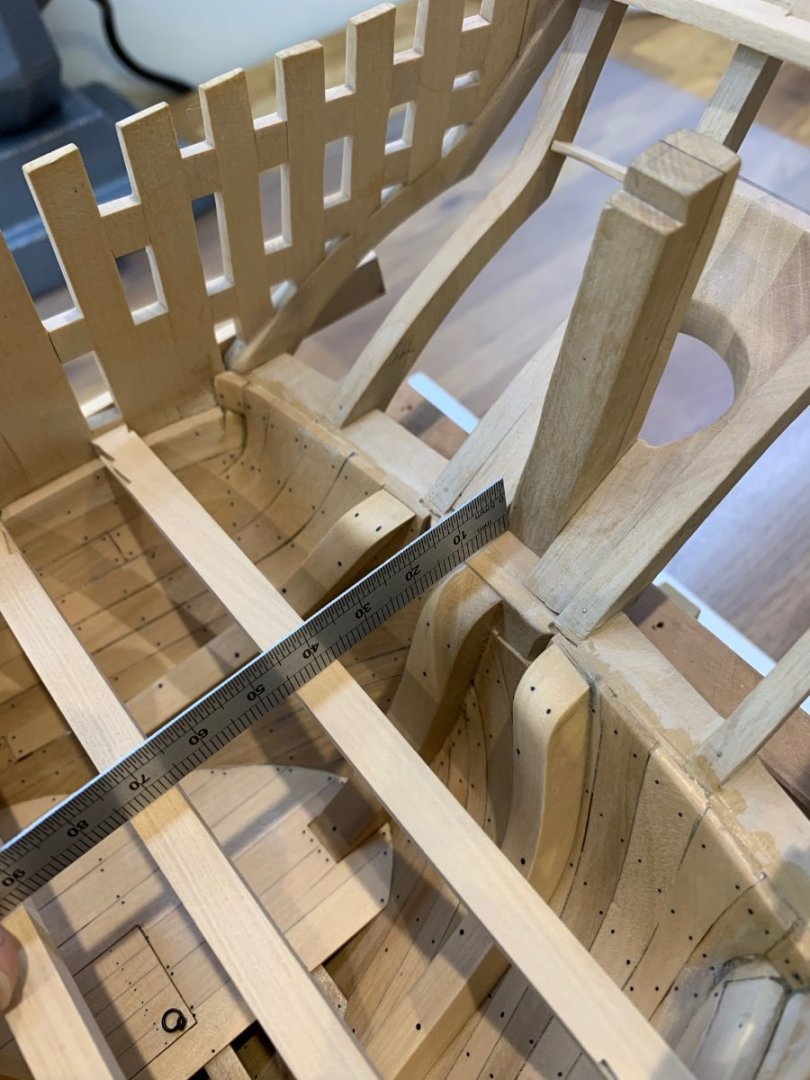
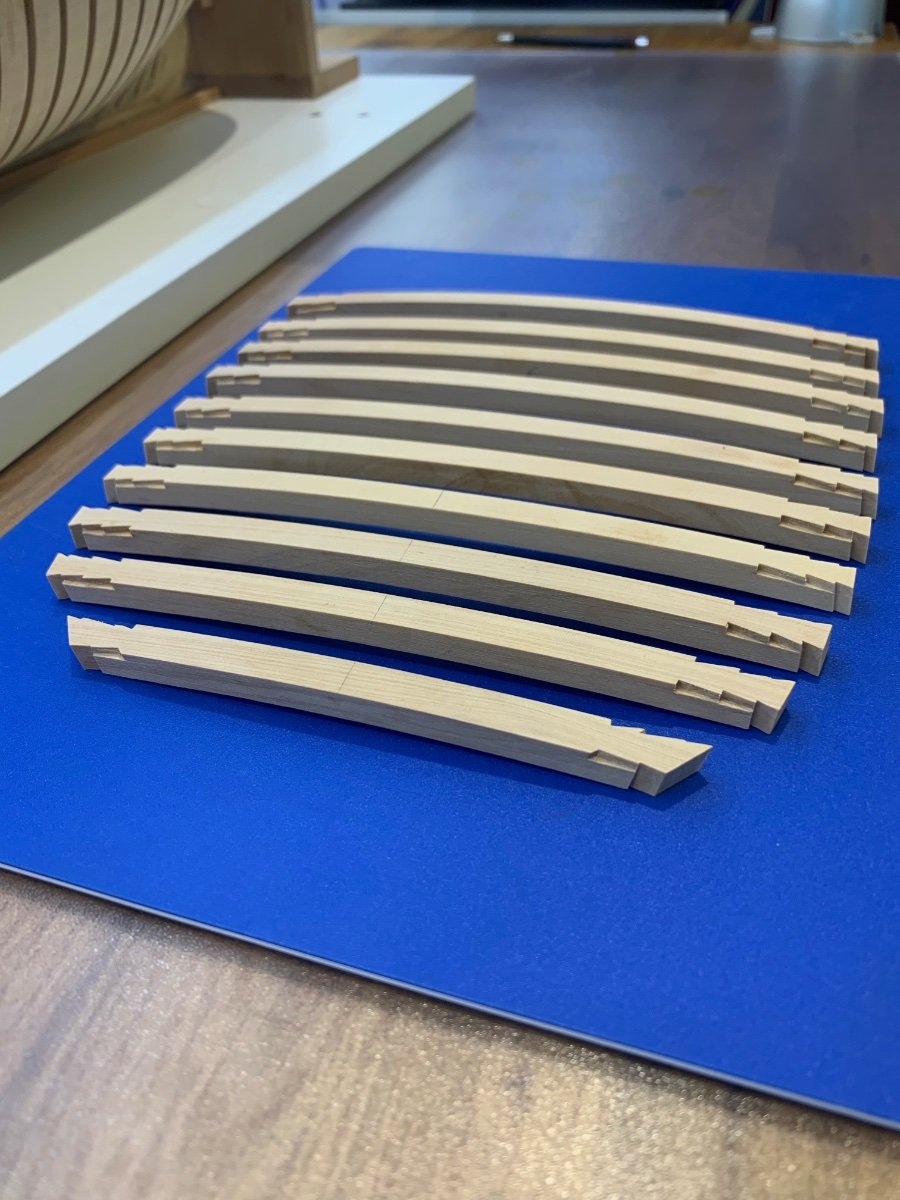
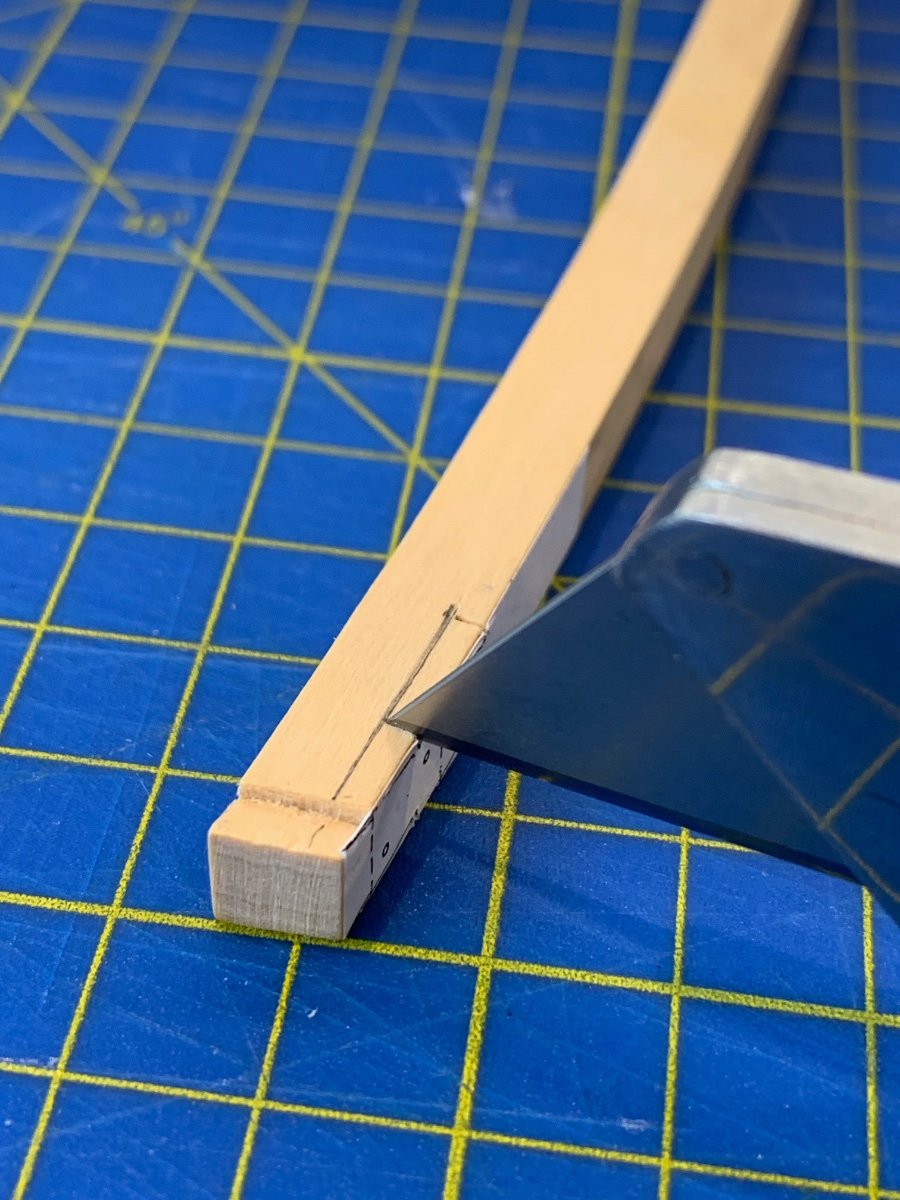
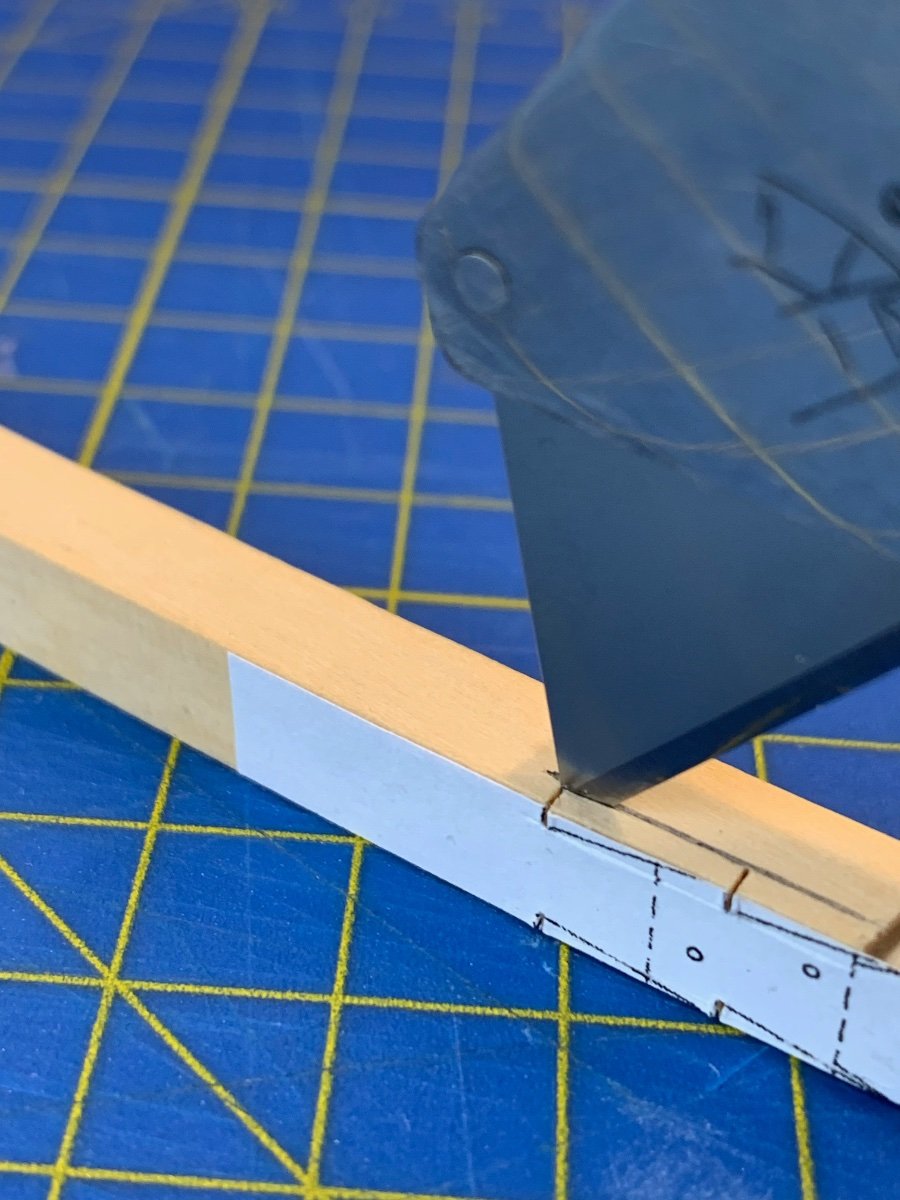
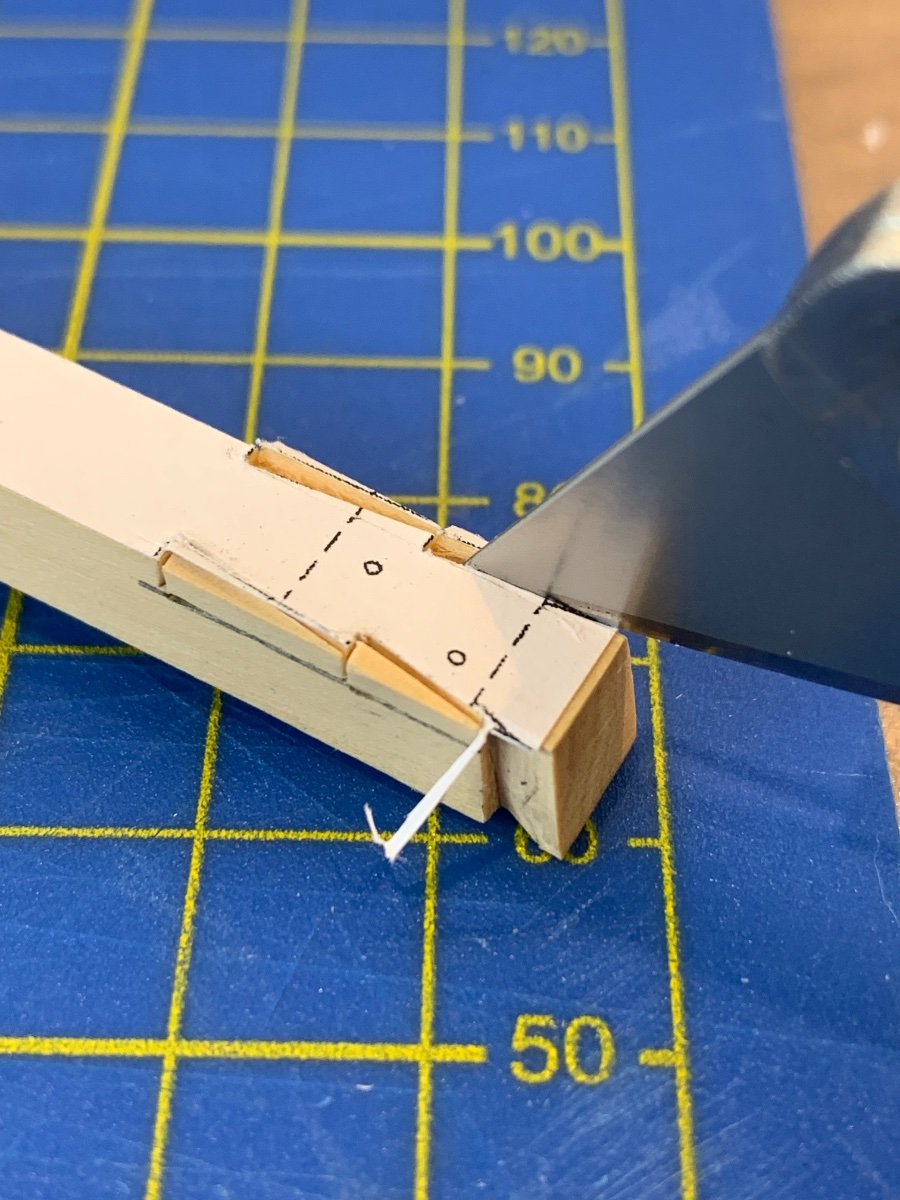
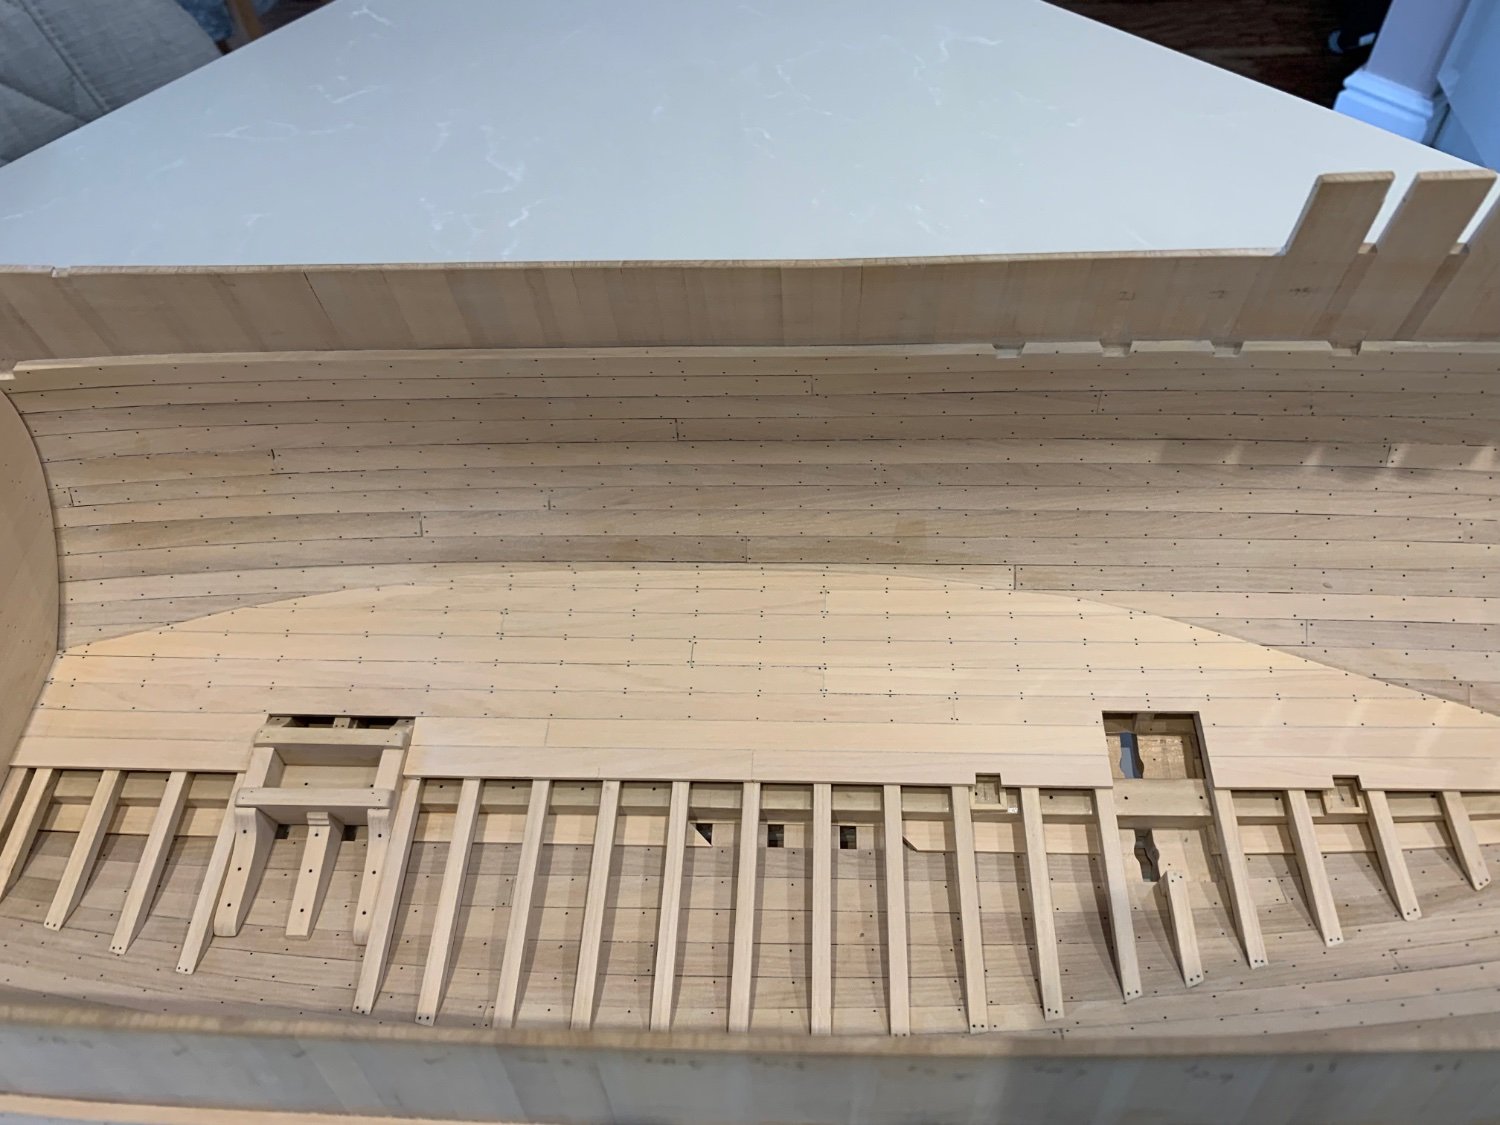
I also had to cut out the dovetails for the waterway and spirketting into each beam which is a job that I was unsure of how to do accurately. I considered using the mill but in the end I decided to cut them by hand as this is a skill that do need to improve. So here's how I did it.
Firstly I glued the templated onto the top of the beams and then marked the depth of the dovetails which in my case is 2mm
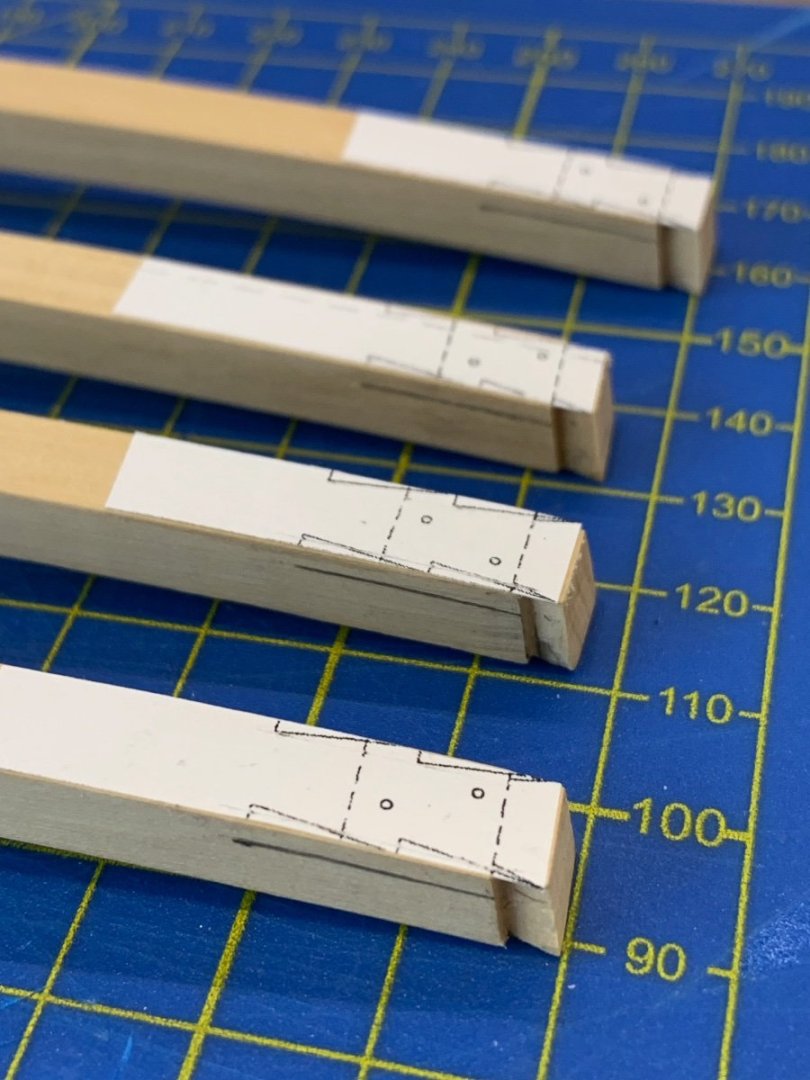
Next using a blade I cut the square ends of each joint to the required depth
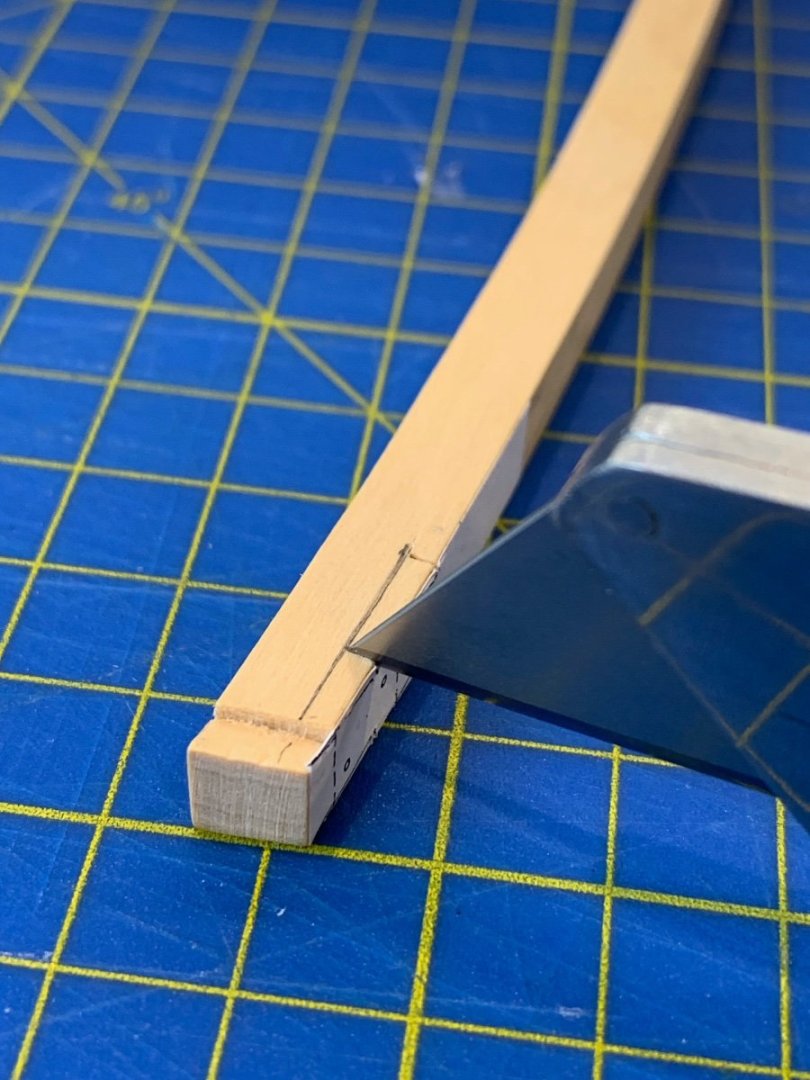
Then I cut the deepest point of the dovetail which is basically stabbing the blade in and then scored the 2mm depth line along its full length.

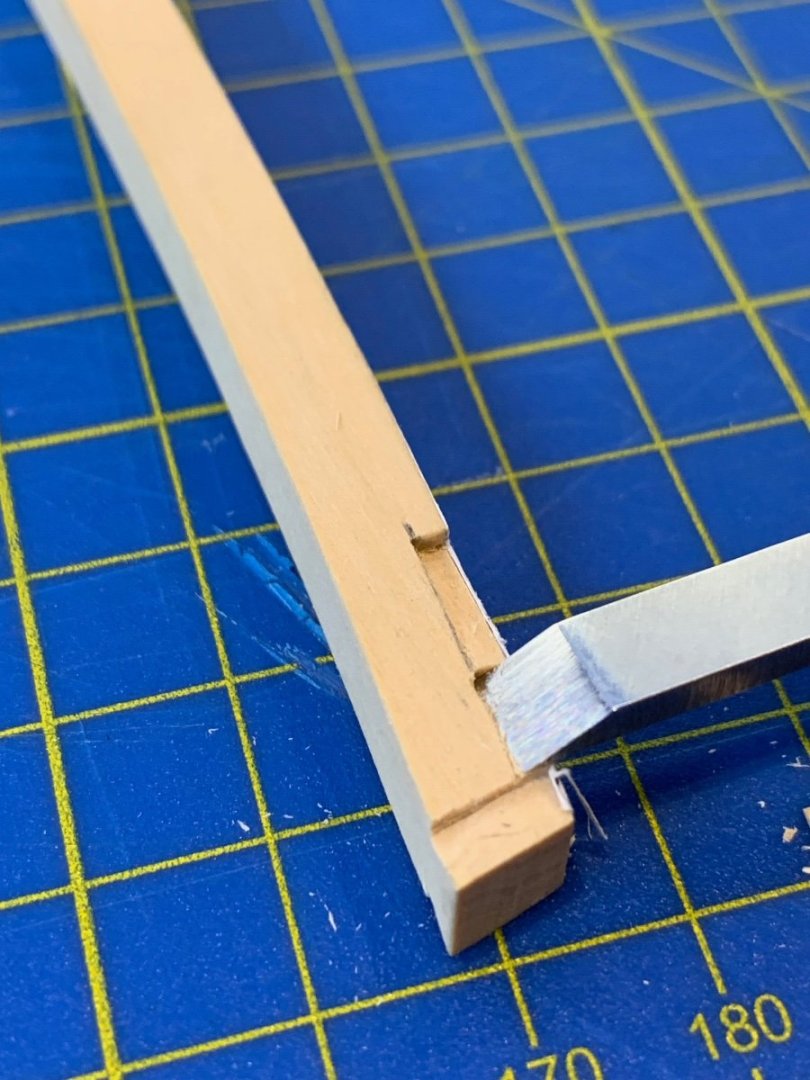
It was only after doing these cuts that I attempted the diagonal cuts. I found that I had to be very delicate with this cut as its so easy to split the wood.

Then I cleaned the joint up by using a chisel
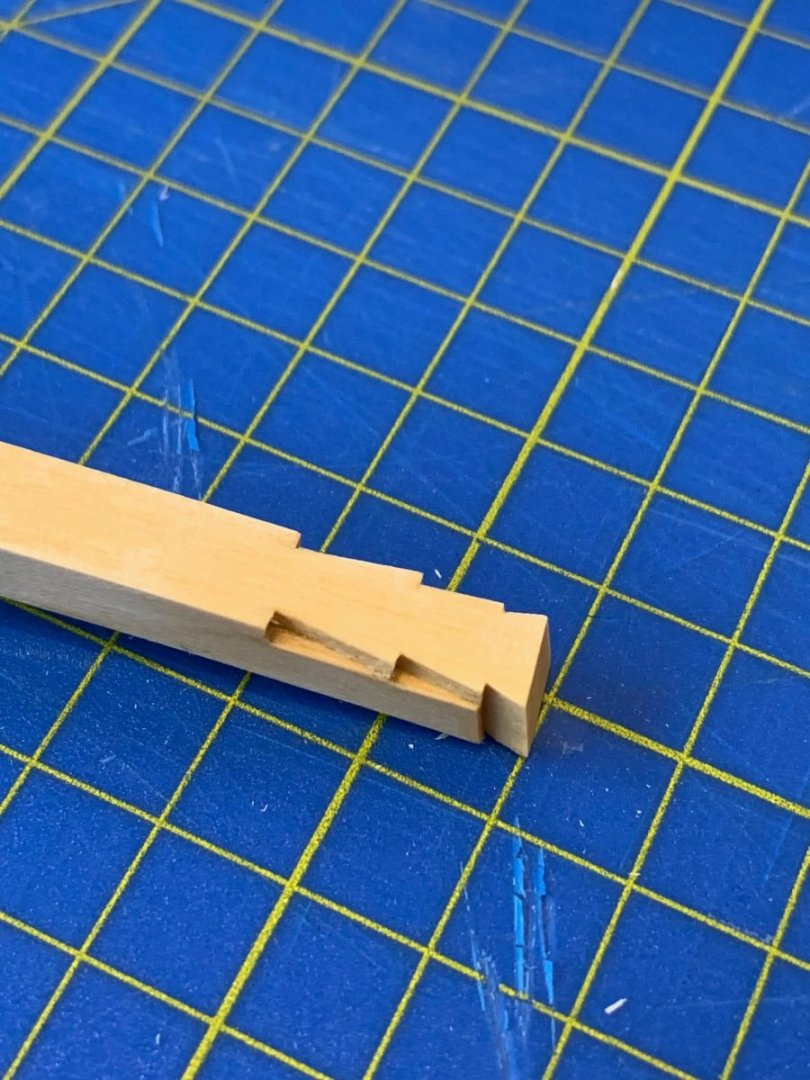
And the final result looked like this - I was quite surprised just how nicely they turned out. Its one of those jobs where its just better not to think about it too much and just get on with it.
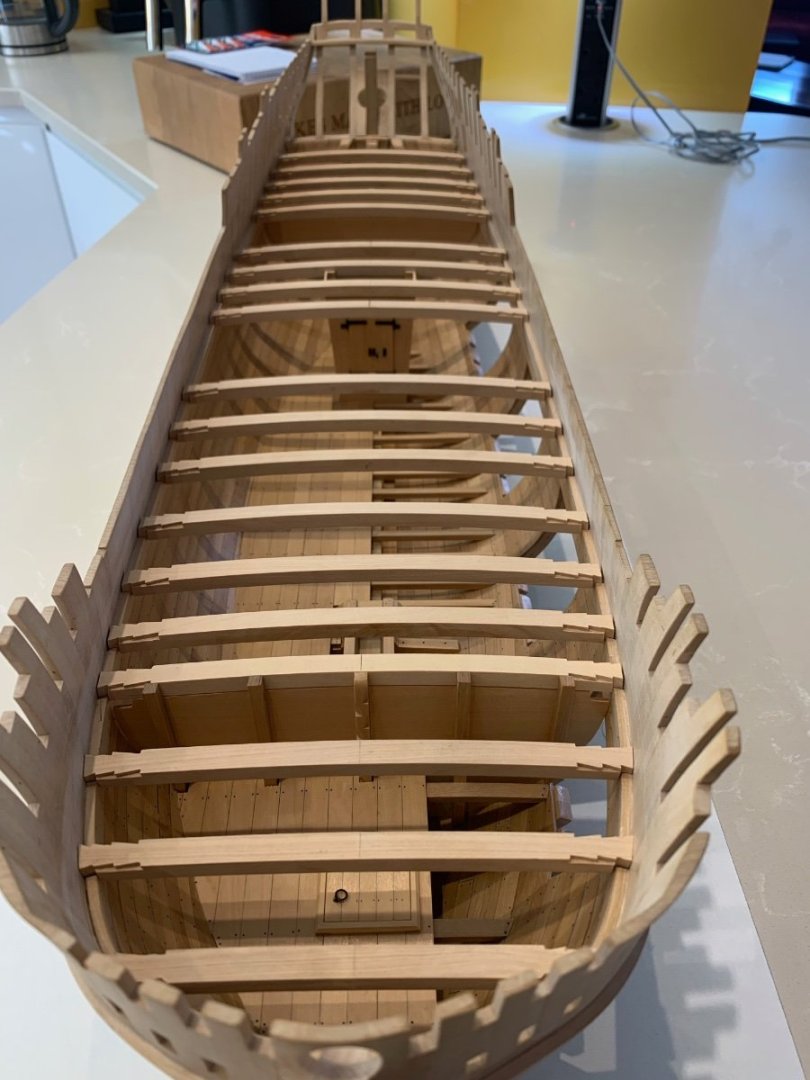
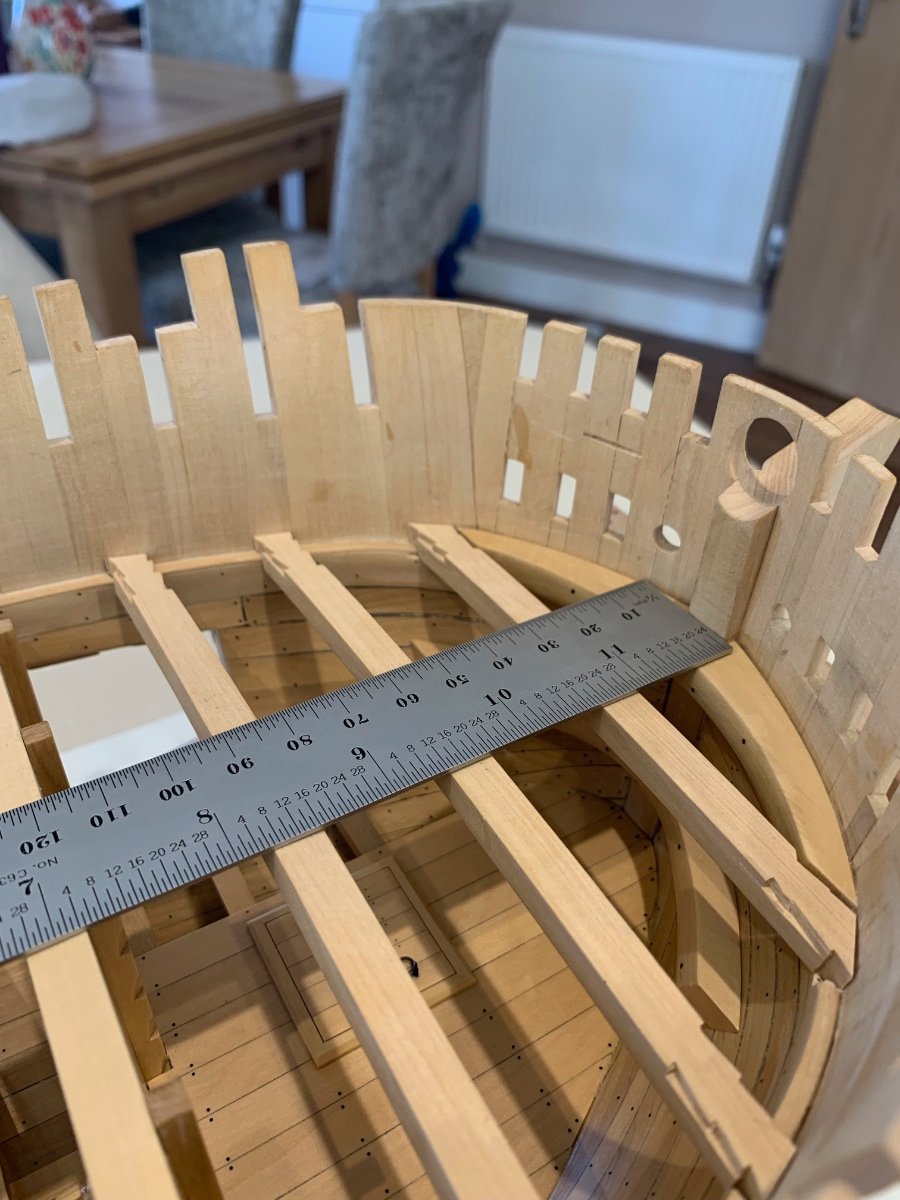
So I'm halfway there now and these beams seem to make the hull look much more solid.

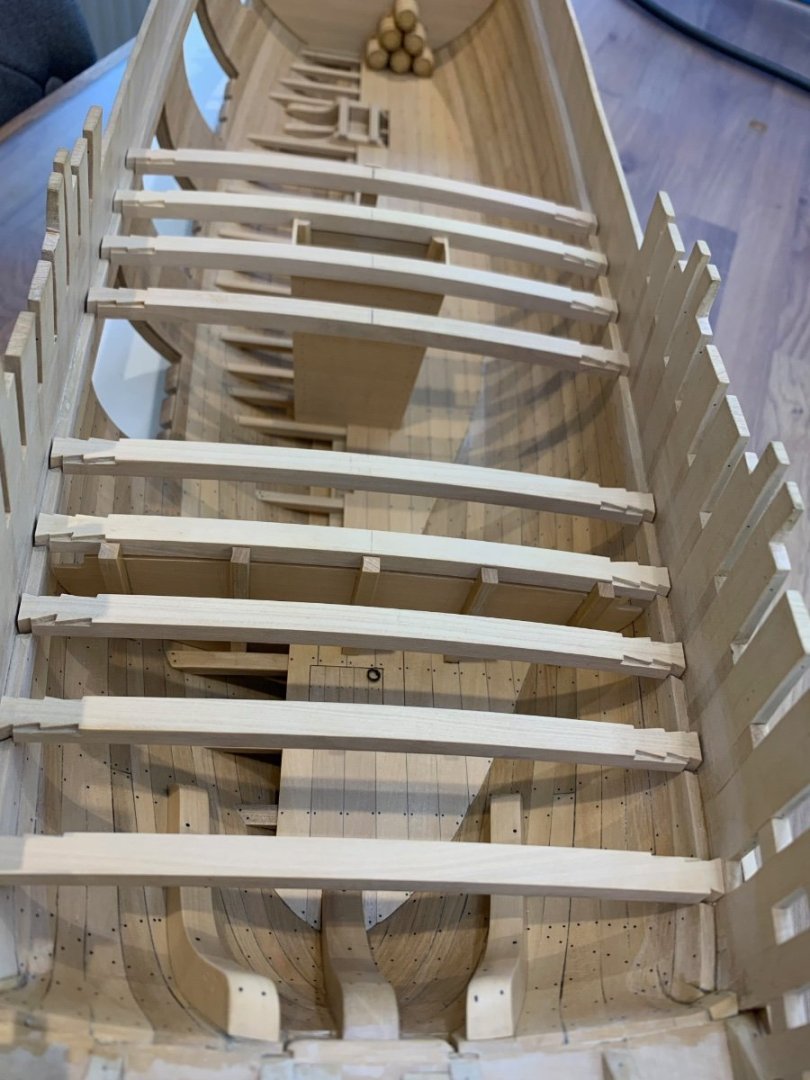

And yep it all lines up with the wing transom.......it's just a little high 🤣
So I'll now make a start on the forward beams 👍 I've not yet cut any of the rebates for the hatches and carlings because I want to fire a line straight down the middle using thread once all of the beams are in. That will give me a really good datum to keep things nice and straight.
Cheers Mark
-
2 hours ago, Nersch said:
Hello Mark,
You are doing a really great job. Very neat work!
You are the second modeler I know who uses Castello to build a ship model. I think Castello is much harder than pear wood. What are your experiences? Is Castello easy to work with or would pear wood be a better choice?
Cheers Nersch
Hi Nersch and thanks for you kind comments. To answer your question in my experience Castello is only slightly harder than pear and they are very similar to work with too. They both hold a very good edge so the choice for me is really about your personal preference in regard to colour. Both are fantastic woods for model ships.
1 hour ago, a.sorolla said:Hi , No Idea
Congratulations on the work, clean and well done.
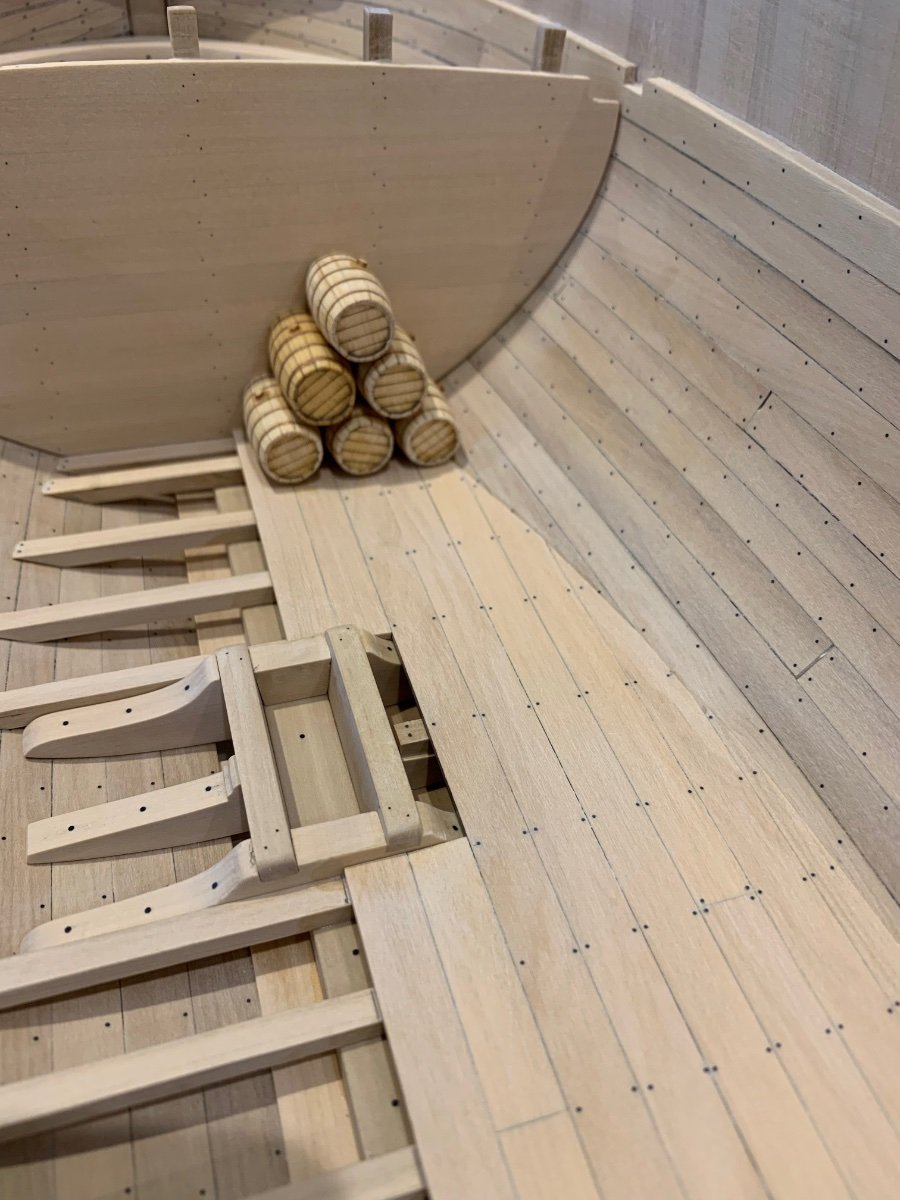
Le Rochefort is a ship destined to the supply of powder the fleet therefore the barrels, that samples in the interior of the cargo hold, do not carry metal rings, go recercados with ropes.
You can see it on the cover photo of the monograph book.
as I do not know if the translation was understood well, I put a photo of the barrelsI hope you understand that this is just a comment
Adrián Sorolla
Hi Adrian thanks for dropping by and your comments are very welcome. Gerard also pointed out my error but thanks for the photo of your barrels.
I follow your book very closely and it has guided me through this build so far. I have a lot to learn about building ships!
I still haven't had any time to work on Le Rochefort but hopefully work will resume very shortly
Mark
- Keith Black, mtaylor, Nersch and 3 others
-
6
-
Hi Dave - if you are getting bleed you may not be using archival ink pens which are better than normal markers. I use this one
Apologies if this is the kind of thing you are already using - Mark
-
I also found the fashion pieces very difficult and they either fit or they don't. Chuck you've done a fantastic job there - are you going to make any transom filler pieces too to fill the gap between the wing transom and the fashion pieces? Or are you planning on planking the stern as is?
Mark
-
Hi Chuck I don't think you will need to worry about the price of your amazing kit. I would guess that so far my scratch build of Le Rochefort has cost me about £400 in just wood to get where I am and it's no where near finished. This does not include any tooling or consumables which would put a price on that I don't want to think about.
The finished kit will cost what it does and I believe that the final builders will get a great kit at a price which will be a whole lot cheaper and more accurate to build than a scratch built ship.
Fantastic work and if I wasn't building my ship I would build this one.
-
-
Hi Dave I use these pens and they do not react to shellac at all so you will be safe there 👍
Your rabbet that you have cut though towards the stern follows the line which is more like the bearding line which would be a little lower. Your rabbet needs to go all of the way to the stern post which also tapers the deadwood and will go the full length of the garboard plank. It's a simple correction and I have to say what great work you are doing on your build!
-
On 3/10/2023 at 9:36 AM, Riotvan88 said:
Hi guys I'm doing my first scratch build of Zwarte zee tug. I'm guessing the frames should be 5mm plywood? I've noticed many different woods available on Cornwall model boats site. Is ply sufficient for frame or should they be hardwood?
Also for planking what should be used considering the planking won't be visable like a period ship. Cheap strip wood or walnut/cherry? I'm guessing the expensive strip wood would be used for a period ship where the planks are decorative?
Cheers
Guys
Hi Mate
If you're building this as an RC ship plywood will be fine for your bulkheads. Any ply will do as you will need to give it a good coat of epoxy resin or fibreglass inside to keep it water proof. The reason being water will get inside when you sail it.
As for the planking thats entirely up to you - You are going to have to coat it with resin and cloth on the outside so you are right you do not need anything expensive at all. What you really need is space inside to get the motors, esc, receiver and batteries in which do take up a lot of space.
So make the bulkheads as narrow as possible to give you the room that you need. Here's picture of my Anteo's frame to give you some idea. Its hollowed out and rienforced to give space to get a boiler in.

The same frame after double planking with Castello and mahogany. You will just need to use any wood as you will be painting it for a finish.
Good luck - Mark
- Riotvan88, mtaylor and GrandpaPhil
-
3
-
3 hours ago, bruce d said:
Timberline Decorative and Specialist Hardwoods | Tonewoods | Guitar Making (exotichardwoods.co.uk)
My go-to. Phone if the catalogue doesn't have exactly what you are looking for.
This is my timber supplier - honestly they know their product and I always tell them I'm a model ship builder. Although it's not cheap they have never sent me anything other than perfect wood for what I do. I cannot recommend this supplier enough.
-
Hi - I've not really had anytime lately to get much done on Le Rochefort. Hopefully things will ease off soon and give me a little more time.
I have now finished the nailing on the hold deck

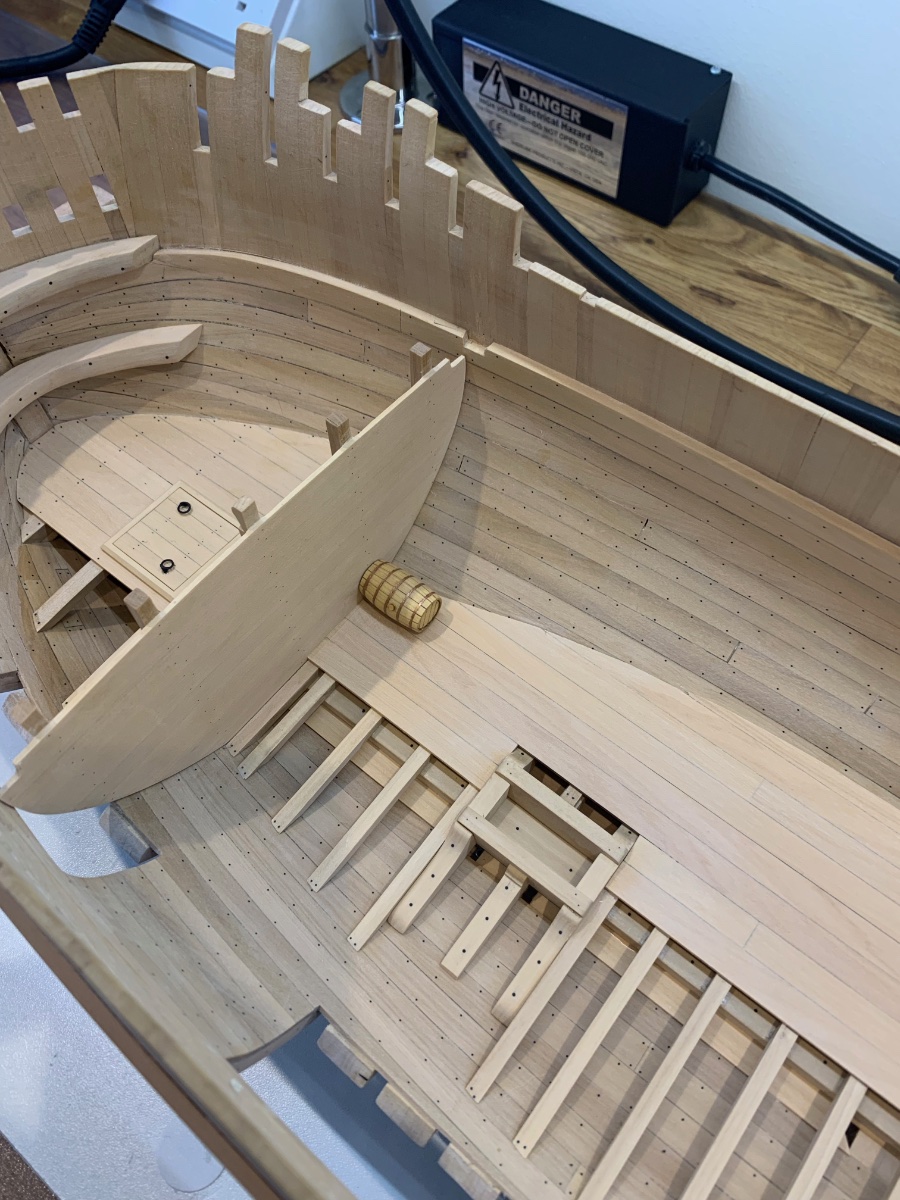
I've also finished making Chuck's barrels and they are now stacked in place. I must mention though that they are historically incorrect as French powder barrels should be circled in chestnut. For some reason though I really like the copper - and its my ship so I left them as they are. Plundered from a captured English ship!

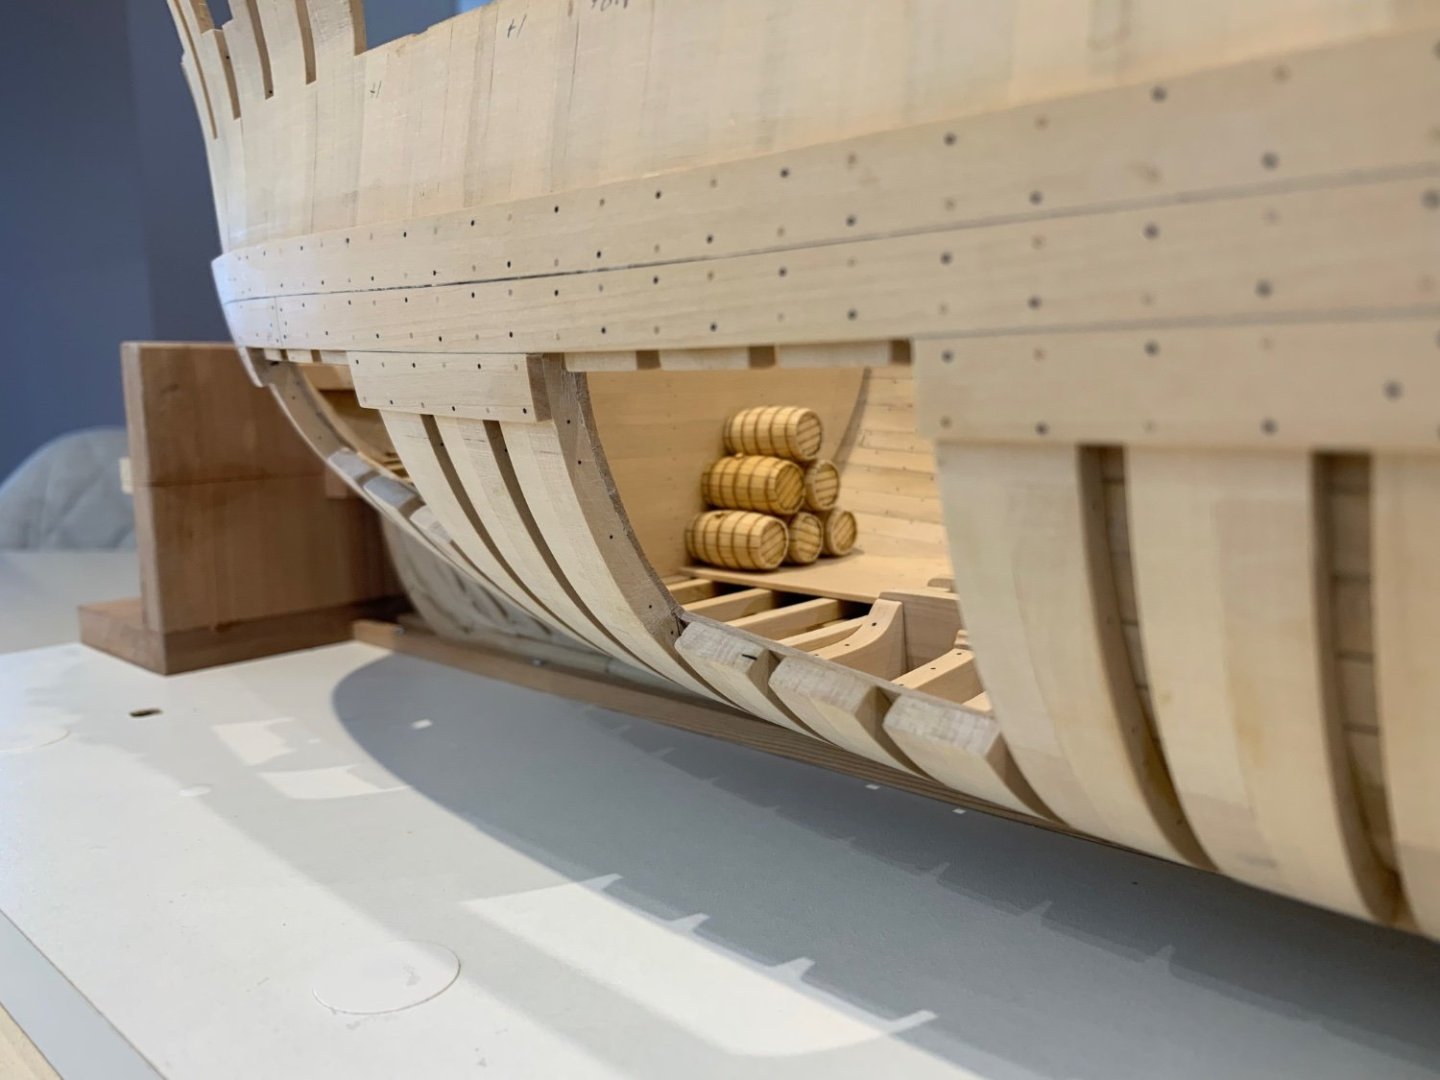
Cheers Mark
-
10 hours ago, Riotvan88 said:
Hi guys I'm doing my first scratch build of Zwarte zee tug. I'm guessing the frames should be 5mm plywood? I've noticed many different woods available on Cornwall model boats site. Is ply sufficient for frame or should they be hardwood?
Also for planking what should be used considering the planking won't be visable like a period ship. Cheap strip wood or walnut/cherry? I'm guessing the expensive strip wood would be used for a period ship where the planks are decorative?
Cheers
Guys
Where in the world are you based? If you are in the UK I can give you some details of a decent wood supplier
-
A great start and very good luck with your build! I'll be following along and look forward to your updates.
- Mic_Nao, mtaylor and Keith Black
-
3
-
Welcome to the forum mate - I'm only down the M6 from you living in Dudley 😀
- Edwardkenway, Keith Black, Dave_E and 1 other
-
4
-
Hi Dave - I cut all of the straight sections on my build using my mill. A “V” cutter did it for me with no problems at all. I didn’t use a vice I clamped the parts directly to the bed. The rabbet around the bow was cut by hand using a chisel. I use the small veritas chisels which are a great size for our hobby and I make them absolutely razor sharp to make the job easier. I could have easily used a 1/4 chisel though and achieved the same result - Mark
-
I also think if you haven't done any silver soldering at all before you may not know what you're looking for in a finished joint. The flux tends to go dry and then blow up from the joint a little - it then looks like it's getting very hot and its so easy to take the heat away too early. When the solder runs it looks like liquid chrome running around the joint. I've silver soldered stainless steel to brass without any problems but it does take a lot of focused heat.
-
On 2/19/2023 at 4:07 AM, dvm27 said:
As close to a fool proof method of cant framing as I've ever seen. Amazing, Chuck!
The blade on my machinists square tapers to point on the fore edge. It's super accurate for transferring lines from the building board. It must have a special name but I can't find it on the internet. Perhaps a machinist will know what I'm describing.
Greg is this what you use - a bevel edge square
-
50 minutes ago, Chuck said:
That looks very good indeed. I cant wait to see them on the model.
Me and you both 👍 These are lovely little kits by the way I was very impressed.
25 minutes ago, Mic_Nao said:Nice and very clean work ! In the barrels, a few drops of rum ?? 😉
Now there's an idea 😉
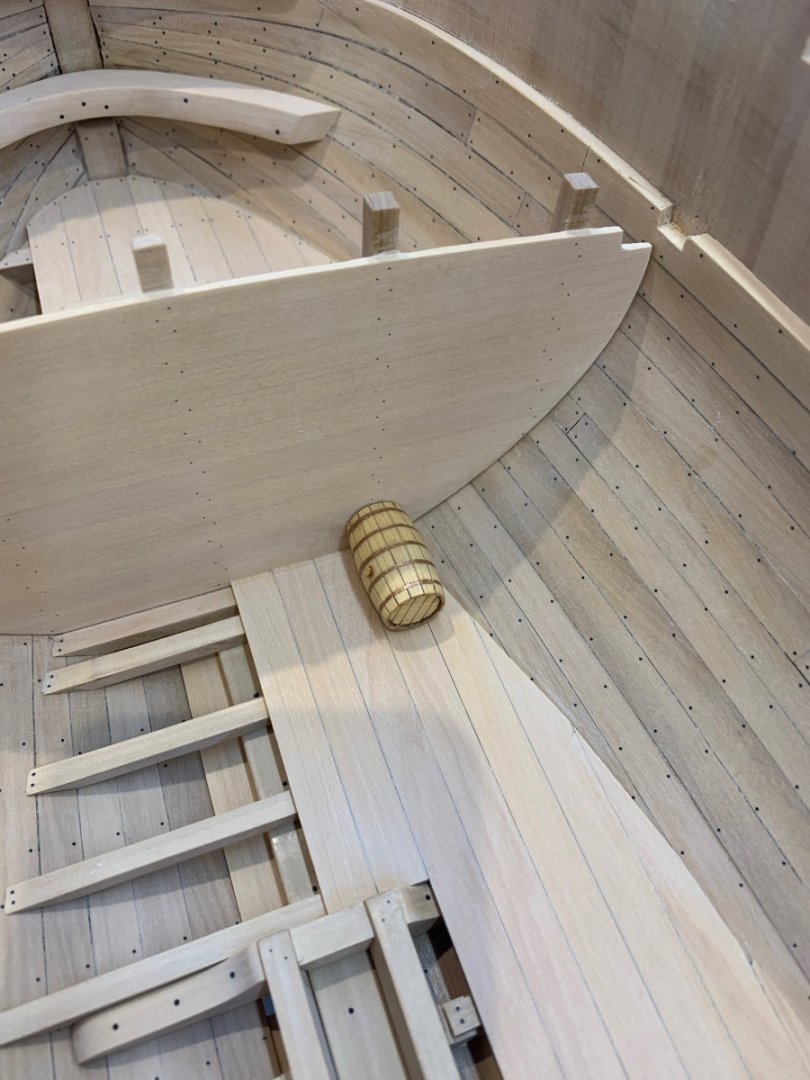
Just to give a little perspective on just how tiny these barrels are here's a couple of pictures of it in the hold. I think it looks great!


Sloop Speedwell 1752 by Chuck - Ketch Rigged Sloop - POF - prototype build
in - Build logs for subjects built 1751 - 1800
Posted
Chuck I like the one on the right - it looks like the sea has had a go at it and looks just right. Just my thoughts.