
DONATION DRIVE - SUPPORT MSW - DO YOUR PART TO KEEP THIS GREAT FORUM GOING!
×


druxey
-
Posts
13,352 -
Joined
-
Last visited
Content Type
Profiles
Forums
Gallery
Events
Everything posted by druxey
-
 I agree with Michael on the issue of illustrations crossing the gutter. I suspect it's to discourage folk from copying the plans.
 -
Try swelling the wood with a drop or two of water applied with a brush. It will probably leave a watermark, but a rub of fine sandpaper and refinish over it and it should miraculously vanish!
- 1,215 replies
-
- 2
-

-
- sloop
- kingfisher
- (and 1 more)
-
I've just received my copy of this book. I echo Bob Friedman's review: well worth buying if you have an interest in the smaller vessels of this era. The reproductions of contemporary draughts alone is eye candy worth the price!
-
The raised beakhead platform was so that there is no step between this and the head gratings. It is the result of the headwork of the ship being designed higher than in earlier ships. You will notice that the platform is in line with the main rail of the head. This layout is also seen on Victory today: her headwork was raised during one of her many refits.
-
That lathe is for serious metal machining - is that what you want to do?
-
Rob: The stem was usually straight sided to just below the lower cheek, then hanced in to the lesser dimension.
-
If you succeed in getting past these and the cant frames, the rest of the model will be comparatively easy! I know of no-one who has nailed these pieces the first or second time over. You are in good company.
-
Quite the eclectic cargo! That is an interesting window into the transported goods of the day.
-
Alas, Robin, there's no reference to coasting anchor or cable!
-
I pencil in the twelfth divisions wherever I need them for convenience.
-
Might I suggest you use the sheer plan as your basis? Once the 'framework' of station lines and perpendiculars is established on a new sheer plan, the framing can be superimposed over this. Otherwise you will drive yourself crazy trying to reconcile things. Are you measuring the distances between stations off the part of the scale immediately below the same part on the sheer draught? Distortion will usually vary along the plan, so this is one way of taking this into account.
-
Nice summer project, with those long daylight hours you have there. And a lovely story of Scandinavian lady choristers or, in this case, one particular Swedish one.... Look forward to seeing your progress.
-
Oh, my. She looks great in the water (and Jude does, too!). You are going to either get insurance against a hernia or, more reasonably, build a rolling launch cradle.
-
Exemplary as usual, Ed. Quite spectacular.
-
I've been pondering that length problem, Alan. As 168' 0" was never crossed out on the contract and replaced with 175' 0" and the 'as launched' draught states 168' 0", I'd say the longer measurement is a red herring. Fergeddabahtitt!
-
If there was a change, often the previous specification was crossed through.
-
Stowing the anchors
druxey replied to dafi's topic in Discussion for a Ship's Deck Furniture, Guns, boats and other Fittings
Is this photo of any assistance?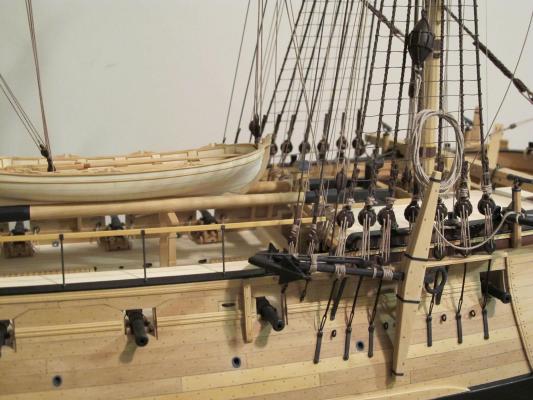
-
Oh, neatly and adroitly done, Mark!
-
A curious skeletal approach. Spectral!
-
Why bankruptcy? Charles Dickens had it right: "Income per annum, twenty pounds; expenditures nineteen pounds, nineteen shillings and sixpence, result, happiness. Income twenty pounds; expenses twenty pounds ought and sixpence, result, unhappiness." Presumably Mr. Greaves' expenditures in business exceeded his income, despite all the extra payments.
-
Yes, any increase in measurements (and therefore tonnage) had to be approved by their Lords of the Admiralty or - no extra monies!
-
I sometimes view my work in a mirror. Things can pop out at you that way. Glad you've corrected what could be a huge headache down the road!
-
I have a scintilla of doubt, Toni: could it be that the model is leaning slightly to starboard on its baseboard? Sorry to be OCD about it! I'll shut up now.
-
She's looking terrific, Michael!

