.jpg.f26acc9a74319261612561bfa7da1303.jpg)
vaddoc
-
Posts
1,605 -
Joined
-
Last visited
Content Type
Profiles
Forums
Gallery
Events
Everything posted by vaddoc
-
.thumb.jpg.6fd4c1b78768bb3efd745ab810936005.jpg) Now, I did not really intend to get involved in a project like this. My current boat (Deben 5 tonner) still needs a lot of work and has been going on for close to 4 years. However, this week I somehow found myself with a lot of free time to sit in front of a computer but not being able to work in the garage. I stumbled across the prints that the National Maritime Museum sells and there were some of boats carried by ships of the line that looked nice and detailed. I have always wanted to draft from printed lines and I ve been missing messing about with planks so I started playing with CAD. I just used the images the museum has on the on line shop. I progressed rather well, kind of 20% through the first lofting, so I thought I ll start a log initially with the CAD lofting and then with the boat it self, provided of course I ll get a reasonable result. Without a deck and rigging and with just a few planks it should not take more than 2 years to complete... I would like to try and do a nice lapstrake, not sure if it is historically accurate. Also, I cannot find easily much info on how these boats were actually built in terms of stringers, thwarts etch so I ll use some more modern arrangements and hope for the best, unless in the meantime I get by some more info. I admit I have not searched through MSW yet. I would like to try for a quality model, choosing appropriate wood, lining up holes, being careful with fit and finish etc. We ll see.. Enough talking, lets get down to business. This is the set of plans I used. The print costs £25 and can be ordered on line but as I said I just used the picture uploaded on the webisite. I think we are ok with copyright issues. More info on https://collections.rmg.co.uk/collections/objects/86936.html The plans show that this boat has a Davit but I will ignore this, at least for now as I do not really understand how it works. It seems like an interesting twist though. These plans are really very detailed. They include the keel, three WL, two diagonals, the sheer, all but the middle frames (this seems to be common practice) and also some of the interior arrangement. They proved later quite accurate and it is amazing that people can produce this with a ruler and a pencil. Especially the accuracy of the diagonals is impressive. Tracing the lines showed that there was slight distortion of the paper so adjustments had to be made. Getting all pieces in the correct position produced a half hull In the next photo, the sheer was created from the two views (red lines) provided in the plan. It fits the frames reasonably close. After I took this screenshot I had to re position all fore frames to account for the missing middle frame. This sorted things out. Later on I also found a small mistake and correcting it raised all the frames a bit. These is the top view of the waterlines. A bit of effort was needed to get them somewhat fair And on to the hull...not too bad. The diagonals (blue) are also added The sheer seems reasonably fair. This is the only line that really needs to be fair as it will not change and will be a reference line. All other lines except maybe the diagonals will change during the lofting cycles. The waterlines are also faired but these will get adjusted many times The hull with just the lines. Note that the transom in the plans is given in its vertical projection. It first needs to be projected in the angled plane it would normally be prior to adding to the hull This concluded the first part which is to just get all lines drawn. Now, the first lofting cycle begins. I created two more WL to help me maintain the shape of the frames in the upper strakes (green colour) I decided that the diagonals are the more accurate lines and I will follow these, using the WLs to maintain the shape of the frames. This is how I arranged the new shape and how much off the frame was. Not too much really. The small horizontal lines were added to maintain the distance from the old line, so keeping the same shape as close as possible. Later on, the WLs will be created anew and faired and the cycle will begin again. In the next two photos, you can see that the frames on the left side that have been faired follow the lines much closer than the rest Now we can try and create a bit of surface with the frames we have adjusted and see how it looks and how smooth it is. The points and lines from adjusting the 5th frame can be seen in the background. This is not bad at all considering that the waterlines have not been faired back at all. Of course the difficult areas will be first the two segment at the bow and possibly the transom. To my experience the transom always creates problems! It looks promising though. I am not sure when I ll have time to do any more work on this but it has been fun. If I ever manage to build this it will be a big baby at 640 mm LOA, some planks will be close to 80 cm long! Off to a very busy weekend, I will be doubling the lighting in my garage, it should be as bright as a supenova afterwards. Regards Vaddoc
Now, I did not really intend to get involved in a project like this. My current boat (Deben 5 tonner) still needs a lot of work and has been going on for close to 4 years. However, this week I somehow found myself with a lot of free time to sit in front of a computer but not being able to work in the garage. I stumbled across the prints that the National Maritime Museum sells and there were some of boats carried by ships of the line that looked nice and detailed. I have always wanted to draft from printed lines and I ve been missing messing about with planks so I started playing with CAD. I just used the images the museum has on the on line shop. I progressed rather well, kind of 20% through the first lofting, so I thought I ll start a log initially with the CAD lofting and then with the boat it self, provided of course I ll get a reasonable result. Without a deck and rigging and with just a few planks it should not take more than 2 years to complete... I would like to try and do a nice lapstrake, not sure if it is historically accurate. Also, I cannot find easily much info on how these boats were actually built in terms of stringers, thwarts etch so I ll use some more modern arrangements and hope for the best, unless in the meantime I get by some more info. I admit I have not searched through MSW yet. I would like to try for a quality model, choosing appropriate wood, lining up holes, being careful with fit and finish etc. We ll see.. Enough talking, lets get down to business. This is the set of plans I used. The print costs £25 and can be ordered on line but as I said I just used the picture uploaded on the webisite. I think we are ok with copyright issues. More info on https://collections.rmg.co.uk/collections/objects/86936.html The plans show that this boat has a Davit but I will ignore this, at least for now as I do not really understand how it works. It seems like an interesting twist though. These plans are really very detailed. They include the keel, three WL, two diagonals, the sheer, all but the middle frames (this seems to be common practice) and also some of the interior arrangement. They proved later quite accurate and it is amazing that people can produce this with a ruler and a pencil. Especially the accuracy of the diagonals is impressive. Tracing the lines showed that there was slight distortion of the paper so adjustments had to be made. Getting all pieces in the correct position produced a half hull In the next photo, the sheer was created from the two views (red lines) provided in the plan. It fits the frames reasonably close. After I took this screenshot I had to re position all fore frames to account for the missing middle frame. This sorted things out. Later on I also found a small mistake and correcting it raised all the frames a bit. These is the top view of the waterlines. A bit of effort was needed to get them somewhat fair And on to the hull...not too bad. The diagonals (blue) are also added The sheer seems reasonably fair. This is the only line that really needs to be fair as it will not change and will be a reference line. All other lines except maybe the diagonals will change during the lofting cycles. The waterlines are also faired but these will get adjusted many times The hull with just the lines. Note that the transom in the plans is given in its vertical projection. It first needs to be projected in the angled plane it would normally be prior to adding to the hull This concluded the first part which is to just get all lines drawn. Now, the first lofting cycle begins. I created two more WL to help me maintain the shape of the frames in the upper strakes (green colour) I decided that the diagonals are the more accurate lines and I will follow these, using the WLs to maintain the shape of the frames. This is how I arranged the new shape and how much off the frame was. Not too much really. The small horizontal lines were added to maintain the distance from the old line, so keeping the same shape as close as possible. Later on, the WLs will be created anew and faired and the cycle will begin again. In the next two photos, you can see that the frames on the left side that have been faired follow the lines much closer than the rest Now we can try and create a bit of surface with the frames we have adjusted and see how it looks and how smooth it is. The points and lines from adjusting the 5th frame can be seen in the background. This is not bad at all considering that the waterlines have not been faired back at all. Of course the difficult areas will be first the two segment at the bow and possibly the transom. To my experience the transom always creates problems! It looks promising though. I am not sure when I ll have time to do any more work on this but it has been fun. If I ever manage to build this it will be a big baby at 640 mm LOA, some planks will be close to 80 cm long! Off to a very busy weekend, I will be doubling the lighting in my garage, it should be as bright as a supenova afterwards. Regards Vaddoc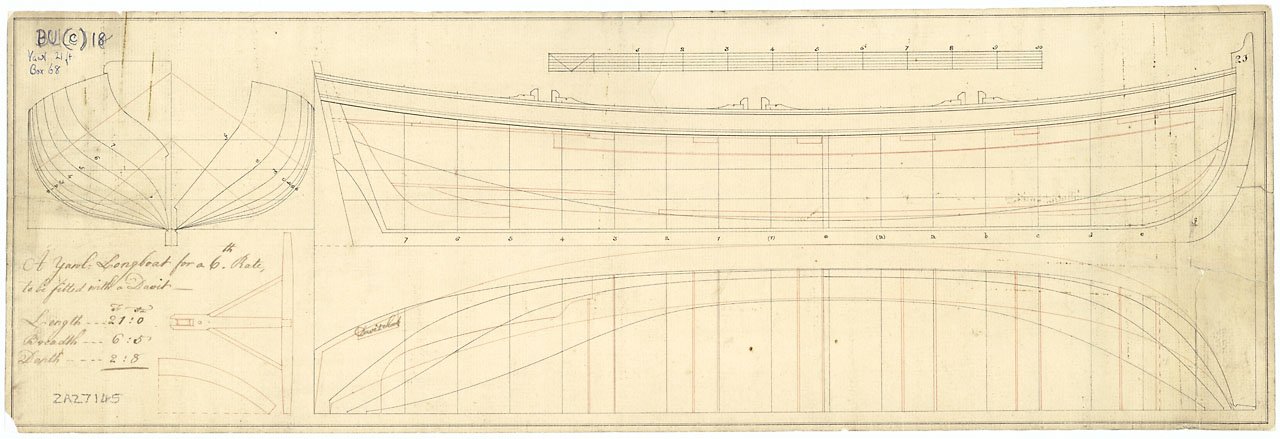
cropped.thumb.png.64da0c5486f4900ffd7b9dd417d293d4.png)
cropped.thumb.png.21f1d4a3a7b7261b0230e00e4ee0d907.png)
cropped.thumb.png.a8425a74bc480511f7716eecb3c446c9.png)
cropped.thumb.png.f588130825940cec6cfeb5905c84e774.png)
cropped.thumb.png.3aa8727d55571d503c61ee5d3f92e916.png)
cropped.thumb.png.3891bad48a5de6dde675c9eb7bb2e066.png)
.thumb.png.96fcc1de9fad79d4fe1e1c1ea7fc3436.png)
.thumb.png.e0093a2684c49af39dcfd5f05abe2ab3.png)
.thumb.png.85e73955249e7eeb71251718fd8aa2df.png)
.thumb.png.9d443c094c267acfedb70cef880bf88c.png)
.thumb.png.62f659e540c08174a003759f7b2ddf6f.png)
.thumb.png.88bc753c0e2f6aba3245942b711b5c30.png)
.thumb.png.d2c873e98758556488fd74334ccd7dc2.png)
.thumb.png.7d5d832dbaa5fd2b7e4296680a7588f6.png)
.thumb.png.8d256c385d136b48dde0eeca245d3050.png)
.thumb.png.5ab2c4518720341024e6eb690163b821.png)
- 233 replies
-
- 18
-

-

-
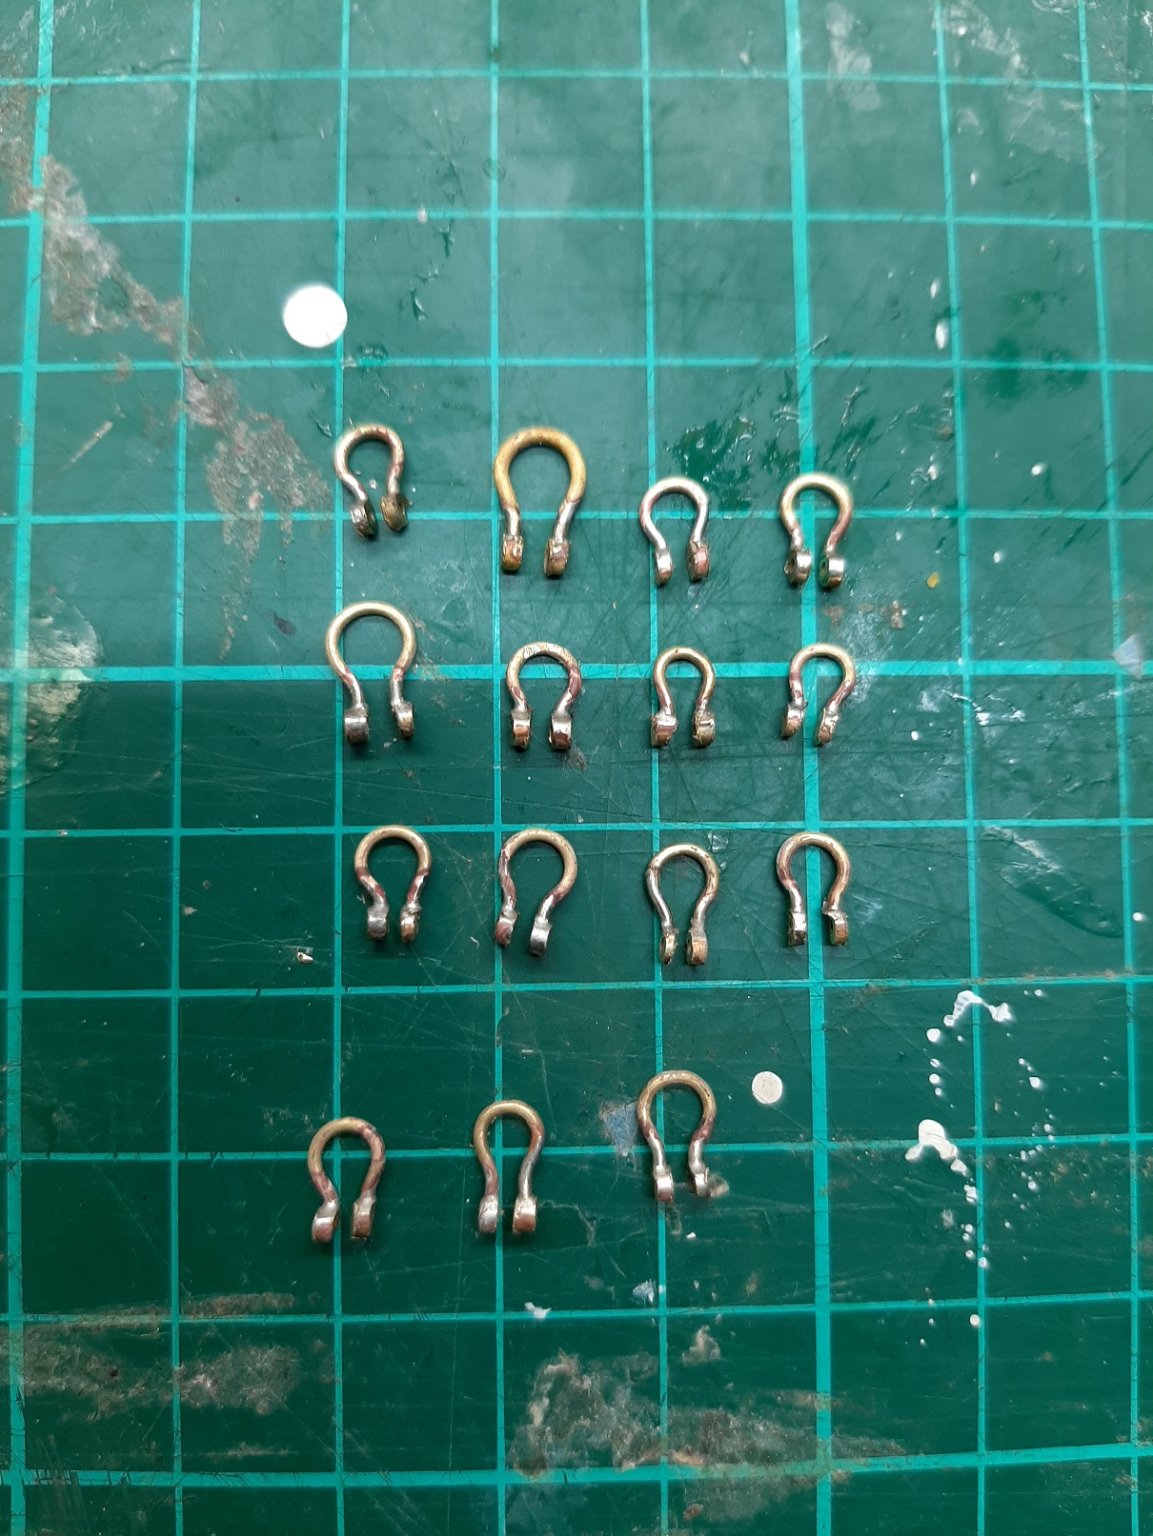
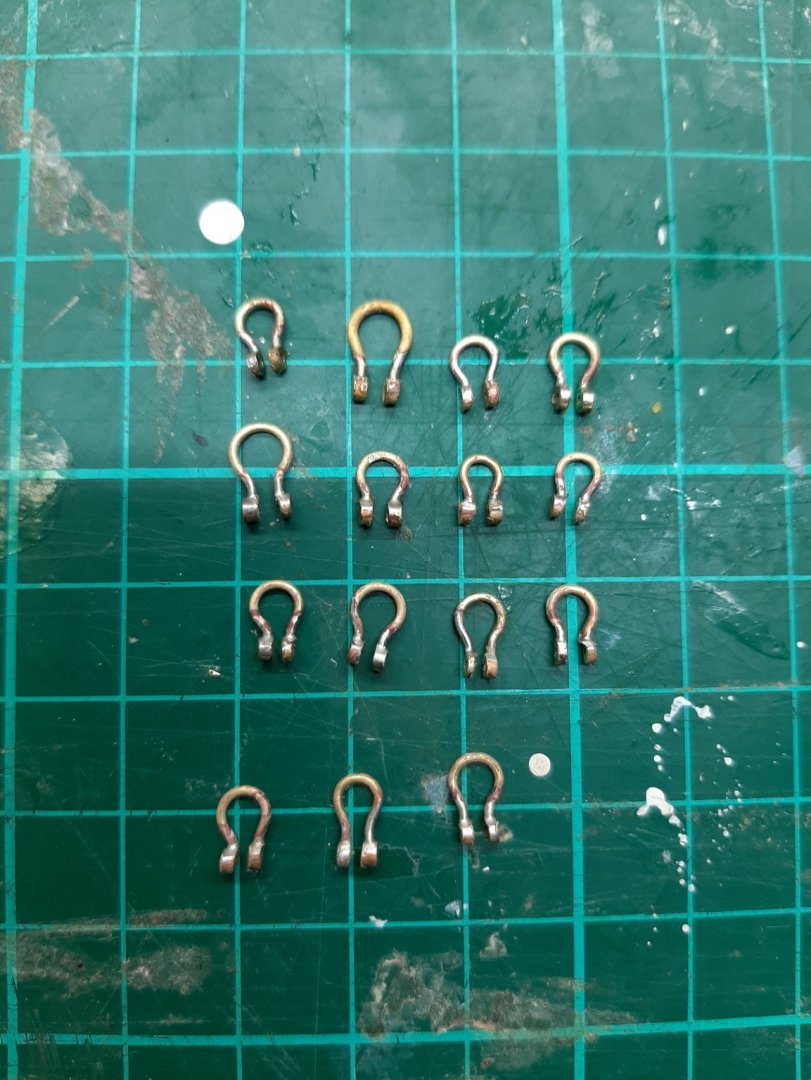
Dear all Many thanks for your likes and comments It is Mark but I am looking for something simpler and maybe less permanent. I d like to avoid wielding a very hot iron close to the rigging and the shackles will have rope attached. Still, I think I should try it. Oh yes Druxey, very nicely! But the ones I can get this side of the pond are very expensive. This boat has already gone way overbudget and the admiral unfortunately has noticed... Michael, the holes are 1.1 mm wide and in line. My problem is, after I install them on the boat and pass the rope and the pin through, how to secure the pin in a quick and cheap way that is reversible and looks ok. I ll experiment a bit and post the results. Since there is very little metal in each shackle, maybe a quick touch with the soldering iron would be the better option. For now however, I cannot go in the garage. I had however lots of free time to sit in the computer and got side tracked by another project. I will probably start another log for that. Regards Vaddoc
-
A quick post I took down the rope walk and is shackle time! I think I ll need very many so I d like to make 100 and choose the best. Now that I have standardised my method, it takes a few minutes to make each shackle. I made a few today, no failures. They still need to be polished. I am struggling a bit with the pin for the shackles. The hole is 1.1 mm and the diameter of the pin ideally should be 1 mm. I could use 1 mm brass wire and CA glue but this is slow and messy. I have ordered some small brass crimp beads with an 1.2 mm hole. I could not find smaller ones. I do not like this idea either though. Vaddoc
-
Welcome Afonso! Even a small boat can be surprisingly difficult to make, especially large scale scratch built. But it is also equally surprisingly fun and rewarding. Vaddoc
-
Recommended toolkit for beginner
vaddoc replied to Niall's topic in Modeling tools and Workshop Equipment
Very true. There is a current thread on $1000+ milling machines that many of us feel is almost as necessary for life as oxygen. Yet we have built many models without one...I d say just start building using whatever you have. Do start a log. As you progress, you will know what more you need/want/would be very nice to have. (It will be a long list). Regards Vaddoc -
Sherline 5400 versus Micro Mark Milling machines
vaddoc replied to allanyed's topic in Modeling tools and Workshop Equipment
It's an unfair world. The admiral recently decided she needs a new hob, extractor fan and living room furniture. My opinion was needed and was given to me...It would not work the same with the milling machine. Is it possible to covert the milling machines mentioned so far to computer guided/router with reasonable bother and expenses? Vaddoc -
Sherline 5400 versus Micro Mark Milling machines
vaddoc replied to allanyed's topic in Modeling tools and Workshop Equipment
Indeed Alan, I have come to the same mindset. What would be the features of a sensible buy and what are the real options for a versatile machine? I do not need a milling machine (and cannot afford one just right now) but I sure want one! It seems that the main issues are the travel limits of the table and the spindle speed, whether it can go low enough for wood. Vaddoc -
Welcome Tony! Multiyear projects with life getting in the way...yep, you ll fit right in!
-
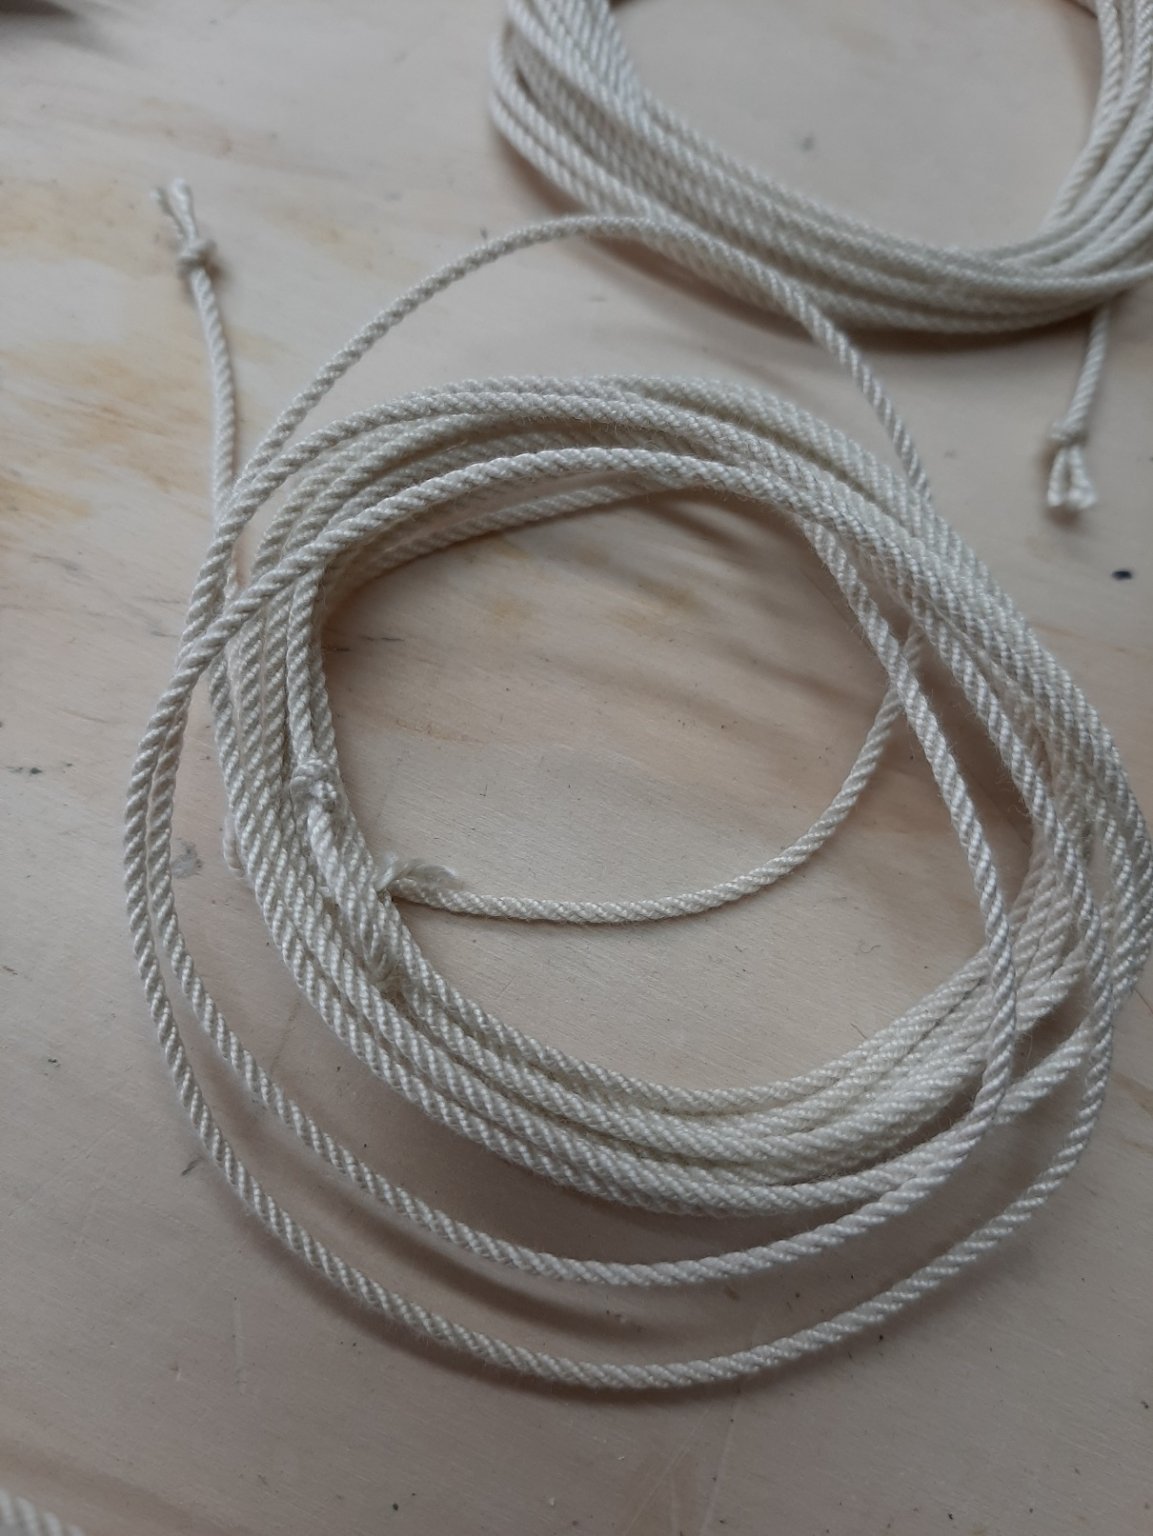
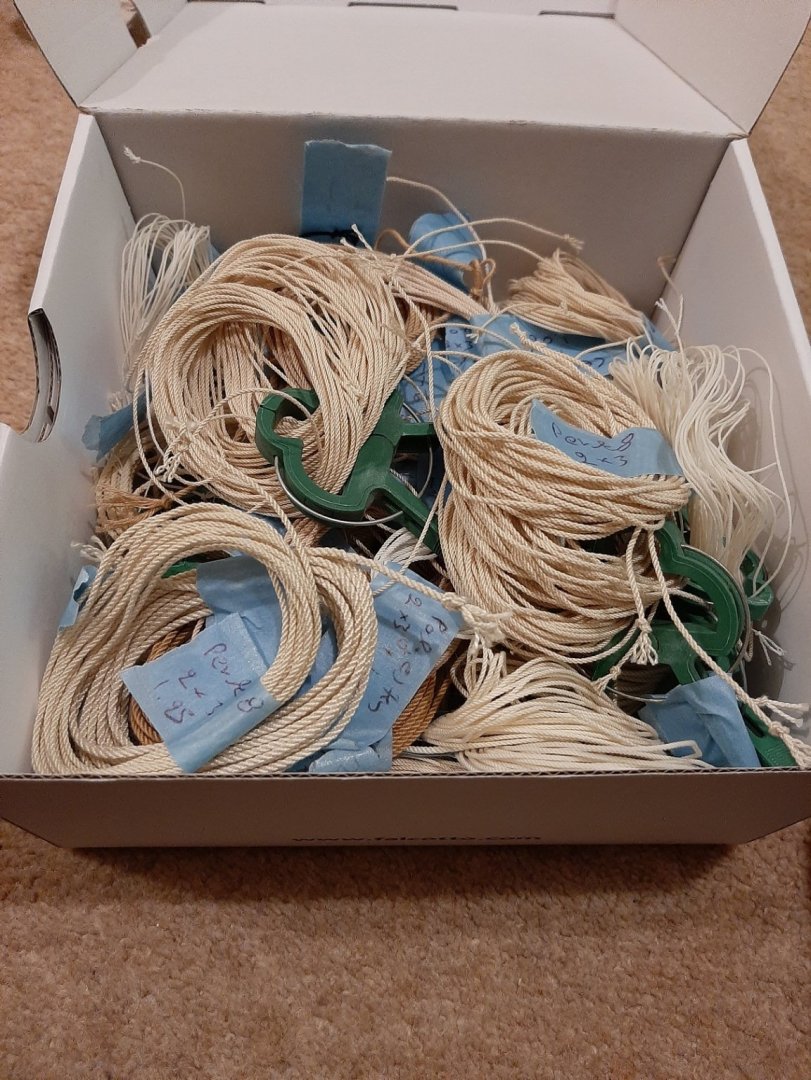
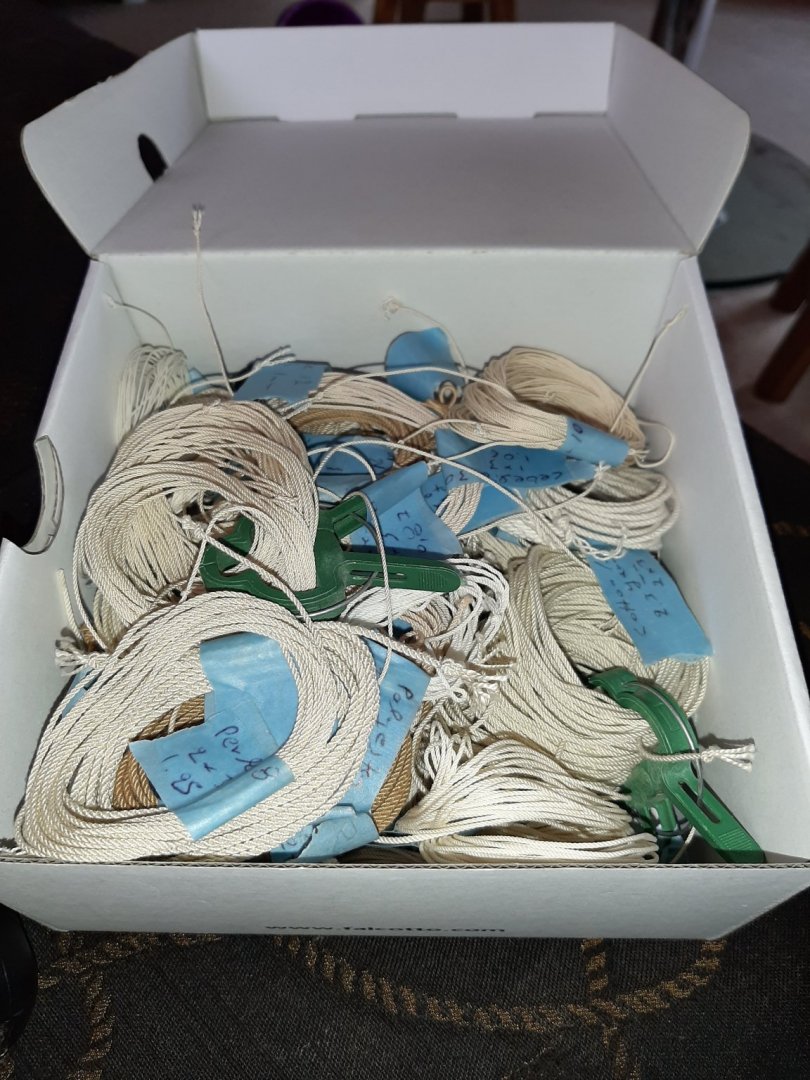
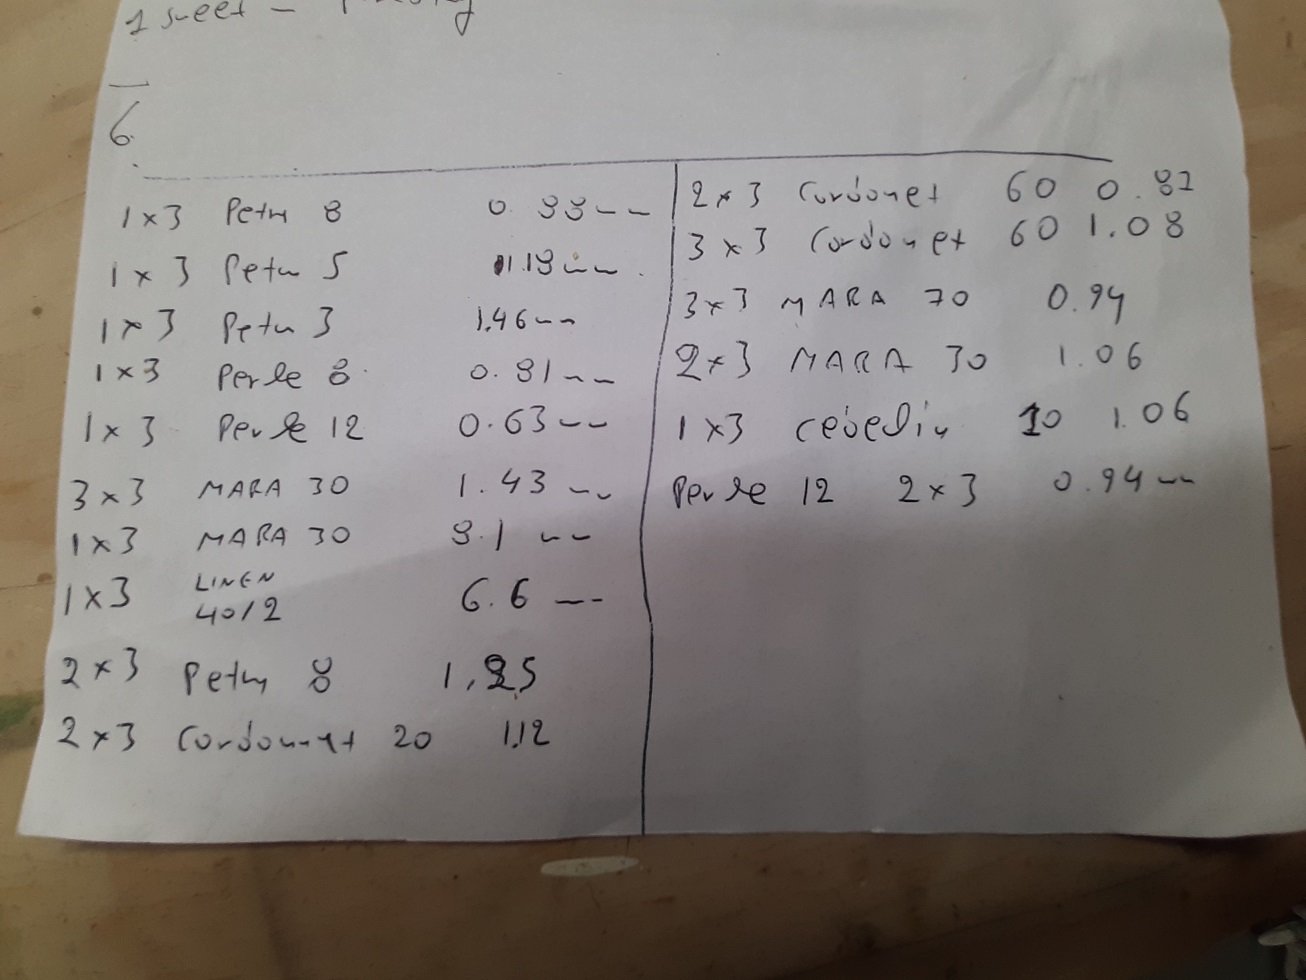
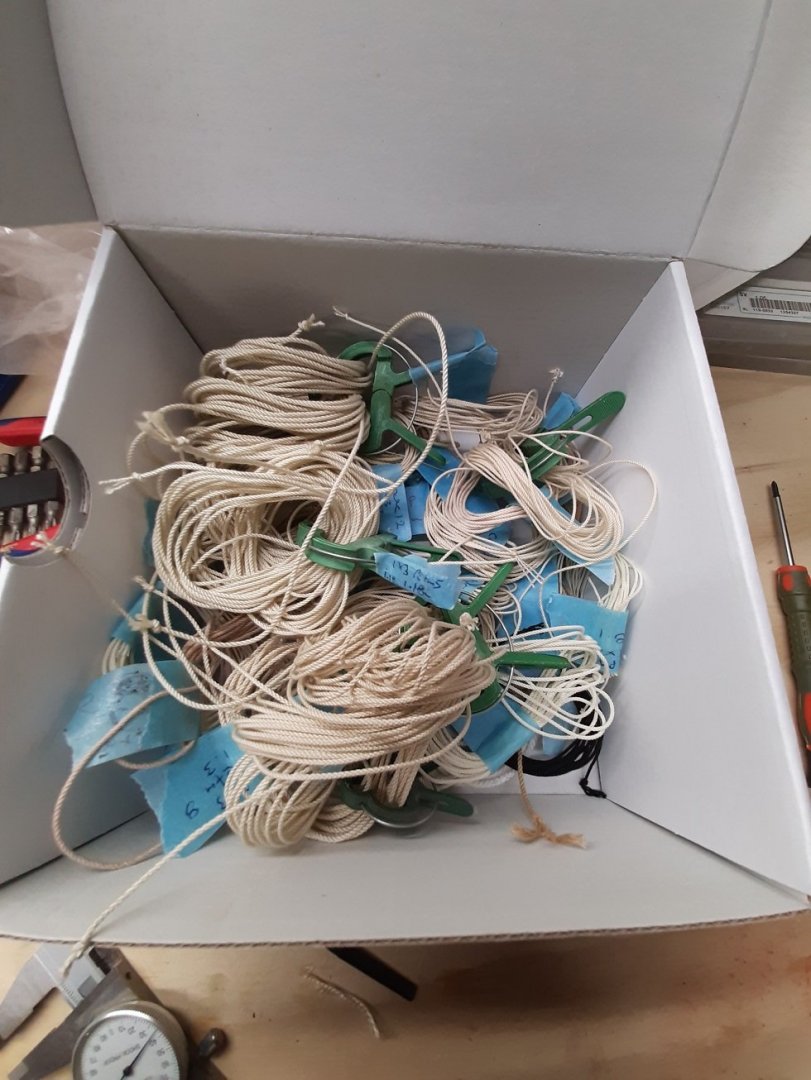
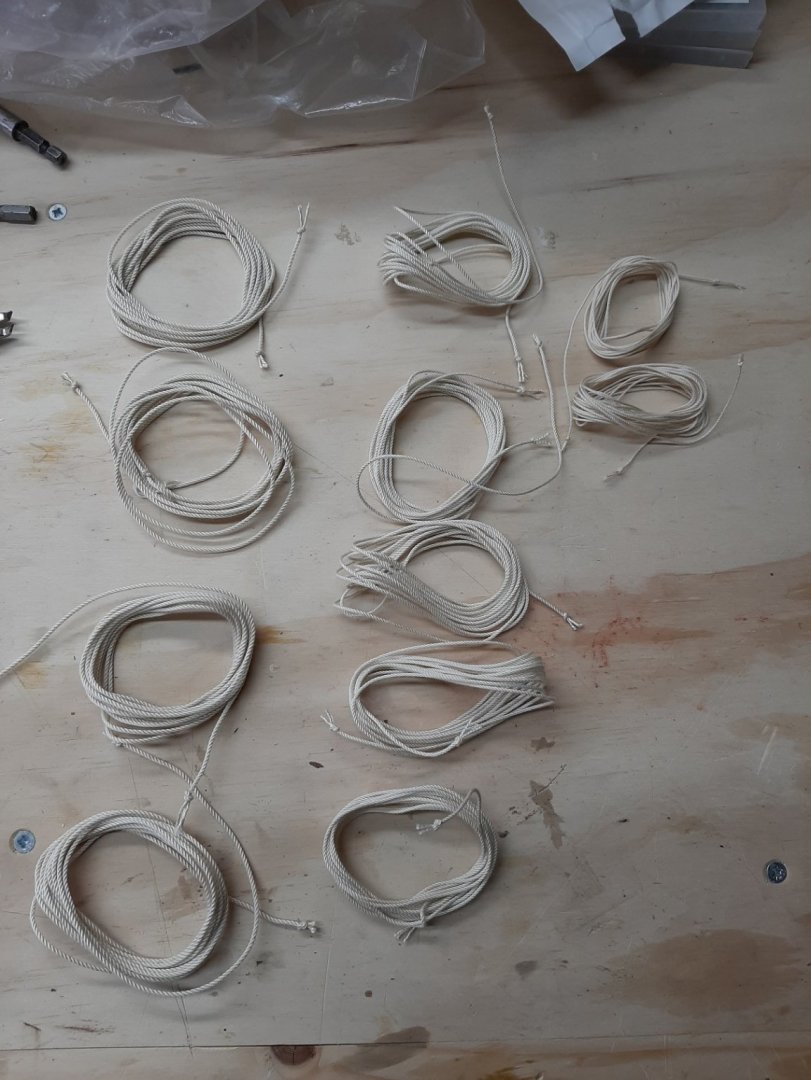
I think an update is in order I have been busy as a bee with all sorts of things and spending the limited free (-ish) time making rope. I made a variety of sizes because my rope walk takes up the whole garage so I wanted to take it down and not put it up until my next model. Overall I made 250 m of rope! My rope walk works fantastically well and I actually had a go at making a cored rope. It did not work but the experience was very valuable. I might actually in the future make a whole new motor-cog unit with 4 positions, to make 4 strand and also cored rope. This are my results in regards to thread and rope sizes Left Twist: Petra, Perle Right Twist: Cebelia, Babylo, Cordonnet, Mara one ball Cordonnet 40 makes about 22 m of rope DMC Petra 3, 1x3---1.46 mm Petra 5, 1x3---1.18 mm Petra 8, 1x3---0.88 mm Petra 8, 2x3---1.25 mm Cebelia 10, 1x3---1.06 mm Cebelia 10, (1x3)x3---2 mm Babylo 40, 2x3---0.9 mm Perle 5, 3x3---2.1 mm Perle 5, 2x3---1.72 mm Perle 8, 1x3---0.81 mm Perle 8, 2x3---1.25 mm Perle 12, 1x3---0.63 mm Perle 12, 2x3---0.94 mm Cordonnet 20, 1x3---0.61 mm Cordonnet 20, 2x3---1.12 mm Cordonnet 40, 2x3---1.04 mm Cordonnet 60, 2x3---0.87 mm Cordonnet 60, 3x3---1.08 mm Cordonnet 80, 2x3---0.82 mm Cordonnet 100, 2x3---0.7 mm Cotton/linen yarn, 2x3---2.3 mm (too fuzzy) 100% cotton yarn, 2x3---2.3 mm (Too fuzzy) Gutermann Mara 30, 1x3---0.81 mm Mara 30, 2x3---1.06 mm Mara 30, 3x3---1.43 mm Mara 70, 2x3---0.77 mm Mara 70, 3x3---0.94 mm Mara 120, 2x3---0.56 mm Various Linen 40/2, 1x3---0.66 (Irregular, bad rope) Dual Duty XP, 4x3---1.6 mm (bad rope) Dual Duty plus, (1x3)x3, 1.6 mm (bad rope) Cottolin 22/2, 3x3---1.9 mm (quite fuzzy) DMC thread are very expensive but really wonderful. Gutermann Mara threads are very impressive, if I ever build a period ship I will only use these. I ll go back to the actual building now. On a different note, I have been very superficially thinking about the next model. A (very) large scale RC cold moulded sailboat is somehow coming up constantly. But I also want to make a simple clinker rowing boat, again at a very large scale, I feel the need to get immersed in the lapstrake planking. I certainly do not have the time, equipment and piece of mind to tackle the two masted schooner I ve always wanted to build. We will see.
-
Dear all Having spend a lot of time making rope I d like to share my experience. I ve made many rope sizes using all of DMC range as well as a few others. This is what I came up with. Left Twist: Petra, Perle Right Twist: Cebelia, Babylo, Cordonnet, Mara one ball Cordonnet 40 makes about 22 m of rope DMC Petra 3, 1x3---1.46 mm Petra 5, 1x3---1.18 mm Petra 8, 1x3---0.88 mm Petra 8, 2x3---1.25 mm Cebelia 10, 1x3---1.06 mm Cebelia 10, (1x3)x3, 2 mm Babylo 40, 2x3---0.9 mm Perle 5, 3x3---2.1 mm Perle 5, 2x3---1.72 mm Perle 8, 1x3---0.81 mm Perle 8, 2x3---1.25 mm Perle 12, 1x3---0.63 mm Perle 12, 2x3---0.94 mm Cordonnet 20, 1x3---0.61 mm Cordonnet 20, 2x3---1.12 mm Cordonnet 40, 2x3---1.04 mm Cordonnet 60, 2x3---0.87 mm Cordonnet 60, 3x3---1.08 mm Cordonnet 80, 2x3---0.82 mm Cordonnet 100, 2x3---0.7 mm Cotton/linen yarn, 2x3---2.3 mm (too fuzzy) 100% cotton yarn, 2x3---2.3 mm (Too fuzzy) Gutermann Mara 30, 1x3---0.81 mm Mara 30, 2x3---1.06 mm Mara 30, 3x3---1.43 mm Mara 70, 2x3---0.77 mm Mara 70, 3x3---0.94 mm Mara 120, 2x3---0.56 mm Various Linen 40/2, 1x3---0.66 (Irregular, bad rope) Dual Duty XP, 4x3---1.6 mm (bad rope) Dual Duty plus, (1x3)x3, 1.6 mm (bad rope) Cottolin 22/2, 3x3---1.9 mm (quite fuzzy) This is how 230 m of scale rope looks like!
-
I have not been able to follow your work on this boat Elijah and I very much regret it. Your skills have developed so much, you are doing a fantastic job! The planking came out superb. Regards Vaddoc
- 228 replies
-
- 3
-
-
- gunboat
- model shipways
- (and 1 more)
-
Large scale small rowing wooden boat, what a fun project! And very nicely done!
-
Welcome Hector!
-
I recently used copper wire served with thread. It may work for you and the scale you work at.
-
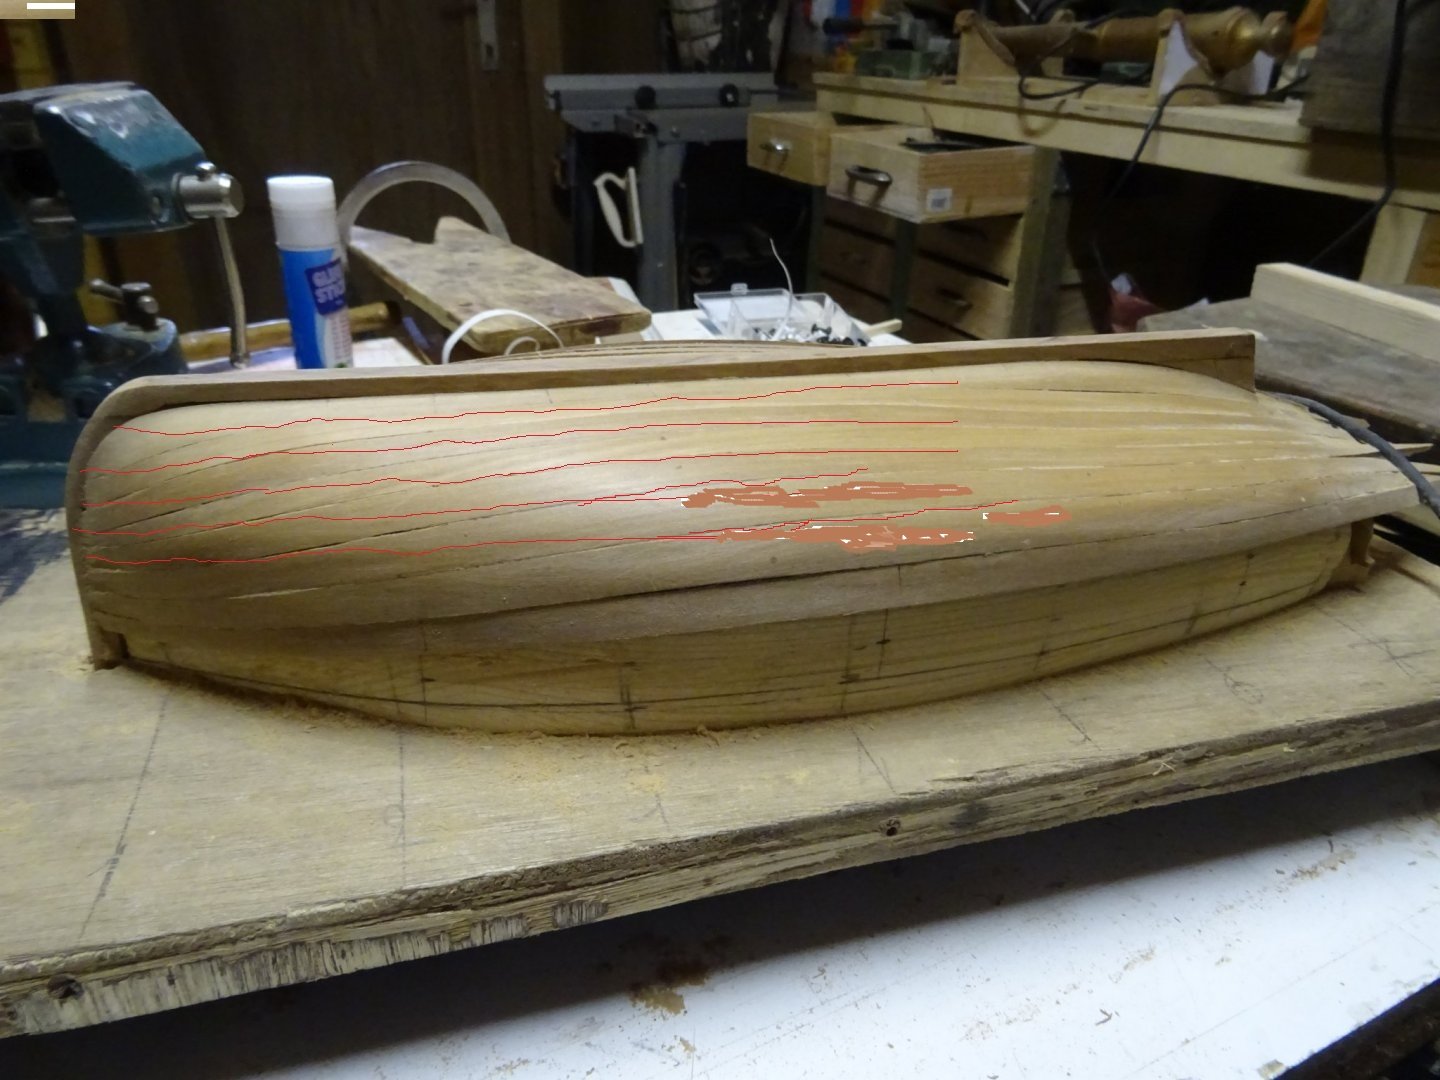
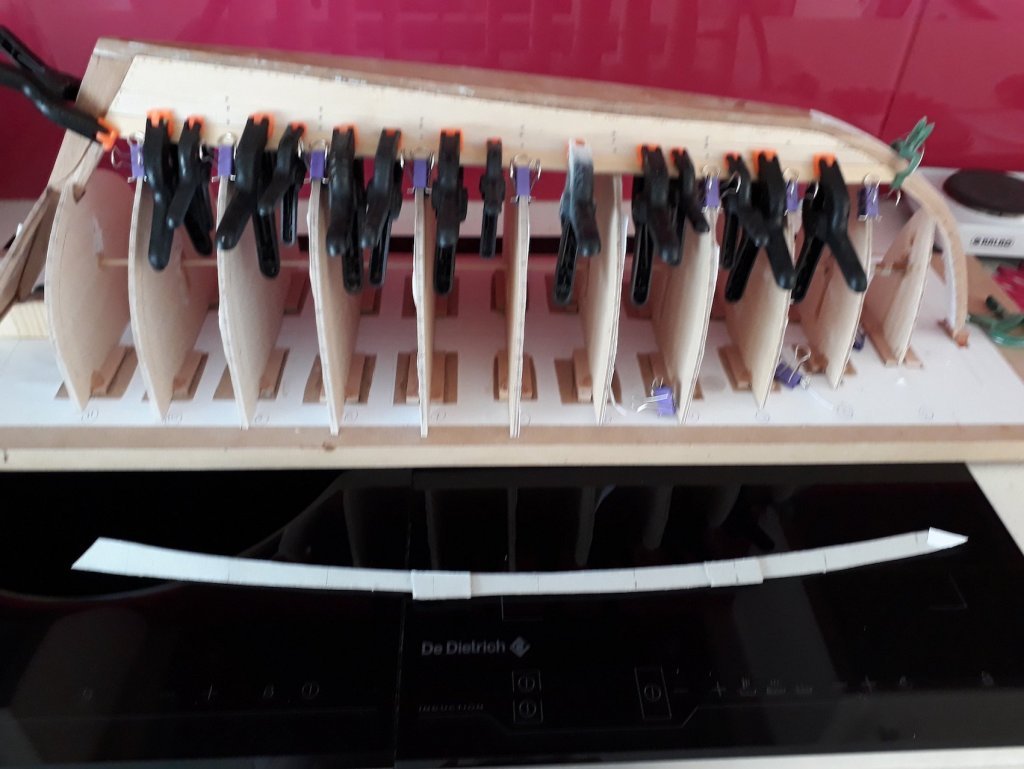
Looks very nice Geert! Going back to the planking: I think that you might get away without spilling in 1:62 scale or similar but not in 1:10, especially with 3 mm thick planks. I think a guide to how the planks should be is that when looking the planks from the side, they should look almost horizontal In the Deben, the gardboard and the planks close to it where very curved upwards. The planks in the middle were straight (-ish). The planks near the sheer were quite curved the other way. All of the planks however, when put in place appeared almost horizontal. When defining their position in the frames, I used a 3 x 3 mm pear strip to make sure they were fair. So in your boat, maybe it could be something like this (Sorry for the patches in the picture) Considering the curved plank will need to come out of a straight one, and that trees have a given width, this tells you how wide the planks could be in the real boat and how many planks need to be on each side. Very curved planks need to be quite narrow otherwise they would need to come out of massive pieces of timber By changing the shape of the gardboard in the middle and aft at the sternpost and also changing how far up the stem it will end, you can change the shape of all the other planks. 1:10 is a great scale, you can use 1 mm screws to hold the planks in place and then fill the holes with tree nails.. Another thing, for 3 mm planks you would need to shape their edges a bit so they can sit closer when the hull has a significant curve. Apologies for the long post, hope I did not hijack your log! Your hull looks great so your method in the end worked just fine Vaddoc

-
Such an enjoyable log Gary. The valve and hose blew me away. Too many new things to absorb, looking forward for more Regards Vaddoc
-
ancre Le François 1683 by jose_b - Scale 1:48
vaddoc replied to jose_b's topic in - Build logs for subjects built 1501 - 1750
Very nice work Jose! It's amazing how much wood this boats had, they were floating forests. Your boat is lovely, your hard work shows through. -
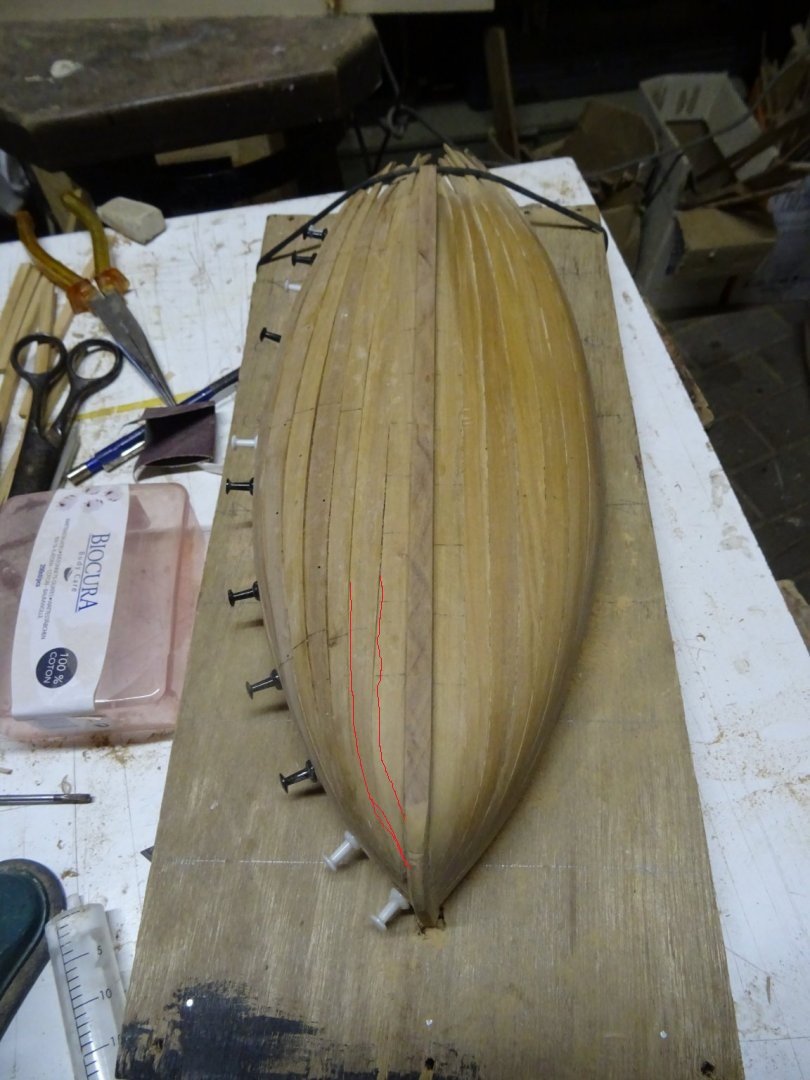
Lovely work Geert, just found the time to visit. I especially like the scale and the proper steam bending of the frames! The second method of planking you followed is much more likely to produce accurate results. Could I make a few suggestions from my experience: You can take the pattern of a plank in segments, one third first, then add the second etc, see photo bellow Use thicker card so that it cannot be bent laterally. The cardboard in the photo is 2 mm (The planks were also 2 mm) The garboard plank should reach as low at the stem as possible, so the rest of the planks are less cramped and lie more fair. The shape of the planks, after the position in the frames is determined, need to somehow be faired. Your hull looks great. What glue did you use for the ribs? Regards Vaddoc
-
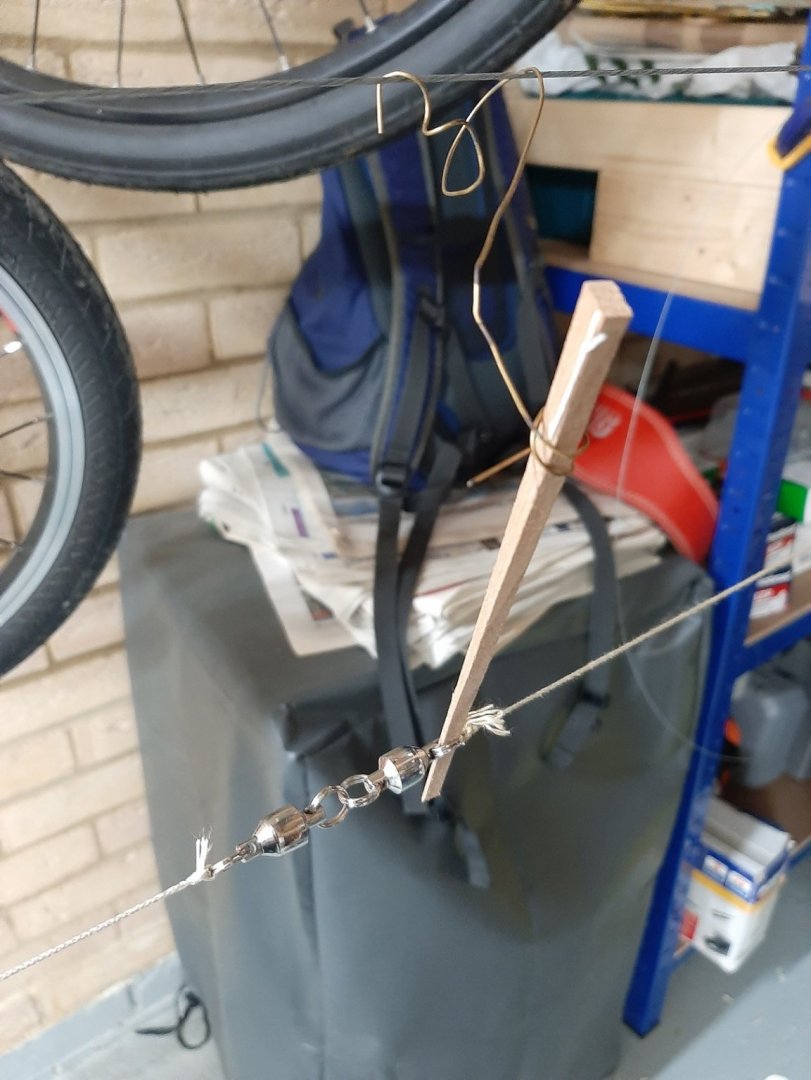
One last update, probably the last one for some time By attaching a second swivel to the existing one, it now rotates much more freely. The piece of wood is there to stop the line at the other end of the swivel twisting as well. These are the sizes of rope I produce with the various combinations of threads. I think I ve made close to 100 m of rope this weekend. I think that the majority of rope will be 1.1 mm (11 mm in real boat), a few bits maybe 1.3 -1.4 mm and the rest 1 mm or less. It is much faster to make 2x3 rope than 1x3 as tying the threads to the rope walk is much quicker. So I think I ll use Perle 12 and various Cordonnet sizes in 2x3 and also Petra at 1x3 which makes great rope but needs a lot of tying. DMC threads are very expensive but also very nice.
-
Just a few of my tries, the twist of the rope produced was pretty tight. This thread has a right hand twist but can be untwisted and twisted the other way easily. Mara 30 3x3 1.43 mm 2x3 1.06 mm 1x3 0.81mm Mara 70 3x3 0.94 mm
-
My DMC threads arrived and today I ve been making ropes. The rope walk takes up the entire garage and is a bit of a job to set it up so I would like to make all the ropes I will need or that is likely to need. So I ll just produce huge quantities of various sizes and then take the rope walk down so I can work on the boat. The DMC threads are wonderful and the rope equally great. I actually like the ecru colour.


-
Indeed Druxey, this modifications improved the lay up dramatically. Glad you found it helpful G.L., the current problem I have is the swivel at the weight end. It is a fishing swivel and although in the hand it rotates very freely, it does not during rope making and this puts strain on the threads. I have not found yet a solution for this. Many thanks Daniel! The Debens are small boats but actually pretty complex, you ll have a lot of fun Thanks Michael, now I really liked your solution, very elegant. I bought some tube but also some fishing double barrel copper crimps to experiment. I am not sure if your crimps are just copper tube but they look great.
-
Very nice Patrick! This boat is turning out more formal and business oriented, compared to the others that were a bit party animals. Is that a pool in the upper deck? Maybe putting in slightly blue gel might stand out more. Vaddoc
cropped.png.c8c93436d7610c3581cdbc09ea2ce9a1.png)
cropped.png.286b2028d1ca0338407d4c72ed498302.png)
cropped.png.29efca76a26ca49cda3081d3913546ce.png)
cropped.png.9d03b140631b911b5592c085f23d0882.png)
cropped.png.2429495eb2041286ca7e3ec7b3d6ff54.png)
cropped.png.de239418595fea8a7b28e0ca036b8a70.png)
.png.22678a93620cdcd26f6295ff1df95f2b.png)
.png.66c47f3989a8c254bdb704f74bdd5e86.png)
.png.7f90347b3e8d8303c19635dd79cbb817.png)
.png.2c9727e8d613bb213ccd41a6f383fb90.png)
.png.003075eee1a91a420c6bed53b164b5e6.png)
.png.04d0f8455b35481cc3a4140bec2ff510.png)
.png.f4d7e016567ae28d9336b7ccf6a7b8af.png)
.png.a82fcfa105398891a7592ea240684306.png)
.png.1ae74c7abf234c937b2fa115309d4ccf.png)
.png.5a1bf2b8a15d6caaaf5aefd8d64d5cc6.png)