


Bob Cleek
-
Posts
3,374 -
Joined
-
Last visited
Content Type
Profiles
Forums
Gallery
Events
Posts posted by Bob Cleek
-
-
36 minutes ago, mtaylor said:
Temptinig... but HMS Visa is down by the stern and afire. Someone will be getting a great sander and a great deal.
"Damn the torpedoes! FULL SPEED AHEAD!"
Tools get you through times of no money better than money gets you through times of no tools. Don't think of it as spending money, think of it as saving money. You know you want it. You're going to get one someday and then you probably won't be able to realize the savings. Just do it!
(Yeah, I'm the kind of guy wives don't want their husbands associating with.)

- gjdale, paulsutcliffe, mtaylor and 1 other
-
 4
4
-
Great machine. Like all Jim-tools, simply the finest of its kind, bar none.
- Landlubber Mike and Canute
-
2
-
52 minutes ago, Charlie B said:
If something comes of it, I'll be sure to post an update!
Please do! I'll bet your kids would love that... if you can pull them away from their video games ! If you do undertake a restoration (she's an heirloom, after all,) feel free to ask questions here. Like the government, "we're here to help."

-
-
-
Wefalk is correct. The sail grommets would definitely have been sewn. On larger sails, they probably would have worked the grommet around a metal ring with the stitches carried around it, which, when the grommet was complete, would hide the metal ring. There wouldn't have been "rings" on the stay. I believe at Bounty's time they would have used a hank in the shape of a "U" of bent iron with eyes in each end, shaped something like the "monocle" on the hood of a cobra. The stay would go into the crotch of the "U" and a selvagee (a loop formed of several passes of small stuff) would be worked through one eye of the "U" fitting, through the sail grommet, through the other eye of the "U" fitting, until a sufficient number of passes had been made and then the selvage would be married with half hitch coxcombing between the two eyes. The open "U" shape permits the "hanks" to be removed from and replaced on the stay without unrigging the stay and the selvagee lashing and the shape of the "U" hank minimizes chafing of the sail grommets.
Prior to the use of the iron "hanks," clever steam-bent wooden "hanks" were used. These had notches in the ends so they could be opened to be attached or removed from the stay without the need to detach the stay. The "X" formed by the overlapping notch was seized with small stuff and lashed through the grommet, pulling the "X" of the "hank" against the bolt rope. This also prevented chafing of the sail.

This information should eliminate your search for miniature thimbles, but in the future if the occasion arises and they aren't available in the size you want, one way to fabricate them is to take a suitably sized piece of copper or brass tubing, which is available in quite small sizes an anneal it well, cut off small sections of it and place one end of the section on a ball bearing or other round hard surface and place another ball bearing of the same size on the other end of the small section of tubing and gently hammer the top ball bearing. In this manner, provided the metal is annealed and doesn't work-harden (in which case it just needs to be annealed again,) the ends of the tubing will "roll" outward and form a thimble with the inside diameter of the tube. Lubricating the working surfaces when shaping thimbles in this way will make the task easier, as well.
- vossiewulf and mtaylor
-
2
-
7 hours ago, vossiewulf said:
In other words it works well as a hand clamp, but only for things that don't require too much force to hold. The jeweler's wedge hand clamps can grip much harder.
I just got it and haven't put it to use "in the field" as yet, but I noticed the same thing just fiddling with it. It's mainly for drawing wire or wood through a drawplate. It should hold small stuff as a vise, too, but I agree that you really can't clamp it down as tightly as a vise with a wedge or a bench vise with a turning bar on the screw.
- mtaylor, vossiewulf, pontiachedmark and 1 other
-
4
-
I can’t be sure from the photos whether your decks are made of wide pieces of grown wood (not plywood.) If they are, cracking as you’ve pictured is a common problem I’ve seen when restoring models. Most all wood species expand and contract most across the grain as the ambient humidity fluctuates. When a thin, wide piece of wood is fastened down and then moves, it’s highly prone to checking. It simply doesn’t have the strength to resist cracking when it is thin. A one Inch thick piece wouldn’t crack, but a eighth inch thick one will.
Sometimes it is possible to fill the crack, but this often looks unacceptable and if the filler is hard, it will likely crack even more when the wood swells again. The only real solution is to plank the deck with scale planks which will allow for movement between the planks without cracking. Usually, smaller pieces tend to move less than larger pieces. I also find it a good practice to seal all wood with a thin coat of shellac. Shellac is one of the most effective moisture barrier coatings around. It won’t prevent the effects of humidity changes completely, but it slows them down considerably which reduces the amount of movement.
-
10 hours ago, tkay11 said:
Just now I am 'scratch-building' a small gaff-rigged 'cutter' from a walnut shell for the grand-children (although there won't be a build log on this forum for it).
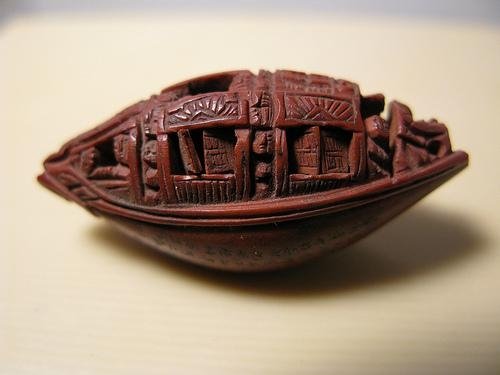
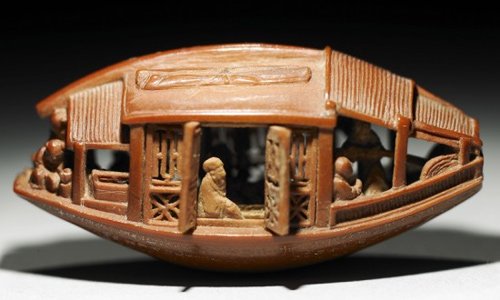
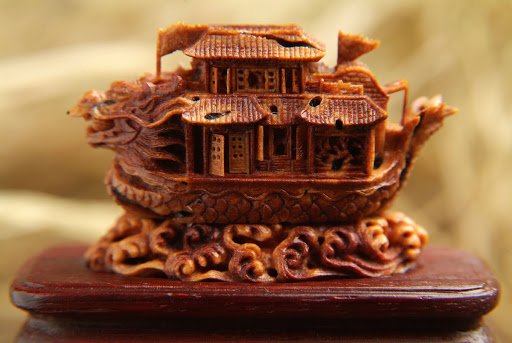
And why not a build log for a walnut shell boat? I think it would be quite interesting. That's a great way to get little kids interested in ship modeling. When I was about six, my dad made me my first "ship model," a simple rubber-band powered paddlewheel boat out of some wood from an apple box. I painted it myself. (My first "kit build," as it were.) I had tons of fun with it. There's a long tradition of carving shells, nuts, and stone fruit pits. Carving peach pit boats has been considered a fine art in China for centuries. Here's some "museum quality" Chinese peach pit boats:
 10 hours ago, tkay11 said:
One interesting question is when did the contrast start between 'kits' and a rather romanticised notion of 'scratch building'? There have been many discussions about the contrast between 'scratch' and 'kit' building on this forum over the years and you might like to search for them to see the sometimes vigorous and passionate arguments. The current thread repeats many of them.
I'm sure that when the cavemen were painting the walls of their caves, the guy who painted the bison thought his bison was better than the guy who traced an outline of his spread hand on the wall because the bison was painted "from scratch" and the hand was just traced. The guy who did the hand said, "Yeah, but my hand looks more like a hand than your bison looks like a bison." And we've been arguing about it ever since.
Any art form intended to be shared with others is, essentially, self-expression and self-expression doesn't exist in a vacuum. It expresses the declarant's point of view and invites the judgment of others, frequently in the hope of receiving their appreciation. It's a characteristic of our humanity, hardwired in our DNA. I suspect the "passion" and "romance" gets injected into the equation because the response to artistic expression invites judgmental comparisons. When we make qualitative judgments about ship models, we employ various criteria. Is the model pleasing to the eye of the beholder? Does it exhibit skill? Does it exhibit creativity? What does it say about the person who built it? What does it say to the person who experiences it? All of these qualities are not only subject to evaluation individually, but also combine to create the gestalt that determines the overall value of a given model.
The contrast between "kits" and "scratch building," perhaps first and foremost, is that a kit necessarily limits the artist's ability to demonstrate (if not express) both their skill and their creativity through the uniqueness of their work. Again, the "paint by number" oil paintings which were a fad now long ago provide a good example. It takes the practiced eye of another artist to appreciate the skill and creativity which may be exhibited in the product of a kit. The unpracticed eye frequently doesn't know the difference. (And kit manufacturers often capitalize on this by offering gilt-encrusted ships-of-the-line model kits, "ship porn" for the uninitiated.) Similarly, the practiced eye instantly recognizes the artist's skill and creativity in the uniqueness of a "scratch built" ship model.
10 hours ago, tkay11 said:The sharp distinction is unclear to me, the spectrum is not.
Because the spectrum is broad, when the distinction is sharply drawn, passions rise. We have to recognize the nuances. A masterfully build kit model can indeed exhibit the builder's skill and even to some extent creativity if the builder ventures beyond the confines of his kit and into the unconfined world of "scratch building." A kit model can certainly engender the builder's satisfaction and please the eye of its beholders. That is more than enough to justify its existence and merit our appreciation. Where the kit model is disadvantaged, however, is in the apparentness of those qualities, much of which is dependent upon a model's uniqueness. As some have remarked here, the gestalt of a "scratch built" model can intimidate even the knowledgeable: "I could never do that!" (The uninitiated, of course, probably won't even know it was built from scratch.) That reaction is far less likely with a kit, which, in its most basic form, limits its builder's opportunity for self-expression to that of craftsmanship alone. Essentially, kit models are assembled. "Scratch built" models are "created." (And even this distinction is nuanced. Many wood kits demand considerable craftsmanship to carve and shape the block of wood and bundle of sticks and string some manufacturers call a "kit," while others, plastic kit manufacturers particularly, may advertise that all it takes to build their kit is snapping together numbered parts.) This doesn't mean "scratch built" models are qualitatively better than kit built models. (Indeed, the distinction between the two is a bone of contention as well... "Is it really scratch built if he bought all his cannon, carriages, blocks, boats, and anchors from an aftermarket parts supplier?") It's just that when we judge a model's quality, we have to be clear about what qualities we are judging. This is why most modeling competitions award prizes in categories that distinguish between kits and scratch built entries... and why the "People's Choice" award exists to acknowledge that the uninitiated are rarely qualified to judge the quality of a ship model or to even recognize a kit model from a "scratch built" one.
- tkay11, mtaylor, CaptainSteve and 3 others
-
6
-
I've tried to avoid this thread. It's "an occasion of sin," as my Catholic grammar school nuns used to say. Unfortunately, I continue to be tempted by all the goodies that keep being posted. (Thanks to all of you for sharing! This thread should get it's own category... a running "tools review" thread.)
Here's my contribution. It's a "Lowell pattern" jeweler's vise. I'd wanted one for quite some time, but never got around to it. I decided to take a chance on this one because at less than twenty bucks with free shipping on eBay, how bad could it hurt if it turned out to be junk? I was pleasantly surprised when it arrived. It's a well-made hefty tool. I like the weight of it compared to my wooden one similar to the one pictured above, although the wooden one is easier on small parts perhaps.
It's main attraction is that the jaws tighten by rotating the handle and it has a hole running through the handle so that wire and rod of any length can be accommodated. Its primary use by jewelers is to pull wire through draw plates. Details can be found on eBay at: https://www.ebay.com/itm/Lowell-Pattern-Hand-Vise-Wire-Working-Tool-Hand-Held-Vise-Hollow-Handle-Drawtong/202242174597?ssPageName=STRK%3AMEBIDX%3AIT&_trksid=p2060353.m2749.l2648

- paulsutcliffe, vossiewulf, Rustyj and 7 others
-
10
-
On 1/24/2019 at 4:32 PM, Roger Pellett said:
Wow Bob you have some beautiful equipment. As I said above, my ships curves were acquired during my student days and I have an abbreviated set, no mahogany box.
Roger
I started with a box that came with an incomplete collection of ship's curves, too, but I got hooked on checking eBay every few days and managed to complete the set by adding two or three every so often when they'd come up for auction. I think it actually was cheaper that way, since there was a big premium on complete sets, while few bid high for the "orphaned" curves that came along now and again. Eventually, I was into it more for the collecting than because I felt I needed them all. (Breaking one of my "tool rules:" "Never buy a tool until you need it."
)
-
33 minutes ago, leclaire said:
One thing I have learned from following this rather technical but extremely interesting discussion is that any notion of trying my hand at a scratch build in the future has been completely blown out the window.
Bob
Not to worry. If you can build a kit, you can scratch-build on your own. You don't have to worry about drafting your own plans and lofting your own pieces. Just find a simple subject vessel you like for which plans are available, use them, and GO FOR IT ! "Experience starts when you begin." as the saying goes. The fact is, every time there's something missing in a kit (and we all know how often that can be) or you break a part and have to fashion a new one on our own, or we decide to add a little detail of our own, we're "scratch-building." Most kits don't have much in them but a set of plans, a box full of sticks and string, and some cast parts and crummy blocks and deadeyes, which isn't much when you consider what they cost. So get your plans from a book, your wood at the hobby shop, and better parts that you'll ever find in a kit from the aftermarket suppliers and you'll be bucks ahead. That's scratch building. When you come right down to it, it's not much different than building a kit, just less expensive.
The trick in this game is to "Do the common thing uncommonly well." Start with a "common thing" simple subject to model and do the best you can possibly do with it. That's all you have to do. The rest will take care of itself. Accomplishment, however small, begets confidence. There's some incredibly good modelers on this forum building some incredibly complex models incredibly well. When I get the same feeling following their build logs that you get about scratch-building, I remind myself that I'm not, say, a retired master tool and die maker or micro-surgeon, that I never will be, and that I'm in it only to please myself. Learn from them, aspire to be as good at it as they are and you will be, but don't expect that to happen overnight. The more you do, the more you'll learn. Consider yourself lucky that you are at the point you are now. You will always find somebody on the MSW forum with an answer to your questions and the forum is a gold mine of tips and tricks. A lot of us who have been at it for decades really had nothing but a book or two to learn from when we started out. You've got the whole darn internet, the mother of all shopping malls, the Library of Congress, and every dirty book store in the world, all instantly available on your screen 24/7 and for free !
Kits are shop modeling's "gateway drug." They lead to harder stuff like "adding details" and "kit bashing." The next thing you know, you're mainlining "scratch-building." There are lots worse things you could be doing with your time.
-
16 hours ago, amateur said:
Hi Bob,
Although I admire your knowledge and your equipment (guess you also use it for models, bur couldn’t find anything of that work here at msw), I wonder whether you make things more difficult than necessary: you can draw ideal lines, but I guess (never tried myself) that slightly less ideal would also work. The final fairing is done when frames are set up in the model so the use of a simple pencil and ruler and a basic set of curves should do for a beginner.
I have even seen an admiralty type of model without lofting, using just station lines. Also Mccaffery uses such a method for his small-scale models: he cleverly builds up a layered block, and shapes it as if it were a solid hull modell. Requires some thinking and preparation, but it works without any curves or dawing let alone drafting.
Jan
HI Jan,
You're quite right that there are a lot of corners that can be cut. Particularly when working at small scales the degree of latitude being inversely proportional to how anal the modeler may be, but don't forget that somebody had to draw the lines somewhere along the way and there's no way to turn those lines into a three dimensional boat without some sort of "lofting," even if done mechanically, rather than on paper. For example, the architects who designed vessels using half-hull models, such as Nathaniel Herreshoff, often devised mechanisms to mechanically generate their offsets directly from their half-models without ever drawing plans at all. The loftsmen then lofted their patterns working from a table of offsets measured off the half-model itself without any intermediate drawings at all. You'll find very few drawings of Herreshoff's famous works in the MIT library. The "plans" of his vessels in their much-studied "Herreshoff Collection" exist mainly as tables of offsets in his handwritten notebooks. The discussion at hand arose from a good question: "How do you get the patterns for frames," or more broadly, the construction patterns, "from a lines drawing" or from a table of offsets? The answer is that you have to loft the vessel, which led to a discussion of naval architectural drafting. The entire context of the discussion really exists in the realm of scratch-building models of vessels for which there are not construction plans available which are suitably drawn for modeling purposes. That does, of course, "make things more difficult," as you note. It's a challenge that I expect anyone wishing to build an accurate model of a vessel nobody has modeled before, or at least for which "modeling" plans aren't available, or unavailable in the scale they wish, is going to have to accept.
That said, fairing the frame bevels on the set up frames is often the easiest way to go on a model, but, as the original poster here realized, one still has to get the molded shape of the frames from somewhere. I'm well-acquainted with how Lloyd McCaffery accomplishes that by "mechanically lofting" frames with his shaping-a-block-made-of-a-sandwich-of-frame-blanks method, but I submit that is a far more practical approach with the miniatures he built than with larger scales. I've had the pleasure of studying some of his models on display in the Columbia River Maritime Museum in Astoria, OR, and they are truly amazing, but however accurate they may be, their diminutive size limits their usefulness as future objects for historical study. He is more than a modeler. He's a "miniaturist." His work is in the same class as the proverbial "The Lord's Prayer" engraved on a grain of rice exhibited beneath a microscope!
Like some, my model building is more sporadic than I'd wish. I keep getting sidetracked restoring other people's models. With retirement on the horizon, and the physical limitations of age curtailing the work on full-size wooden boats I used to do more frequently, I'm gearing up to proceed with a number of original modeling projects I've "had on the back burner." Relative to your observation, I've been researching the Irish Hooker type the last few years for the purpose of building a model which accurately portrays certain of their characteristic construction techniques. Hookers were never built to plans, but rather to "rules of thumb" based upon the size of the boat and handed down orally. (e.g.: "the mast is as long as the length of the boat on deck.") One distinguishing feature of hookers is that their frames are built of sawn floors and futtocks which are lapped alternately with the laps fastened in a particular way. In building, the shape of the boat is defined by three molds, one midships, one forward and one aft of midships, and a transom. The mold patterns were proprietary to the builders and their descendants. Battens were set up on the molds and the floors and futtocks were shaped to fit to the inside of the battens. There are only about four accurate sets of plans that have been taken off existing hookers and, given the way the floors and frames are fashioned, trying to develop the floor and futtock shapes on paper would be a nightmare. I've concluded that the easiest way to go is to build the model the same way the original was built. In that case, yes... the lofting will be minimal, but the fitting will be a challenge.
"My name is Bob and I'm a tool-aholic." I consider some tools objects of beauty whether I really need them or not. Others can accomplish as much and often more as I can with far fewer tools. I certainly do hope that the discussion of the rather arcane craft of naval architectural drafting and lofting didn't scare anybody off! If one side of a model isn't shaped exactly the same as the other, one could even argue that in that respect the model might be a more accurate representation of a lot of full-sized wooden ships and boats!
- Roger Pellett, druxey, nancysqueaks and 4 others
-
7
-
That "Little Ripper" bandsaw milling attachment sure looks to be the ticket, Kevin! I checked it out and it's very impressive. I have no idea how that guy gets such perfectly straight cuts without any blade drift using that attachment, but seeing is believing. Good timing on your post, too. I had a tree come down in a storm last weekend and bucked it up in two foot sections for possible use as modeling wood. It is liquidamber, a very white hardwood, which also occurs with significant figuring when subject to fungal infection. They say it tends to twist when drying, but it's valued as furniture and veneer wood. It's also called "blond walnut" and "sweet gum." This tree had a rot pocket in the trunk and it snapped clean off, but that decay was localized. It was about a foot in diameter and I got about ten feet of pretty much knot-free trunk and a bunch of branches that should be good for compass timber if I can dry the stuff without it turning into a pretzel. I figure it will be fun to play with. If it isn't worth the effort, it will always work in the fireplace next winter!
-
12 hours ago, Jolley Roger said:
I guess you can potentially make your own out of acrylic with either scroll saw, CNC or laser cutter?
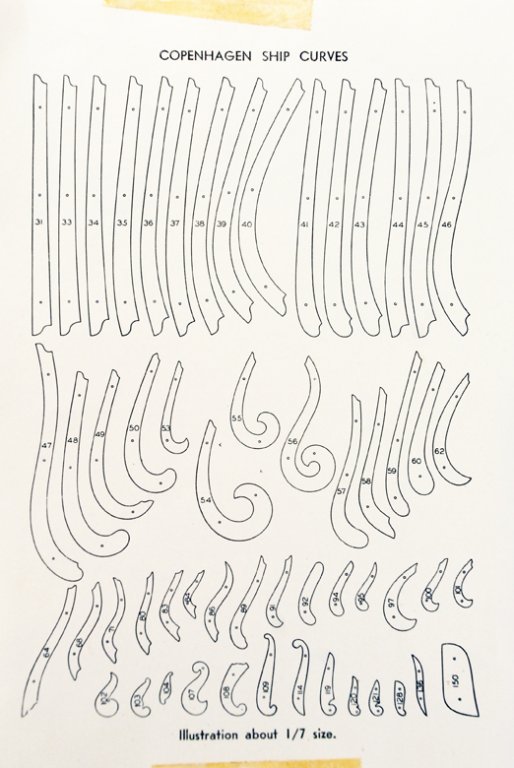
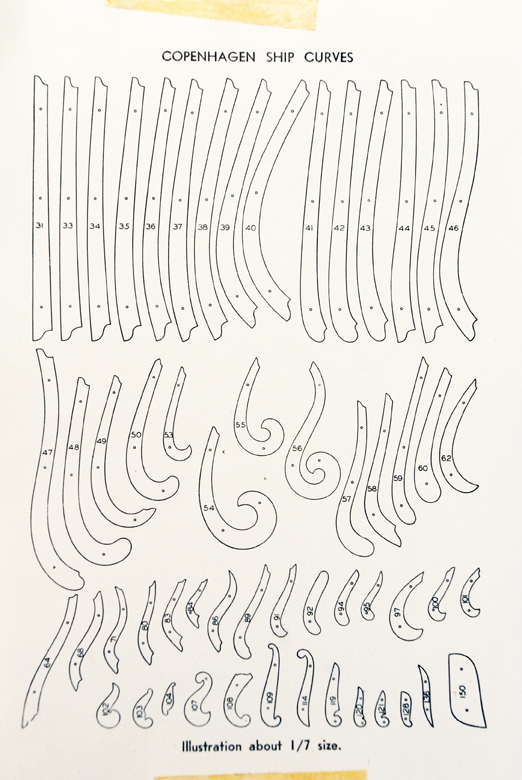
In theory, yes, but one would have to have a set to use as a pattern in the first place. Recently, one guy attempted to get enough financial backing on Kickstarter to produce a run of sets for sale, but failed because he couldn't raise the start-up costs to amortize the investment in tooling up for production. See:http://copenhagenshipcurves.com/#purchase
Drafting curves, be they ship curves, French curves, or engineering curves... there were many types... are all based on mathematical formulae defining a fair particular curve. This ensures that the curves, when used correctly, alone or in conjunction with one another, can produce any desired mathematically fair curve. Simply enlarging a picture of them and trying to make a set from that would probably not provide a sufficiently fine line to cut to in order to insure accuracy.
Proper method of using drafting curves to generate fair curves:
- CaptainSteve, mtaylor, michael mott and 3 others
-
6
-
20 hours ago, Roger Pellett said:
I personally enjoy making hull lines drawings (lofting) by hand. I still have my K&E Ships curves that I bought new as a student 50+ years ago. I also have a set of lead drawing “ducks” that I made at the same time. These are used to hold down a wooden spline bent around a set of plotted points. You will not need all of this stuff to start. You can get by with a couple of French curves bought at an office supply store. Splines can be easily ripped from straight grained construction lumber and held down with tacks driven into an improvised MDF drawing board.
Personally, I suggest just trying to do it and erasing and redoing things as you go. As they say, “Paper is cheap!”
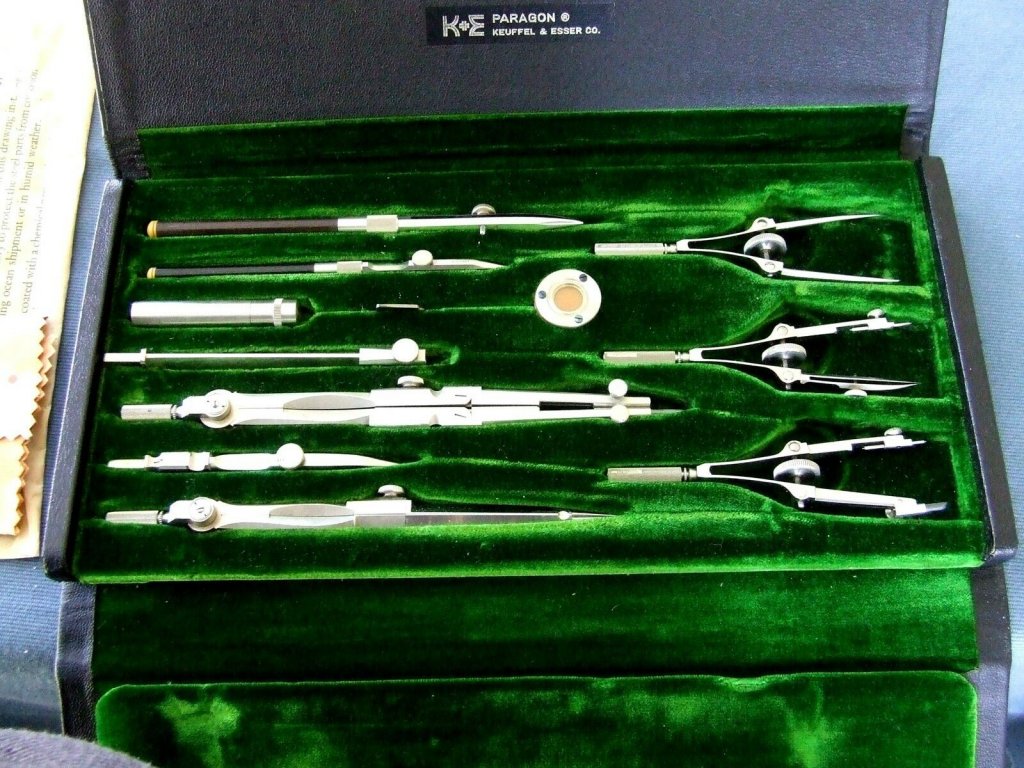
I share your love of drafting, Roger. As I expect you did also, basic mechanical drawing was a skill I acquired in high school over 50 years ago when drafting was a distinct trade at which many professionals still earned a decent living. I'm sure it's no longer taught anywhere. As a serious hobbyist, I made do with a basic set of drawing instruments until several years ago when I decided to acquire a planimeter for calculating hull displacement and searched on eBay. I discovered to my amazement that the finest instruments ever made, such as Keuffel and Esser's "Paragon" line, which in my youth I could only lust after from afar , having been made obsolete by CAD, were then available for what were extremely reasonable prices. So I "treated" myself to a couple of years of watching the "drafting" section of eBay and amassed a pretty complete set of the best of everything Keuffel and Esser ever made that could be used for naval architectural drafting. It did cost a few bucks, but none of the purchases were particularly painful and the expenditure was stretched over a couple of years, so it wasn't noticed, if you know what I mean.
I was lucky to "hit the market" at the right moment when some really pristine instruments and complete sets were still available. Since then, I've watched the prices rise as the supply and the quality dwindled, because the demand increased when the "collectors" entered the market. Our mahogany-cased K&E Copenhagen curves sets have gone the way of the dodo bird. As far as I know, there is no longer anyone manufacturing them anywhere in the world. I haven't seen a complete set offered on eBay in perhaps three or four years now. The last full set went, if memory serves, for almost five hundred dollars! If this is news to you, perhaps you might want to amend your last will and testament!

I'd add that those modelers who are interested in manual drafting should have little problem finding used high school drafting textbooks on line or in used book stores. (Sometimes titled as "Mechancal Drawing" or "Technical Drawing.") Although I've never seen a drafting textbook that specifically addressed the conventions of naval architecture and lofting, the standard texts all have chapters on the use of instruments and the general conventions of "drafting language," which suffice for anyone wanting to pick up the more specialized subject of naval architectural drawing, which will be found addressed separately in any of the boatbuilding books' chapters on lofting.
Any modeler who is of a mind to get into manual drafting would also be well advised to grab a high-quality decimally-scaled set of proportional dividers while there are still a few occasionally coming up on eBay. These will enable easily mechanically scaling drawings in books and on plans sheets from the scale of the original to any other scale one desires. These are still available for retail purchase. Micro-mark has a particularly cheesy small pair of proportional dividers offered for $100 which is not decimally scaled. (It's scale lists proportions as "1X, 2X, 3X," etc. A decimally scaled pair allows any scaling in any proportion expressed as a decimal by means of a geared Vernier adjustment.) Much higher quality 10" decimally scaled proportional dividers still come up on eBay occasionally for about the same price as the low quality 6" ones offered by Micro-Mark. I suppose that's not Micro-Mark's fault. The good ones aren't made anymore.
Below: Micro-Mark six inch "cheapos" oddly set at what appears to be equal proportions at each end.
Below: Keuffel and Esser "Paragon" ten inch decimally scaled ("Universal") German silver proportional dividers and case.

Below: Keuffel and Esser "Paragon" "three bow set" of basic German silver drawing instruments in case.
- CaptainSteve, Trumper07, AON and 5 others
-
8
-
4 hours ago, mtaylor said:
There's the database: http://modelshipworldforum.com/ship-modeling-articles-and-downloads.php that has some basic articles and also a CAD tutorial.
Oh, drat! Just when I was starting to feel complete with my acquisition of a full set of Keuffel and Esser Copenhagen ship's curves, at not inconsiderable expense, I might add, CAD became sufficiently accessible to raise the question of whether the investment of money and time to acquire and master a CAD program is worth it, considering how many years one may have left on this old blue marble. I've seen the rather remarkable work produced on the more advanced programs and I envy it. For a younger, and wealthier, modeler with the time and money, or perhaps the good fortune to work with CAD for a living, it certainly is worth pursuing. For myself, however, I've decided to stick with my ship's curves and my battens and ducks and avoid the quest for the perfect Bézier curve.
Regardless of how neat and pretty the good CAD drawings are these days, they just don't have the dimension of "art" that is evident in the high-quality old-time pen and ink on linen draftsmanship.
At the risk of thread drift, I do think there's a general discussion to be had in the hobby regarding whether or not there is a line that can be drawn between "craft' and "art" in modeling. Is the perfect reproduction of a model part accomplished by the use of CAD and 3D printing really "art," or merely the technique of an accomplished craftsperson? (Which isn't to say there's necessarily anything "mere" about accomplished craftmanship.) The advent of digital photography certainly took a bite out of the photographic art work market. (I'm sure professional photographers had the same complaint when Kodak came out with the "Brownie" camera for the masses a hundred years ago.) I'm wondering if 3D printing isn't poised to similarly devalue the artistic merit of ship modeling. Perhaps that's a story for another night, though.
-
3 hours ago, iMack said:
Thanks everyone for taking the time to answer - with such meticulous answers. This has given me a good base to work on. I shall search for some of the suggested books. I've just commenced looking through the wealth of information that is in the archives. Apologies for any incorrect terminology I use - it will come with more research. I'm sure there will be more question to pursue.
You need search no further than Amazon. They are all still in print and readily available. (Some, like Davis' early books, are pushing 100 years old and still in print. They're that good.) Don't let the retail prices throw you. There are also lots of used copies available at considerably less, since old geezers like most of us are rapidly becoming have a bad habit of dying off with some regularity and their heirs frequently have little or no appreciation whatsoever for the libraries their ancestors have spent lifetimes and tens of thousands of dollars building.
- mtaylor, Canute, paulsutcliffe and 2 others
-
5
-
6 hours ago, nancysqueaks said:
Hi, I'm sure other members will reply but being in this position 40 odd or so years ago I found Underhill's
Plank on Frame Models Vol 1, and Longridge's The Anatomy of Nelson's Ships to be the most useful
books to really appreciate initially how frames can be lifted from drawings. Both books are really towards the end
of the spectrum of wooden shipbuilding and the actual differences in period is insignificant when appreciating
how ships three dimensional shape is represented in the 2 dimensions. Both books give the introduction to
start to understand Steel and other similar writings that look at other complex ways of describing the hull form.
I think Bob's comments are very to the point and very well explained.
Regards, Nick
I'd add to your excellent essential reading list the more recent volume by Crothers, The American-Built Clipper Ship.
- mtaylor, Decko, Richard Griffith and 2 others
-
5
-
7 hours ago, No Idea said:
Hi Bob what an amazing and thorough answer..... so basically if I wanted to build a beautiful ship like the one in the picture, I would need to have a working understanding of lofting theory. Then apply this understanding to my drawings as best I can, given the limitations of my information. Which would mean plenty of bedtime reading, research and some technical drawing practice. The reason for my interest in this thread is I too want to improve and build ships like the one above. I think I’ll order some more books
It's possible to build one of a handful of ships like the ship above from kits or written instructions, but such a build will yield simply another copy of somebody else's interpretation of a particular vessel which has been built perhaps as many as hundreds of times before. That would relegate the builder's several years of dedicated work to the level of a "decorator model," albeit, if well-done, a very nice decorator model. It could certainly be a monument to the builder's skill and perseverance and a delight to the eye of the beholder, but it could never be an "original," really, nor would it possess that quality of uniqueness and accuracy which distinguishes what, for want of a better description, is called "museum quality." Knowing how to loft would get the hull built. Then you'd need to learn the marlinespike seamanship necessary to know how to rig your model and how an Eighteenth Century British ship of the line was sailed to present it for display properly. And, of course, that all assumes you have the tools and craft skills to do the woodworking and metalworking necessary from scratch... and in miniature. (Consider that a rigged model of a ship like the one above may have close to a thousand blocks in its top hamper.) Put another way, "It helps a lot if you have a pretty complete knowledge of the full-scale building and sailing procedures and practices of the period when the vessel you are modeling was built." It's a lot easier to build models when one has decades of hands-on experience sailing and maintaining classic and historic wooden vessels. Admittedly, that's a pretty tall order and even with such experience, in order to build models of ships built hundreds of years ago, reading books is essential in any event. If one wants "to build ships like the one above," I'd advise them to start with a plank-on-frame kit, such as Bluejacket Shipcrafters' Jefferson Davis or America, keeping in mind that the manufacturer describes these as "experienced" level models. There are books, such as Davis' The Built-up Ship Model, Underhill's Plank on Frame Models (Vols. I and II,) Longridge's The Anatomy of Nelson's Ships, and lesser-known practicums which describe the building of specific fully-framed models, but be forewarned, the task isn't for the faint of heart. (See Ed Tosci's magnificent build log on his model of the clipper, Young America, at https://modelshipworld.com/index.php?/topic/3453-young-america-by-edt-extreme-clipper-1853/. I believe he is in the process of the publication in installments of a multi-volume work that should enable one to replicate his detailed interpretation of that vessel.) Frankly, the framing of a model such as the 6th Rate, Enterprize, above, is only a small part of the job. Properly rigging such a model would likely take much longer than building the hull, which is why many of the Admiralty Board models were never rigged. (The rigging schedules were also dictated by the Admiralty and one would refer to the appropriate schedule for the period when the ship was built to approximate her rig or study a contemporary model, if one exists. Again, here is where the research is required.)
As I mentioned above, and as Chapelle, McCaffery, and other master modelers have lamented, there is a lack of diversity in the models which are built. What these experts fail to mention, however, is that the trade skills required to build an accurate model from extant lines drawings and limited pictorial documentation would discourage most people from attempting to build a model "from scratch." Consequently, folks focus on kits and books and publications which have, to one degree of accuracy or another, done the research work for them. That's a great way to get into the hobby and that's how most all people do get started, but compared to the number of vessels which could be modeled, but for the availability of lofting and research, the available choices for the modeler are relatively limited. As Chapelle once wrote, "Do we really need another model of Nelson's Victory?" (Or words to that effect.) In my own humble opinion, the world of workboats and yachts, for one example, for which detailed construction drawings abound in the available literature, offers a multitude of subjects for spectacular models without the need to do the sort of research required to build a model of a vessel that was built two or three hundred years ago and about which much is unknown. (See L. Francis Herreshoff's Sensible Cruising Designs for "how to build it" chapters on many exquisitely beautiful yachts which have rarely, if ever, been modeled. If one were of a mind to build an "Admiralty style" model of some of his famous clipper-bowed schooner and ketch designs, they'd be something to behold and quite unique.) The kit manufacturers are in business to make a living and I don't begrudge them their "rice bowls," but I do think some do the hobby a disservice by aggressively marketing extremely complex (and expensive) kits of vessels such as Sovereign of the Seas with the implied promise that "you, too, can build a model like this one." To that extent, some seem like the old ads for "paint-by-numbers" kits that promised the buyer a "Rembrandt" of their very own.
-
They aren't "bulkheads" or frames. They are station lines. The stations are depicted in a standard draft at each station line on the baseline. (The lines pictured were drawn for the purpose of modeling and have some modeling-specific information in them, however.) These station lines, together with the other lines in the draft, define the shape of the vessel. The table of offsets, correspondingly, defines the dimensions of the lines. While, in smaller craft particularly, frames may coincide with station lines, that is more a matter of coincidence than anything else. In a larger, heavier vessel, such as the one above, were every frame to be represented with a station line, the drawing would be so full of lines as to be unreadable and for the purposes of defining the shape of the hull, unnecessary.
Station lines have nothing to do with the construction details of the vessel. The construction of a vessel is addressed by the construction drawings, if there are any. (And in period vessels, there rarely are, as such details were left to be worked out by the master shipwright.) If you want to build a model using bulkheads, stations may be used to define your bulkheads. If you wish to build a model with frames the way the vessel was actually built, as with an Admiralty model, you will have to research the methods of construction at the time the vessel was built and apply that research to determine how the parts were fashioned to build it. The Admiralty had detailed rules for construction, sometimes called "scantlings," which you can look up in resource materials. These scantling rules dictate, based on the overall size of a vessel, the size of framing timbers and frame spacing, the thickness of planking, and on and on.
The task of translating "lines," as above, to patterns for the actual parts of a vessel is called "lofting," because it was usually done on a wooden floor in a loft at the shipyards. Using the scale lines drawings and the scantling rules, the loftsman draws all the parts of the vessel full-scale and "takes up" (transfers) these "loftings" to create full-sized patterns which are then used to define the shape of all the parts that go into the vessel. If one wishes to build a model of the vessel with the lines above, they will have to "loft" the construction drawings at the desired scale and work from those in constructing the model "Admiralty style" in the same way the full-sized vessel was built. (Which, without the actual prototype available, will always be an educated approximation, since the form of the parts was often dictated by the size and shape of the raw wood available to the builders at the time.)
A command of lofting is essential to using lines drawings to create scale models. With it, one has a huge selection of vessels from which they might select a subject to model. Without it, they are left to those relatively few subjects for which plans for modelers have been drawn up and offered for sale. (This is one reason why so many models of the same few ships keep getting built from commercially produced kits. Therein lies the distinction between "kit building" and "model making.") A good basic explanation of lofting is contained in Howard I. Chapelle's book, Boatbuilding. A far more comprehensive treatment of all aspects of lofting, including, for example, the methods for determining the degree of bevel on each frame of a hull, are contained in Alan Vaites' book, Lofting. (Both are readily available.)
The common use of lines drawings is relatively recent, coming into use sometime in the Seventeenth Century, IIRC. Like all drafting, naval architectural drafting is a "language" which must be learned. The Lords of the Admiralty and the other bureaucrats who decided which vessel would be built were often, like most laymen, completely incapable of "reading" a set of lines on a sheet of paper. This why the Admiralty models came into being... to provide a readily understandable three-dimensional representation of the vessel proposed to be built to people who were unable to translate a two-dimensional set of lines to three-dimensions in their heads.
-
The real question is "how old is 'old'?" Model Shipways makes excellent kits and always has, but times change and Model Shipways has improved their kits a lot over the years. Hence, an "old" Model Shipways kit of a particular vessel may well be quite different from a modern kit of the same vessel. As they say, "Don't ask me how I know this."
I am generally wary of any kit on eBay because, in the first place, you really can't know if the kit is complete. I strongly suspect few are. There are a lot of parts that can be lost or broken. Plans sheets get lost. Stuff happens. There's no way to even know if all the parts are there until one goes through the entire lot, assuming there's a parts list to go by.
Old Model Shipways kits will likely have cast metal fittings with considerable lead content and it is quite possible to encounter problems with "lead bloom" or "lead rot" as the lead oxidizes, particularly in acidic environments. Neither will you find any highly detailed photo-etched parts in old kits. Old Model Shipways kits will not have anything near the plans and instructions found in their current kits. Model Shipways kits today seem to often include detailed multi-page instruction "practicums" written by professional modelers, as well as very good plans drawings. The old kits provided a few plans sheets, a single typed page of "instructions," and that was it. It also bears mentioning that the standards of the art have been raised exponentially over the last few decades. In many respects, the old kits, if built as intended, will end up looking a bit crude compared to what a lot of modelers turn out today. To build a 30 or 40 year old, or more, ship model kit to present-day standards will require a considerable amount of scratch-building. The blocks and deadeyes, such as they are, will likely be unacceptable in quality. The same goes for the rigging thread. (Many purchase after-market versions of these items even when building the current kits because the kit materials aren't up to their desired quality.) In the end, there won't be much in the box of an old kit that ends up in the model when all is said and done. (Of course, there's a lot that doesn't end up in a well-built model out of today's kits, too!)
I'd suggest that if you are considering a first kit, you select a modern kit specifically recommended by the manufacturer for builders who are new to the hobby. I believe both Model Shipways and Bluejacket Shipcrafters rate their kits on the basis of the experience one should have to build them. I would strongly suggest you follow the manufacturers' advice. Build a "beginner" kit, then move up to an "intermediate" kit, and so on. A lot of builders on this forum have several, or more, very expensive kits sitting on their workshop shelves waiting to be built. In most instances, I suspect, a lot of those un-built kits were "donated" by folks whose "eyes were bigger than their stomachs," as my father used to say when we didn't finish our meals. It would be a shame to bite off more than you could chew and go sour on the hobby when you might otherwise have found it a great pastime if you'd eased into it. I would not encourage someone without experience modeling ships, and particularly modeling ships in wood and metal and thread, to attempt a vessel like the Essex for their first outing.
If you are interested in seeing what is involved in building the Model Shipways Essex, take a look at the build logs index on this forum and see if someone has done a build log on it. That would give you a good idea of whether you feel you have the ability to tackle challenge of that magnitude.
-
56 minutes ago, Jim Rogers said:
Question. When the mast and rigging were not used did they just leave the block on the horse and remove the rope. How were the shrouds removed? Was all this rigging stowed on the Longboat when not in use?
Somebody probably has a more authoritative answer from a book somewhere, but I'd guess that they would attach the block on the horse with a shackle or a moused hook and remove the block when the mainsheet wasn't attached to the horse. (I'm not sure when shackles came into use, actually.) The shrouds would be attached to the chainplates similarly, with a shackle or moused hook on the bottom of the lower deadeye. This would permit the deadeye lanyards being loosened and the deadeyes and lanyards removed from the chainplates with the mast as a unit. The shrouds and deadeyes and lanyards, as well as halyards and stays, would likely have been lashed to the mast when it was stepped, and then the entire mast and gang of rigging removed with a tackle while the longboat was alongside. I doubt they'd have gone to the trouble to reeve the mainsheet tackle and deadeyes, although they may have stowed some of it below if they were "off soundings" for a long while and not anticipating sailing the longboat for weeks at a time.
The spars and rigging would likely have been stowed lashed on the boat skids or spar rack of the ship. The mast is likely too heavy and unwieldy to step from within the longboat and there isn't any "tabernacle" arrangement that I expect would have been present (as in American whaleboats) if it were ever intended to be stepped from the longboat. Then again, some of the evolutions that were performed by the naval crews of that time were pretty amazing. For the size of the vessels, they carried large crews and many hands make light work. The amount of heavy work that was performed, such as stowing furniture and removing cabin bulkheads throughout the ship, when the crew was "beat to quarters" to go into combat was truly prodigious.
-
On 1/12/2019 at 3:31 PM, Chuck said:
This has been discussed a few dozen times already....
Its the way they did it back then. Around 1750 they started switching to above the tiller. Contemporary models. rigging plans and paintings show it below the tiller as I did it. There are many many many primary sources that conclude beyond a shadow of a doubt that this was the case.
It's been niggling at me for days now and I think I've found the answer. I think the horse below the tiller makes perfect sense, Chuck.
Everything on a vessel is for a purpose and on most vessels, particularly naval vessels, things are pretty well worked out.
A longboat is primarily a pulling boat. It's usually used for short trips to shore when anchored out, between vessels in a squadron, between ships at sea, or for sending armed parties ashore. Speed and maneuverability would usually be of the essence. There is no shortage of manpower on board the mother ship, so there's no problem manning the oars. By far, the most use she'd see would be propelled by oars. That would provide reliable speed and no problems with the wind being ahead of the beam.
The sailing rig, as handy as it may have proven to be to Captain Bligh and his mates, had to be a pain to have to rig and was likely rarely used. It would only be of advantage on longer journeys when nobody was in a hurry and then, primarily, when the wind was abaft the beam. If so, there would be even less occasion to tack and thus to see the mainsheet running into the tiller as it came across on the horse.
The tiller sets rather high. To install a horse above it would be complicated, as the horse has to be stable and the taller it is, the less ability it has to withstand the athwartships forces of the sheet block at the corners of the horse. The tiller is relatively short, which allows for the loose sheet tackle to perhaps be thrown around the tiller as the boom crosses amidships.
As primarily a rowing boat, a "hybrid" approach is also obviously available. Traveling long distances to windward, short tacking under sail can easily be avoided by leaving the sails to luff on the short leg with the oarsmen taking over, and then relieving the oarsmen on the long tack to let the wind do the work. That would permit rather rapid windward progress without having to pass the boom over at all when the helm was a-lee.
So, all in all, the horse below the tiller, while shocking to the eye of small boat sailors used to sail as the primary means of propulsion, and hence who do a lot of short tacking under sail, makes perfect sense on this particular boat.
So from now on, Chuck, any time somebody asks about the mainsheet horse, tell thelm I said it was right and right for good reasons!
- Dubz, paulsutcliffe, JpR62 and 6 others
-
9


New here. Possibly in over my head.
in New member Introductions
Posted · Edited by Bob Cleek
If all you want is a ship model, you'll probably find it difficult not to burn out on trying to build one. If you enjoy working with your hands and solving mechanical challenges, you're in the right place. It's all about the process and the crafts involved. I can't imagine there's a challenge you'll encounter that hasn't been met before and solved by somebody in here who explained how they did it. You'll learn all you need to know reading the past posts in this forum. It's probably the best collection of basic information on ship modeling anyone could ever hope to find. There are some real "Rembrandts" sharing their work in here. Few artists will ever be a Rembrandt, but we all can't help being better artists when we get to look over Rembrandt's shoulder.