


Bob Cleek
-
Posts
3,374 -
Joined
-
Last visited
Content Type
Profiles
Forums
Gallery
Events
Posts posted by Bob Cleek
-
-
Probably none of the above. They'd all probably "be a wee bit on the hard side for a first time builder. " But with the disclaimer than I'm not directly familiar with any of the kits you've mentioned. I trust somebody will come along and address them specifically. Mamoli, for what it's worth, suffers from a reputation for poorly translated instructions from the Italian. That wouldn't be a problem if you spoke Italian and were familiar with Italian nautical nomenclature, but...
If you want to see what you'd be getting into tackling Mamoli's il leudo model, here's a "first build" build log by another builder who built that kit with help from other forumites who walked her over some rough spots.
Too many first time modelers, trapped by the seductive allure of kit manufacturers' advertising, buy a kit beyond their abilities and end up never progressing beyond the frustration of an abandoned first kit. It's critical to get off to a good start with something simple and move up the ladder as you gain skill, experience, and confidence. That doesn't mean one has to settle for a "dumbed down" model at all, but they do have to find a quality kit that doesn't make demands beyond the builder's abilities. Even an "easy" subject can be crazy-making if the kit is a poor one. A relatively simple model, done well, will always be far more attractive than a complicated one done poorly. That's not always a matter of the builder's skill, either. I believe most "crafty" people without prior ship model building experience can do a pretty good job of building a kit ship model if the kit is a good one, but even the best miniaturists can't "make a silk purse out of a sow's ear" when a kit's materials are poor. Poor materials, a frequent problem with kits, can't be overcome by even the most experienced modelers.
Check out this recent forum thread below. It pretty much answers your question with a lot of good responses. In my opinion, the most important feature of any kit build suitable for someone who isn't an experienced ship modeler is whether or not there's a good "build log" on the MSW forum that they can use to walk themselves through the project, or even better, a "group build." Most kits, and especially European kits, have significant built-in "stumbling blocks." The evaluation of a kit requires consideration of the quality and completeness of the materials provided, the accuracy of the model built from it, and the quality of the instructions. It's best to see if somebody with experience has evaluated any model before spending money on it and risking buying "a pig in a poke." Many experienced kit modelers find themselves buying after-market wood, cast parts, and rigging line, because the materials provided in even otherwise highly regarded kits fall short of their quality standards. Ship model kits are definitely a "buyer beware" kind of item! You did right by finding the right place to get the information you need. Welcome!
- mtaylor, grsjax and Keith Black
-
 3
3
-
Dear Mr. Wingrove,
I first made your acquaintance close to forty years ago when I obtained a copy of your book, The Techniques of Ship Modelling. https://www.amazon.com/Techniques-Ship-Modelling-Wingrove/dp/0852423667 I am happy to be able to personally express my deep appreciation for your having written that book. At this point, I have a fairly complete library on the subject, including all the "classics" such as all of Underhill's, Davis', Crothers', and Longridge's works, as well as your own. I have to say, though, that it is your book to which I find myself returning more often than the rest. This is not so much for reference, but rather to "recharge my batteries" when I feel the need of a muse. It isn't so much a "how to do it" book, as it is a "how to figure out how to do it on your own" book. I can't recommend it highly enough to any miniaturist, regardless of their particular subject matter, be it ships or automobiles, or anything else, for that matter.
Notwithstanding how much I expect you must have on your plate, I urge you to consider an "updated and enlarged edition" of Techniques of Ship Modelling. Much has changed in the nearly fifty years since it was written and, surely, you've come up with many more fascinating techniques, tools, and fixtures to share. The book was written long before the advent of the internet when books were the primary way modelers learned the techniques of the craft. Today, of course, one can easily find a "how to" video on any subject from tying your shoelaces to removing your own appendix, but a shortcoming of the internet is that information is rarely presented in a comprehensive, orderly manner that permits one to learn in a comprehensive and orderly way and, certainly, one has to separate the wheat from the chaff, which is near impossible when one is there to learn the difference in the first place. Forums like this one have greatly accelerated our progress on the modeling learning curve, but they often lack general reference material that is best presented in book form, as is evidenced by the continuing market for volumes like Steele's Elements... and Underhill's Masting and Rigging...
As far as I know, nobody has published anything even approaching your book's detailed treatment of modeling shop design and tools and machinery. Every other book on the subject offers a list of tools so basic that their authors merely overstate the obvious and dismiss the rest with a promise that "You'll find other useful tools as your skills develop." No recent book has comprehensively addressed the subject of contemporary state-of-the-art "scratch-building" at all. (And who might be better suited to do so authoritatively than you?) It was your book that introduced me to the Unimat, albeit a few years after that nifty machine's production had ceased. After years of unrequited lusting, I was able to procure one and now use it for all my small turning and milling work. Unimat SL's have developed something of a cult following today and used tooling and accessories often bring more than they did when new. Sadly, like many out of production lathes, they are worth more "parted out" so parts and attachments can be sold separately. Indeed, some of the Unimat attachments treated in your book, e.g. the table saw attachment, can cost more than a new stand-alone miniature table saw such as the Byrnes or Proxon examples which are better alternatives than the Unimat saw available back then. I'd love to know what tools you are using now and what you think of what's currently available. When your book was written, you were still in your little eight by ten foot "garden shed" attached like a wart to the back of your house. (It was a masterpiece of space-saving engineering.) I am sure, were you of a mind to expound further, you'd have several times over the amount of fascinating information on the subject of shop and storage design to add to the "first edition." Then there's your modeling tools, jigs, and fixtures... You must have added an entire book's-worth of those in the last nearly fifty years. Perhaps you are thinking, "I've been there and done that." but even the Beatles came out with a "Greatest Hits" album.
I know it's a chore and perhaps an imposition for me to implore you to write an second edition of The Techniques of Ship Modelling (although I hope you take it as a compliment,) but surely there must be a publisher willing to make a reasonable advance and an editor willing to collaborate on such a project. If you decline, we'll still love you, but for the moment, your audience is shouting, "Encore! Encore! Encore!"
- paulsutcliffe, Chasseur, tkay11 and 2 others
-
5
-
3 hours ago, rwiederrich said:
I purposefully set the sails at a 20degree cant so that sails never fully overlap. I also placed name plates of the model on both sides of the display base so that I could turn the model for a starboard or port viewing. If the model is at a port viewing stance, then you can see fully the running rigging and inner sail rigging detail very easily on all masts. The back side of the sails has just as much detail as the front with all its buntlines and reef points.
I figured you'd make some provision for viewing port and starboard. I hope you have the space to put the model in the middle of a room so the viewer can walk around it!
Contrary to the "sails hide the rigging detail" conventional wisdom, if the sails are done well with full running rigging detail, as you note, the running rigging on the sails "working" demonstrates for the viewer what all those lines are designed to do far better than a lot of lines run through blocks and back down to the deck, or worse, no running rigging at all.
-
That Aeropiccola electric plank bender is a real collectors' item, among model ship builders, at least. No longer made and much sought after. While I have not used it in this fashion as yet, I am told that it can be used to bend and fasten planks a frame or bulkhead at a time. First, the plank is spiled and shaped to the exact space it needs to cover. (Follow the instructions in the "how to plank" articles.) This is essential. You have to cut out a plank from flat stock that will cover a curved surface. (Much as a world globe or a basketball is made up of flat pieces that form as sphere.) There's no point in trying to plank with strips that aren't properly shaped. The shaped plank is fastened at the end with the greatest initial curve, generally the bow. This is done with glue and wooden or metal pegs. Wood glue is placed on the next frame or bulkhead down the plank and the bending iron is run over the plank as gentle pressure if applied until the bend is formed. (Don't force it or you risk breaking the plank.) When the bend is formed, the bending iron is applied to the plank at its junction with the frame or bulkhead. The heat from the iron will cause the water in the glue to evaporate and the glue to harden fairly quickly, fastening the plank. The process is repeated until the full length of the plank is bent and glued. The end of the plank is fastened with pegs as was the beginning of it. Some also go back down the plank and fasten with wooden pegs (trunnels or "tree nails") at each frame, as in full-sized construction.
This comment comes with the caveat that I've never done this before, but it sounded like a good idea when I heard it. I'm not sure where that was, though.
 I expect it will take a bit of experimenting to determine how long it takes for the iron to heat the glue enough to get it to set and hold. If it works, let us know.
I suggest that you first practice bending and fastening planking on a small mock-up before attacking your model itself. A few bulkhead shapes is all you need. That should give you the hang of it. All of the advice given so far is good. There are many ways to skin a cat, and a model hull.
-
Getting the sails done well on a square-rigged model at this scale is no mean feat. I've seen very few that didn't spoil the overall effect of an otherwise beautifully done model by adding sails set and full and falling short of the mark. This is one in a hundred that has done it. Wonderful work, Rob!
-
Has anybody ever tried tumbling wooden cleats in a "block tumbler?" If so, how did the turn out?
- thibaultron and lmagna
-
2
-
9 hours ago, James78 said:
Are the armed longboat and longboat much the same by model ship ways do you know. I see 2 of similar boats on their site. Thanks again.
They are very similar vessels, but, as I understand it, two different British Admiralty longboats. Each is an exact replica of two different contemporary longboat models in the British National Maritime Museum in Greenwich. The Model Shipways "Armed Longboat" is a 1:24 scale kit and the finished model is 24" long. It carries a cannon at the bow. This kit was, I believe, designed by Chuck Passaro for Model Shipways.
The "Medway Longboat (1742)" does not have a cannon, but is equipped with a anchor windlass and sailing rig. It is also 1:24 scale (1/2" = 1') and is probably about the same size as the "Armed Longboat." The Medway longboat is sold by Chuck's own company, Syren Ship Models. See: https://www.syrenshipmodelcompany.com/medway-longboat-1742.php You buy it directly from Chuck. He has a rebate/discount price deal if you sign up to participate in the group build of it on this forum.
(See:
I am sure that if you send Chuck a PM, he can answer your questions with more detail and perhaps help you choose between the two. I've not built either of them (as yet,) and Chuck could certainly let you know which was the better fit for your needs. I believe that with the deal on the Medway Longboat through the forum, the prices are roughly equivalent.
-
2 hours ago, ricky86 said:
I’m really looking forward to the next victim.
Model Shipways pinky. Glad Tidings.
It gigantic compared to the current project.
And the difference in quality is amazing.
You might consider setting the small scale build you've been working on aside and building Glad Tidings first. You'll probably enjoy Glad Tidings a lot more at this stage of the game. After that, you'll have more experience and confidence and can go back to finishing the "big boat." There's no rule that "you have to eat your peas before you can have desert!"
-
Given your previous modeling experience, I would urge you to build on that. You'll be fine. Your steepest learning curve will be in dealing with the nautical terminology and learning how wooden vessels are built. I'd strongly encourage you to start with one of Chuck Passaro's longboat models marketed by Model Shipways. You can follow his build log and group build posts in this forum and see what building one entails, as well has have access to advice from others building the model and its designer himself. Chuck's instructions are excellent and his kits are "finestkind." You won't have to worry about missing parts, junk wood, and indecipherable instructions. When you are done, you'll have mastered hanging real plank on real frames and mastered the basics of anything you'll later encounter building ship models and you'll have a very interesting, high quality, work of art of which you can be proud. Once you've got a longboat under your belt, you can move on to his larger and much more complex Syren. Avoid the temptation offered by many kit manufacturers to undertake a hugely complex and challenging model, and too often a low quality kit, right out of the gate.
See: https://modelshipworld.com/index.php?/forum/76-medway-longboat-1742-plank-on-frame-group-project/
You can download PDFs of Chuck's instructions here:
-
28 minutes ago, Fred stickel said:
Thanks dave i will give a try.
Any tricks on not getting the ca all over the place. It runs like water and i seem to get it eveywhere except where needed.
This is true. working over a piece of paper or tinfoil will catch the drips. CA is great for some things, but I agree, it is somewhat nasty and messy to work with. While it doesn't set up quite as stiff as CA, I sometimes use clear nail polish. (The color really doesn't matter, since the end will eventually be cut off.) The acetone thinner evaporates very quickly, especially if you blow on it for a few seconds. It's really just a matter of getting something on the thread that will stiffen it enough to get it started through the hole. Nail polish comes with a brush in the cap and isn't messy at all. Cheaper than CA and with a longer shelf life, too.
- thibaultron, J11, mtaylor and 1 other
-
4
-
-
I stumbled over the modelshipmaster company website by accident. http://www.modelshipmaster.com Their website touts that they will make any ship model, anywhere, any time, at the highest quality available about as loudly as anybody could. They claim to produce models for the Smithsonian and other highly respected museums, for the film industry, and the military. Nothing wrong with having a high opinion of yourself, I suppose... if you can back it up. In my humble, but not uninformed, opinion, I found the quality of the many models they pictured in their extensive, and interesting, website to be... shall we say... "uneven," particularly given their high opinion of their products. While they pictured some well done models and restorations of some very interesting antique models, a lot of what they featured were detail-less modern models of cruise ships and megayachts of the sort frequently found in travel agency and high-end yacht brokerage lobbies. There were a lot of other models that were purely decorative and of absolutely no historical value (e.g. "pirate ships.") as well as models of which they spoke highly, but which were, at best, "folk art."
A careful review of their site led me to suspect that they are as much an agency which has modelers with whom they contract to build their bespoke models as anything else. They have a sub-site soliciting modelers to work for them which is interesting: http://www.modelshipmaster.com/about/work opportunity.htm They seek "master modelers" to work for them, being quite specific about how good they expect applicants to be. The catch is, it seems, that they "own" the modeler for the duration, demand a minimum of 20 hours a week working time, and, among other restrictions, the modeler has to agree to be contractually bound not to build another model of whatever model he builds for them for a period of something like five years. They don't mention what they pay for the described "highly skilled labor," of course.
Anyway... there's a lot of pictures of ship models on their site and it's worth a visit for that reason alone. I'm just curious, though. These guys seem to think they're the Second Coming of Gibbs and Cox, which they ain't... but it's the first I've heard of a model building firm of this kind operating today.*
* For those not familiar with them, Gibbs and Cox is probably the foremost American commercial and naval marine architecture firm of the Twentieth Century. They've not only designed some of the most famous vessels in the last 100 years, but they've build the finest models of them ever known to have exist. See: https://www.navsea.navy.mil/Home/Warfare-Centers/NSWC-Carderock/Resources/Curator-of-Navy-Ship-Models/US-Navy-Ship-Models-built-by-Gibbs-Cox-Company/
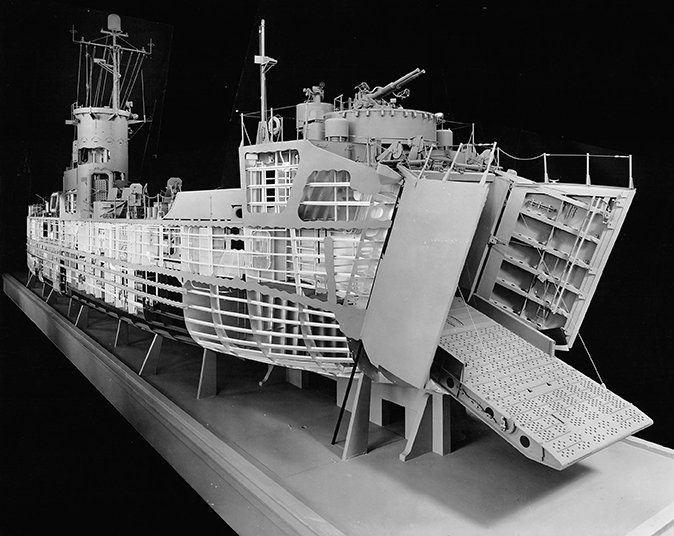
Gibbs and Cox Model Shop builder's model of USS Missouri (USN):

Gibbs and Cox Model Shop builder's model of unnamed landing ship model (USN):
- mtaylor, Canute and mtdoramike
-
3
-
4 hours ago, cog said:
Received the accessories from Donna (thanks madam for the wonderful service) ... now I need advice! How do I make the slits in the zero clearance plates for the BTS.
Install the blade you want to match the zero-clearance insert. Crank the blade all the way down. Install the blank plate in the table top and screw it down. Turn on the saw and slowly raise the running blade as far up as it will go, so that it cuts its way through the aluminum or wood insert as it's being raised. That's all there is to it.
-
3 hours ago, mfrazier said:
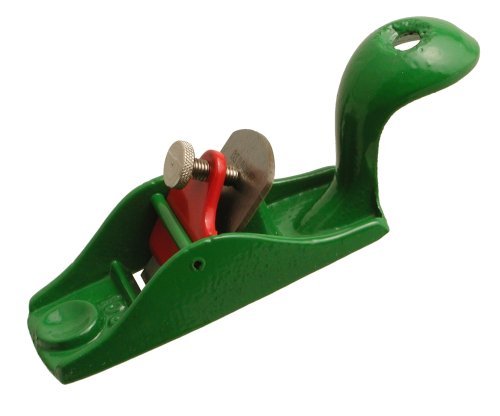
I am glad I didn't order yet. I think I will go with the one from Lee. I see they also have a mini spoke shave.
Not to drive you crazy or anything, but be aware that the Lee Valley "miniature" line of planes, etc., while they are, I am sure, quality tools that "work just like the full-sized ones," are basically intended as collector's items more than practical working tools. (Hence the fancy "jeweler's" cases in which they come.) While they work like the big ones, they aren't ergonomically designed, due to their small size. IMHO, "cute" as they are, if one is looking for a "user," they'd be better off with a good "modeler's" or "gents" (as they used to be called) plane. No doubt the Lie Nielsen "squirrel tail" model is "finestkind," and I'd say "go for it" if one can stomach the price, but, frankly, good as they are, one pays a big premium for the label alone on many of L-N's products. Their irons are great, but a top quality iron, in this case, even an L-N iron, can be put in other planes and provide much the same effect for a lot less damage to the pocketbook. Besides, their modeler's plane body is cast iron, not the bronze bodies for which they are famous.
Kunz (German) is the last company I know of that's making a copy of the old Stanley (and Record) #100 Modelmaker's Plane with the squirrel-tail handle. (The handle. which rests against the palm with an index finger on the finger pad ahead of the blade, makes this small plane much easier to use well than the simply "miniaturized" smaller planes.) It doesn't offer the bragging rights of an L-N or even a Lee Valley/Veritas, but for $20 bucks and a bit of honing after first taking it out of the box, it is a subtle way to make the statement that you have more brains than money.
- Landlubber Mike, Canute, DelF and 1 other
-
4
-
-
2 hours ago, rwiederrich said:
Thanks everyone. Yes...I got that table vice over 35 years ago...and it's been a great aid.
I've had my full-sized Workmate for about as long. I use it all the time. It's one of the most versatile benches of its kind. I've never seen the miniature "Hobbycrafter" model. I googled it. Apparently, they don't make them anymore. There were a couple on eBay for big bucks and the shipping was sixty bucks or so, too. I was dumbfounded by the prices they are asking for old big Workmates, too. If the Hobbycrafter is half the tool the big one is, I'd definitely be looking for one, but not at eBay prices!
-
5 hours ago, Drazen said:
3. Than, depending on how much the cracks went back/recovered, I am going to pour epoxy into the gaps where wood cracked.
Filling cracks with anything that is as inflexible as epoxy resin isn't a good idea. If and when the wood swells up again, it will be pressing against that inflexible cured epoxy and cause greater cracking further down the crack. You'd be much better off to replace the cracked piece entirely, if at all possible, with properly dried wood of the same species.
5 hours ago, Drazen said:What I am still unsure is if it makes sense to spray thinned epoxy instead of shellac inside of the hull. Epoxy would make the whole thing very solid, but I must check if there are good thinner in order to be able to clean the airbrush afterwards. Also, the toxicity of epoxy is an issue. But, for this I have a very good mask which has a very good filter build in.
As you seem to realize, atomizing epoxy resin isn't a good idea. Inhaling it isn't at all recommended. (And this advice is coming from a guy that isn't a sissy about such things.) Epoxy isn't going to make things much more solid unless you build up a rather thick coating and standard cured epoxy resin is quite brittle. (WEST Systems epoxy markets a brand of epoxy known as "G-flex" which cures to a somewhat flexible state. It's now being used as an adhesive in full-sized wooden boatbuilding, but I don't think would do you any good in this instance. As a structural material, epoxy has to be used in a matrix of stronger material, such as glass or carbon fiber fabric or matting. Again, I'm afraid a "do over" of the damaged parts is what is required to restore your model in this case.
Most epoxies can be thinned with alcohol or acetone, but I shudder to think what gunked up epoxy would do to an airbrush!
-
9 hours ago, Drazen said:
The whole idea on airbrushing shellac was to protect the inner areas of the ship by airbrushing through gunports. The wood has not been protected from inside, but only from outside (this by hand brushing shellac or Golden GAC100). Still, the ship hull is getting or loosing moisture from inside and this happens for instance through the gunports. I think the most of the harm has been happened by non-protected inside and exchange through gunports.
I cannot reach every corner of the inside of the ship by brush - by airbrush probably better.
Got it. The airbrush would be a better option. Applying the shellac to areas before they are closed up will prevent that in the future, of course.
- Canute, paulsutcliffe and mtaylor
-
3
-
4 hours ago, Drazen said:
Well, spraying very thinned shellac is possible with my airbrush(es). I can do several thin layers after the first one has been set and soaked into the wood, the next one comes to make the sealing more tight.
An airbrush will work, but I use a brush simply because I don't have to worry about masking and overspray or getting into the cracks and corners. I only apply a single coat, as thinned shellac will penetrate bare wood rather well. Adding more shellac on top of what's already soaked into the wood is really only gilding the lily. Thin as the shellac is, or should be, there aren't any problems with brush strokes mucking up the smoothness of the surface. It's barely noticeable when dried... or should be.
-
3 hours ago, Srodbro said:
When would one apply the shellac? Must be after planking, since we need moisture in the planks to form to the hull ( less so for a deck). But, If after planking, which is after adding blocking between ribs, how does sealer get to the underside of the plank? The blocking should be coated as well, before planking?
Or, is the idea that you seal as much as you can , and continue to hope?
The latter. You do the best you can sealing, depending on the circumstances, and hope for the best. Usually, an element, such as a deckhouse, can be sealed as it's completed and before installing. Sealing is best done just before painting, or what would be painting if not left natural. Planking, of course, is sealed after the topsides are faired and the job is done. The shellac should be thin so that it soaks into the wood readily and doesn't leave any visible build-up after it's dry.
There will always be ambient moisture in the wood. I'm not sure, however, from where the misconception comes that it is necessary to wet wood to bend it, though. It's the heat that's necessary. Moisture, whether it be boiling water or steam, is simply one convenient way to convey heat from its origin to the wood you want to bend. The gondola builders in Venice actually bend their planks over a live fire, taking care not to burn the wood.
Some experienced modelers use other types of sealers. Minwax "wipe on" finishes seem popular. I'm not sure how Minwax compares to shellac in terms of a moisture barrier, but it will serve the same sealing effect to one degree or another. It would provide a soft satin finish, and bring out the wood's color and figuring, better than shellac as it's intended as a visible finish. Shellac is capable of doing the same, but that requires a lot of hand rubbing and repeated applications, as is done with fine classic furniture, and their delicacy makes miniatures poor candidates for a traditional "French polished" finish. I can't comment on the archival properties of Minwax and other modern and often synthetic finishes. Like many materials available today, they simply haven't been around long enough for us to know. Shellac's longevity, on the other hand, is well established by the archaeological record.
1 hour ago, druxey said:I suspect that humidity control is far more effective than any sealer.
Absolutely! That's the first line of defense. Moisture always seeks an equilibrium. The value of a sealer is that it slows the rate of absorption and evaporation and so "levels out" the cycling between high and low humidity. That retards the amount of movement. The cyclic movement of the parts will weaken the structure over time. The less movement, the longer the structure stays strong and tight.
-
3 hours ago, paulsutcliffe said:
Expansion can then become just as big a problem though as the shrinkage, my cheerful hull below after a year in the garage the wood is holly and was dry and seasoned but has obviously swollen after fitting and painting with watered down acrylic
You betcha! I avoid water-based acrylics as much as possible for exactly that reason, even though I seal my wood with white shellac before painting. Sometimes I cheat and thin them with alcohol, if that works on a particular brand. Airbrushing with alcohol solvent allows the solvent to evaporate quickly. Trying to airbrush paint thinned with water results in a wet mess every time. Oil-based, solvent-thinned "modeling" paints are getting harder to find, although the fairly new acetone-based Truecolor acrylics, claiming to be equivalent to the old Floquil, are getting great reviews. Artists' oils (Grumbacher, Windsor and Newton) are fine if you don't mind conditioning your own with acetone, turpentine, Japan drier, Penetrol, and linseed oil, raw or "boiled," provided the pigment is ground finely enough for modeling scale purposes.
If it's any consolation, Paul, the seams on your model look quite like the seams on many newly built carvel planked boats I've seen. In fact, in full-size construction, it is expected that the swelling of the planks after launching will cause the stopping in the seams to bulge outwards exactly how the putty or filler you apparently placed between the seams on your model has done. On full-sized boats, the bulging stopping is sanded fair at the next haul out and paint job looks to be doing. This phenomenon can continue with a new boat for two or three haul out cycles before the planking "settles down," or stabilizes somewhat. Of course, if a boat is on the hard for a long period of time and dries out significantly, the problem will usually arise again upon the following launch.
The same problems occur in building models and full-sized wooden boats. Wood is a dynamic medium, always moving, to one degree or another, depending upon temperature and humidity changes. The degree of that movement depends also upon the species of wood and the grain orientation of the wood. In the case of the model in this thread, Lime ("Basswood" in the US) shrinks 6.6% radially and 9.3% tangentially, Pear shrinks 3.9% radially and 11.3% tangentially, and Maple shrinks 4.8% radially and 9.9% tangentially. These percentages are for drying from a live cut. Once fully dried, the "movement" factor due to changes in relative humidity may vary from "live cut" shrinkage, and is referred to as the species' "stability." Stability will generally be a lower percentage of movement than "drying" from a live cut and, as said, will vary from species to species. The ratio of movement radially and tangentially after initial drying will likely be proportional to the stability of a species. The Wood Database is an excellent resource. A handy hyperlinked version of their print book can be found at https://www.wood-database.com/basswood/
It's important to remember that the actual distance of movement multiplies relative to the size of the piece. Thus, a one quarter-inch wide plank might move +/- 4% with wide fluctuations in humidity, which would be nearly negligible over the width of a quarter-inch plank, but if, say, sixteen quarter-inch planks are butted against each other, the total movement of the four inch width of quarter-inch planking will move in total almost an eighth of an inch, which, if it's shrinking, is a lot more than the elasticity of the wood is going to endure without splitting, and if it is expanding, will be enough to induce stresses in the structure to which the planks are attached to cause catastrophic failures. In full-sized vessels, transversely cracked frames are a frequent result of planking expansion, often caused or exacerbated by driving caulking too hard or filling seams with inflexible, hardened stopping or splines of harder wood species. Regardless of species, wooden boats are always moving structures, some more than others for a variety of reasons. Some, the Vikings' longboats as a classic example, are even intentionally engineered to flex in operation. Models are different only in a matter of scale. What doesn't "scale," however, are the laws of hydraulics. The amount of pressure created by the water in the wood doesn't vary according to the size of the wood. The water in a tiny piece of wood expanding isn't going to compress any more than the water in a large piece, even if the amount of expansion is proportional to the size of the piece.
Sealing wood by coating or impregnating it with some water-resistant material will slow, but not stop, movement because it retards the absorption and evaporation of moisture in the wood. Much as many have tried, there is nothing found as yet that totally "encapsulates" wood. Indeed, the unintended consequence of limiting wood's ability to "breathe" in the marine environment can often create a more favorable environment for decay fungi. Balsa-cored fiberglass decks were once thought to be an innovative solution to achieving lightweight panel stiffness until it was discovered that "water will always find a way" and moisture entering through poorly sealed fastener holes and such soon caused the balsa cores to decompose to rotten mush. As models won't be living in the water, the problem is less severe. One of the best sealers is also one of the oldest. A coating of white shellac is an excellent sealer for model parts. Coating planks with white shellac ("white" because it's the colorless type versus "orange" shellac, which is unbleached.) It won't prevent the wood from moving ever, but it will slow down the absorption and evaporation cycles causes by ambient humidity considerably. The fewer movement cycles, the less stress is placed on the structure over time.
I'm sure a lot of experienced modelers already know this. Those who have experience in full-size wooden boatbuilding certainly are familiar with these principles. These comments are offered for those who are in their modeling "learning curve" where others of us were decades ago. As for myself, most of what I know about this was learned from experience, A mistake is a lesson that isn't soon forgotten.
- paulsutcliffe, Canute and Keith Black
-
3
-
-
If your model was built in the 1920's it certainly was a very well done model for its time. The standards have risen over the years and the speed of that has accelerated in the last few decades as miniature machine tools, computer numeric control machining, and other technological advances have found their way into model-making. Considering the tools and materials your great-grandfather had to work with to build that model, he must have been a very accomplished model-maker.
It appears that it may have been an early kit model. Ship modeling was a very popular hobby in the last century up to WWII, which was a bit of a distraction, to say the least. Thereafter, television reared its ugly head and men started sitting on their butts and watching TV after work every evening. That put a major dent in the modeling hobby. The advent of injection molded styrene plastic models breathed some life into modeling generally in the 1950's, but by then it was mainly a pastime for kids. Serious adult modeling seems to be making something of a comeback in the last decade or two, perhaps encouraged by the internet which opened access to the research and information necessary, and the availability of on-line retailers for what would otherwise be a smaller market that would not be well-served by "brick and mortar" hobby shops. For these reasons, I would consider your model to have some historical interest from the standpoint of it's being an excellent example of an early kit-built model. You may want to inquire of Bluejacket Shipcrafters whether it is one of their early models. They would know more about it if they could identify it as one of theirs. ttp://www.bluejacketinc.com/
Please do read the posts about packing models that are here in this forum. PLEASE, do not put it in a box full of packing peanuts or other such material. That is a sure way to damage the rigging. Packing a finished rigged model for shipping is a rather delicate procedure. A model such as this one, if it is to last, should be kept in a proper case and displayed out of direct sunlight and damp air. In the meantime, you can carefully cover it with one of those light plastic bags that the dry cleaners use to cover clothing. Cut the bag open and drape the bag over the model. This plastic material is light enough not to damage the model and it will keep the dust off of it.
As everybody has said, models of Young America are quite common and you should not expect to get big money for it. It's still a beautiful model and the fact that it's an heirloom makes it valuable to you and your family. Imagine if you cased it and were able to pass it down to your son. What a wonderful thing to be able to say, "My great-great-grandfather made this."
-
Do you have the book, The Whaleboat, by Ansel? https://store.mysticseaport.org/the-whaleboat-a-study-of-design-construction-and-use-from-1850-to-2014.html That is the authoritative resource on whaleboats.
My research on whaleboats on the Morgan revealed that the rudders were stowed lashed to the port side of the boats when not in use. The drawing above shows how the rudders were lashed, fastened between the lower pintle and the stock and to two cleats on the rail. (Note that the photo on the box cover picture above shows the tiller mounted in the hung rudder and sticking up like a sore thumb. The tiller would have been removed from the stock and stowed aboard. No seaman in his right mind would have stowed a rudder with the tiller inserted in the stock. This detail on the box cover betrays an all too common lack of basic seamanship skills and knowledge, a common failing of kit manufacturers and model builders.) Stowing the rudder outboard kept the rudder out of the whaleboat, which was extremely crowded with gear and crew as it was. The rudder would only be shipped when the mast was raised and sail set. Under oars, the steering oar was used.
The each boats' gear was stowed in each boat in a particular place as also shown in the book mentioned when the ship was on the whaling grounds so that all was in readiness for the quickest launch when a whale was sighted except for the line buckets. The line buckets were stowed against the bulwarks on the waterways next to each boat when on the whaling grounds, ready to be stowed immediately before the boat was lowered. This was to relieve the boats and davits of the weight of the line buckets when the boats were simply hanging in the davits. At sea in transit to the whaling grounds, the boats' gear would be stowed aboard the vessel to keep it out of the weather. Spare gear, particularly long stuff like oars, harpoons, lances, and the like, was stowed hung beneath the boat skids.
Note that the period in which the Morgan is modeled is important not only to the accurate portrayal of the ship, but also to the accurate portrayal of her whaleboats. As one will learn reading The Whaleboat, the design of the American whaleboat changed over time, in part to accommodate changes in the species of whale they hunted. It was not until around 1857 or so that the centerboard came into use. Before then, the whaleboats carried masts and sails, but no centerboard because the sails were only employed when running downwind over a distance when returning to the ship. The paddles were used when the whaleboat closed in on its quarry because the paddles were quieter than the oars and less likely to spook the whales. In the mid-1850's, when the sperm whales began to be hunted, they were more difficult to approach, so the whalers learned to sail up to a pod of whales in relative silence rather than row or paddle. The centerboard came into use to permit more efficient sailing to windward when the whales had to be approached from that direction under sail. If a Morgan model depicts her as launched with her ship rig in 1841, her whaleboats would not have had centerboards and the planking would have been as employed at that time. In later times, as the Ansels' book explains, the planking also changed. (Combinations of clinker and carvel planking changed, again for the purpose of building a quieter boat to better approach the quarry.) American whaleboats were stock designs and lasted but a short while in use. Often, they were shot after one voyage, so the design changes are very closely matched with the time period. The whaling ships generally carried newly built boats on each voyage. These picky details risk being overlooked in some of the Morgan kits.
If you don't have The Whaleboat, get a copy. (About $25 in paperback.) I would rely on that before I'd rely on any plans in a kit.
- mtaylor, Roger Pellett and BETAQDAVE
-
3
Bristol Pilot Cutter by michael mott - 1/8 scale - POF
in - Build logs for subjects built 1851 - 1900
Posted
I've seen a lot of coal oil (kerosene, paraffin) running lamps in my days, but I've never seen one like that one. I've seen port and starboard lights in electric fixtures, mounted on the bow of small powerboats with a septim between the two to avoid confusion, but never an oil lamp like that. Perhaps it's a European model. The angle of the lenses is interesting. It would seem they'd not be as easy to see from dead ahead (and wouldn't meet modern regulations.) Can you tell us where you found the prototype and a bit about it. I'll bet there's an interesting story to it.
Beautiful workmanship, by the way!